Skip navigation

Category Archives: Uncategorized

In today’s article, we will be taking a look at the U-M-I ProQuest 900 Series Workstation, a 286-class computer. There also seem to of been versions of this machine using the same case simply labeled as NCR or NCR-286. The motherboard components including CPU, video chip, and chipset seem to be mostly the same, only oriented differently. The motherboard in my ProQuest 900 Series may be a later revision as it does include a spot for a 386 socket to be soldered onto the PCB.

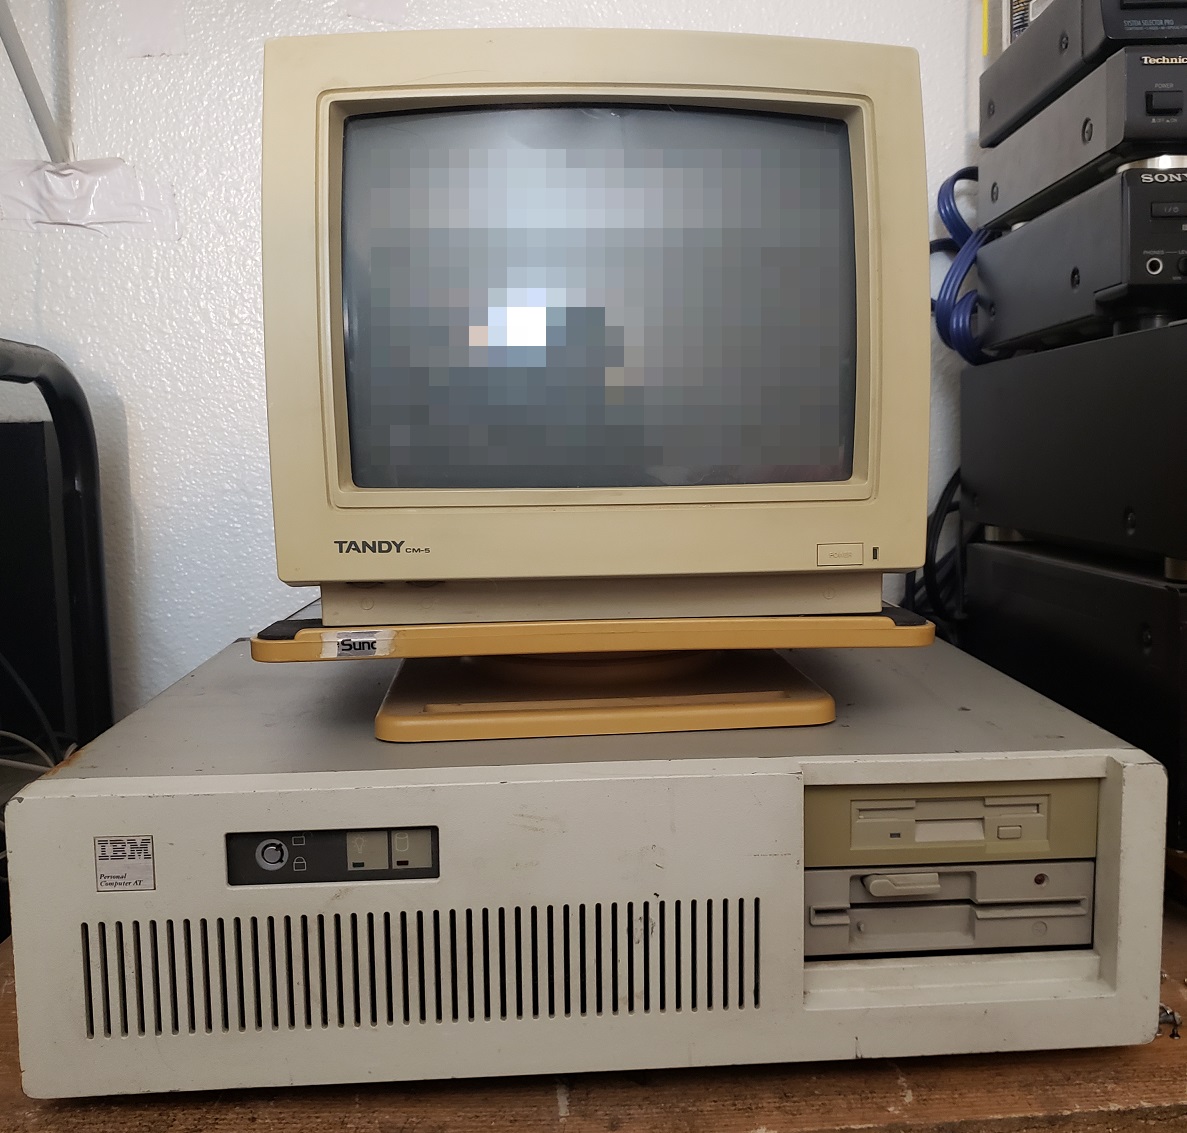
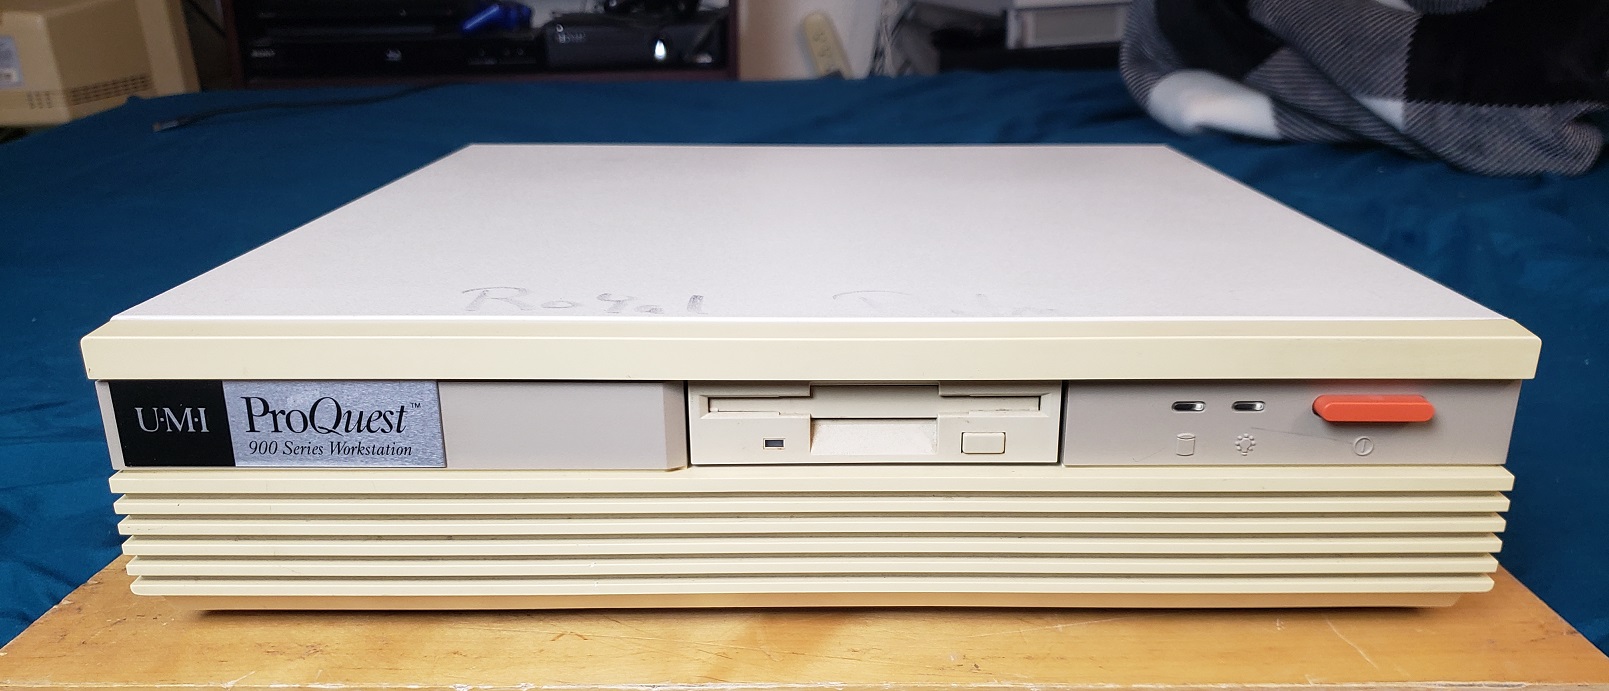
The case is a very slimline design fairly similar in proportion to the Tandy 1000RL HD (though a bit taller) leaving only enough room for a single 3 1/2-inch bay in the middle of the case. mine was outfitted with a 1.44MB 3 1/2 inch floppy drive which is the standard drive one would expect to be installed. To the right of the floppy drive are two LED lights for HDD activity and power. Finally, to the far right, we have a nice large oval power button.

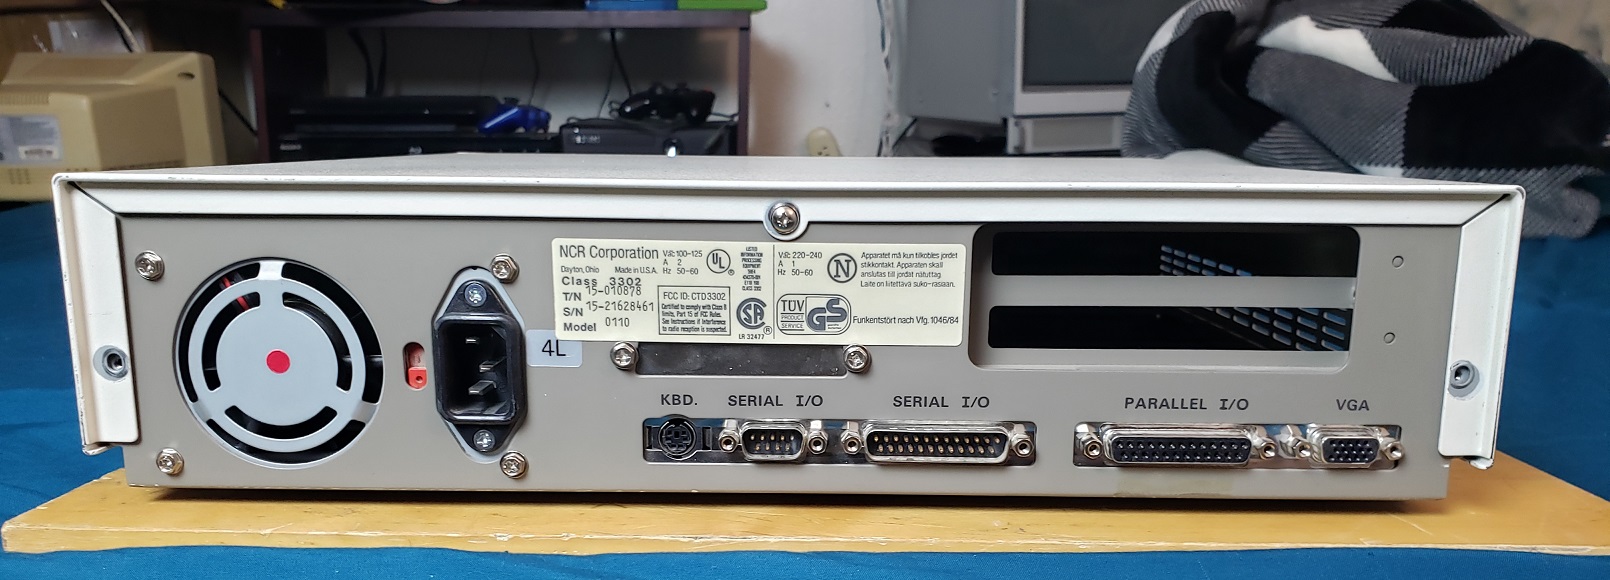
On the rear of the case, we have a fan exhaust port on the far left followed by a standard three-prong power cable connector. Next to that, we have what appears to be a small unused cutout of some sort with the I/O starting below it. First, we have a single PS/2 port labeled KBD, which is for a keyboard. Next, we have dual serial ports of different sizes, which is very slightly unusual since in my experience the serial ports are either one or the other but usually not one of each type. Lastly, we have a parallel printer port and a standard VGA port for the built-in video. all in all between the PS/2 and VGA ports we have a fairly modern assortment for a 286-class machine.

Above the I/O and on the right of the case we also have dual expansion ports for adding two discrete cards.

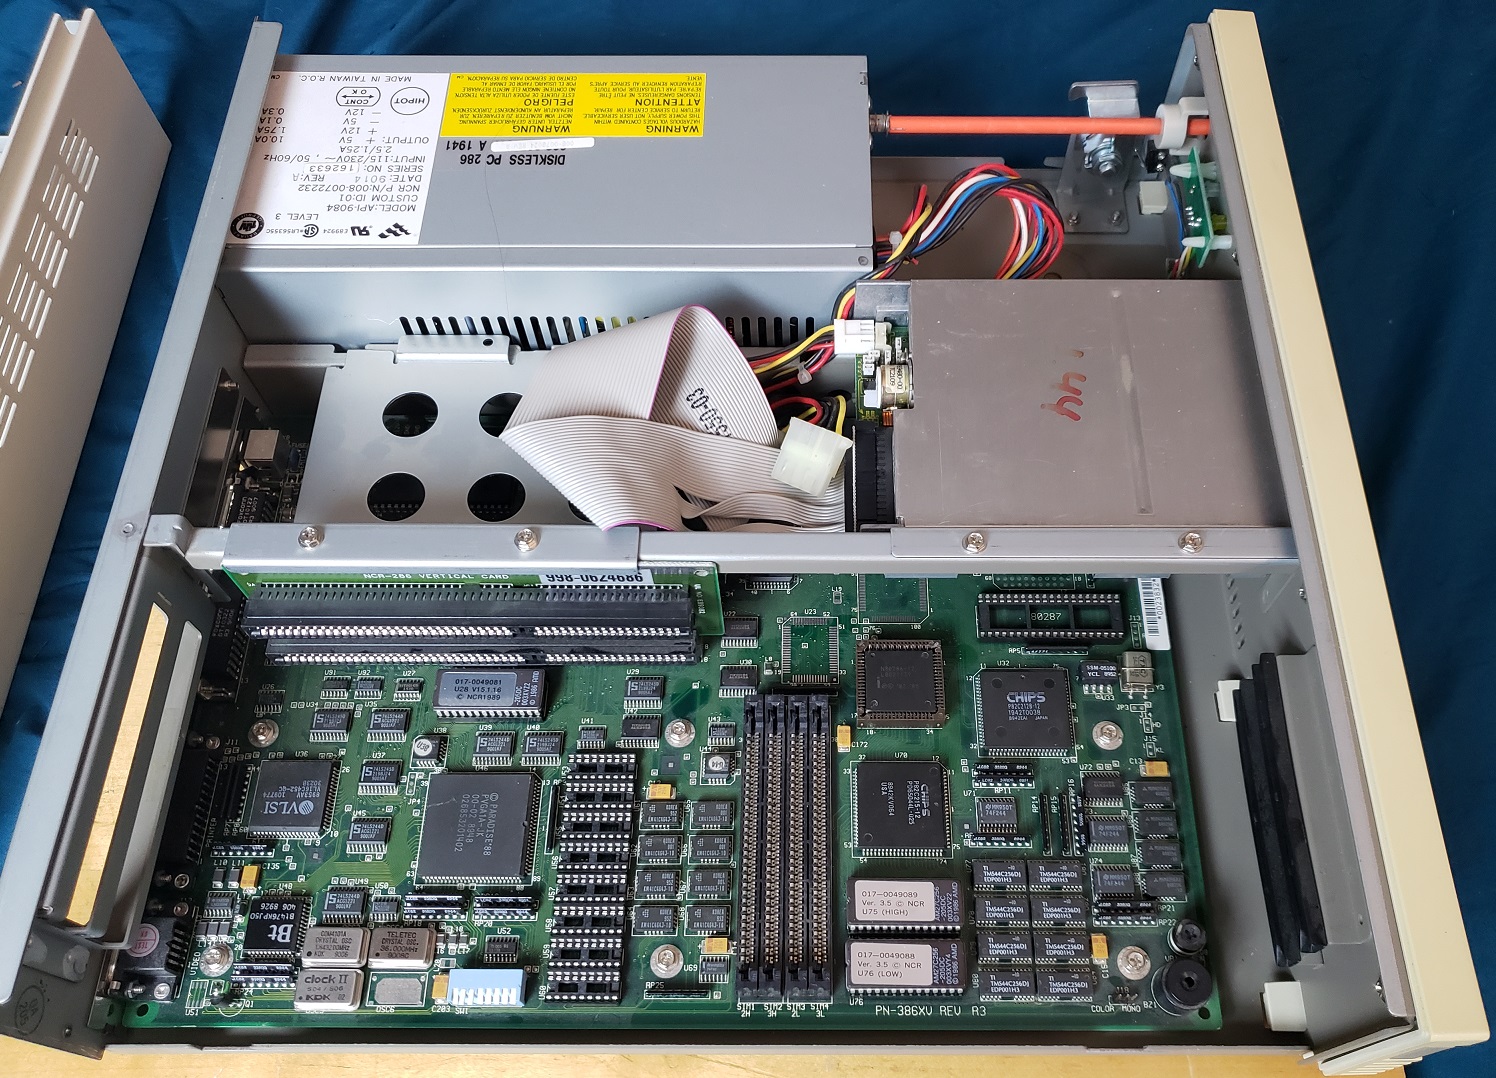
Here we have a look at the inside with the case cover removed. Next to the power supply we have removable sleds for both the floppy drive and the HDD, though my machine was missing the hard drive. From my understanding, these PCs can be quite picky about hard drives and lack any user HDD input in the BIOS setup.

We can also see a riser card labeled NCR-286 which has two 16-bit ISA slots allowing the installation of various cards such as a sound card or network cards if desired.

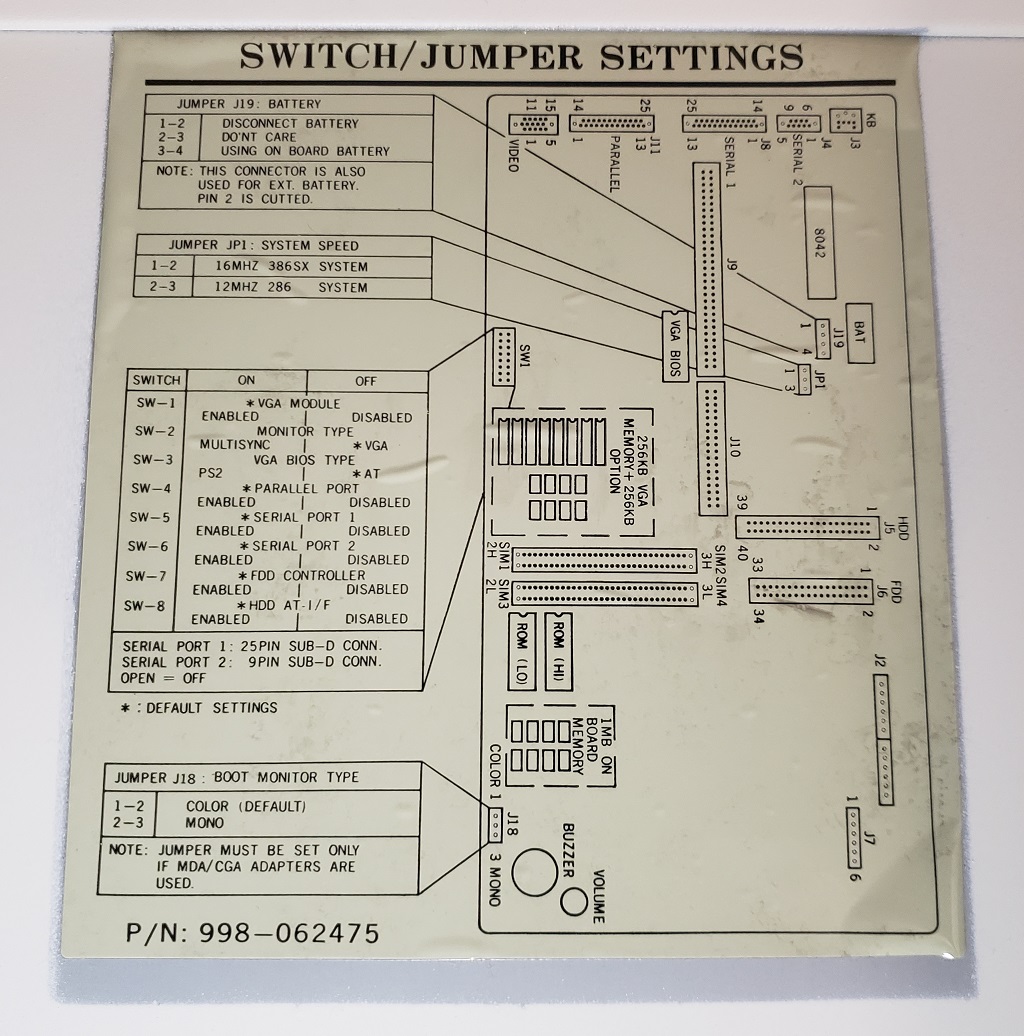
My machine also had one of those very handy stickers on the inside of the cover outlining the motherboard as well as jumper and switch box settings.

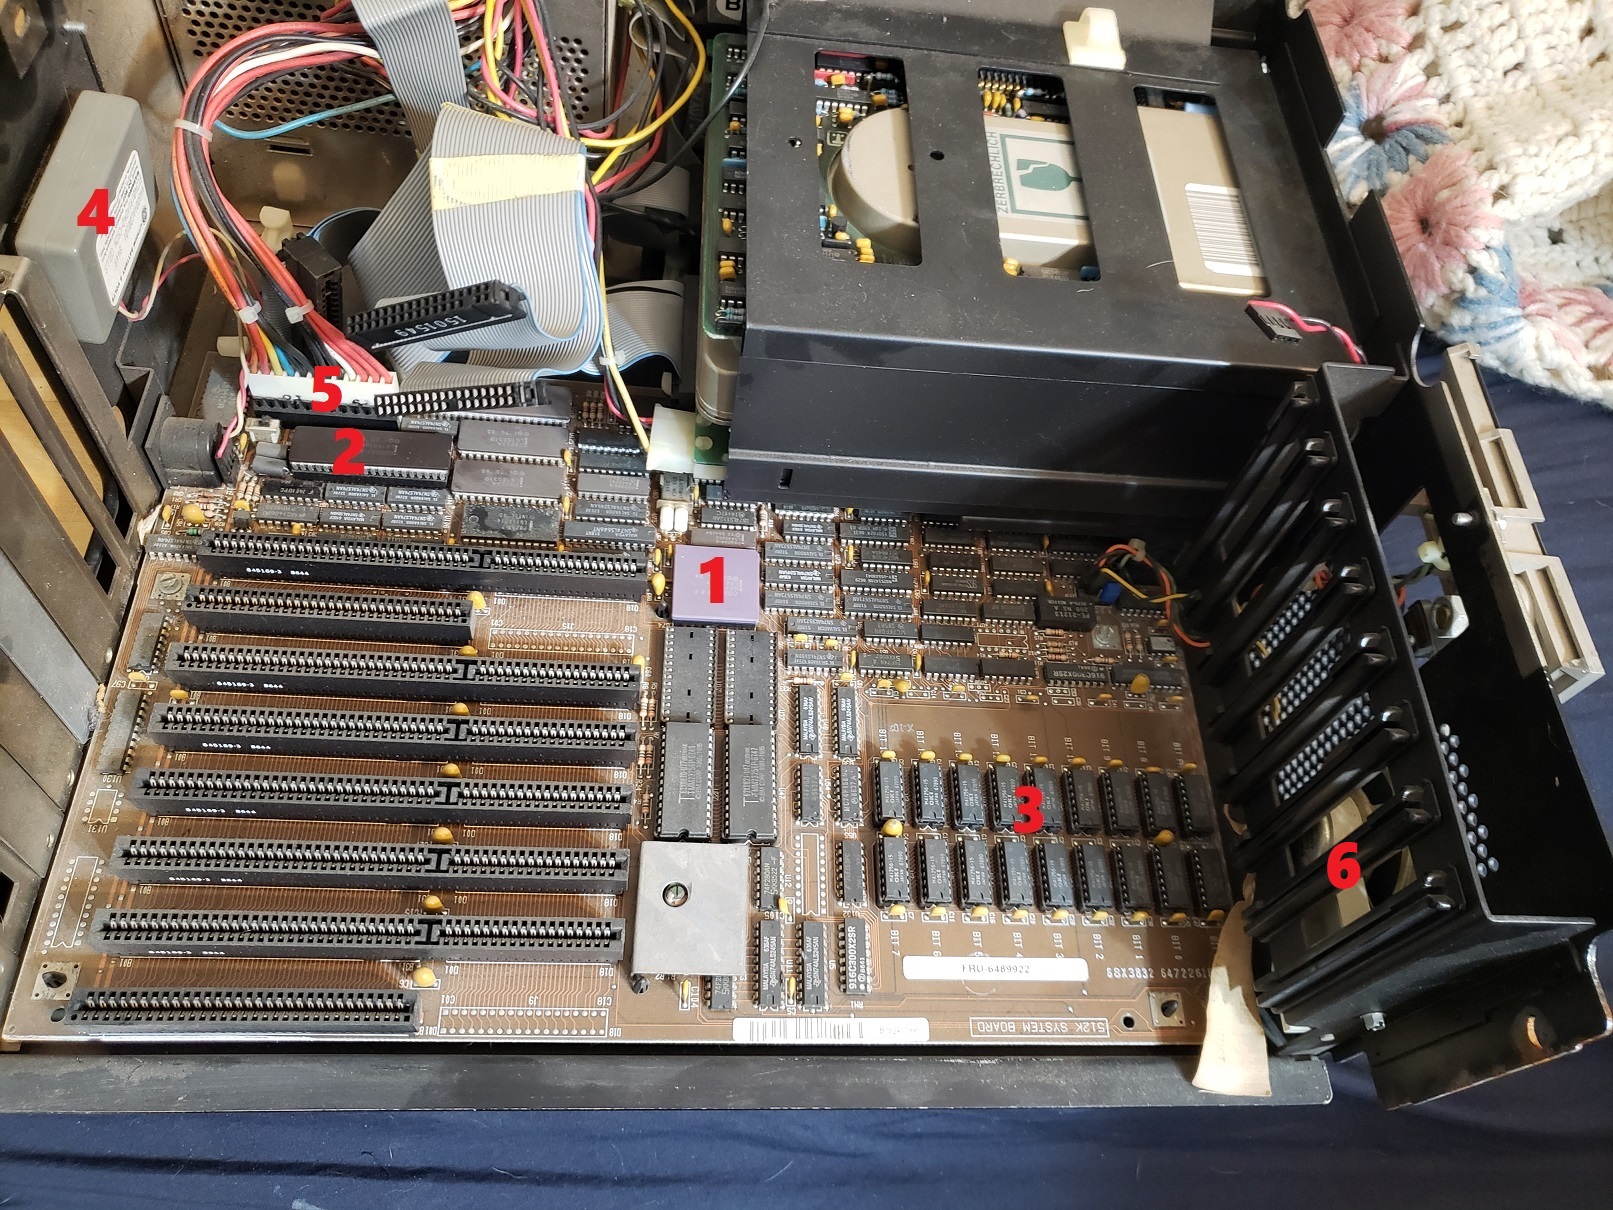
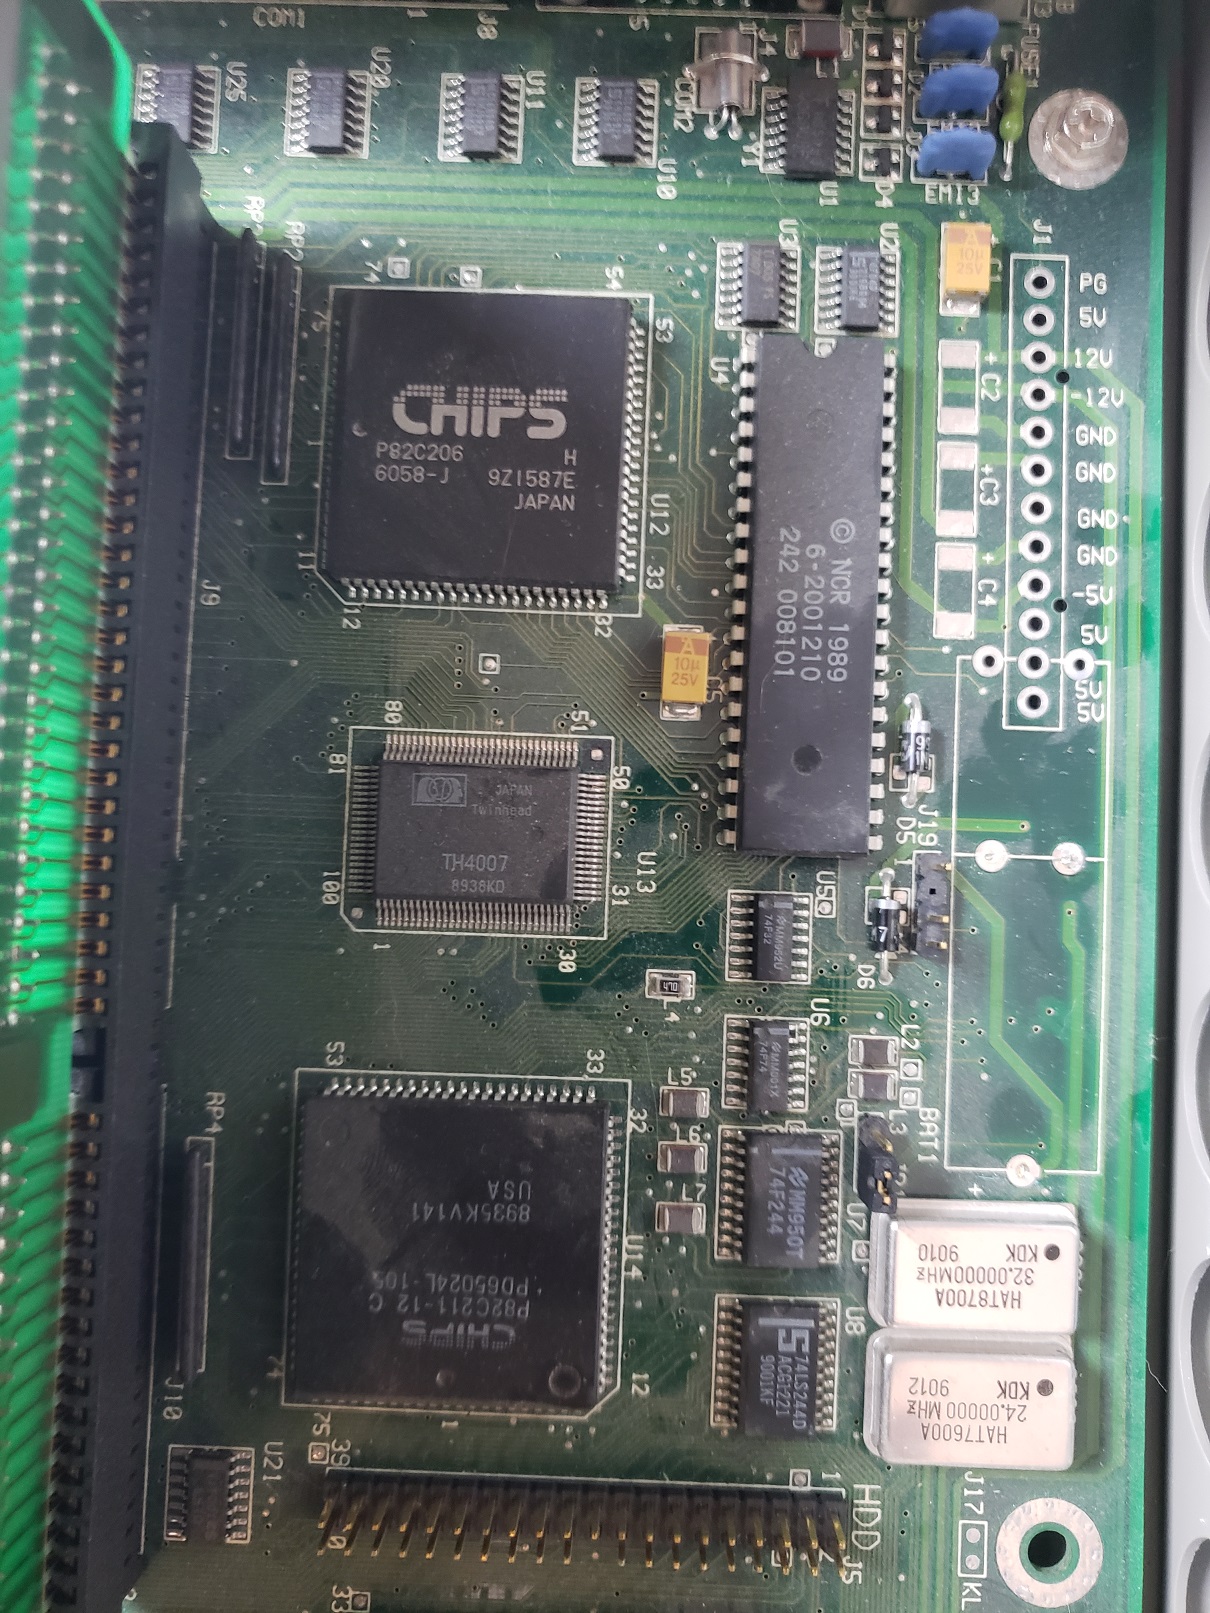
Here is a look at the board with the drive sleds removed.

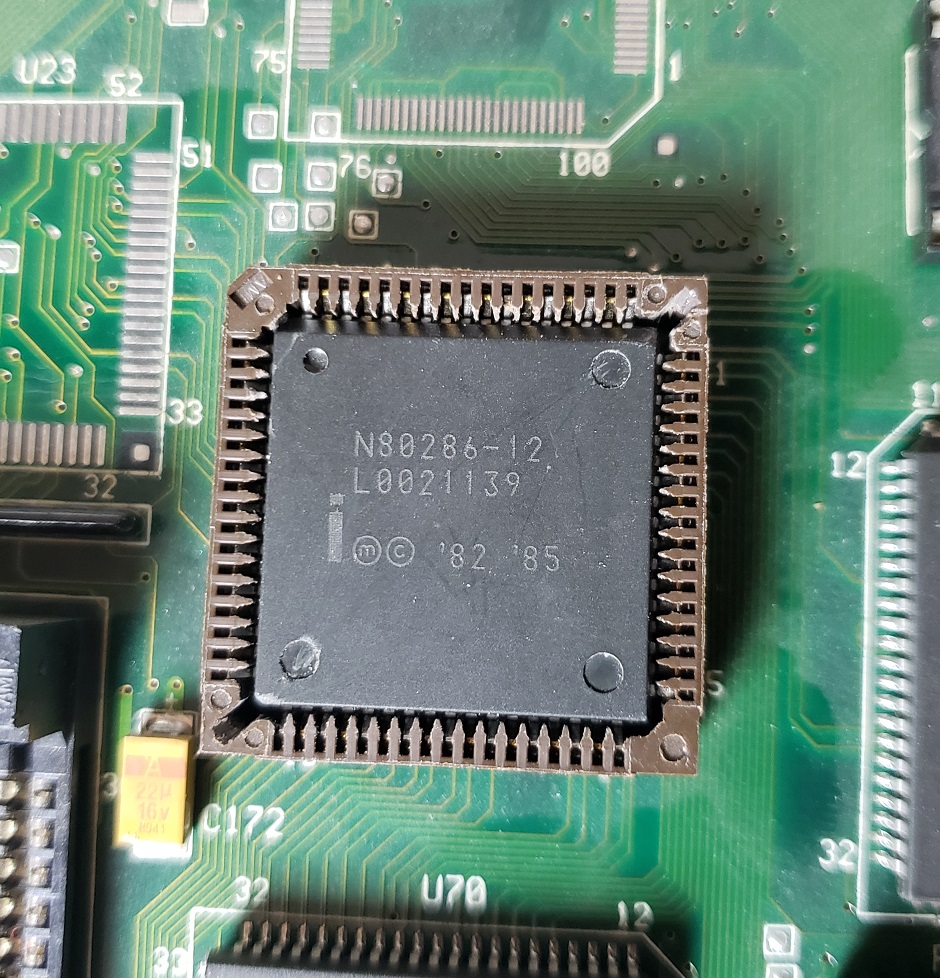
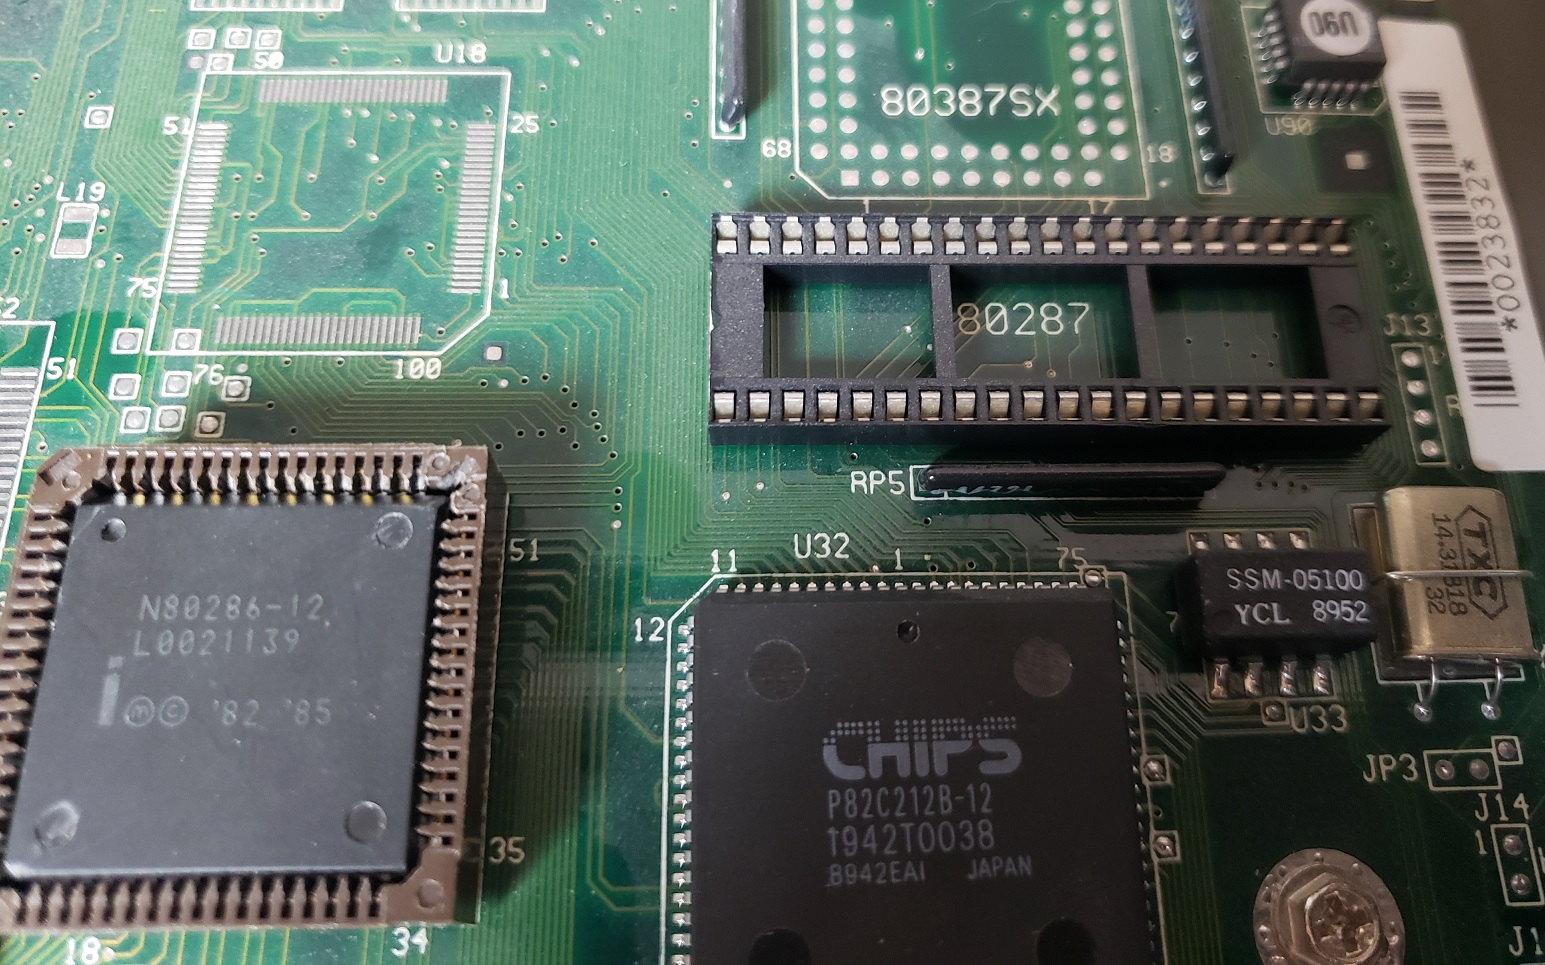
1) CPU – The CPU is an Intel 12MHz 286. Overall this is a great CPU as far as 286 boards go and should be able to play all of your late 80s and early 90s EGA games without issue as well as some early VGA titles. As far as I can tell the CPU is not upgradeable though there is a jumper for switching to a 16MHz 386 and a solder point for a 386 socket. It may be possible to swap out the crystal oscillators and install a 16MHz 286 but I can’t confirm this.

2) Co-Processor – There is a socket for adding a math Co-Processor though mine is unoccupied. This will help speed up some programs such as CAD design as well as a small handful of games from the time.

3) RAM – the ProQuest comes with a full 1MB of memory on the motherboard. On this board, the memory is located between the ROM chips and the Piezo speaker. Unfortunately, this memory is soldered onto the board as opposed to socketed making swapping out bad RAM somewhat difficult. 1MB should be sufficient for a large number of games that will run well on a 12MHz 286.

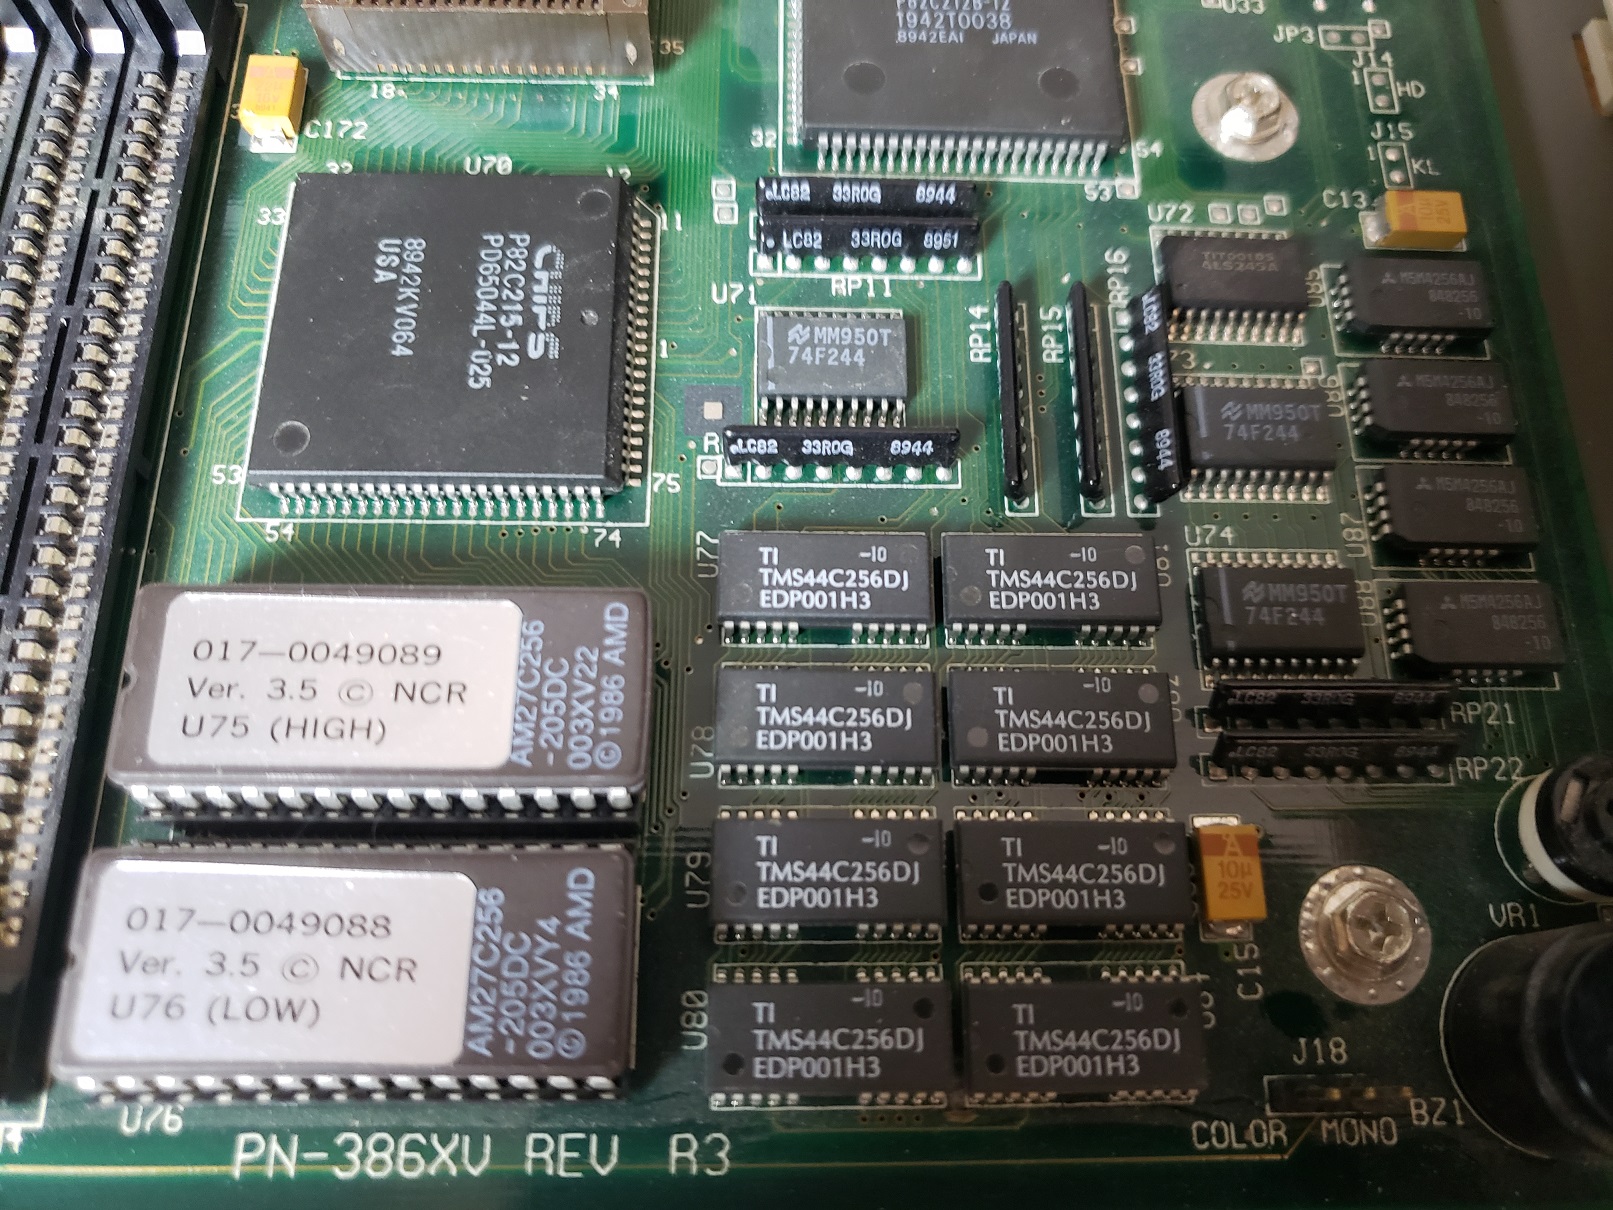
4) RAM – The ProQuest does feature four slots for expanding your RAM. I can confirm you can at least expand your system to a total of 2MB via 4x256k memory sticks though you may be able to expand it even greater I can’t confirm this. It has also been reported that this board is very picky about what kind of memory it will accept.

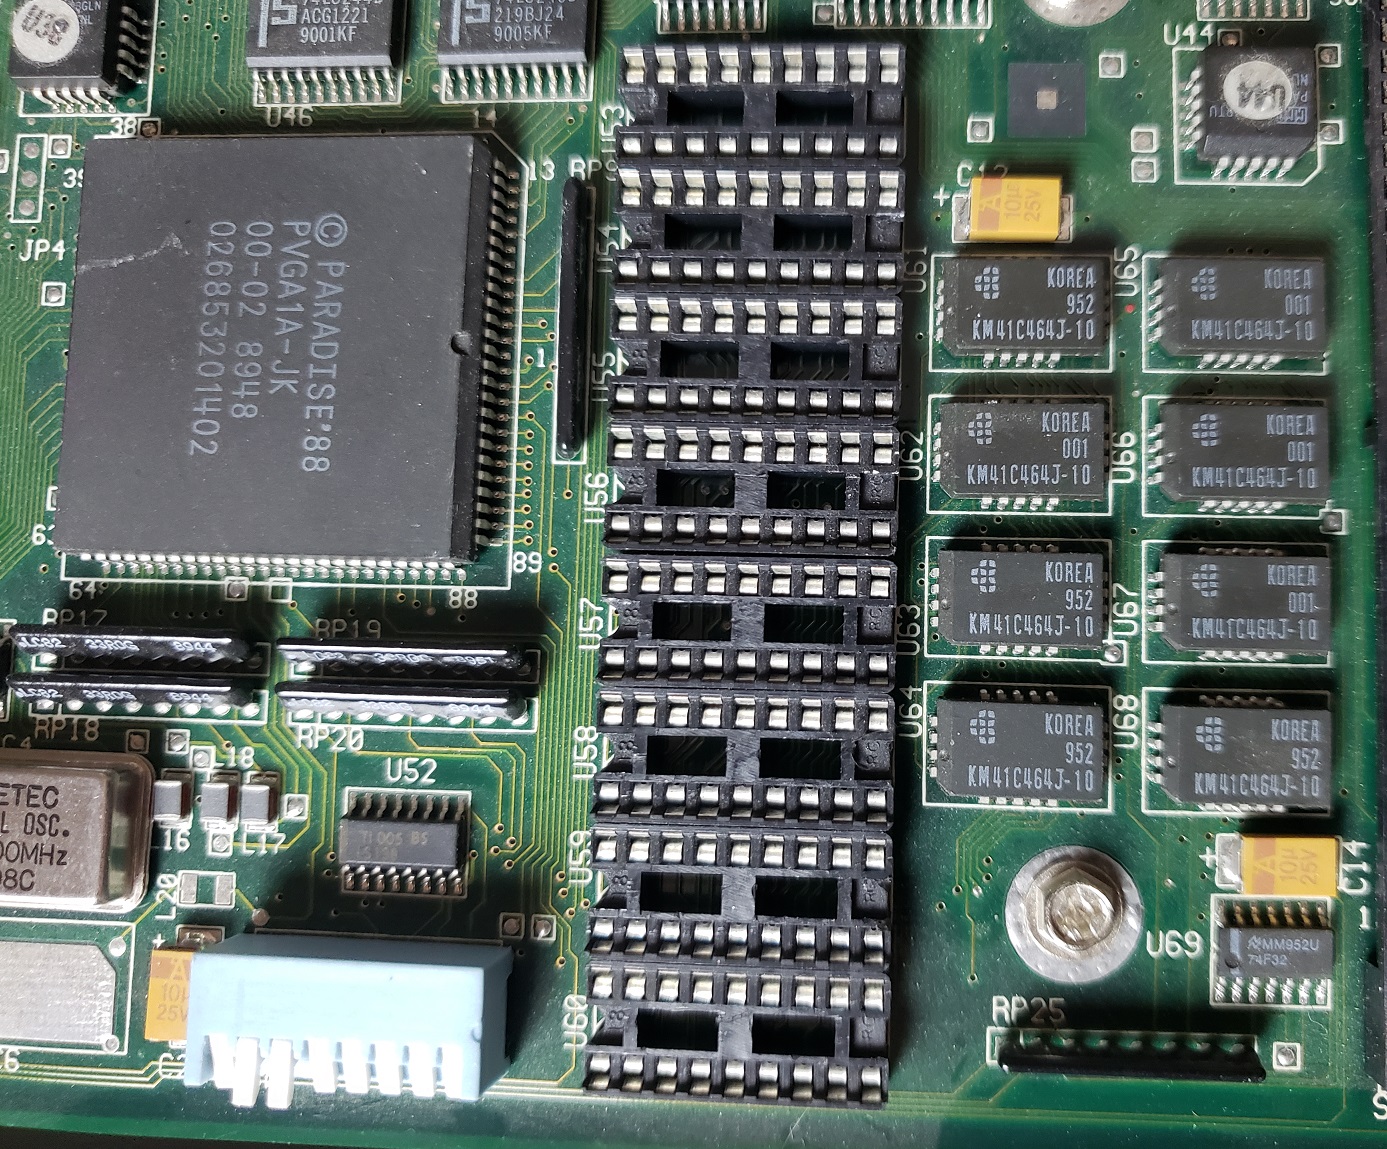
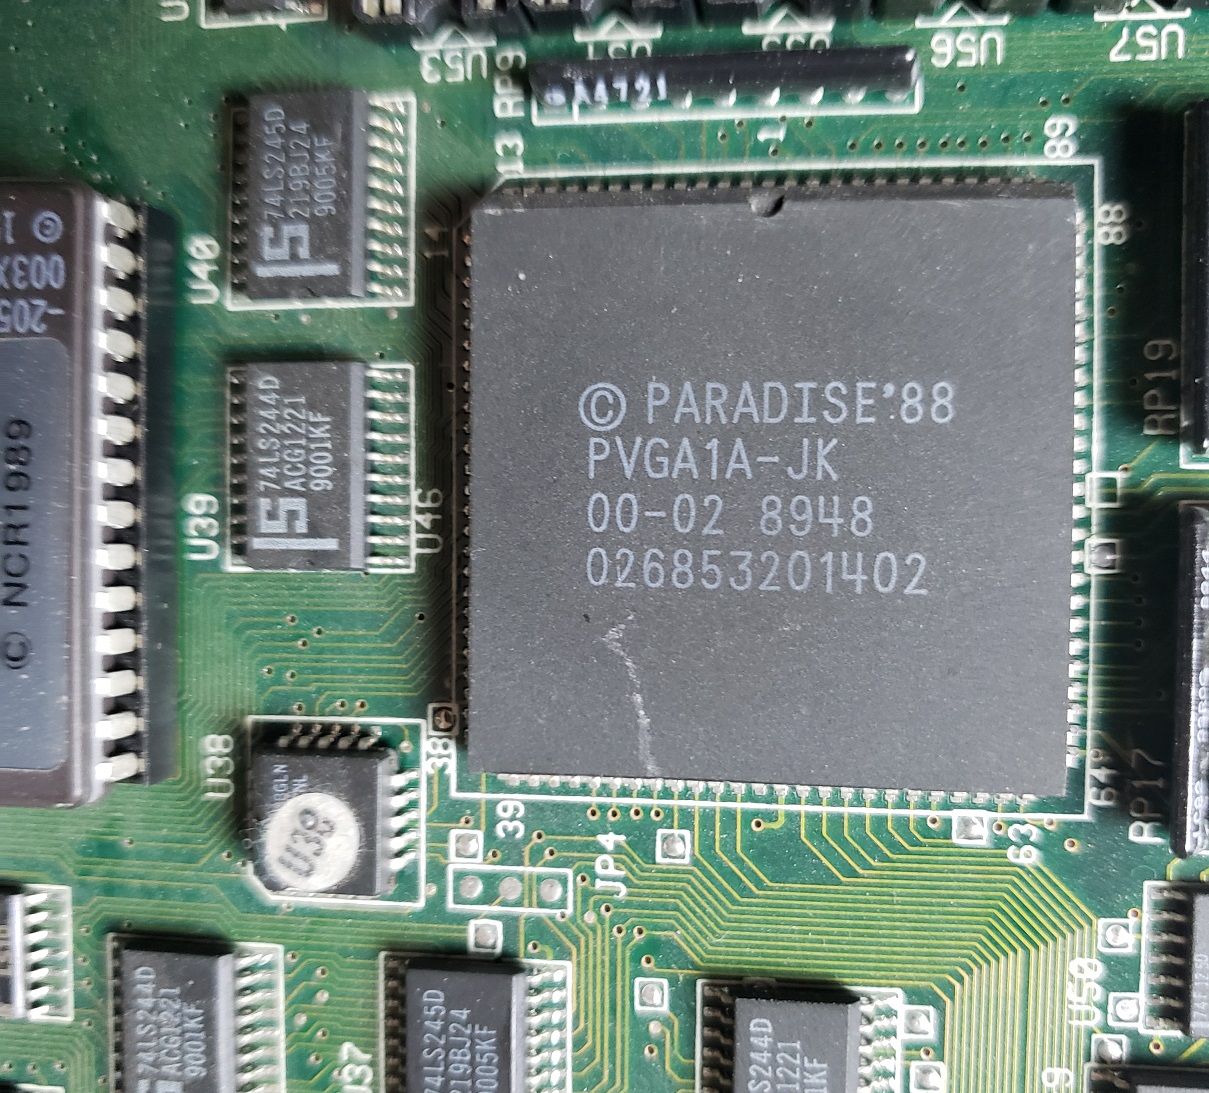
5) VGA video – The board features a Paradise PVGA1A -JK chip as well as 256K of video memory. This was the first SVGA chip from WDC and was considered quite fast for its time. The video memory can be expanded to a full 512K via the sockets next to the soldered-on memory. This chip could be considered a highlight of this machine providing very fast and competent VGA and SVGA output.

6) Switch for enabling and disabling various ports and video modes.

7) Built-in FDD and HDD connectors. The floppy drive controller does support high-density 1.44MB floppy drives. The hard drive controller is IDE but as said before does not support user input in the BIOS for custom drives.

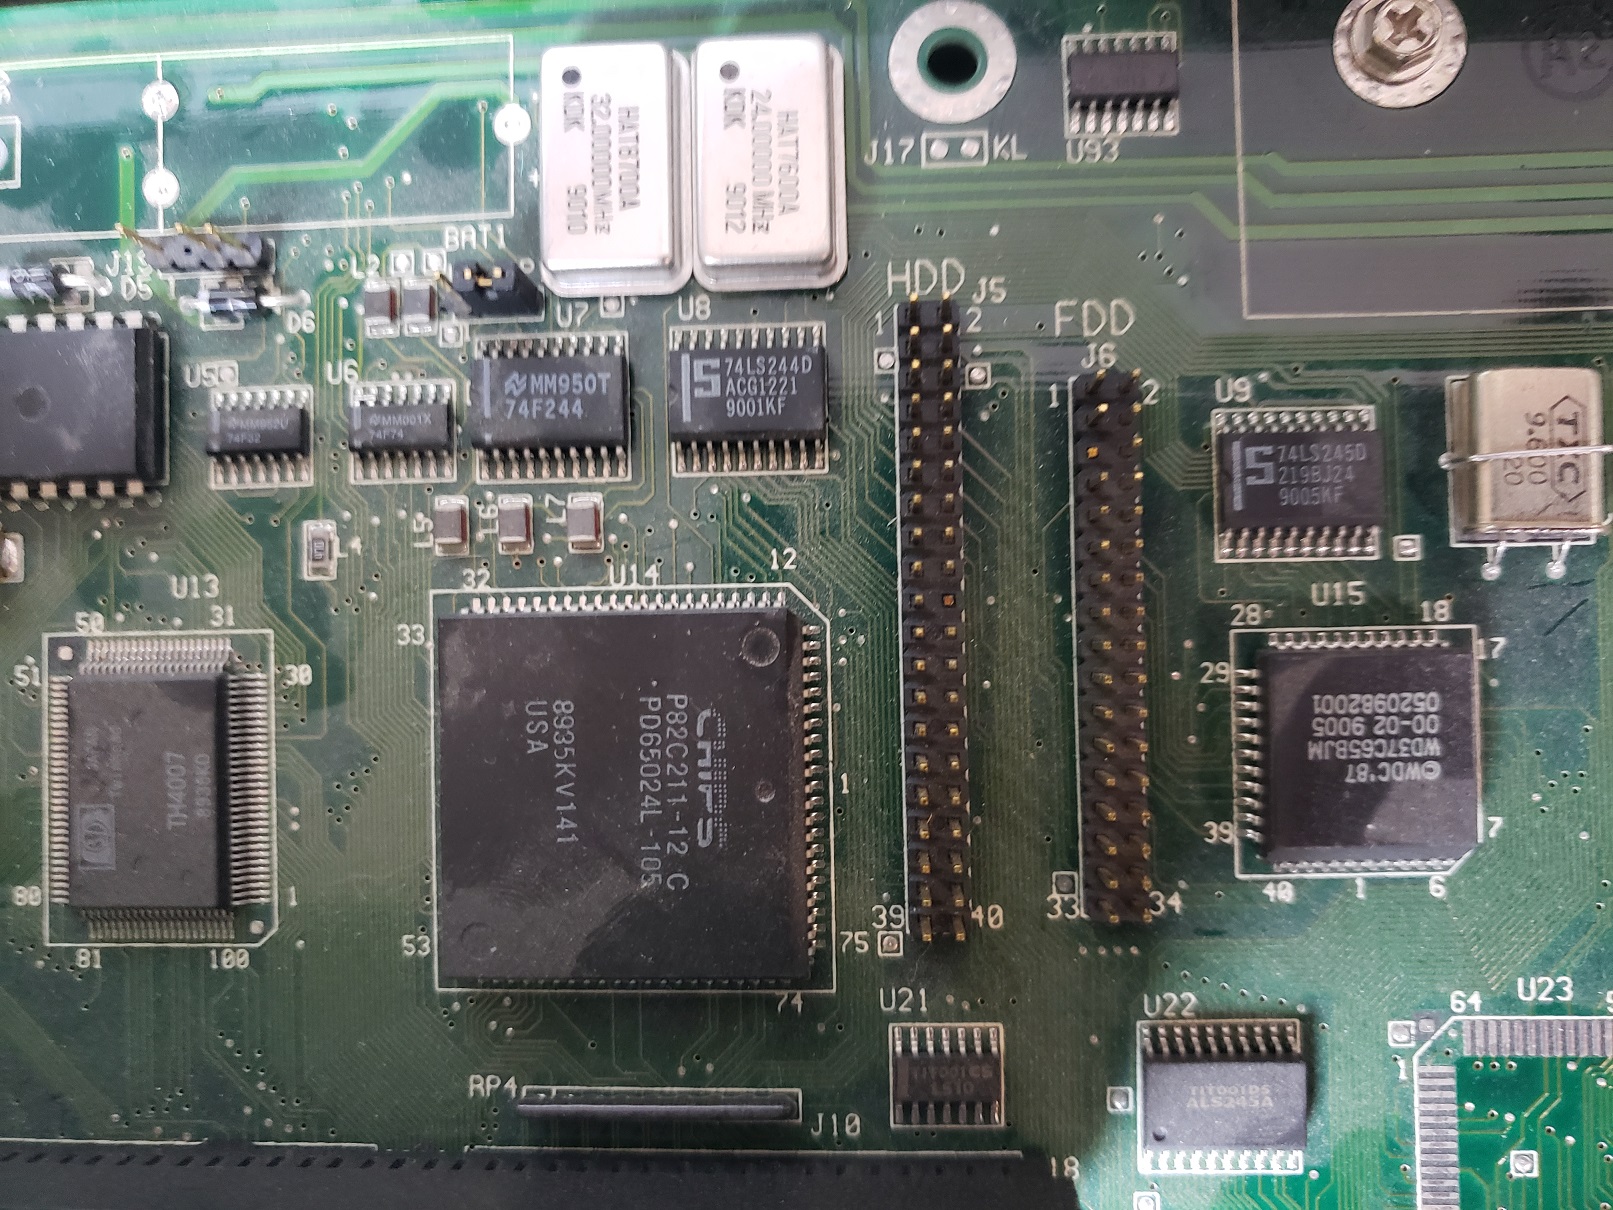
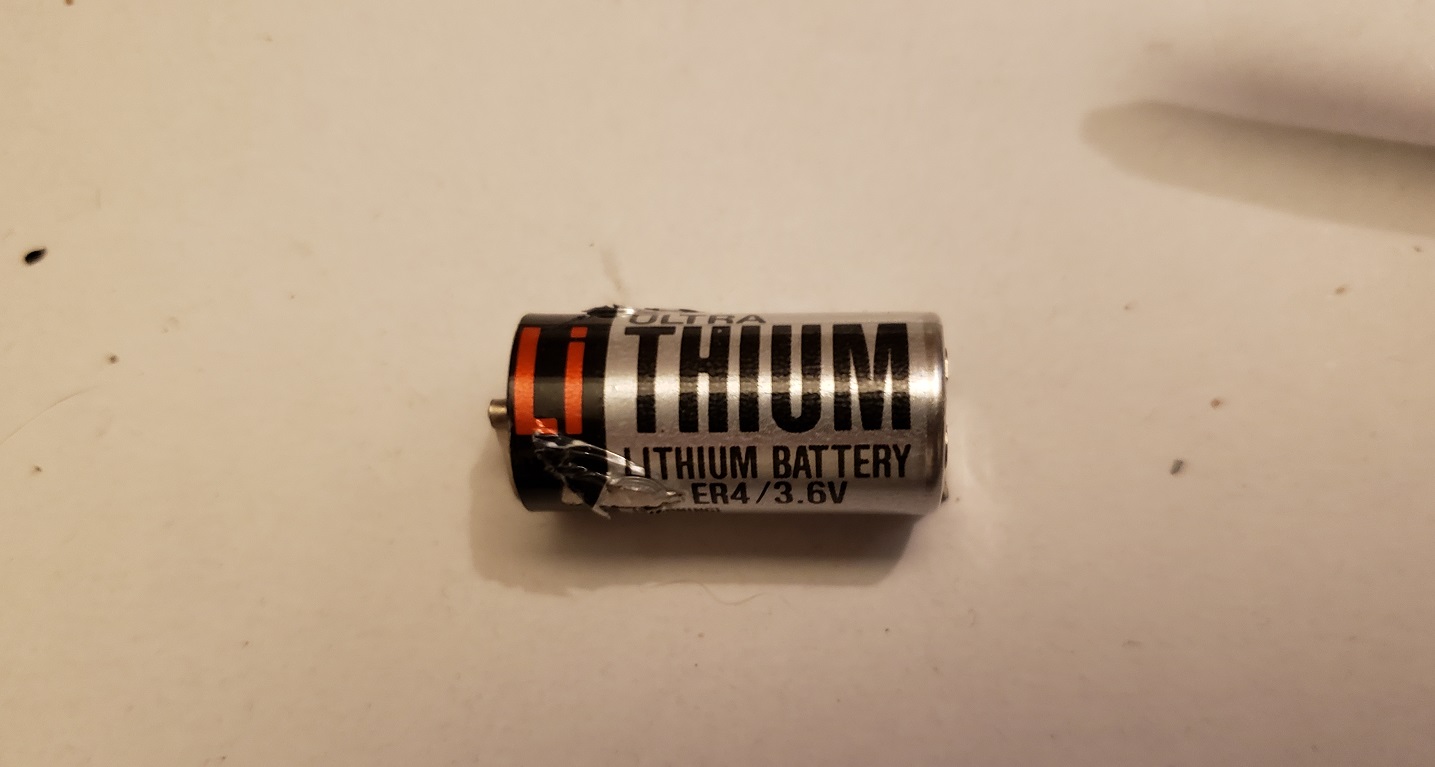
8) Battery – The board uses a barrel-style Lithium battery for the CMOS. Mine was long dead so I removed it. Luckily my board does have pins for using an external battery

9) Power Connector

10) Piezo Speaker – The board does feature a piezo speaker for sound as opposed to a full speaker cone though it does feature a volume control next to the speaker which is nice. You do need to remove the top of the case to change the volume but it’s nice that the option is there at all as this feature is missing on many motherboards.

Overall this is a nice 286-class PC with the Paradise video chip being a particular stand-out feature. The CPU is also quite adequate for a large selection of older games from the 90s and early 90s. Although a full-cone speaker would have been nice it’s good to be able to adjust the volume on it. The case is small and compact and the lack of drive bays could be an issue but the two 16-bit ISA slots and ability to support 1.44mb Floppy drives do make it much more convenient than a PC of slightly smaller size like the Tandy 1000RL (though you do miss out on Tandy video and sound). Throw in a nice Sound Blaster card or Adlib and you have yourself a competent retro PC for EGA and early 90s VGA titles that also won’t take up too much desktop space or break your back to move.

The IBM AT also known as the IBM 5170 is IBM’s follow up to the IBM PC and IBM XT (and XT-286) home computer. Released in 1984 the 5170 featured a 286 processor and the then new 16-bit ISA expansion slots which would continue to be seen on computer motherboards all the way until the early 2000’s. The AT also supported high density floppy drives, came standard with a hard drive, featured a battery to store system settings as opposed to motherboard switches and was a great machine for then then new EGA graphics standard.

For the duration of this article please take not I will be using the terms 5170 and AT interchangeably to refer to this PC.

The IBM 5170 has a pretty utilitarian look in my opinion but there are many fans of the industrial look of this very sturdy case. My case was rescued from a garage and has some significant rust and scratching but it still fully functional. On the far left we have the standard IBM model badge as well as a lock and LEDs for power and hard drive activity.

On the right side of the case are dual 5 1/4 drive bays. These bays are usually populated by two 1.2MB 5 1/4 inch floppy drives though it’s fairly common to see at least one bay housing a 3 1/2 inch floppy drive via a bay adaptor. All 5170’s support 720KB floppy drives but later revisions like mine also support 1.44MB 3 1/2 drives. I did upgrade one of my 1.2MB floppy drives to a 1.44MB drive but keep in mind you will need a bay adaptor as well as a molex to floppy power adaptor.

Below these duals bays there is also a smaller bay obscured by the front panel that could possibly mount a smaller half height form factor hard drive.

Like the earlier IBM computers the AT power switch is a large red flip switch located towards the rear of the case and on the side.

Looking at the rear we see the power supply on the left side. The AT came with a PSU of about 200w which was sufficient to power a hard drive and several expansion cards and drives. The only built in port on the AT is the AT keyboard port located next to the expansion slots. The AT like the XT supports the now standard eight expansion ports which meant now you had to sacrifice less when picking and choosing expansion cards as the earlier PC only have five expansion slots.

After the five rear screws securing the case cover are removed we can take off the top and have a look inside the AT.

As seen in the image above my original configuration included three expansion cards such as the hard drive controller as well as a serial/parallel port card and lastly a cirrus logic VGA card. The VGA card will be replaced later for something more period correct for the 5170.

Below is a view of the motherboard with the expansion cards removed.

The hard drive is housed in a bay next to the dual 5 1/4 bays. The 5170 shipped stock with an unreliable 20MB MFM hard drive though at some point my AT was upgraded to a 40MB model.

The 5170 lacks any switch blocks on the motherboard and setup is accomplished via a setup program run from a floppy disk. There is an official IBM setup program but it can be a little outdated and the setup program itself may not have options for things such as 1.44MB floppy drives even though the motherboard may be fully capable. A good alternative is a program called GSETUP which you can use with the IBM 5170 as well as other computers which require setup programs.

1 ) CPU – Early versions of the IBM 5170 used a 6MHz 80286 for it’s CPU but later revisions like the one I have pictured were upgraded to an 8MHz 80286.

Even at 8MHz the AT’s 286 processor is on the slow side as far as 286 CPU’s go. It’s certainly faster then an 8088, even at 10MHz but it’s still to slow to be optimal for many VGA titles that are more action oriented like combat flight simulators. The earlier IBM XT-286 was said to run faster with the same speed CPU due to 0 wait states though I have never personally tested this.

2 ) FPU – The 5170 motherboard does have a socket for adding a 287 math co-processor to assist in more complicated mathematical processing.

The FPU is useful for CAD type programs but it’s usefulness in games is quite limited with only a scarce few games of the time taking advantage of the processors capabilities.

3 ) RAM – All IBM AT’s came standard with 512KB of memory on the motherboard. The 5170 supports up to 16MB of memory though expanding to a full 640KB and beyond does require a memory expansion card.

4 ) Battery – The 5170 motherboard does not have any CMOS battery on the board to save settings nor switches (besides for monitor selection) thus a working battery is essential to save the settings set with the previously mentioned setup programs. The 5170 in order to save settings uses an external battery.

As original batteries are long dead for the most part buying a newer replacement will most likely be required. There are many options on eBay that use AA batteries though usually the wiring is keyed differently. Modification will most likely be required as most of these battery holders are not wired for the AT.

There is a switch between the power connector and the external battery connector. This switch is for selecting the monitor in use. The rear position is for using an MDA monitor and the forward position is for CGA. The position has no effect when using an EGA or VGA video card.

5 ) AT Power Connector

6 ) PC Speaker – The 5170 has a fairly decent PC speaker located at the front of the case.

Let’s take a look at the expansion cards I have installed in my IBM 5170 making it a late 1980’s configuration.

We will start with the two cards my PC had preinstalled and not counting the VGA card I initially installed for testing.

Hard drive controller

I believe this WD based 16-bit MFM controller card which came with my 5170 is the stock card provided for the later revision 8MHz AT’s.

The other card that came with my 5170 was a simple serial/parallel port card which is extremely useful seeing as there are no built in I/O ports.

And now to take a look at the expansion cards I decided to add.

Joystick Card

I decided to add a gameport card since my soundcard of choice did not have a gameport on it as many later sound cards do.

The card I went with was an 8-bit CH Gamecard III automatic. I didn’t have any specific reasons for choosing this card other then it’s what I had on hand although it is nice that it supports two gamepads.

RAM Expansion

Having memory over 640KB isn’t to important on an IBM AT since most games that will run acceptably on this PC only require 640KB or less of conventional memory. Unfortunately the 5170 only came with 512KB of memory stock so although that is enough to play a number of games you really want to get a full 640KB to get the best experience with the AT.

For memory expansion I installed an Intel Above Board which has a total capacity of 2MB but also allows you to backfill the conventional memory to the full 640KB bringing the total memory of the 5170 to 640KB of conventional memory and the difference allocated to being XMS or EMS memory though usually XMS is favored for 286 class PCs. Larger memory cards are available and you can even install multiple cards up to 16MB but I’ve found little use for more then 2MB in a PC of this vintage and class.

Audio

Sound cards weren’t really a thing until 1987 and most games that will run on the 5170 well won’t necessarily require anything beyond PC speaker though a sound card does expand your options. Since I decided to go more period correct with this PC I decided an original Adlib was the best choice.

The original Ablib as seen above from 1987 uses a 1/4 inch audio jack and a simple volume knob. This card uses off the shelf parts but its YM3812 FM chip is widely supported in games. These cards are quite the collectors item these days so I can’t recommend tracking one down unless you want a strict period correct machine from the later 1980’s and have large sums of cash to burn. Almost all later sound cards like the Sound Blaster 16 have perfect Adlib compatibility so I would suggest more people go down that route. There are also a number of Adlib reproductions available for a much cheaper price if you want to keep that original Adlib look. Later Adlib cards from 1990 also switched to a more commonly used 3.5mm audio jack.

Video

In the late 80’s most 5170’s would likely have been fitted with an MDA or CGA video card though the more expensive and fancier option was the official IBM EGA card allowing 16 colors on screen at once.

There are later smaller and cheaper EGA cards with all the memory built in but the official IBM card just felt right for this PC. The IBM EGA video card only comes with 64K of video memory on the card severely limiting resolutions and colors on screen and causing some games to display an incorrect image. There is a memory expansion daughterboard as seen above which brings the card up to a full 256K of video ram. These daughterboards used to be quite rare though I believe there are third party replacements available. I unfortunately only have a CGA monitor on hand but thankfully the card can be made to display to a CGA color monitor via switches on the card and will display EGA graphics but at a lower resolution.

You can add an ISA VGA video card which would be significantly cheaper and allow the use of much more common VGA monitors if so desired though I find this much less interesting.

Overall the IBM 5170 is a capable PC for the 80’s although I do feel its CPU is a bit on the weak side even at 8MHz speeds. It’s to fast for very early PC games that require an 8088 CPU but for more demanding games of the 80’s a 12MHz or 16MHz 286 or a 386 would serve you much better. I went with a very IBM, period correct build for this article but nothing is stopping you from adding a decent VGA card and Sound Blaster 16 giving a significant boost to this PCs power and expanding the playable game library, though as I mentioned the CPU will still be a bottleneck for more demanding VGA games. In my opinion one is better off with a clone system which are usually smaller, lighter and have more things built in such as more memory and I/O ports. You also most likely do not have to worry about the tiresome setup programs required on the 5170 when using an IBM compatible which is a plus. If you are an IBM fan though this PC can be a lot of fun. The design is seen as beautiful by many IBM enthusiasts the AT is more expandable and versatile then the IBM PC and XT and the case itself is built like a tank.

For awhile now I’ve considered getting into and doing more video content. Rest assured I will not be going over to an all video format. I have many reasons for this but lets just say I prefer writing and I’m very happy with how this blog has turned out and evolved. That said YouTube video’s seem to be all the rage with the kiddies and I do agree some things are just better conveyed via a video. To that end I will be attempting to include more “Supplemental Video” content to my posts. These will largely be quick and fast unscripted video reviews of whatever machine I covered in the article and probably won’t nearly be as in depth as my written article. I may do some game reviews in video only format but that has yet to be seen. Currently I’m going to be going back and adding these videos to my older posts and hopefully the videos will encourage people to visit the blog and read some of the content as I’m not going to be producing a video for every article but only those I deem worth the effort and that could meaningfully add something.

What do you guys think of this? good idea or a waste of time?

To give you guys an example I’ve made one of these videos for one of my earliest articles “Anatomy of a Pentium based DOS PC ” so this would be an example of what to expect. please keep in mind I threw this together in one go and spent less then $100 on its production. Professional YouTubers have quite a bit of experience with video’s and in some instances spend thousands of dollars on equipment. Good quality HD cameras can run an excess of $800, mine was $50. I had a bit of fun making it even if the production value was lacking but if the idea sticks expect the videos to improve in quality.

Just a quick announcement. I have started a separate Blog detailing my journey though various RPG’s across many different platforms. The content format will be a little different then it is here and I just felt it deserved its own blog. Please feel free to check it out here at Random Battles: my life long level grind.

I also wanted to add I do update older articles from time to time if I and things or discover new information. Nothing to major but I have updated my Anatomy of a Windows 3.1 PC with some additional information on the motherboard which happens to be the infamous M919 board.

FDISKformat

A place for the pc collector

I ❤ Old Games!

Probabilmente il miglior blog bilingue al mondo*

Waltorious Writes About Games

Game-related ramblings.

NekoJonez's Gaming Blog

My Gaming Timeline

Evelynn Star

Lynn talks about video games, records and books ...

Retro Megabit

Sharing My Retro Video Game Collection.

133MHz's Junk Box

Random electronics and gaming crap

SNES A Day

Chronogaming project featuring reviews, screenshots, and videos of the entire Super Nintendo library in release order.

Retrocosm's Vintage Computing, Tech & Scale RC Blog

Random mutterings on retro computing, music, plus radio controlled scale modelling.

The PewPew Diaries.

Work(s) in Progress!

1001Up

1001 video games and beyond

retro computing and gaming plus a little more

sparcie

retro computers and stuff

jispylicious

Stay Jispy!