Subscribe to continue reading
Subscribe to get access to the rest of this post and other subscriber-only content.
Subscribe to get access to the rest of this post and other subscriber-only content.
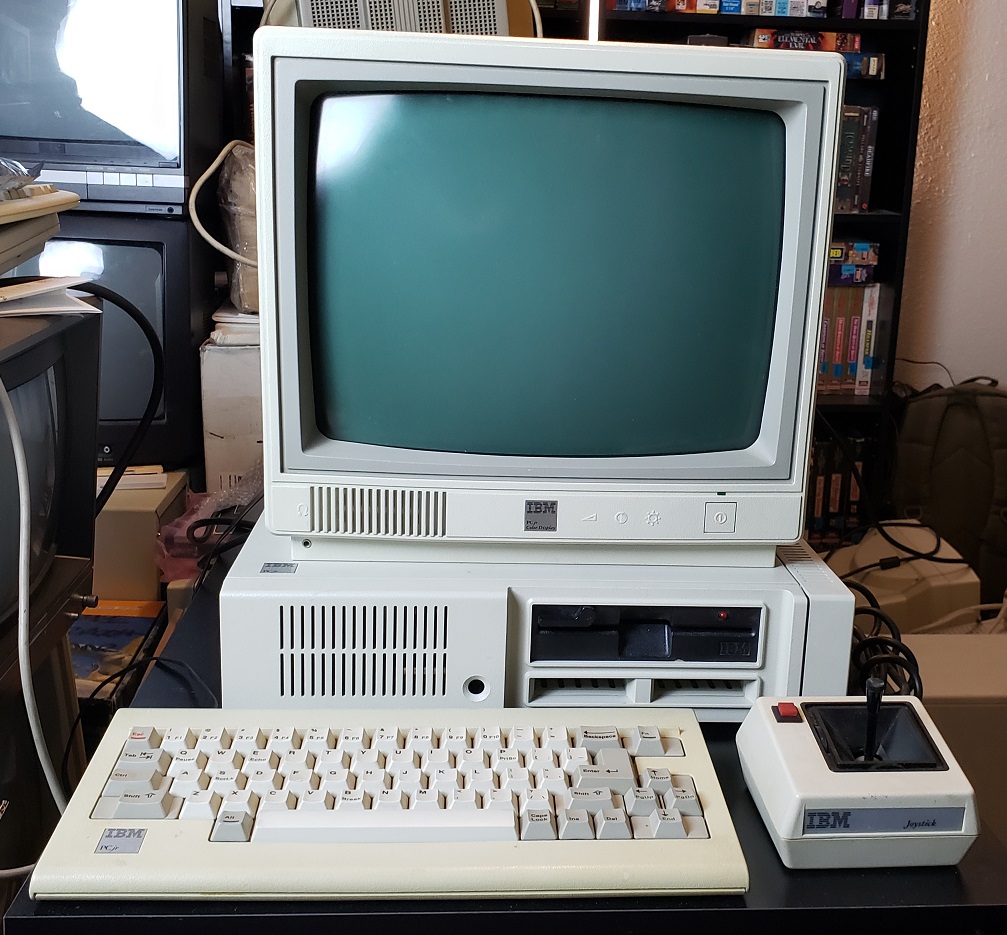
The IBM PCjr, released in 1984, is an interesting machine on several levels. First off it was a major failure for IBM who at the time was THE NAME in computers. Second, it was an “IBM PC compatible” from IBM that wasn’t even all that PC compatible. Lastly, despite being a failure for IBM, if it never existed, we probably would not have had one of the most beloved and successful computer lines of the 1980s and beyond, the Tandy 1000, which were essentially clones of the PCjr.
The PCjr was IBM’s attempt to bring their successful line of more business-oriented computers like the 5150 into the home. It was cheaper than the 5150 while at the same time having enhanced graphics and sound in order to make it more useful for things like games which would be more important to home users.
The PCjr supports 160 × 200 at 16 colors 320 × 200 at 16 colors and 640 × 200 at 4 colors. If this seems familiar that’s because the Tandy 1000 was a clone of the PCjr and supported the same enhanced video and 3-channel sound capabilities. Unfortunately, the machines aren’t fully compatible with one another so many games meant for the Tandy 1000 that use 16-color modes will either not work or will have graphical issues when run on the PCjr.
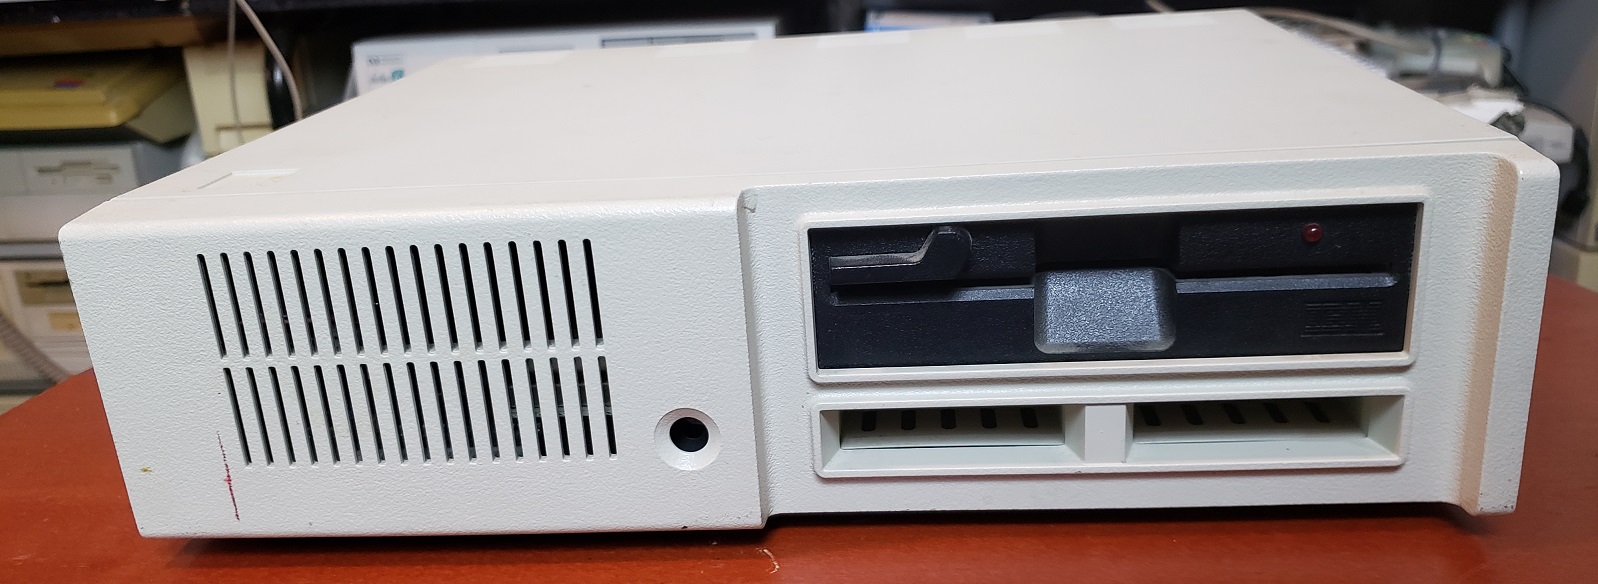
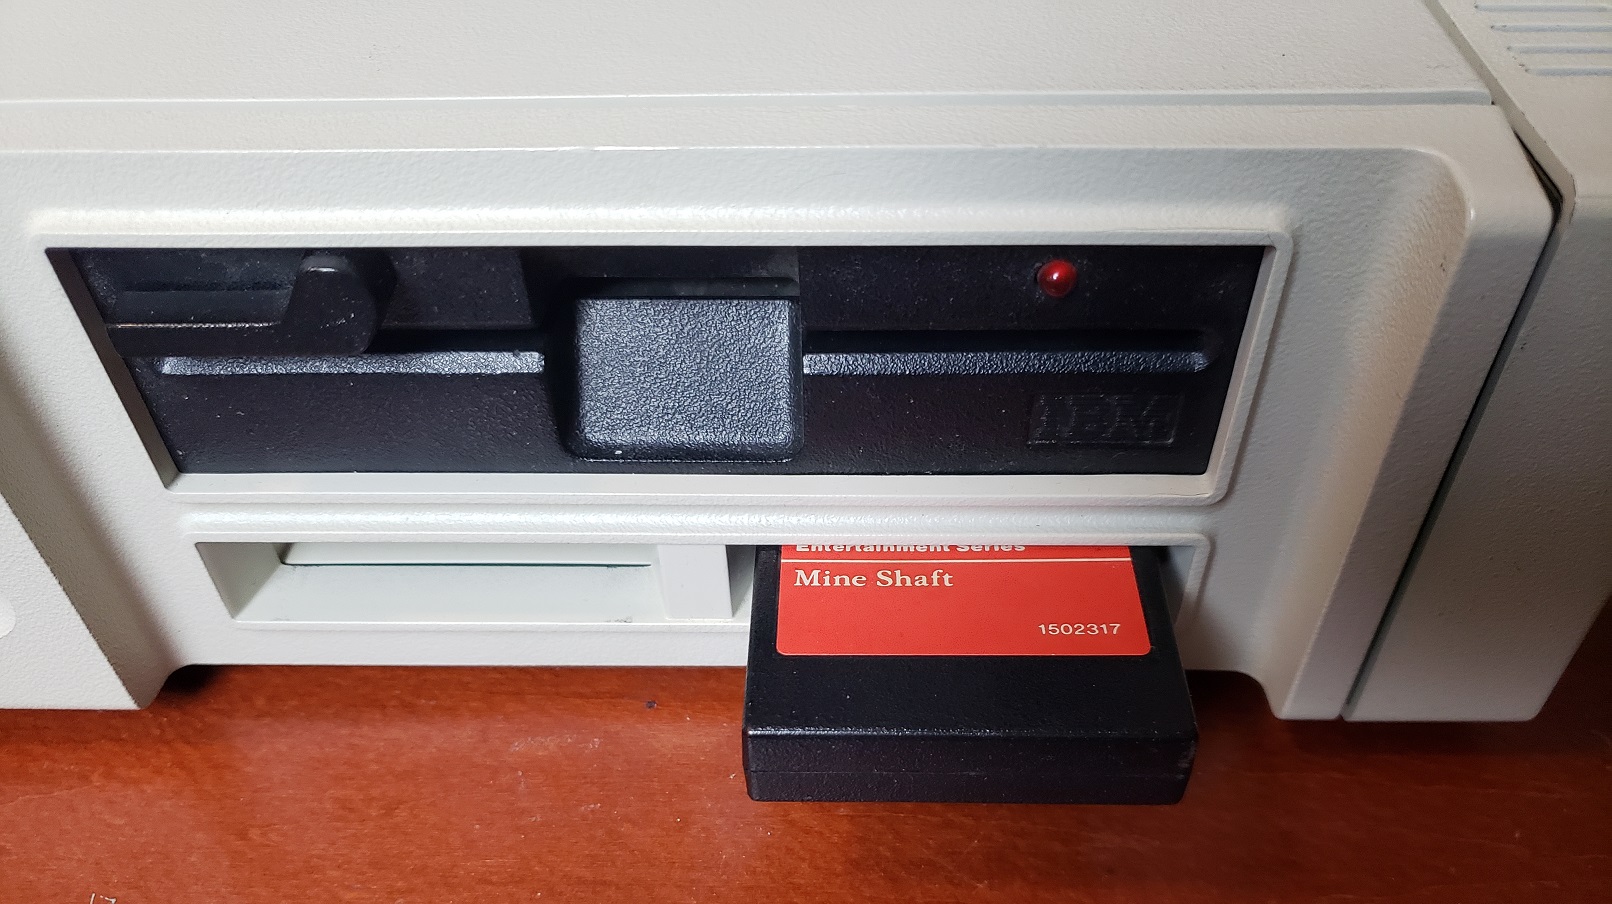
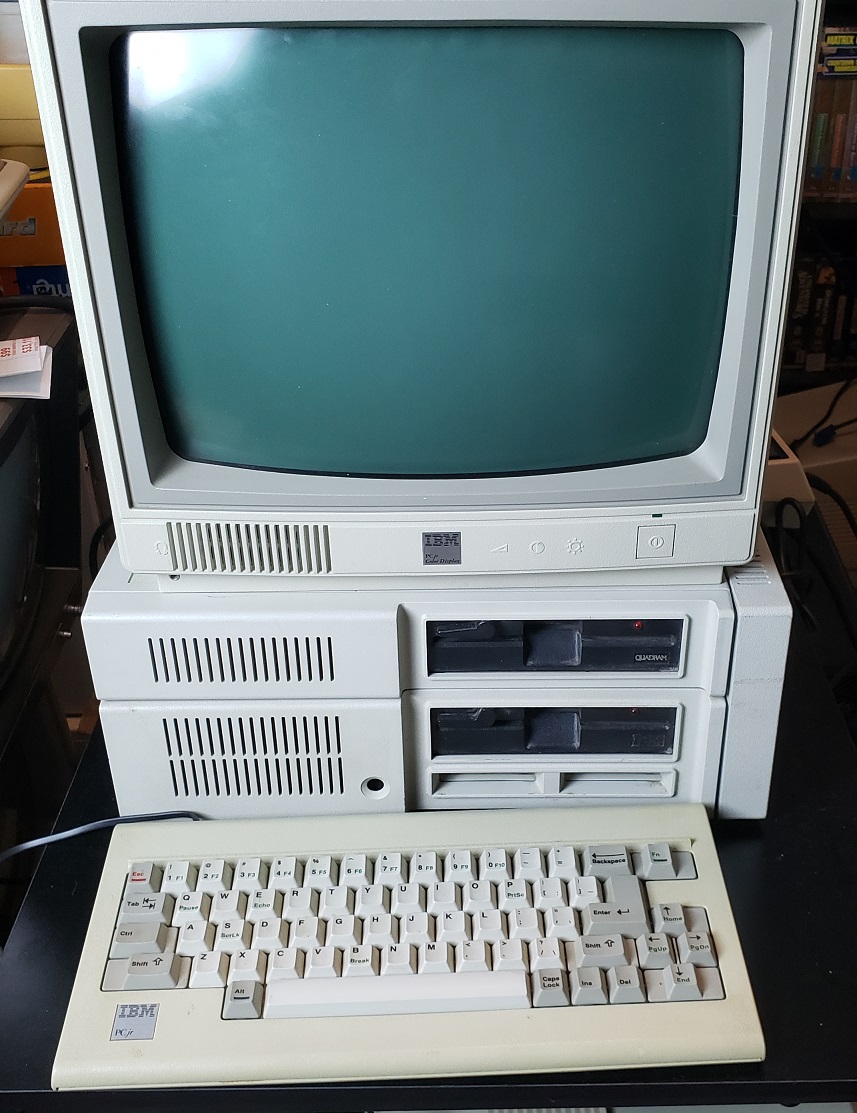
The PCjr is quite a small computer and quite a bit smaller and lighter than its IBM 5150 big brother. With this smaller size comes much less expandability and an all-plastic case. Most of the left of the case is taken up by some slots for airflow. next to these is a small black circle. This is actually an infrared sensor for the cordless keyboard (we will get to that). on the right side of the case, we have one 5 1/4 bay for the 360k 5 1/4 floppy drive, and below that we have two cartridge slots. Supposedly the PCjr can be made to work with 720K drives but I’ve never attempted it or seen it done.
The cartridge slots were part of the idea of making the computer more game-oriented as small games could be placed on a cart and then easily loaded onto the system for play. The idea didn’t really catch on though and very few cartridges were made for the PCjr with only about thirteen being released with a few of those being applications like Lotus 123 and Cart Basic.
The PCjr gets really strange when we turn it around and take a look at the rear of the machine.
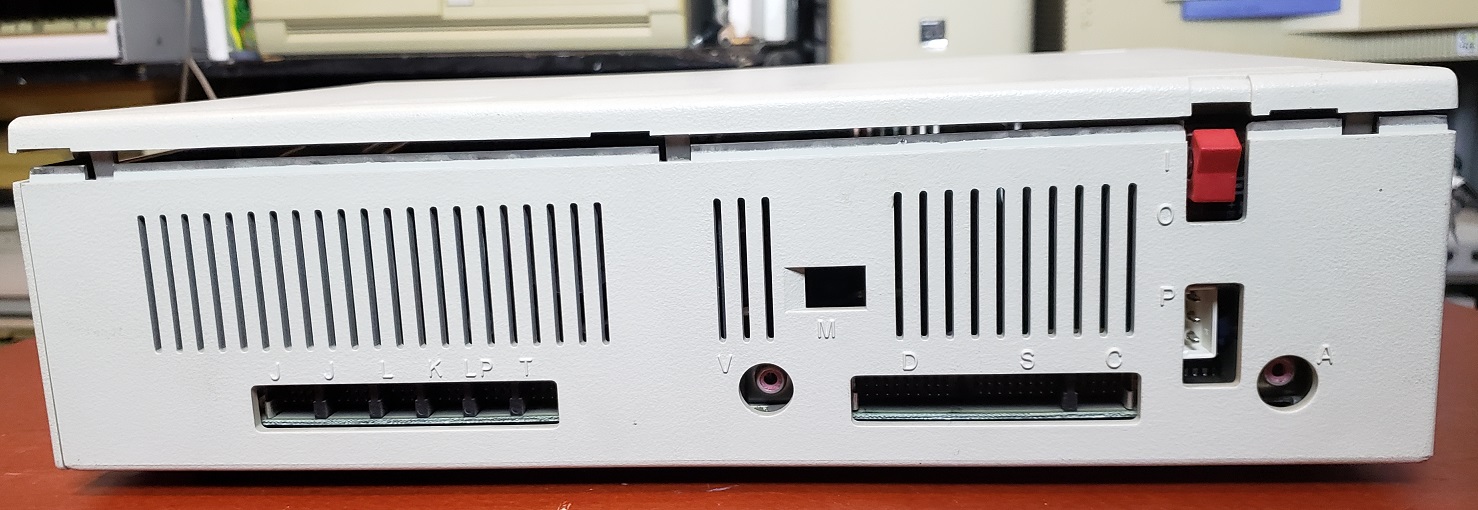
IBM had the great idea with the PCjr to make more or less every connection on the rear proprietary. I suppose the thinking was with all the connectors being a mostly similar type it would simplify the ports and confuse users less. In the end, it just makes the PCjr more of a pain to connect peripherals like monitors to. As far as I know, no other computer uses these connector types. Thankfully there are adaptors available to make connecting non-IBM PCjr peripherals possible.
Starting from the left the the ports are as follows
Before we take a look inside the PCjr let’s take a look at a few peripherals and the monitor.
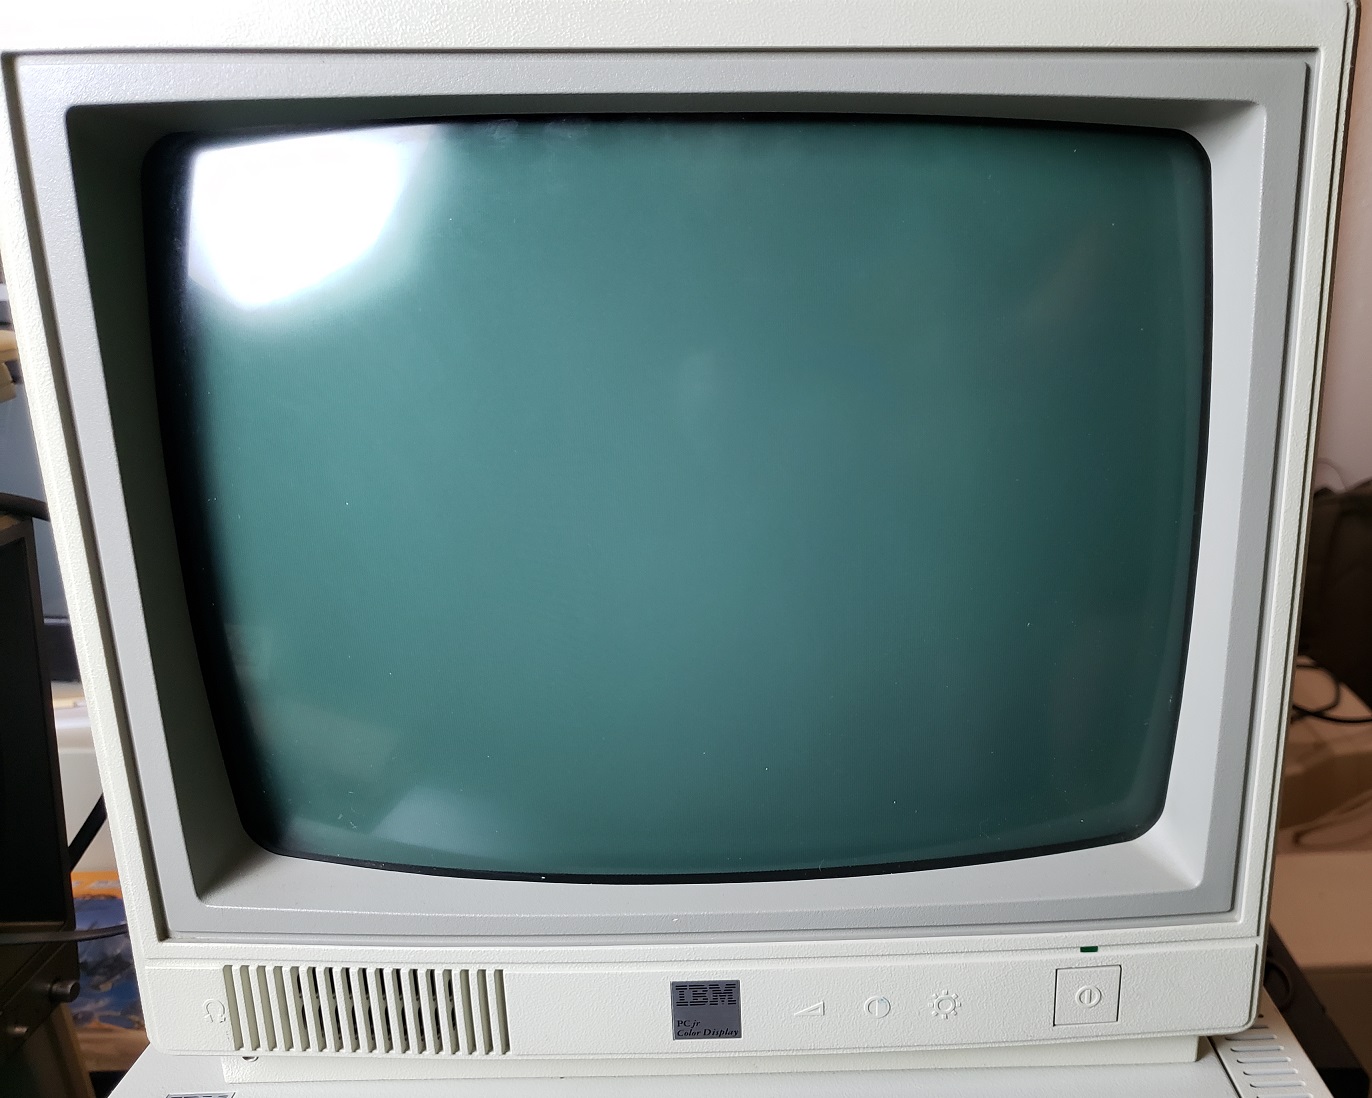
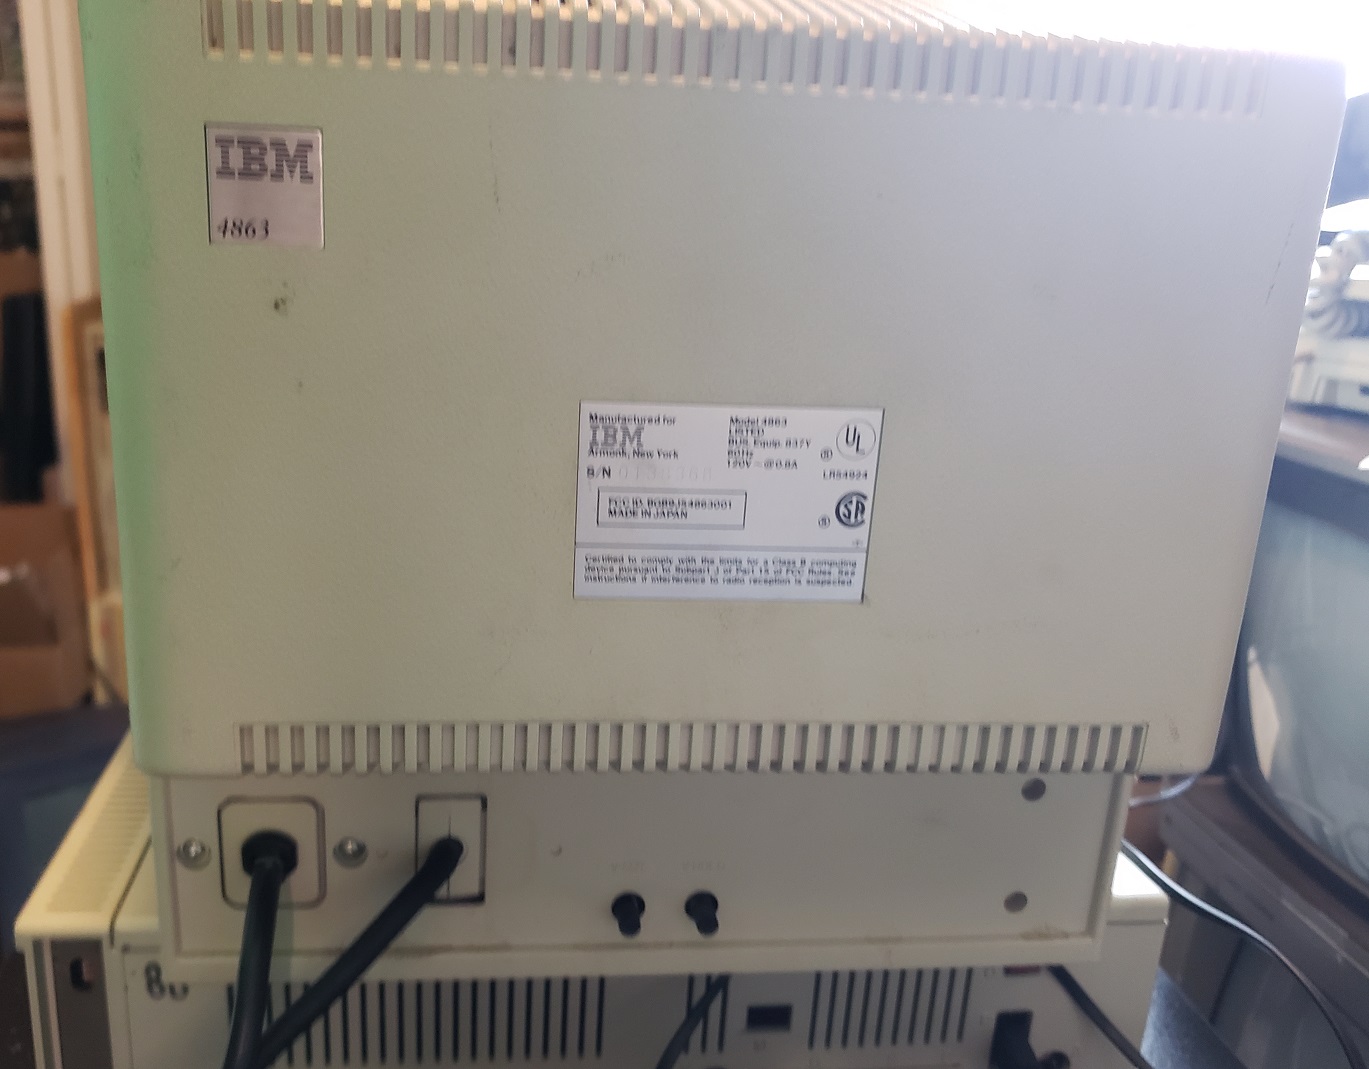
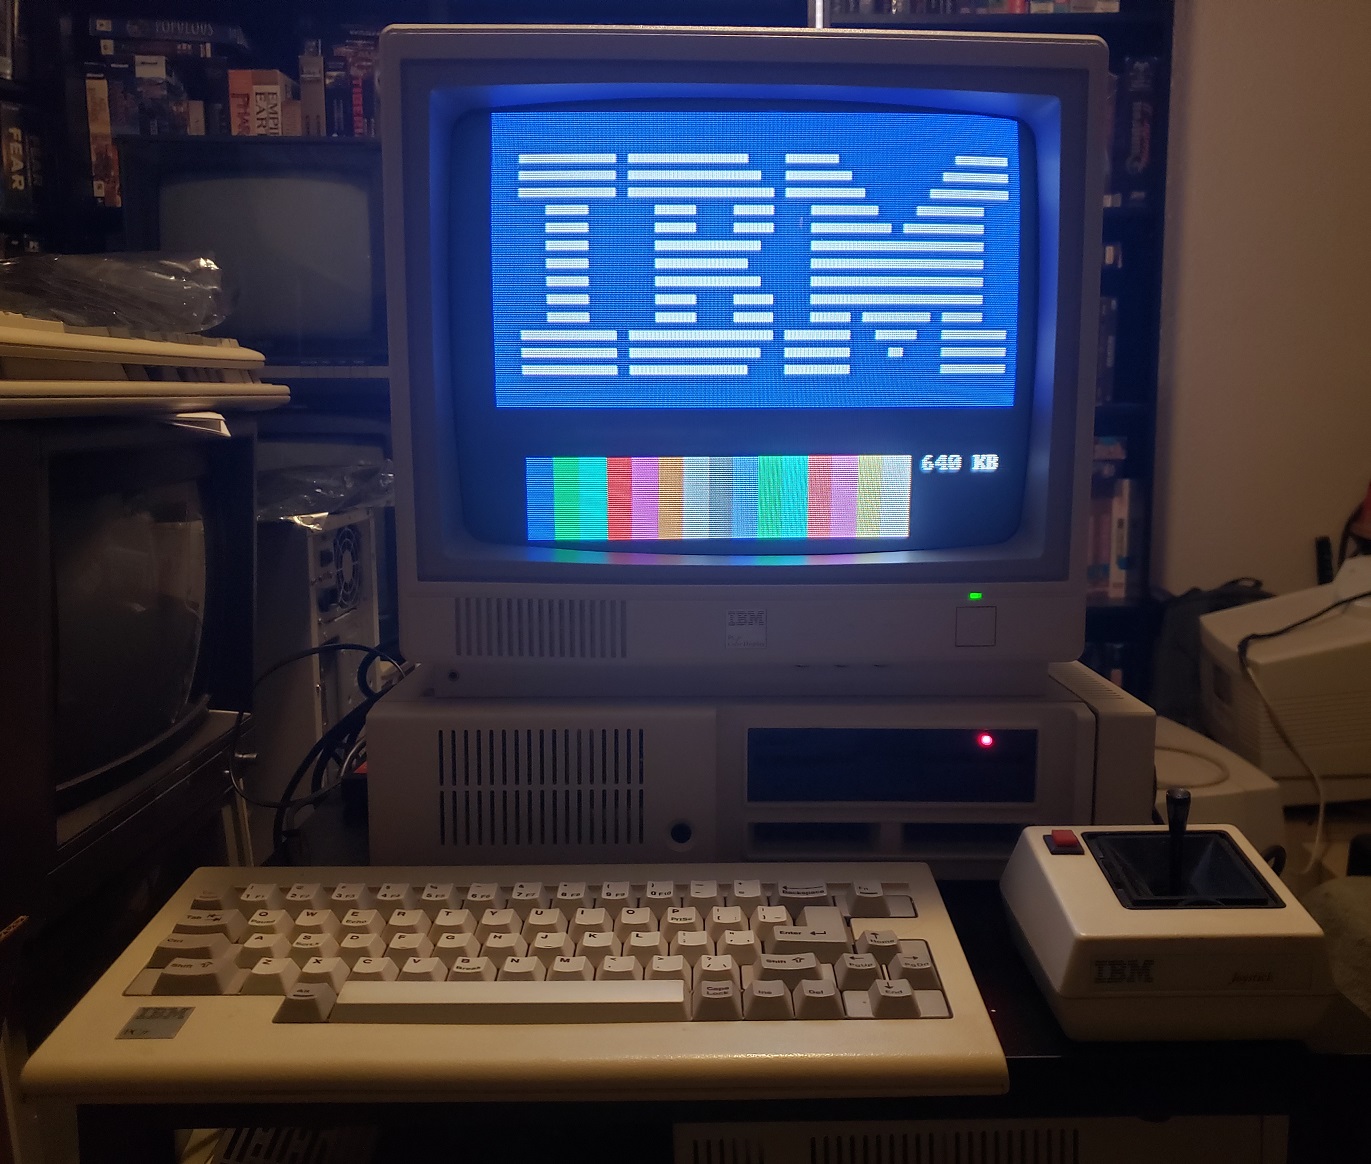
The 14-inch IBM 4863 TTL monitor is the official monitor for the PCjr. It has a standard three-prong power connector attached to the case as well as a special connector for attaching to the proprietary display port on the PCjr. Unfortunately, this meant the monitor could only ever be connected to the PCjr. Fortunately, unofficial adaptors have been made for the 4863 that allow them to connect to other computers and cards that use the standard 9-pin digital TTL connector.
The monitor has a built-in speaker and also has possibly the nicest image I have ever seen from a CGA monitor. Perhaps my example simply has extremely low hours and I got lucky but I can’t stress enough how crisp and sharp the image I get from this monitor is.

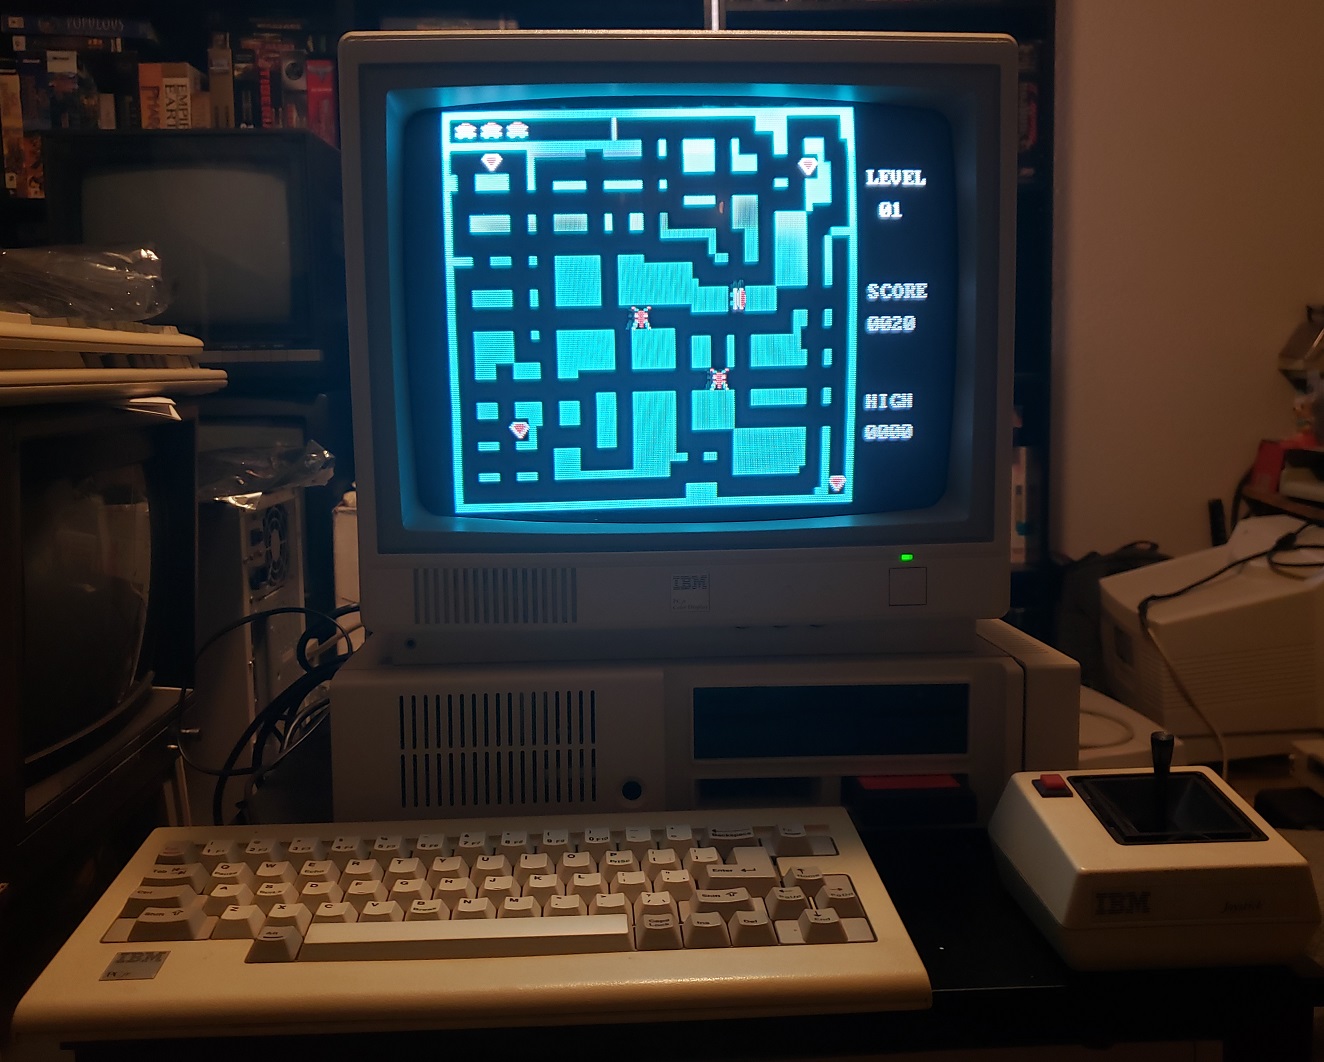
Pretty standard joystick. Nothing really special but I can’t complain.
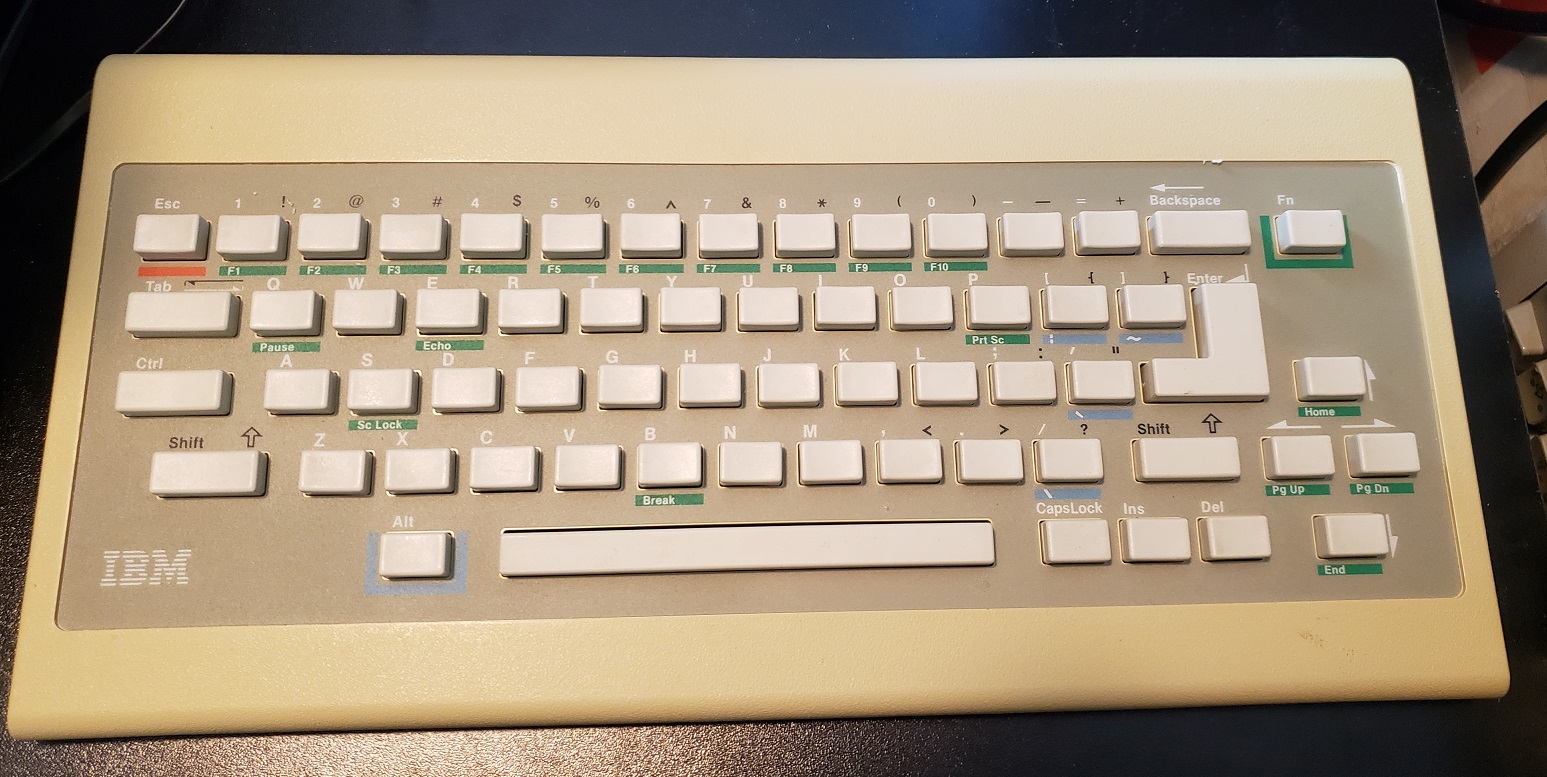
Finally, we come to the keyboard. As I mentioned earlier the keyboard is wireless and with a few AA batteries inserted uses a pair of infrared sensors to communicate with the PCjr.
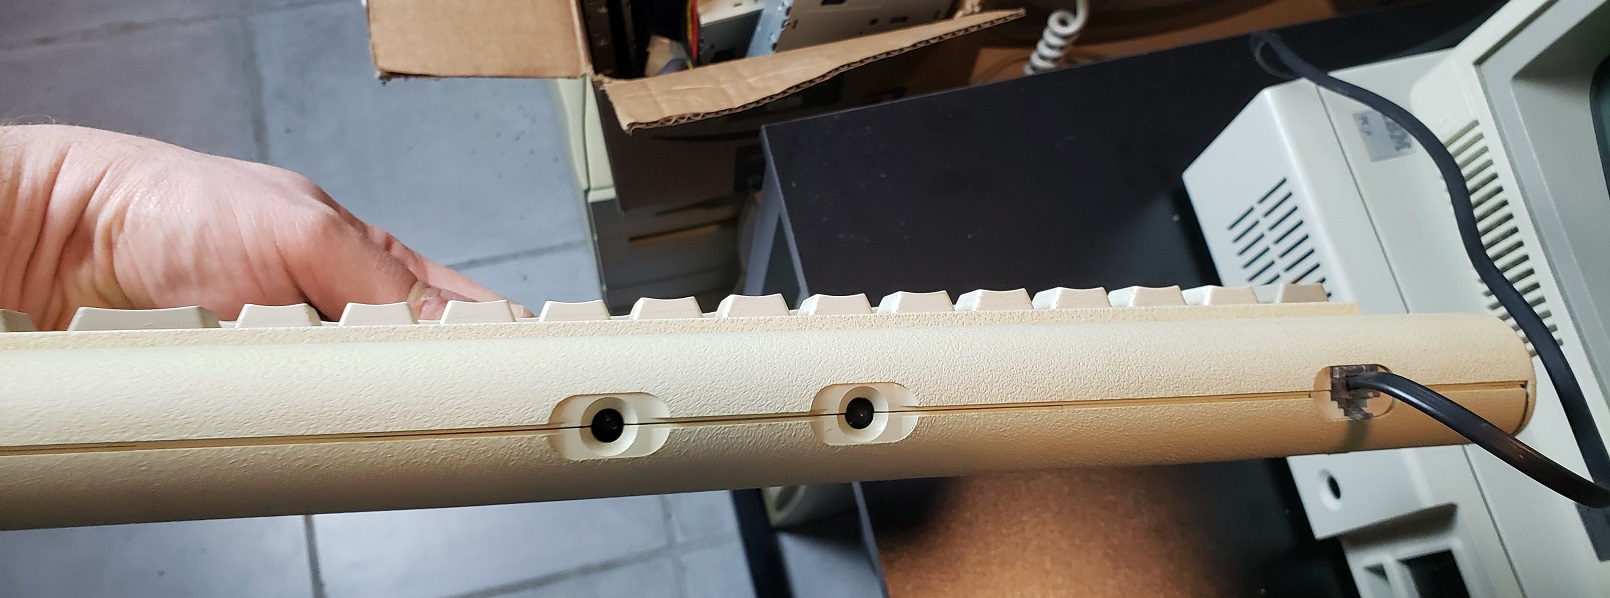
In short, This keyboard is terrible. The wireless “feature” if you’d like to call it that, is unreliable at best and can easily be interfered with simply by lights in your room. Thankfully IBM had the sense to include a port to connect your keyboard via a wired connection and trust me, it is desired. The wired adaptors use a phone-style jack and even new old stock adaptors are still pretty easy to find. Unfortunately, the initial chicklet-style keyboard itself is pretty terrible and feels pretty bad to use. It’s so bad some people even blame this keyboard on the market failure of the PCjr.
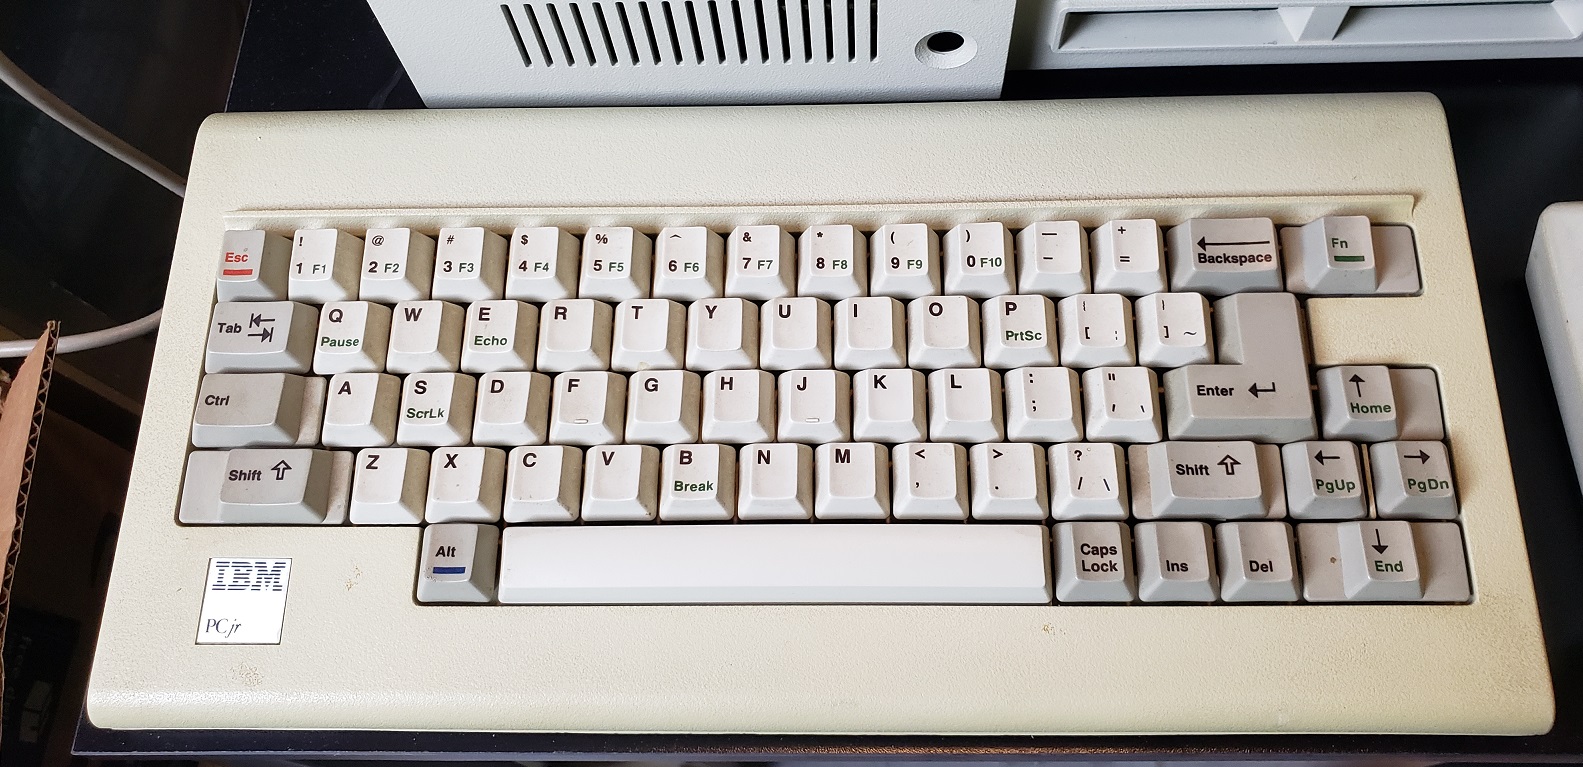
The good news is IBM did release an improved revision of the PCjr keyboard featuring actual keys and a much better feel. If you can find one I strongly suggest using this over the original chicklet-style keyboard.

Before opening the PCjr I should mention the sidecarts. The primary way in which to expand the PCjr was via a connector located on the side of the PCjr, much like the side connector on the Amiga 500. Any number of sidecarts could be attached and daisy chained thus adding things like standard parallel ports and even memory expansion cards. After about two sidecarts though you would need to attach a special power sidecart which required its own power supply in order to power more cards. It’s pretty easy and convenient when you’re only adding one or two cards but anymore and it starts to be a bit ridiculous.

My only attached sidecart is a memory expansion card. Officially these only came in 128K sizes but mine has been modified to add 512K giving me a total of 640K of memory. Third parties have even made modern sidecarts for the PCjr that add real-time clocks as well as hard drives.
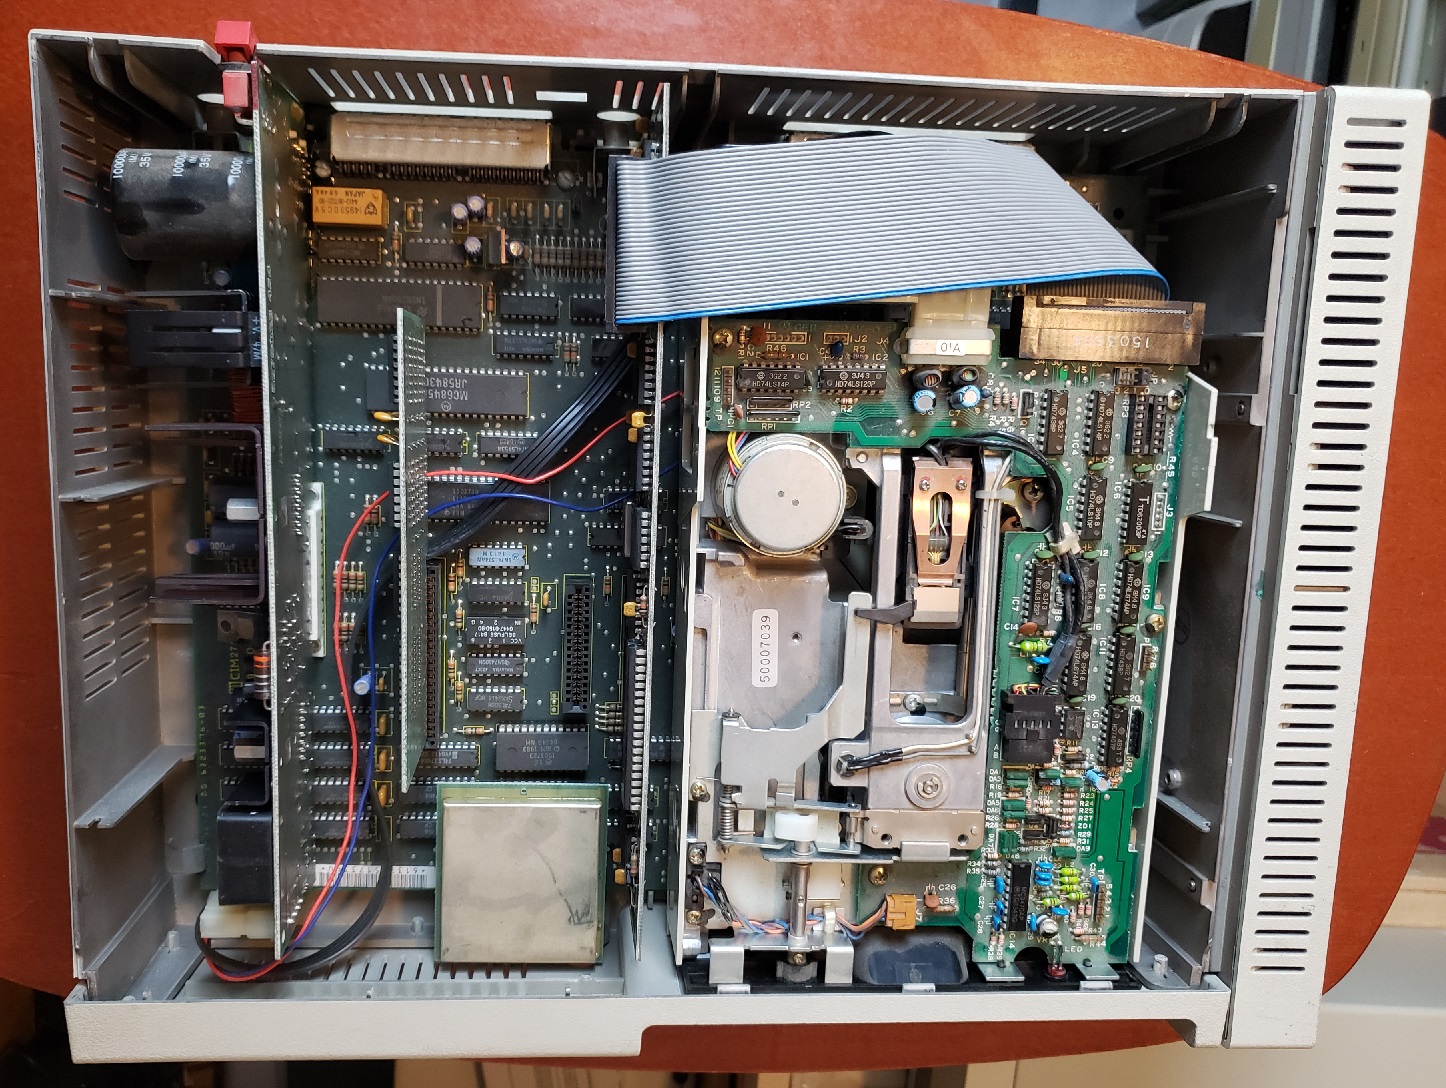
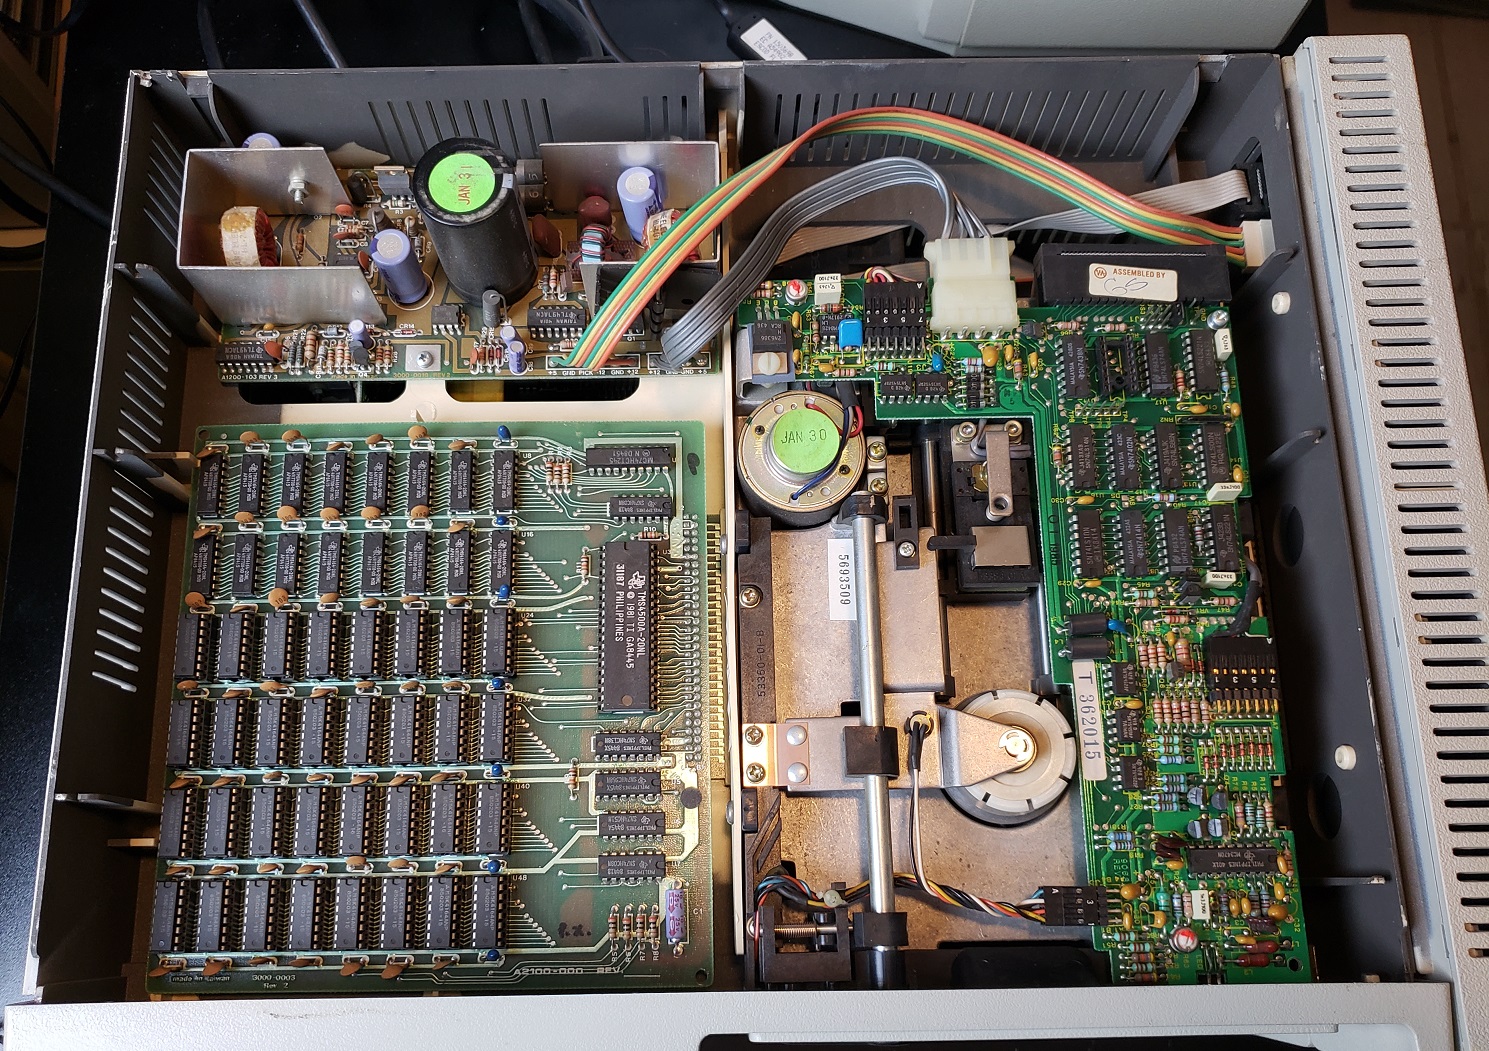
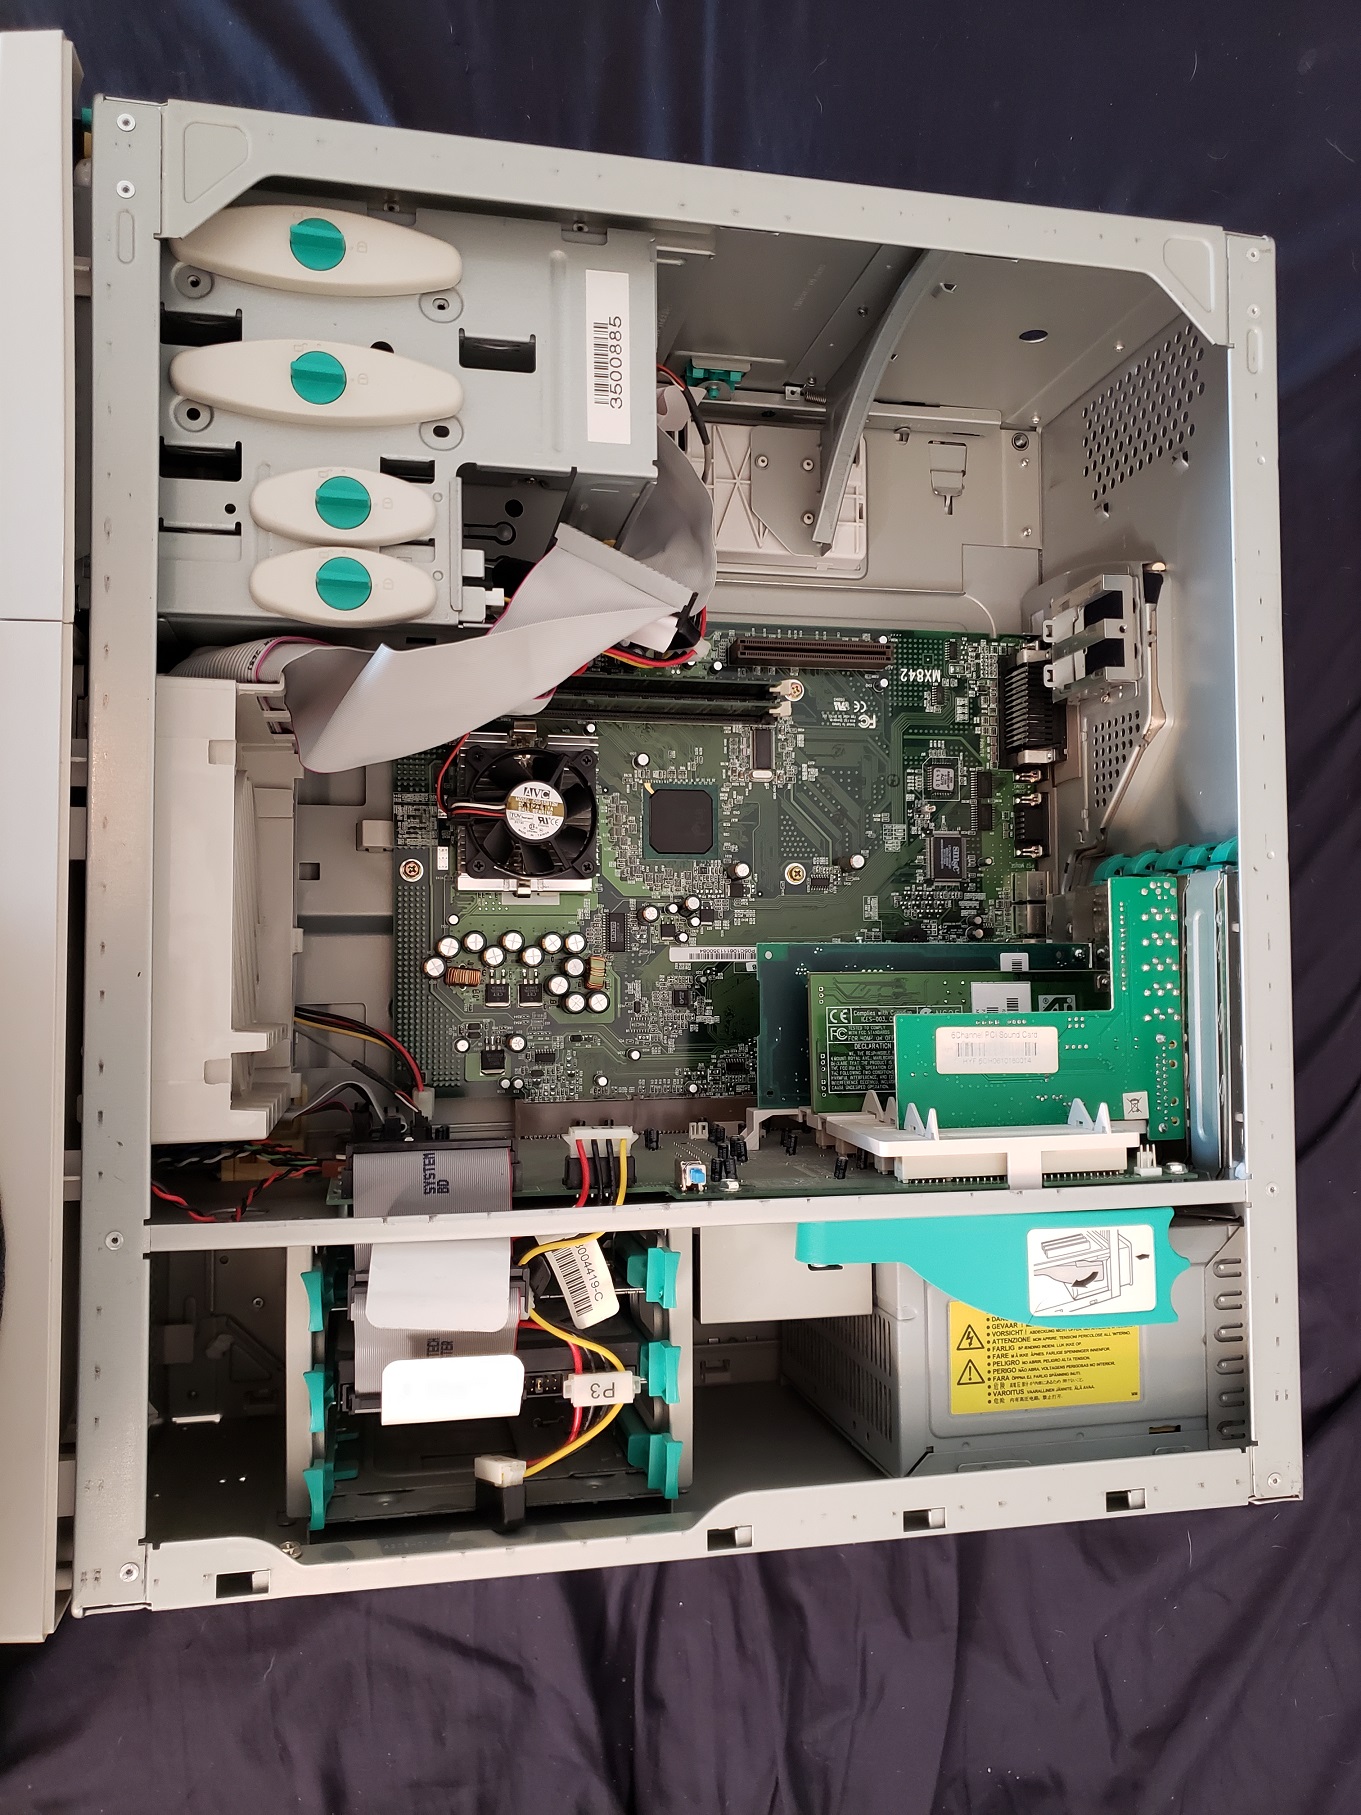
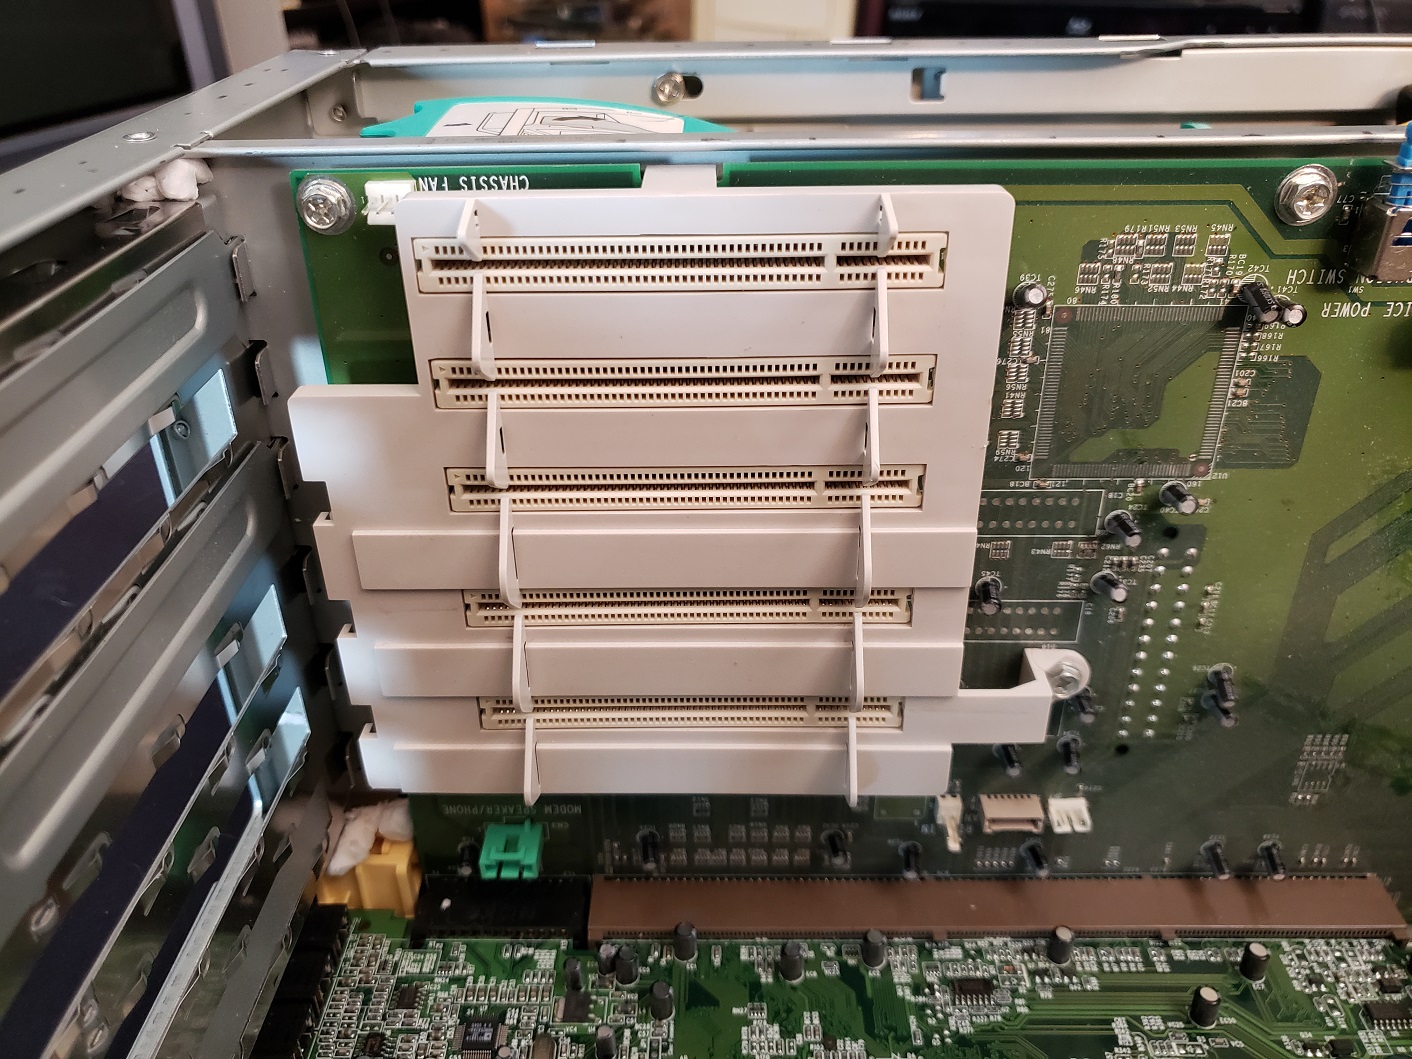
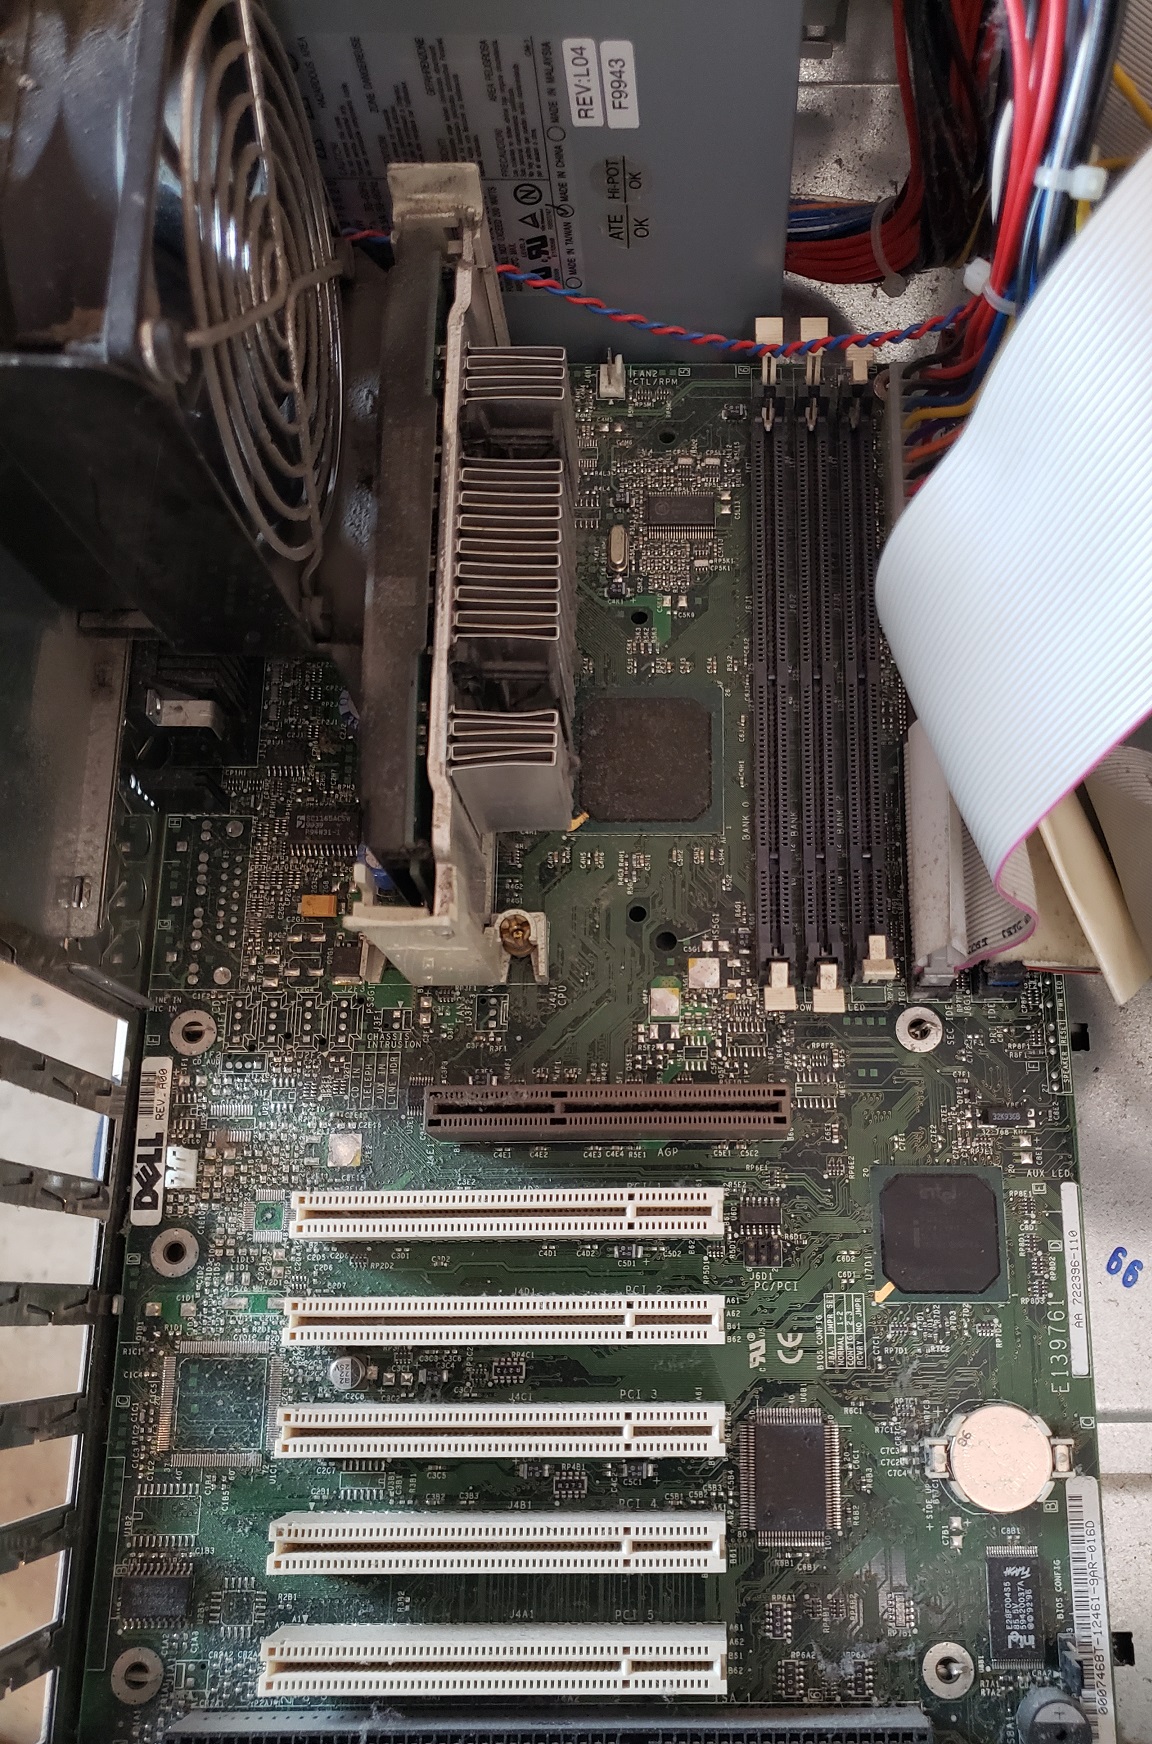
Here is the PCjr with the top of the case taken off. Although there are card slots on the motherboard they are very function specific and as far as I know no one has made any third-party cards for these slots besides direct replacement.
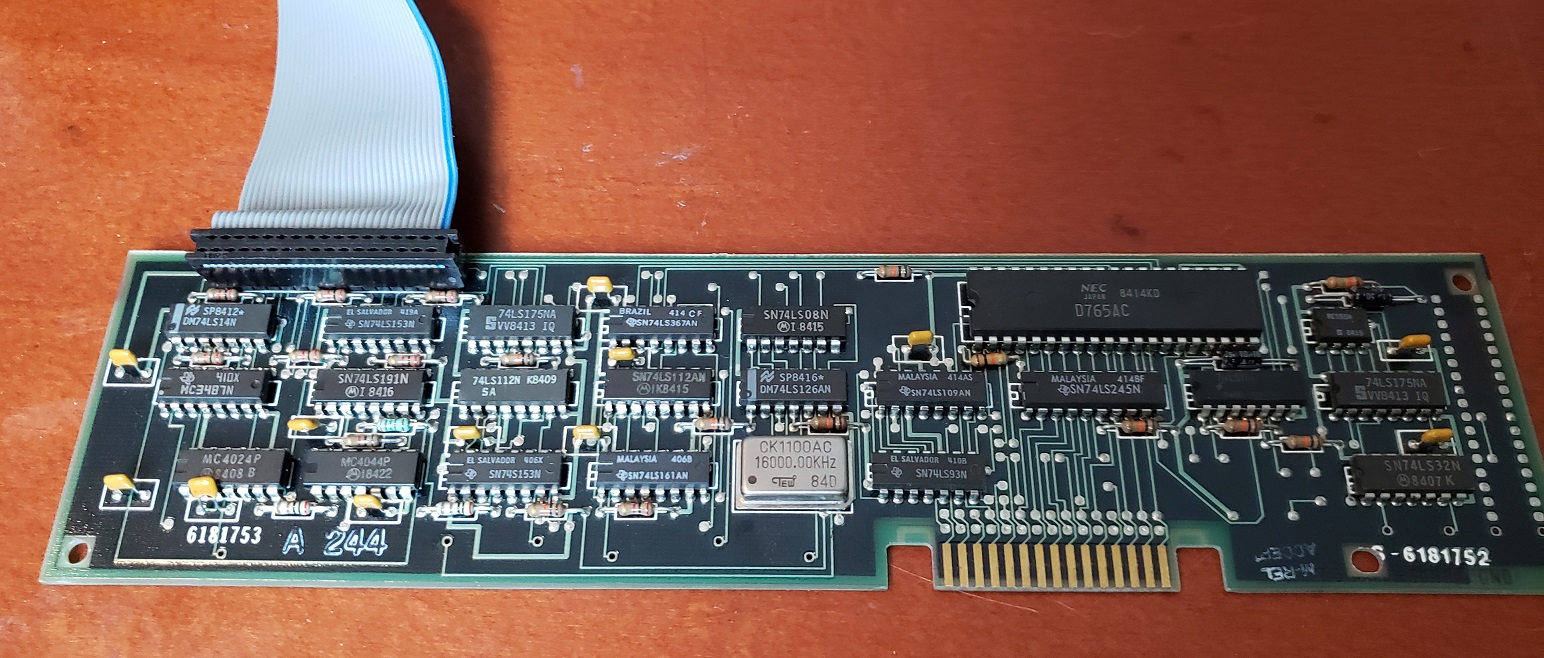
The card all the way to the right is the floppy controller card.
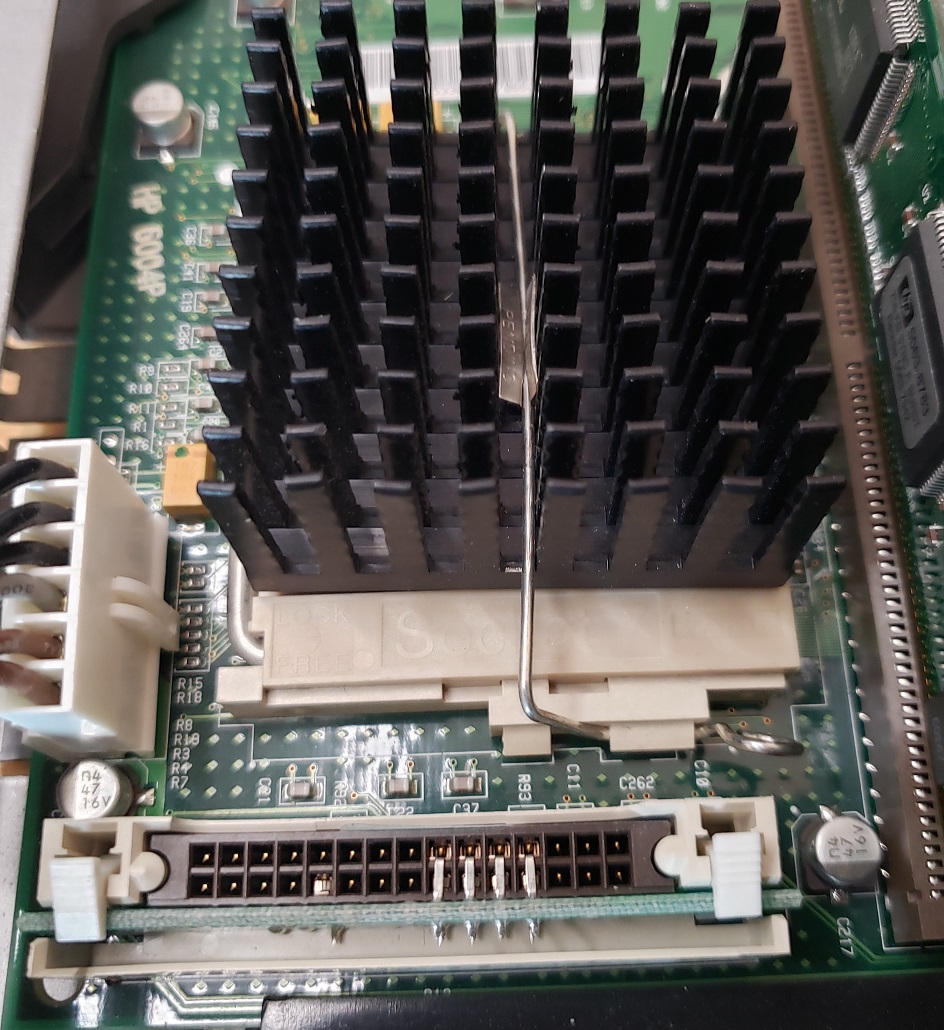
The card located in the center is in the slots specifically for memory expansion. Originally the PCjr shipped with 64K of memory on the board but IBM fairly quickly doubled that and shipped 128K PCjrs with a 64K memory expansion card installed.
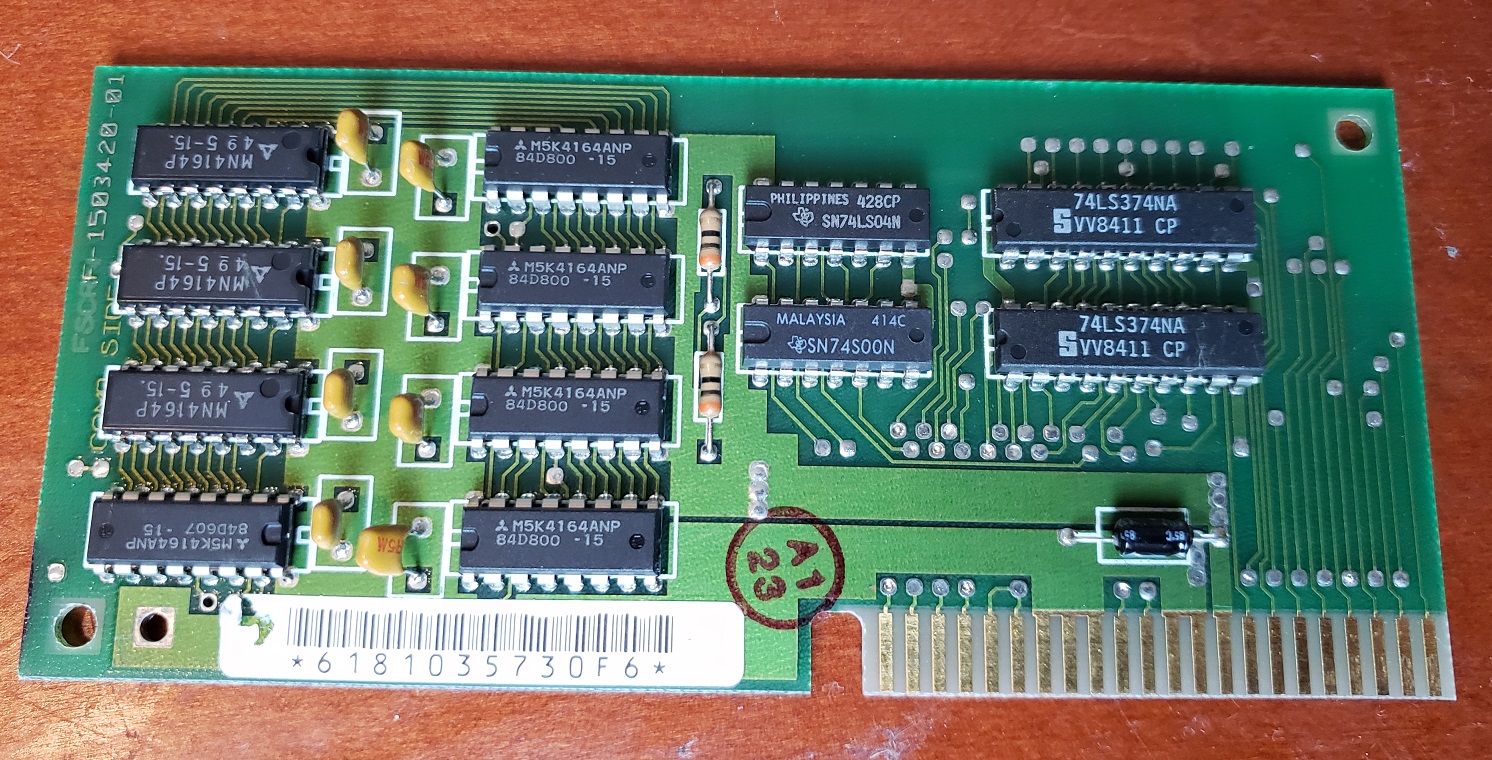
I would suspect third-party modders could produce 512K internal cards though I have never seen anything except the 64K cards available.
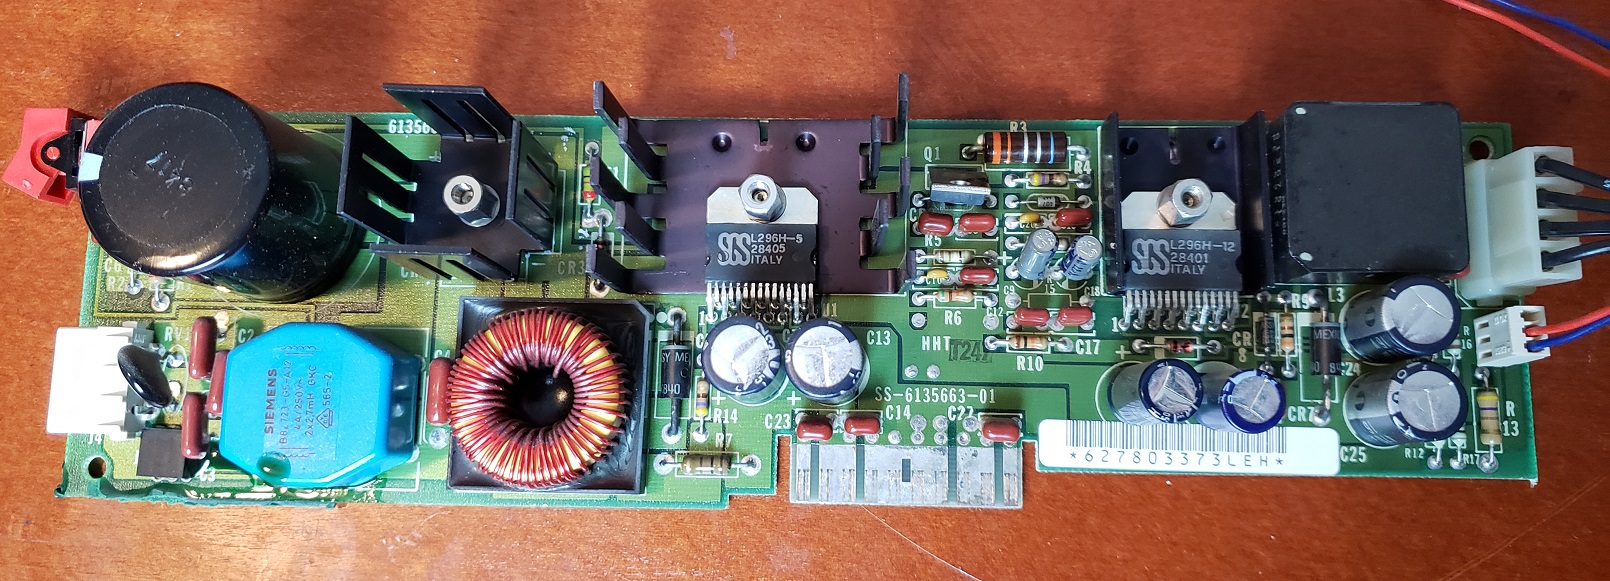
Lastly, we have the power supply card inserted in the special power slot. Besides these longer cards, I have seen PCjrs with shorter cards. I have been told the longer power cards supply more wattage but I can’t confirm that. As a side note, you can also find several modern replacements for this card which, If you’re a PCjr fan may be a wise upgrade.
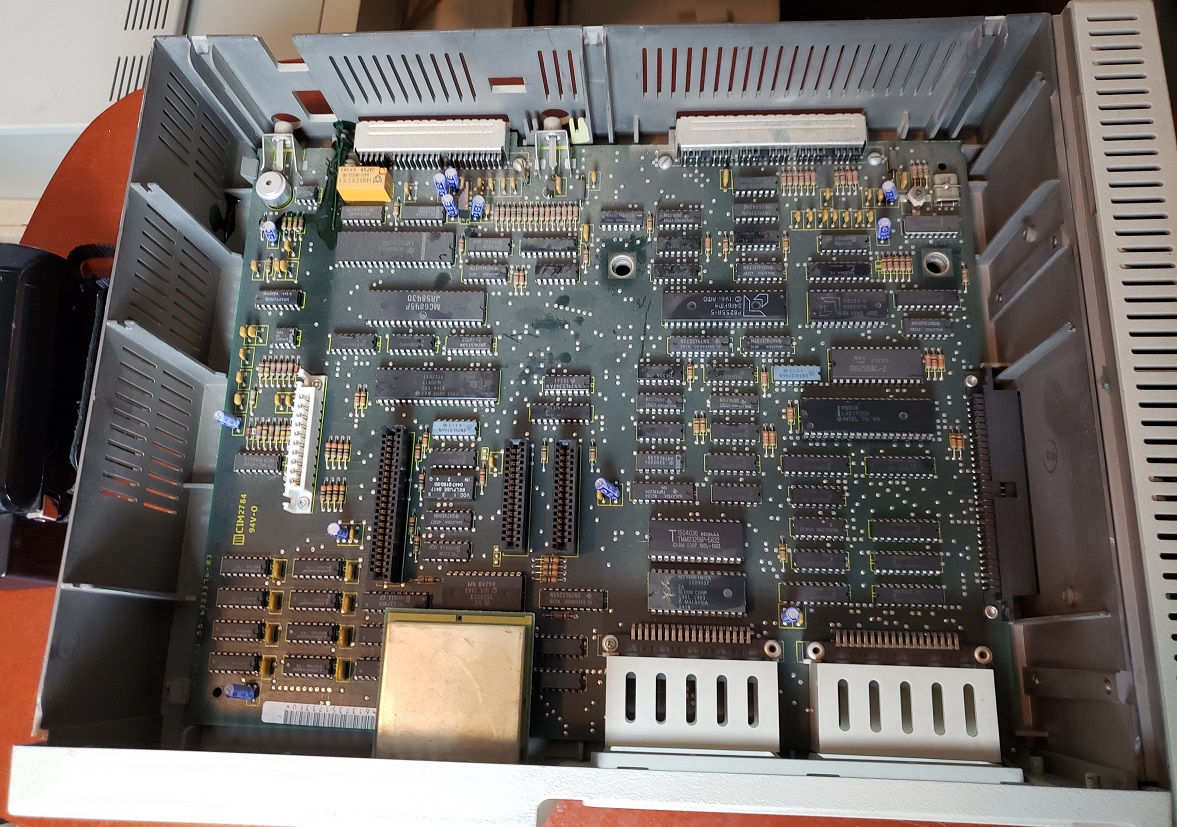
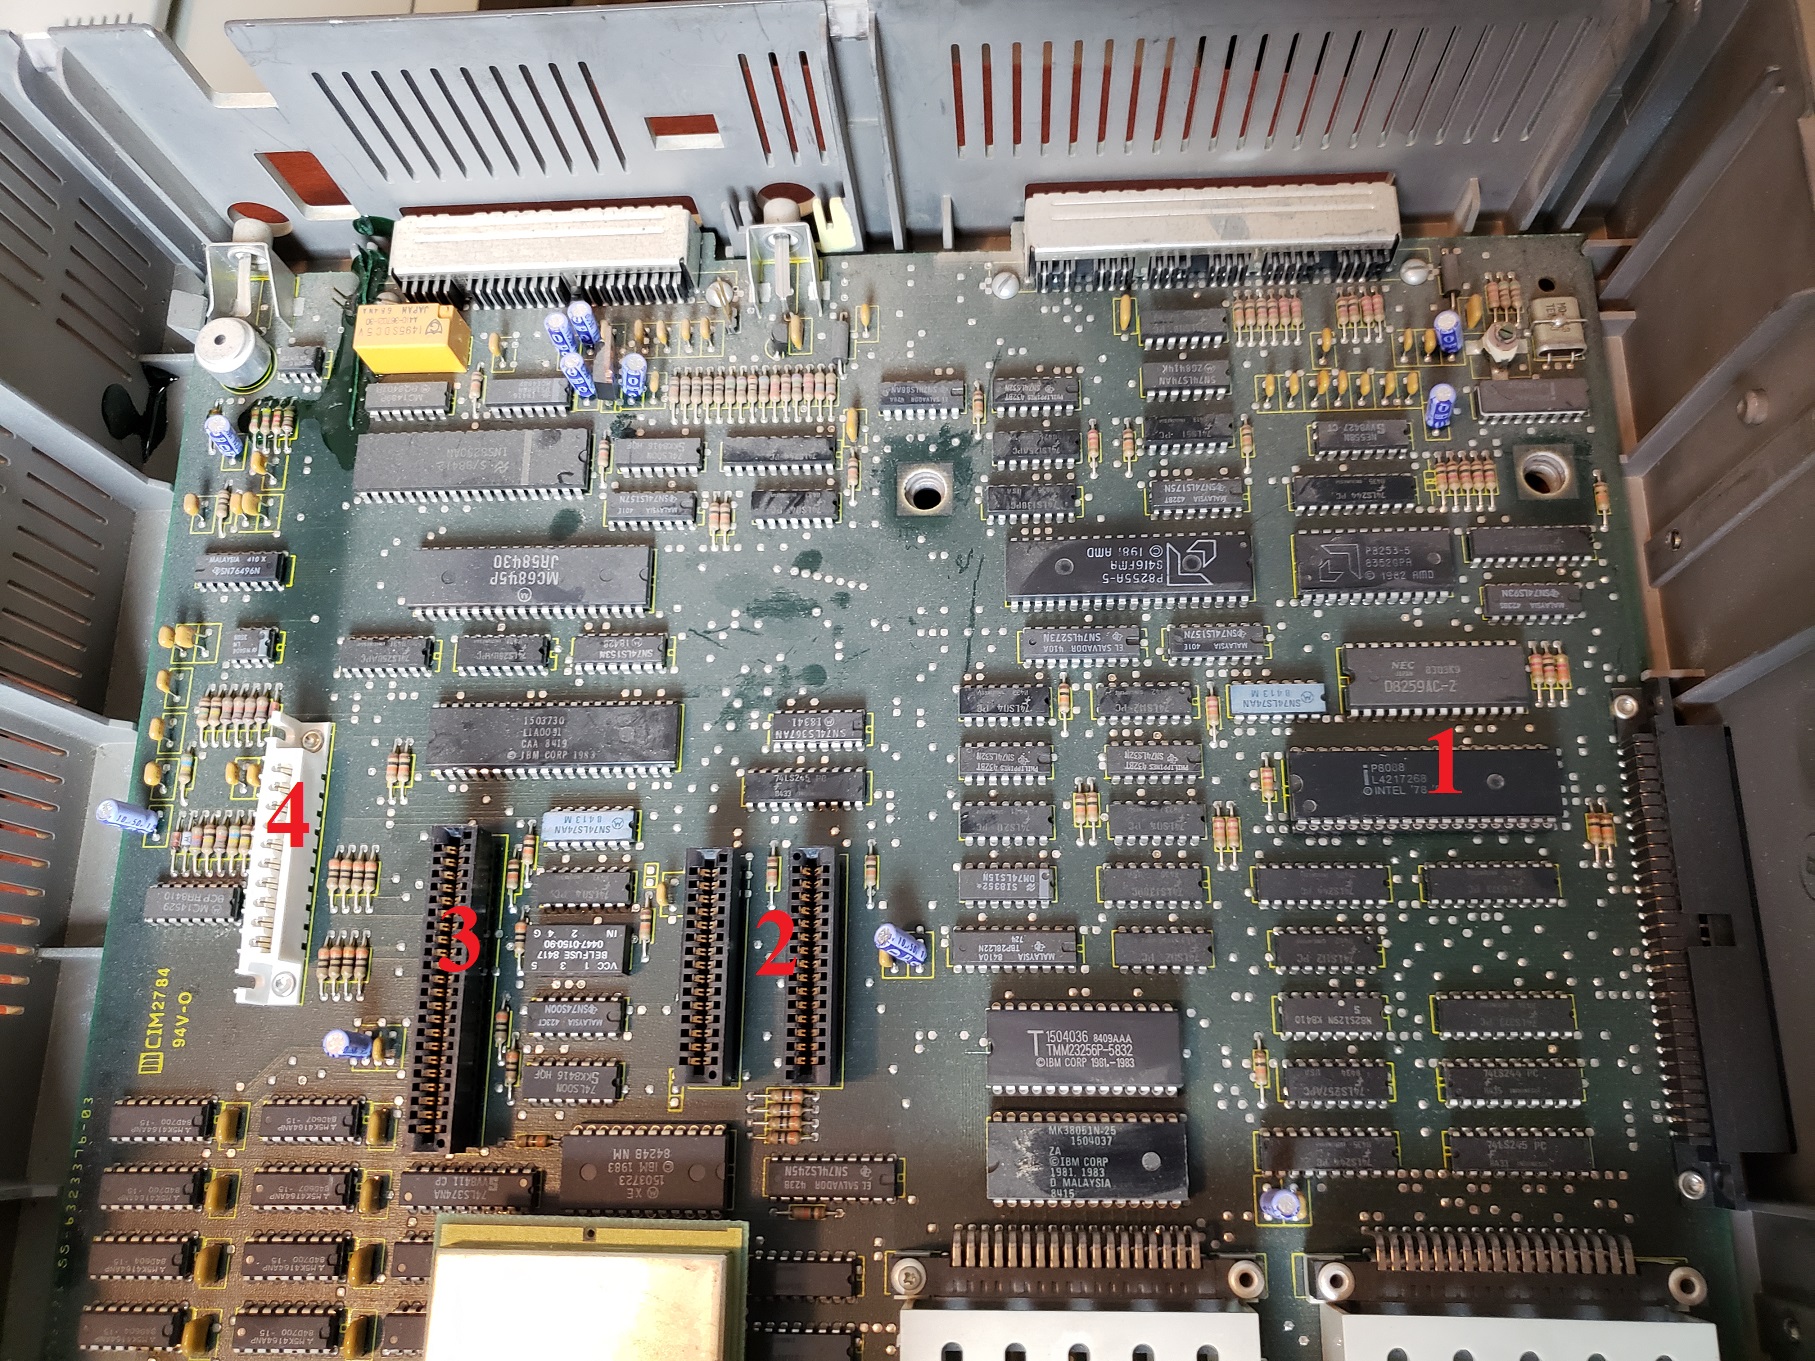
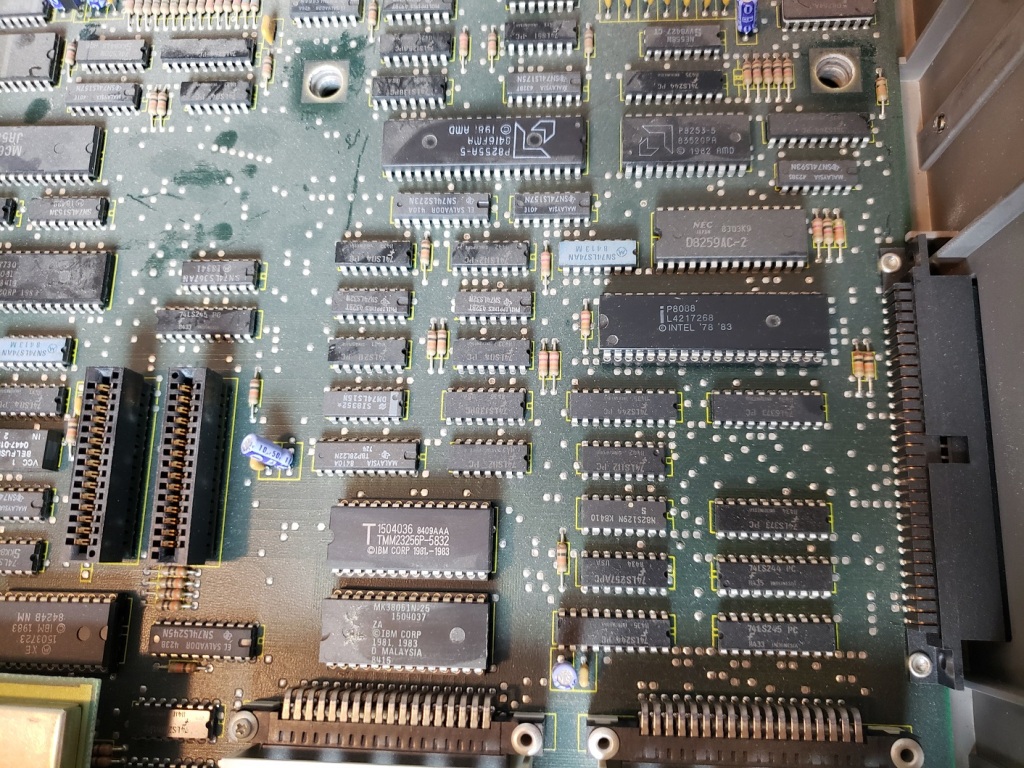
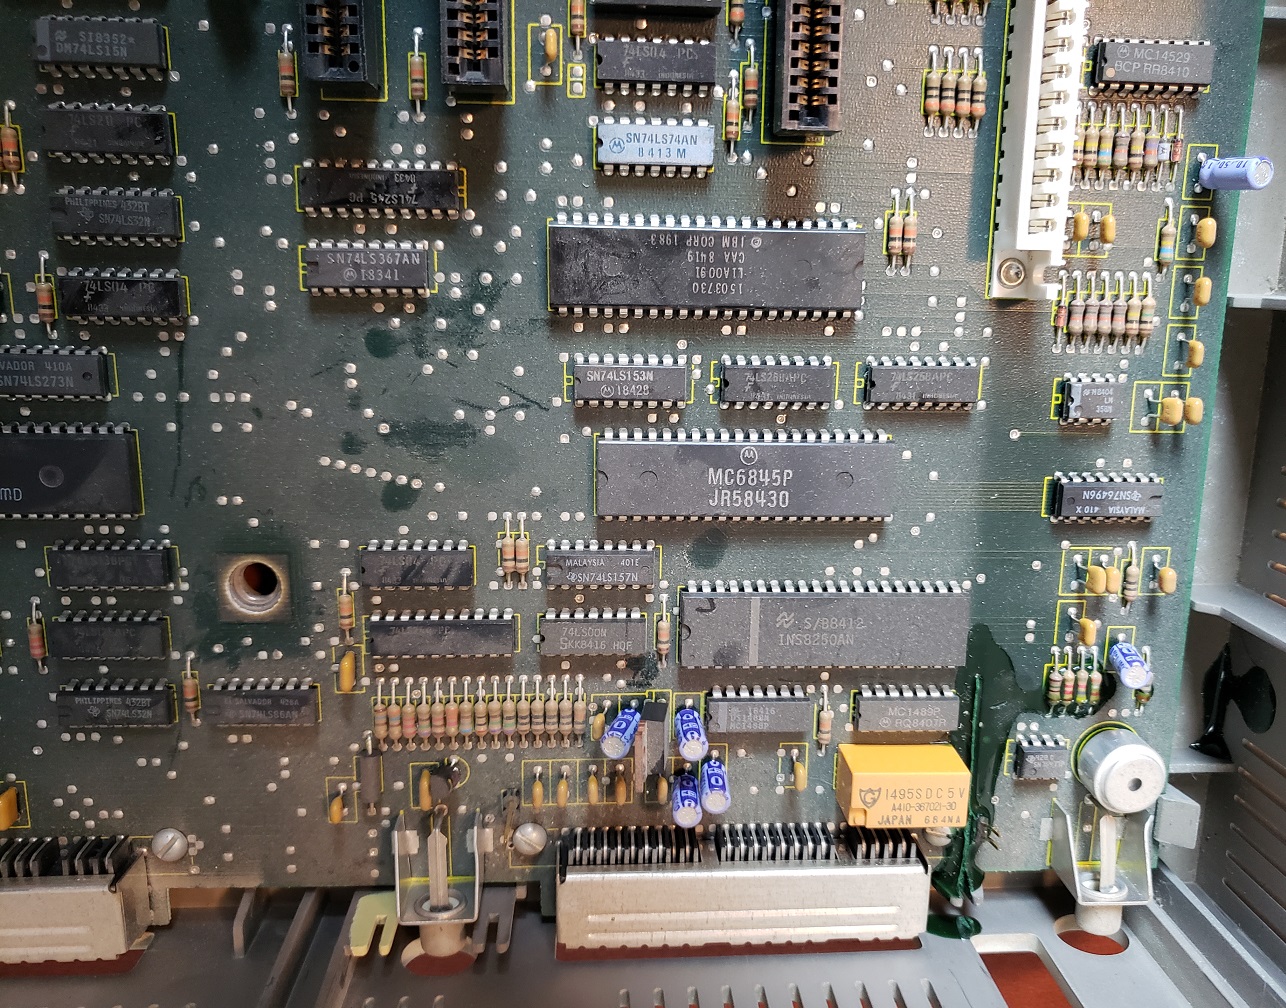
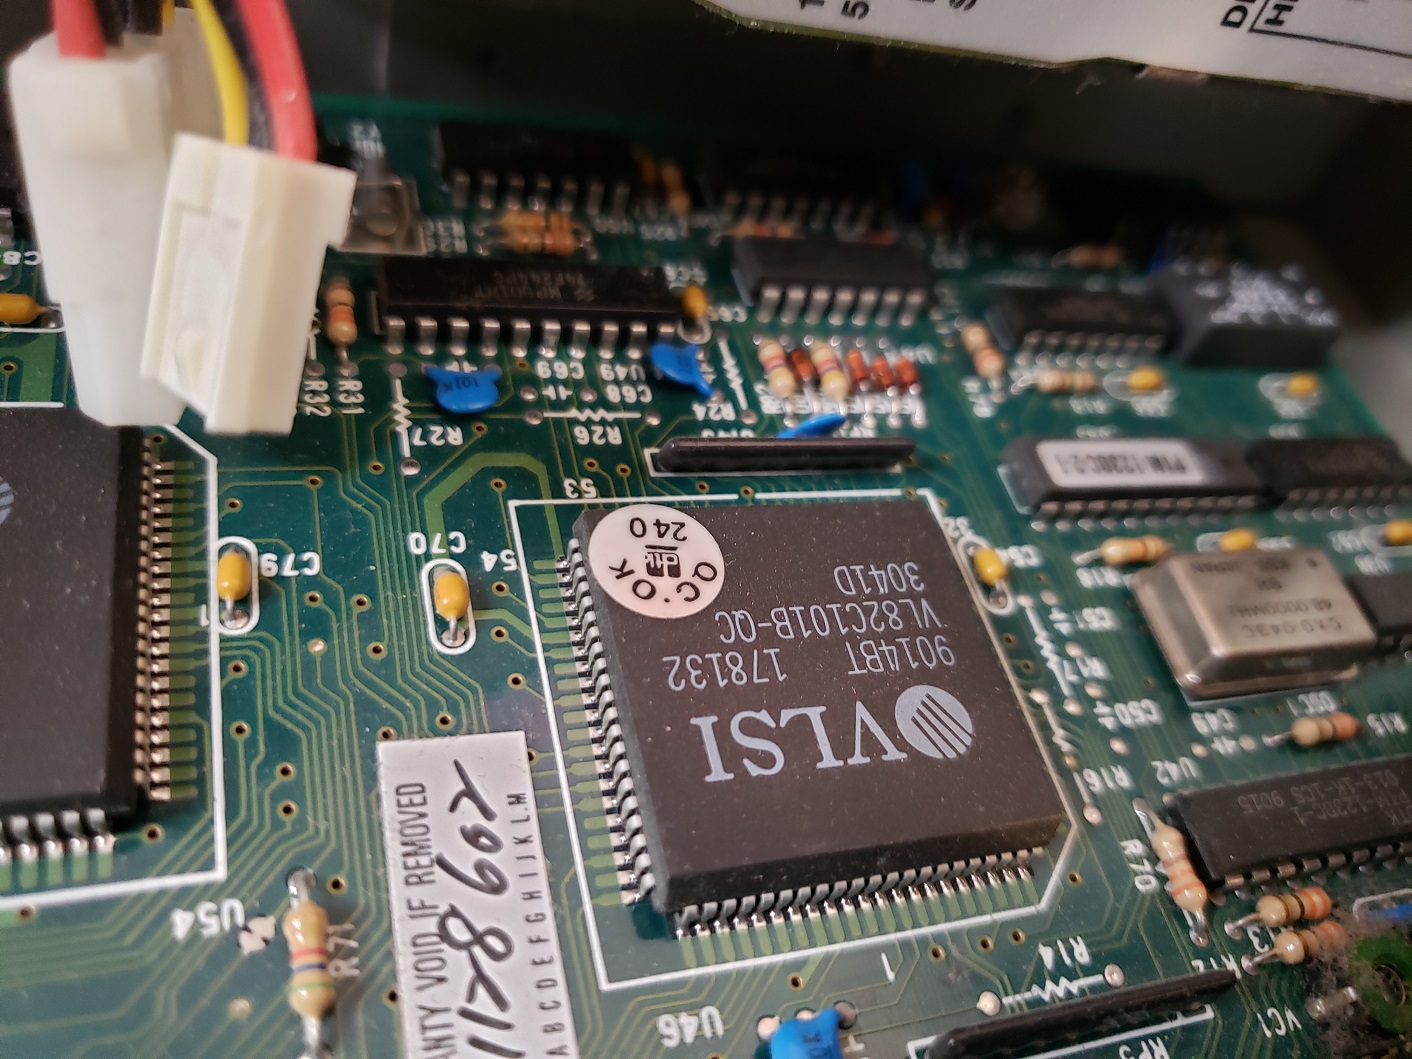
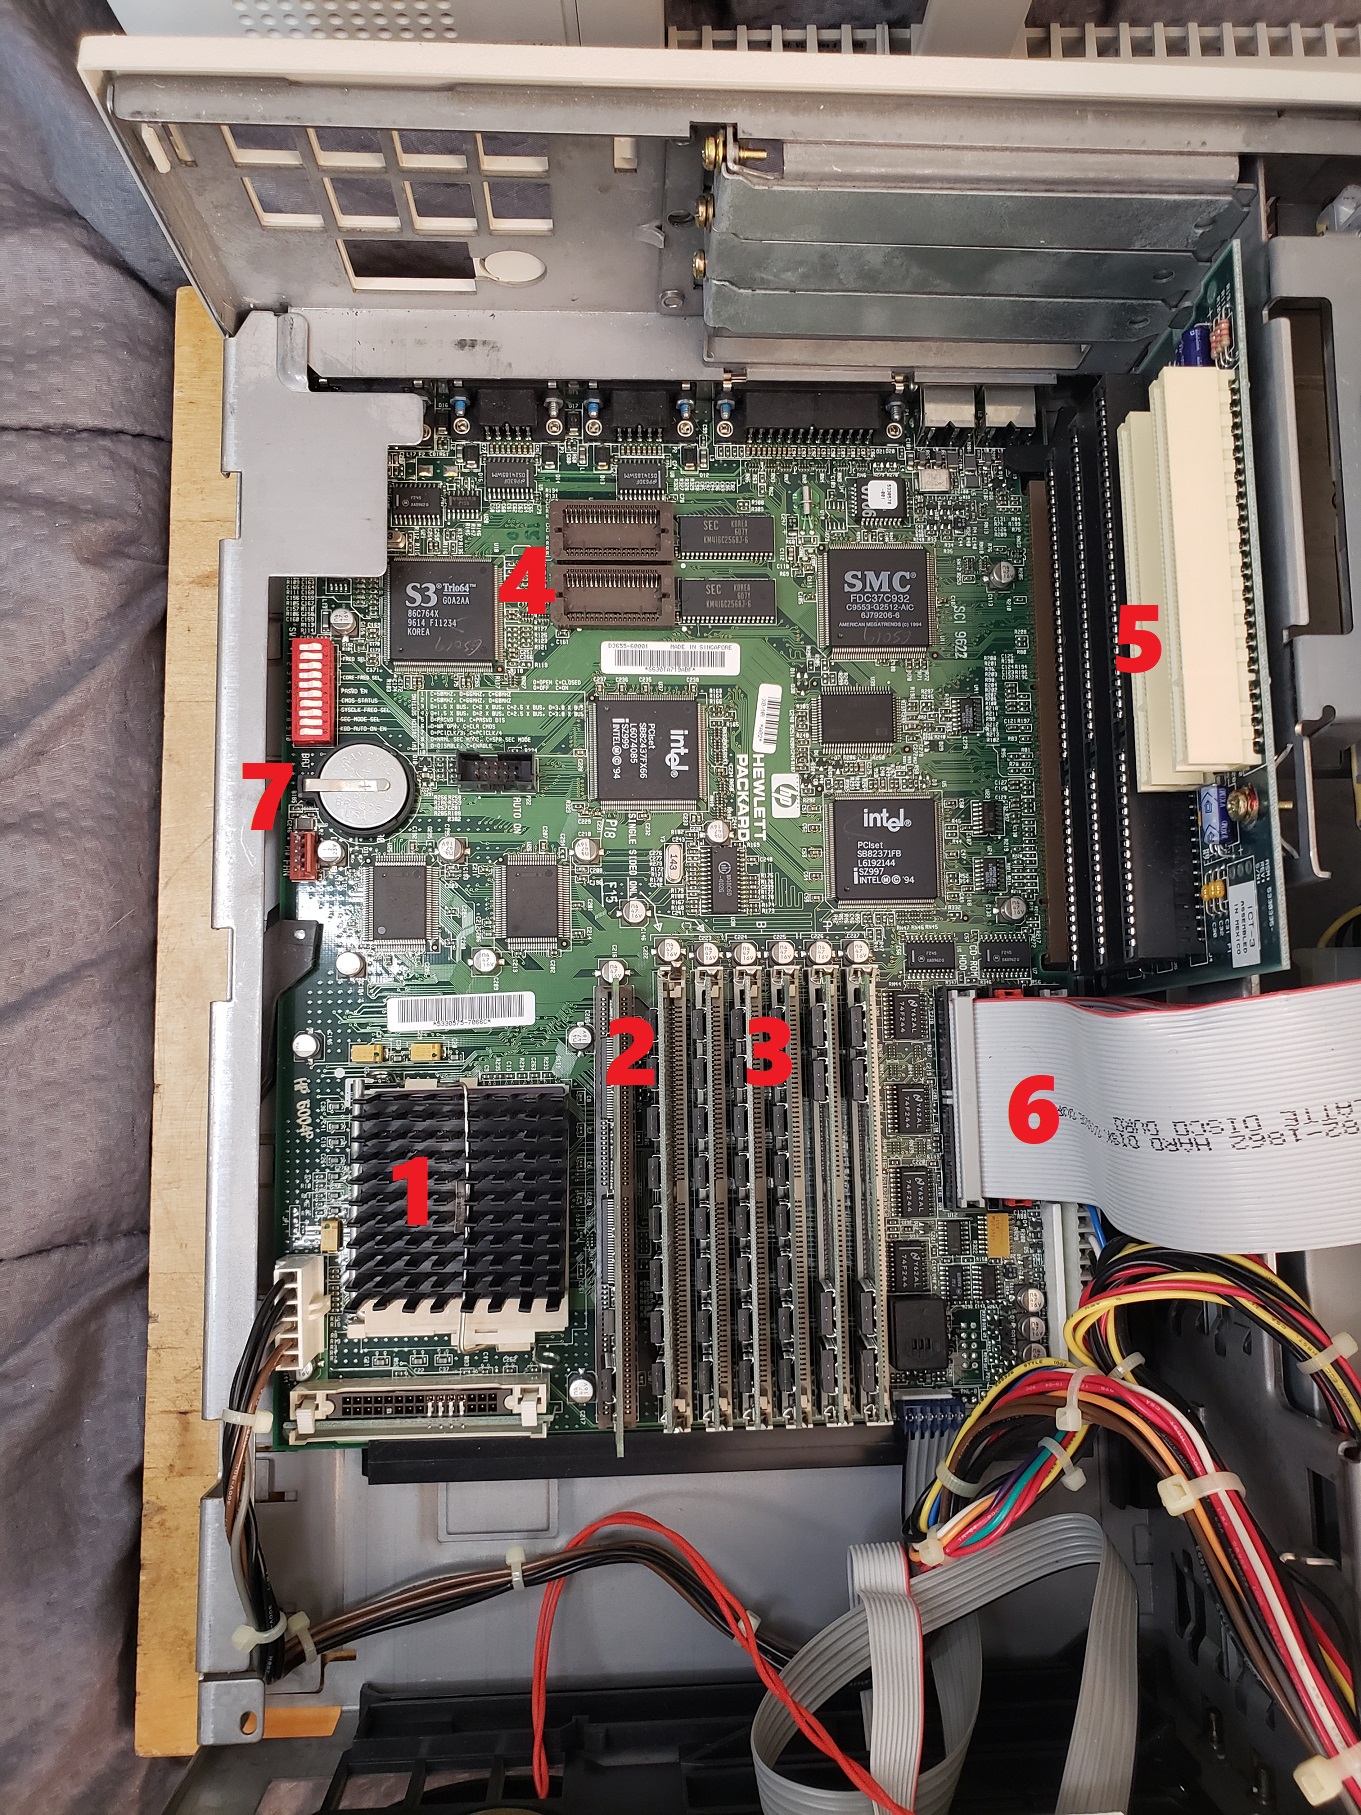
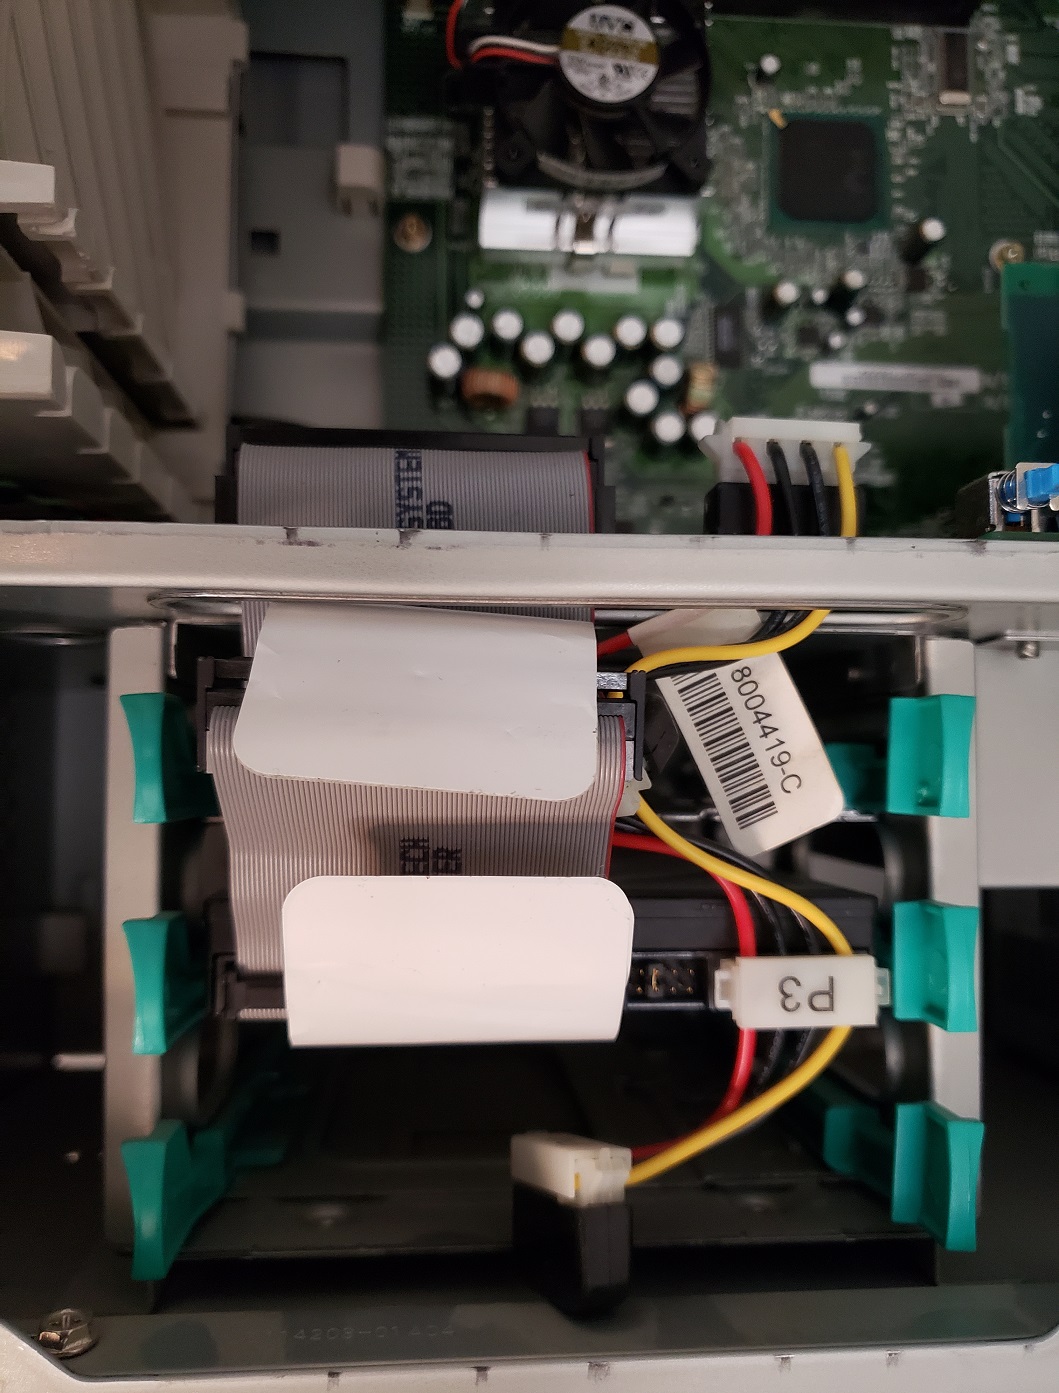
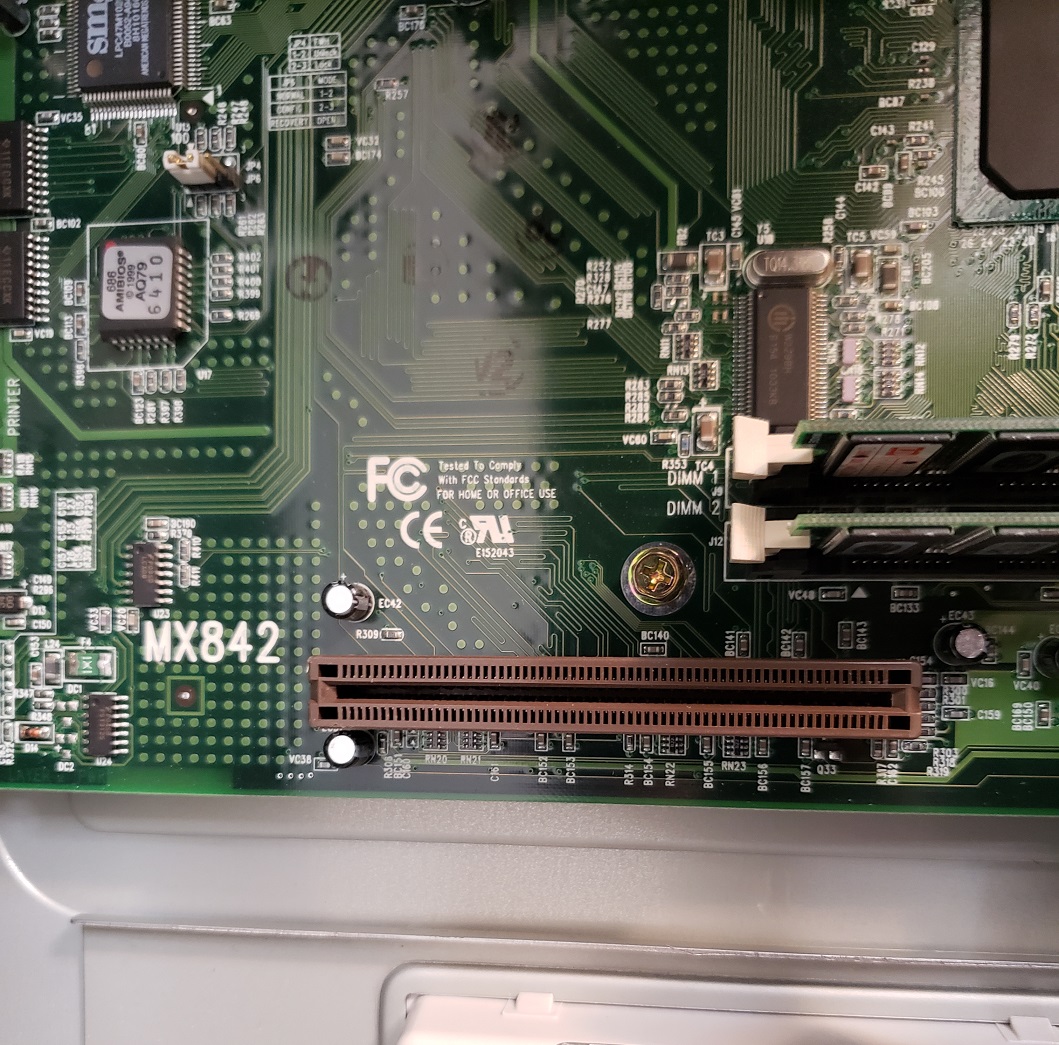
There isn’t a whole lot I’m experienced enough to point out going on inside the PCjr though there are a lot of chips. The Jr does have 64K of memory soldered onto the motherboard though without reading the chips I’m not sure where this is. I would suspect the cluster of “like” chips in the lower left side of the board is the RAM in question. In theory with memory expansion sidecarts the memory should be able to be brought up to a maximum of at least 720K. There is also no socket to add a math co-processor to the Jr though this would be expected as such a luxury would increase the cost and find little use in a computer more focused on the home and less on number crunching business or workstation tasks. The board also lacks a built-in DMA controller.
I would also like to once more bring up the enhanced video and sound capabilities of the PCjr which are also present in the Tandy 1000 line of home computers. Unfortunately due to how certain things are implemented differently on the PCjr and Tandy 1000 many games that take advantage of the 3-channel sound or 16-color video on the Tandy 1000 will not work or will display incorrectly on the PCjr. There is a cheap modification that is available that will make your PCjr much more compatible with Tandy 16-color mode.
The mod chip itself is only about $10 but it does require desoldering a chip from the motherboard so depending on your skill level this may be a deal breaker. You can find the required part here if you are interested in the modification.
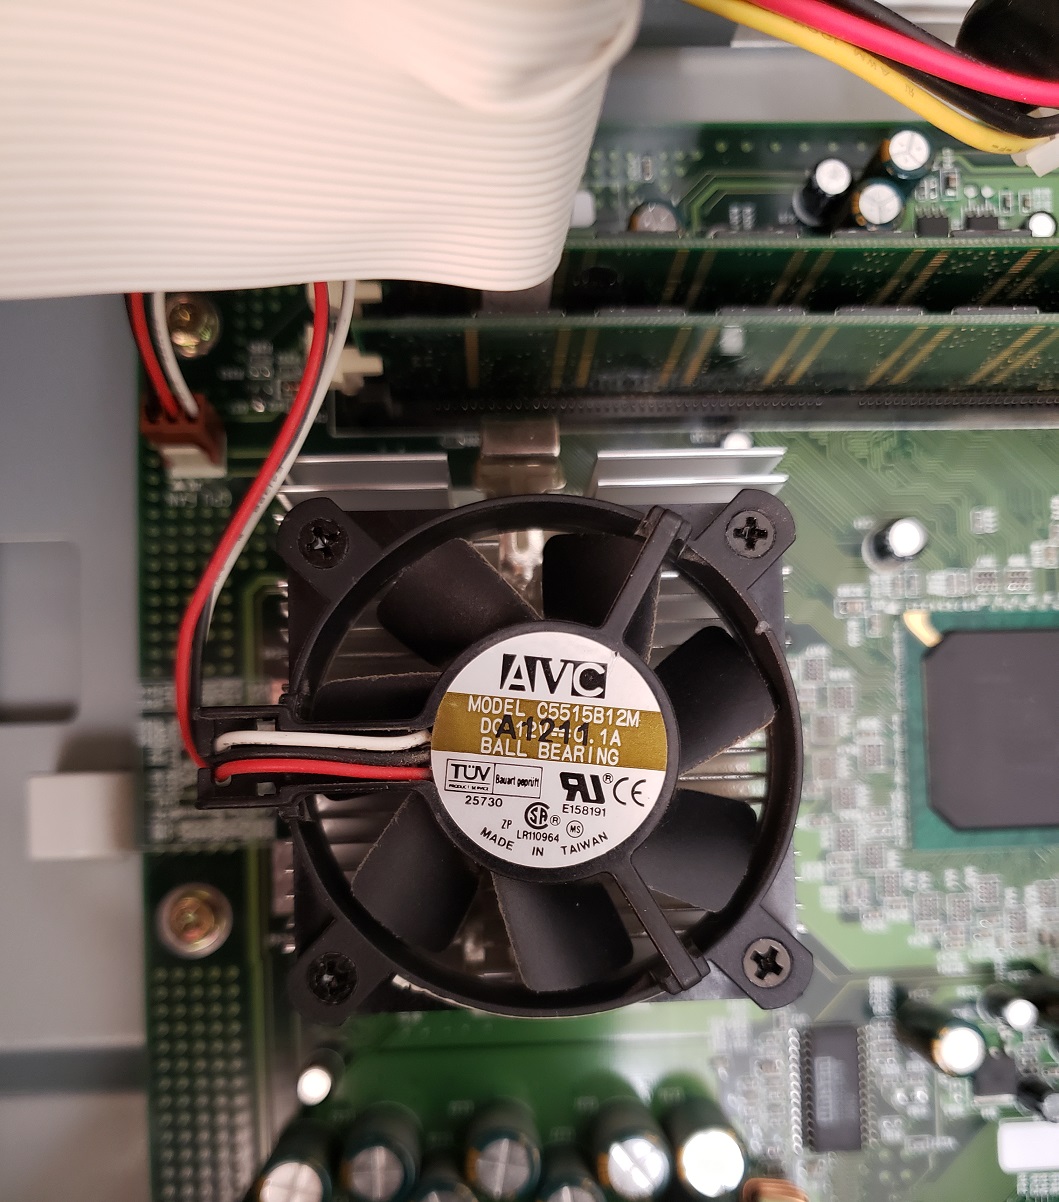
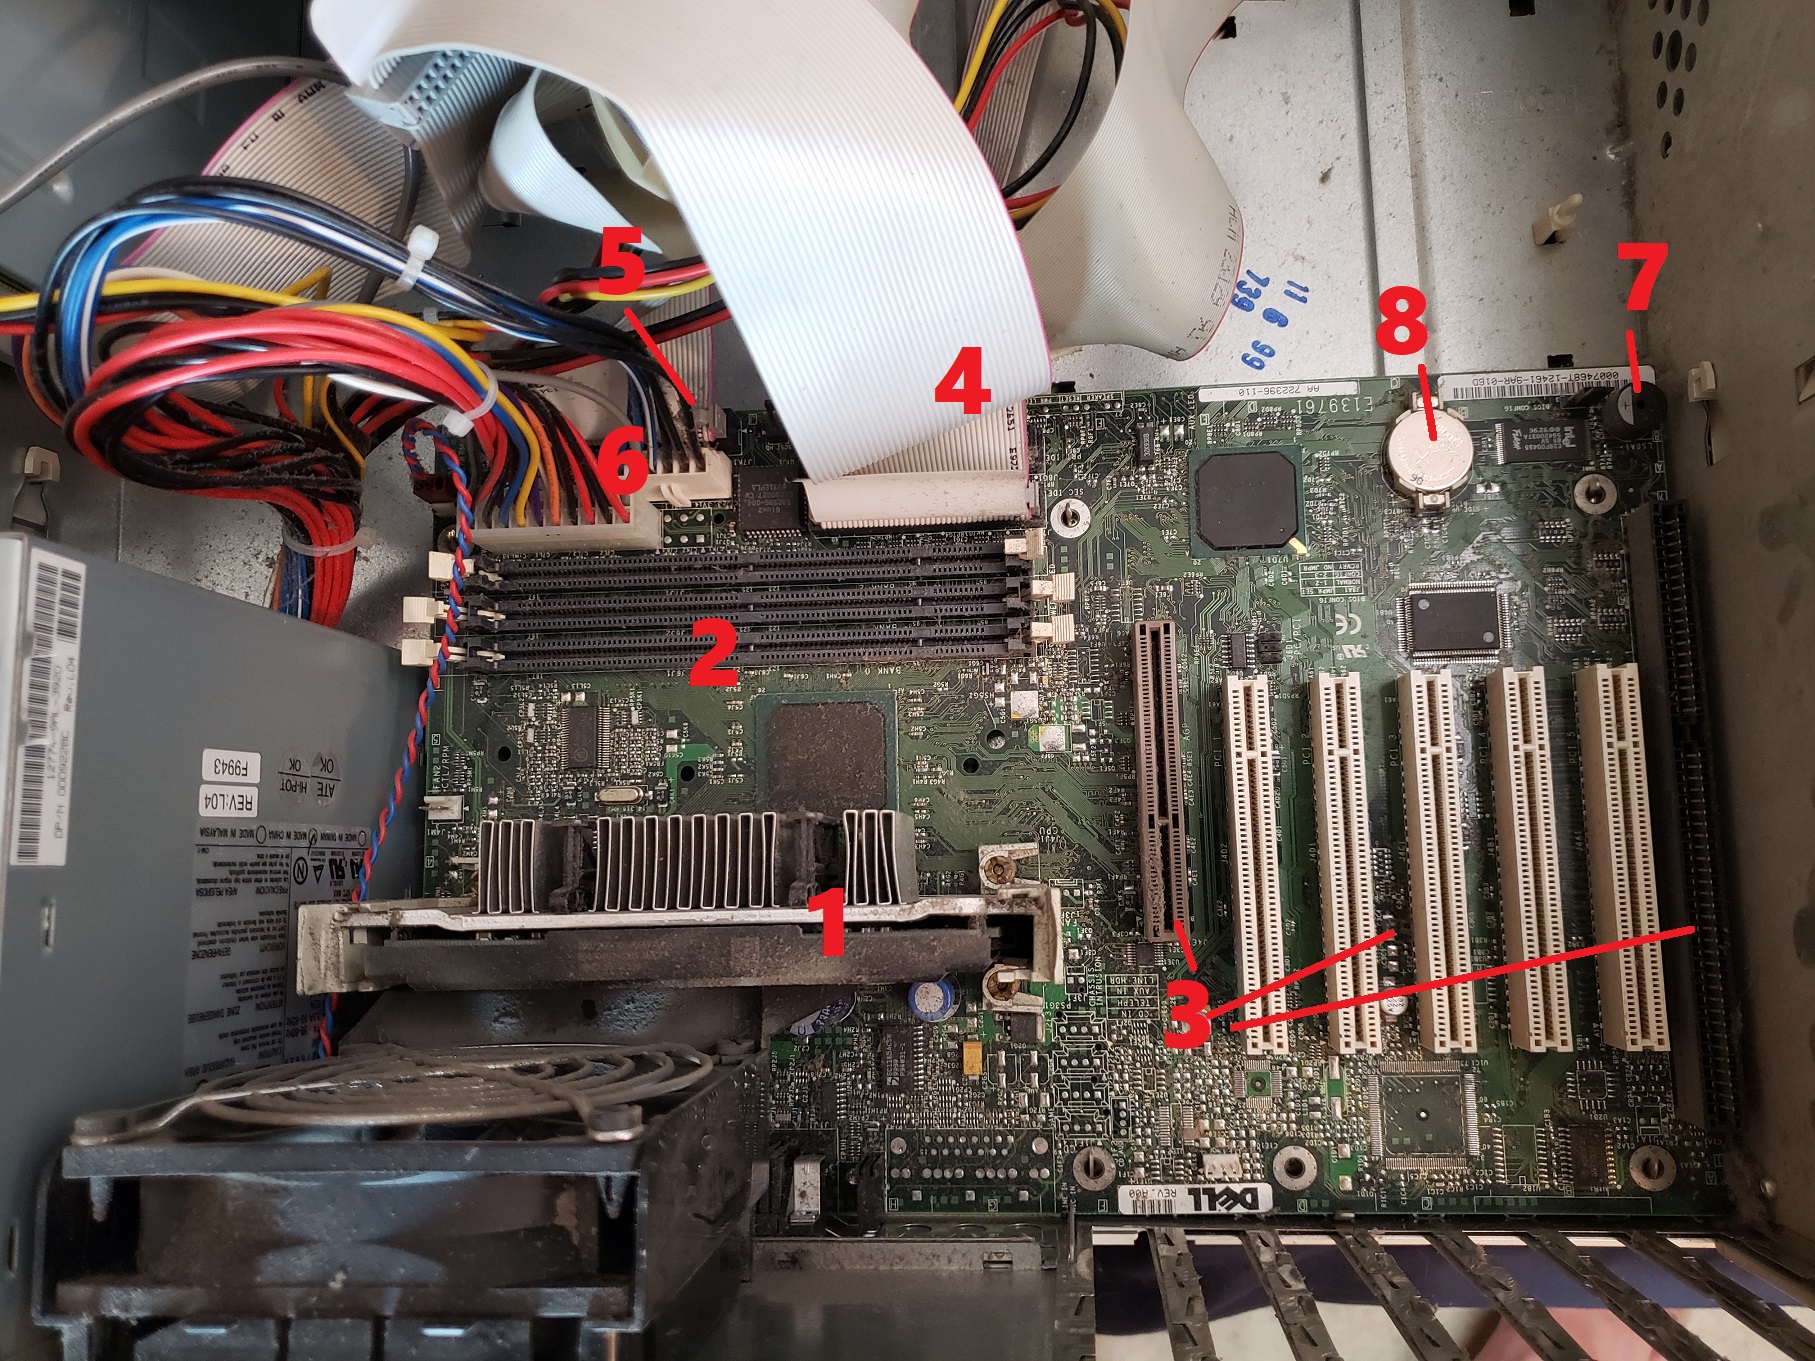
1 ) CPU – Like the big brother 5150 the PCjr uses the 4.77MHz 8088 CPU. Most models I’ve come across have the CPU socketed which means it can be easily replaced with an NEC V20 for a small performance boost though later models had the CPU soldered to the board to cut costs.
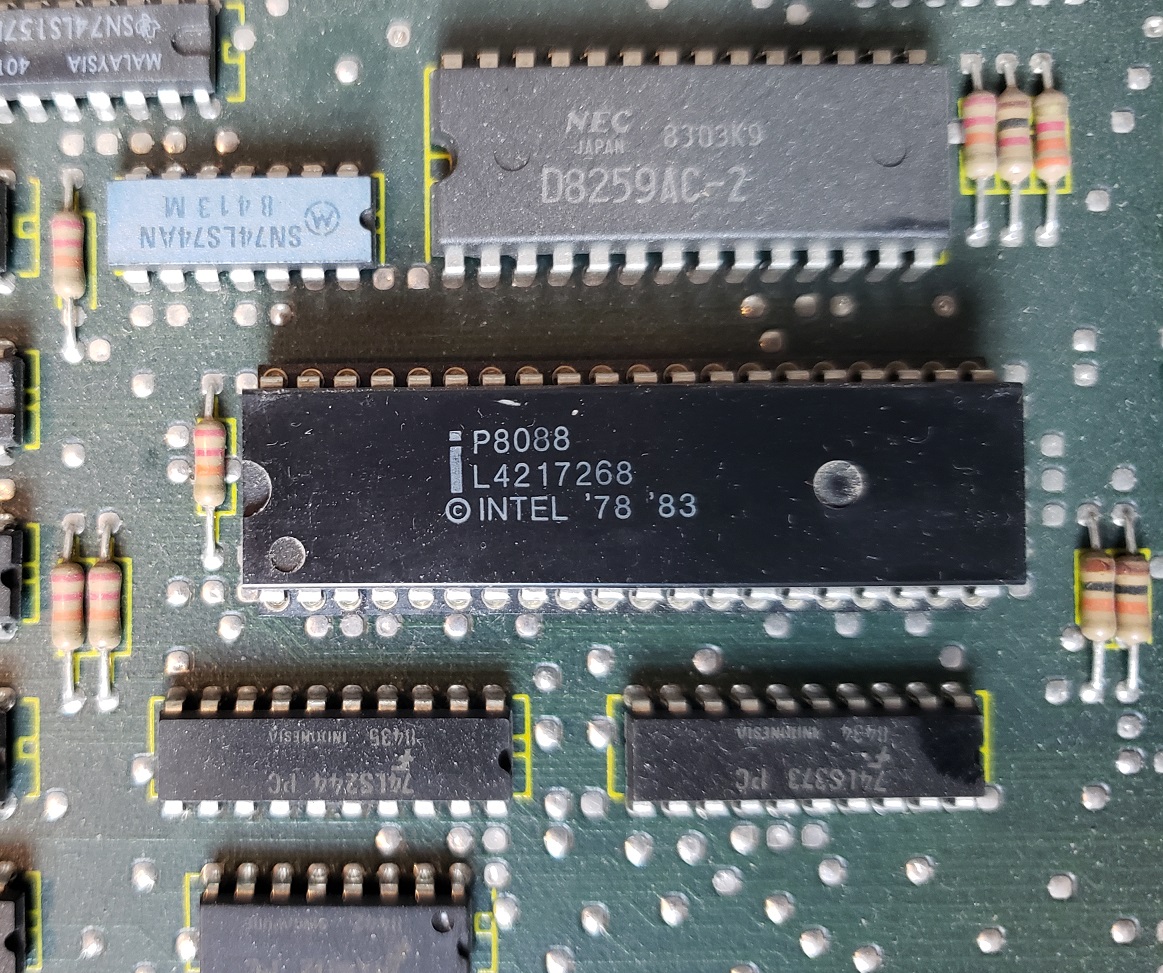
In another case of “unfortunately” the video memory and system memory in the PCjr are shared in such a way that it slows down the 8088 CPU resulting in a CPU that runs at a speed more like 3.57MHz rather than 4.77MHz. Another source I read reported the CPU running 2.6 times slower than an 8088 in a 5150. Installing an NEC V20 may help offset this speed degradation. I have also read that this performance hit only affects programs running in the first 128K of memory and when running in any memory above 128K there is no performance hit.
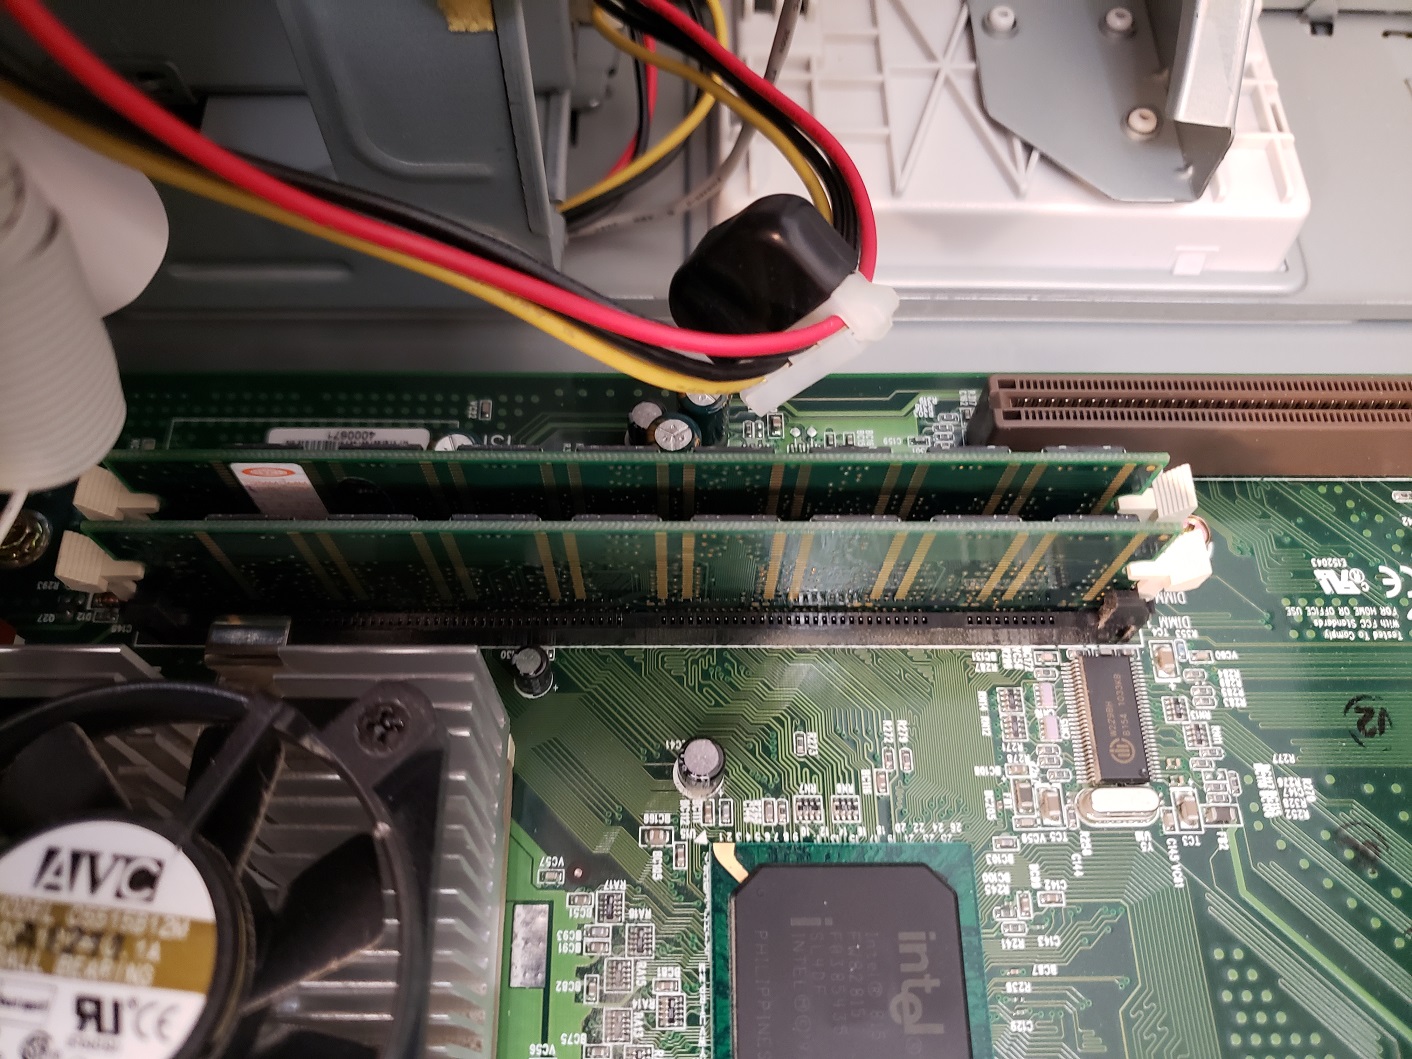
2 ) Floppy controller and Modem slots – These small expansion slots, as far as I can tell, only support very specific cards with the slot closest to the right supporting the floppy drive controller card and the slot to the left of it supporting the optional modem card.
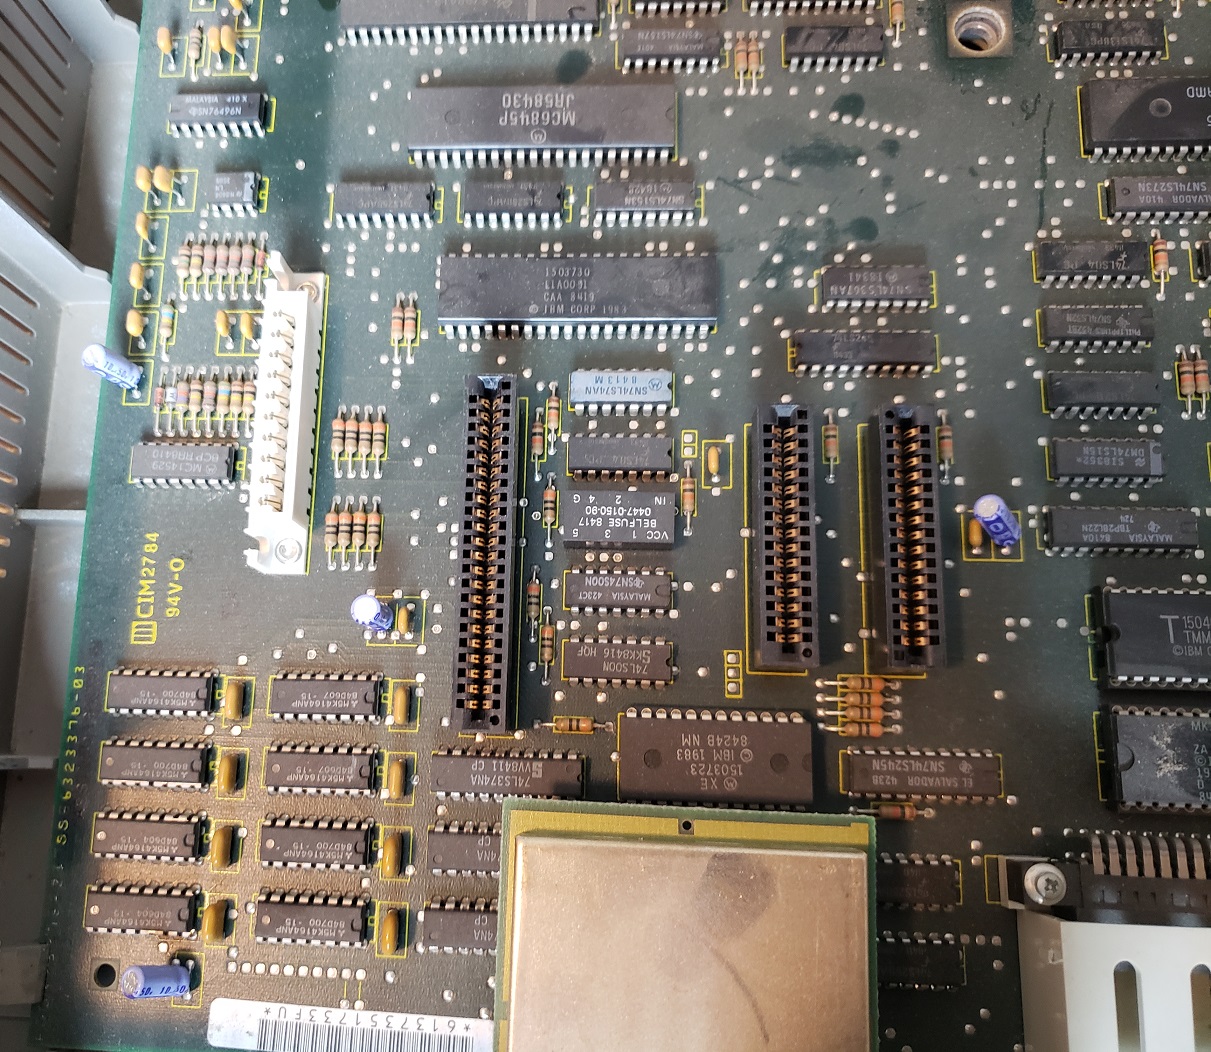
3 ) This is the special memory slot. As far as I can tell this slot only supports one card which is the official IBM 64K memory expansion card.
4 ) Power supply slot for connecting the internal power supply module.
Before wrapping things up I wanted to take a look at one final peripheral for the PCjr that I have in my possession.
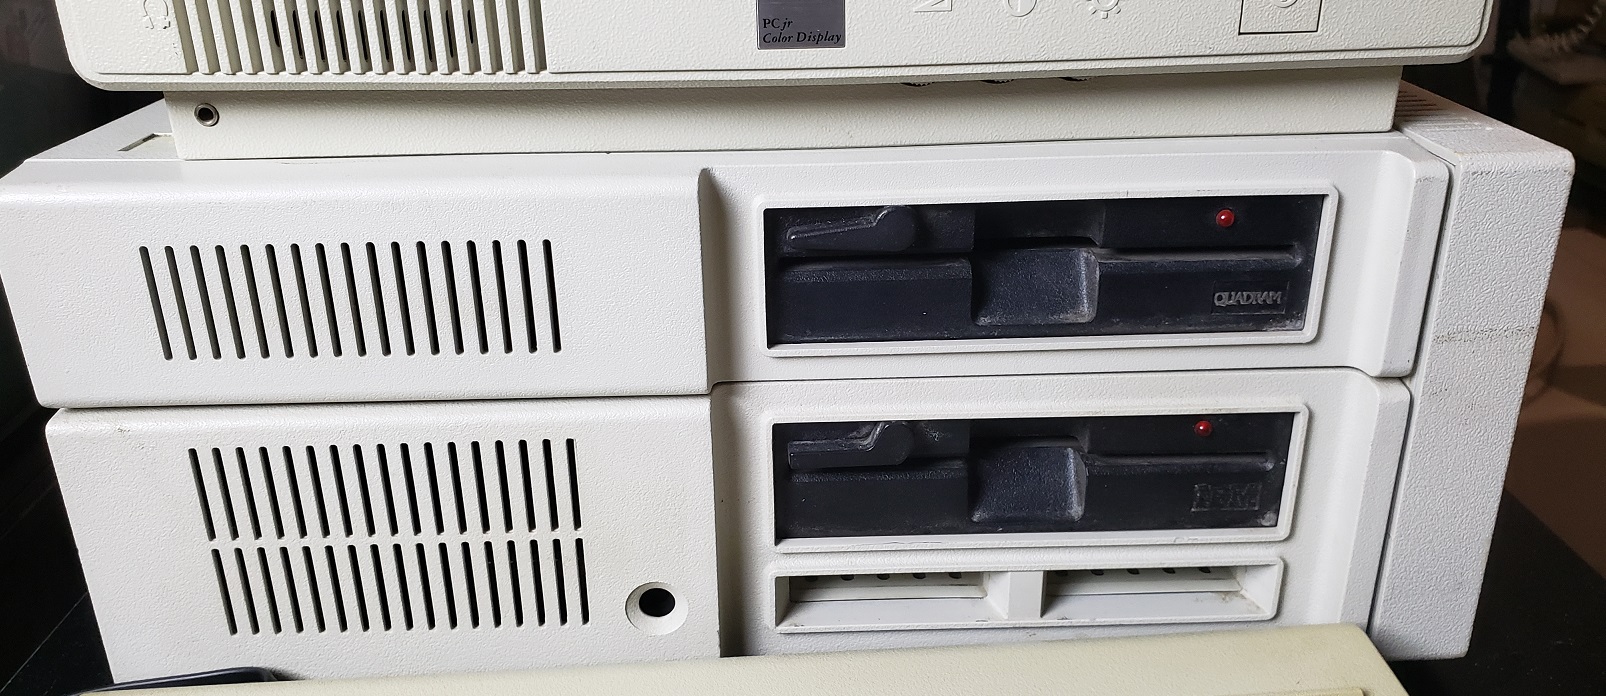
This is the Quadram expansion unit and it adds more memory (I believe 384k) as well as a much-desired second floppy drive.
You will require a second power adaptor to power this attachment. I could not get mine to function and no matter what I attempted would get a memory error on boot and zero activity from the floppy drive. I’ve been told that breaks in the solder connection on the required sidecart are pretty common due to flexing and overtightening the attachment screws and I suspect mine is damaged beyond my ability to repair myself.
The IBM PCjr certainly is unique and a cool-looking little machine. I can definitely see its popularity with IBM collectors. I do have to say in no small terms that the IBM PCjr sucks…..a lot. Remember at the beginning of the article when I said IBM made an IBM PC compatible that wasn’t really PC compatible? I wasn’t lying. Due to how various things were implemented in the PCjr, compatibility with DOS and DOS games and applications is spotty. For instance, I wasn’t able to get my Jr to boot into my DOS 3.3 floppy and “see” the full 640K of memory until I ran a program called PCjrconfig and used it to patch and modify my DOS disk. Before running this program and essentially patching the disk my Jr could only utilize 128K under DOS which is very limiting as far as what games you can play. Even after patching DOS, I ran into several games that just would not play or would display incorrectly even in 4-color CGA mode. Games like Rogue wouldn’t even start and Paratrooper and Airborne Ranger gave various graphical glitches. Even running the benchmark program MIPs gave horrible visual glitches, though I’ve seen it run on a PCjr before so perhaps it requires a specific version. The newer game Planet X3 has a PCjr 16-color mode and it ran and looked fine although for whatever reason it had no sound.
Some games that did run correctly were Project Neptune in CGA mode, Thexder which ran fine with enhanced graphics and sound and Microsoft Flight Simulator which directly supports the IBM PCjr in its 16-color mode (and also has some kind of PCjr enhanced performance option as well).
Besides a novelty or if you’re a hardcore IBM collector, I really can’t think of a good reason to use a PCjr other than it’s an interesting conversation piece when it’s all hooked up. The Tandy 1000 does everything the PCjr does but better. Its 8088 runs at the proper 4.77MHz and above. Memory is much easier to expand, even in the original 1000 model. As an improved clone of the Jr, it features the same 3-channel enhanced sound and enhanced 16-color graphics (eventually becoming known as Tandy mode graphics). Unlike the Jr the Tandy 1000 is largely compatible with standard PC ISA cards and is for most practical purposes is 100% IBM PC compatible. Do yourself a favor if you’re looking for a capable early 80s PC and pass on the PCjr and pick up any Tandy 1000 instead, you won’t regret it.

In today’s article, we will look at the quintessential Macintosh II, the Mac IIci. The Macintosh IIci went on sale in 1989, well after the original Mac II was introduced in 1987. There were also several models introduced after the IIci, some faster, though overall the IIci may be the best all-around model of the line.
The IIci as seen above came in a compact yet expandable desktop form factor which could also be turned on its side and used as a tower if needed. The four small rubber “feet” can also be relocated to the side if the user wants to orient the IIci vertically.
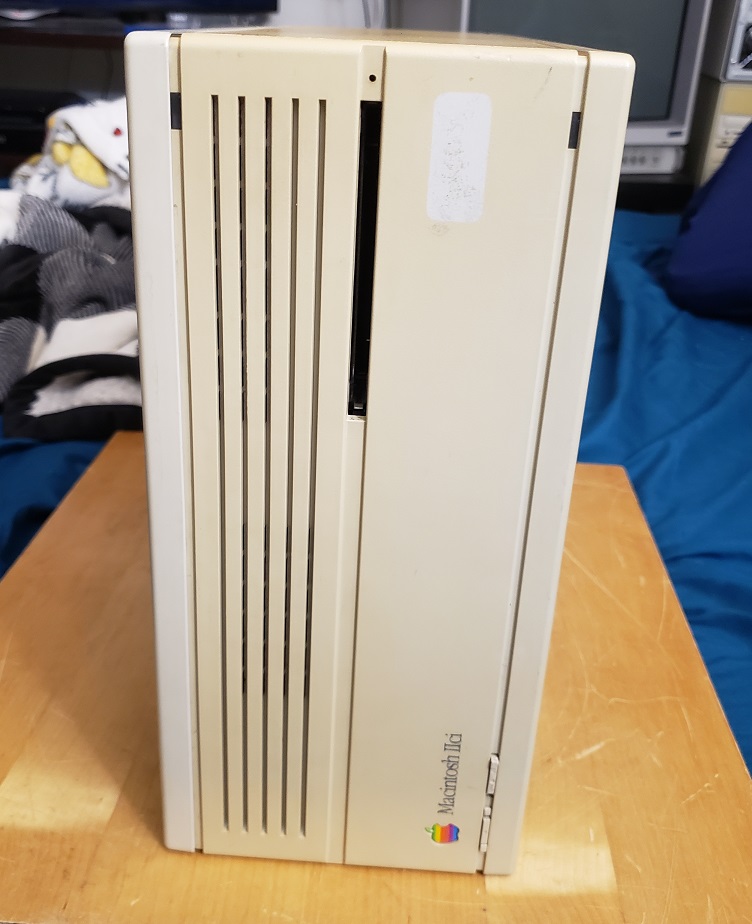
The case for the IIci used Apple’s “snow white” case design. As you can see, mine, unfortunately, is quite yellowed, except for one rectangle on the front where previously a sticker was placed. This case uses a “toolless” design as well so with few exceptions this case can be opened and disassembled without a screwdriver due to the use of plastic tabs. Thankfully unlike some models, these cases have held up fairly well though caution is still advised when opening.
The two buttons in the lower left-hand corner are reset and the interrupt switches. On the right side of the case, we have a single 1.44MB floppy drive and two LED indicator lights. The top right is for HDD activity and the bottom right LED is the power indicator light.
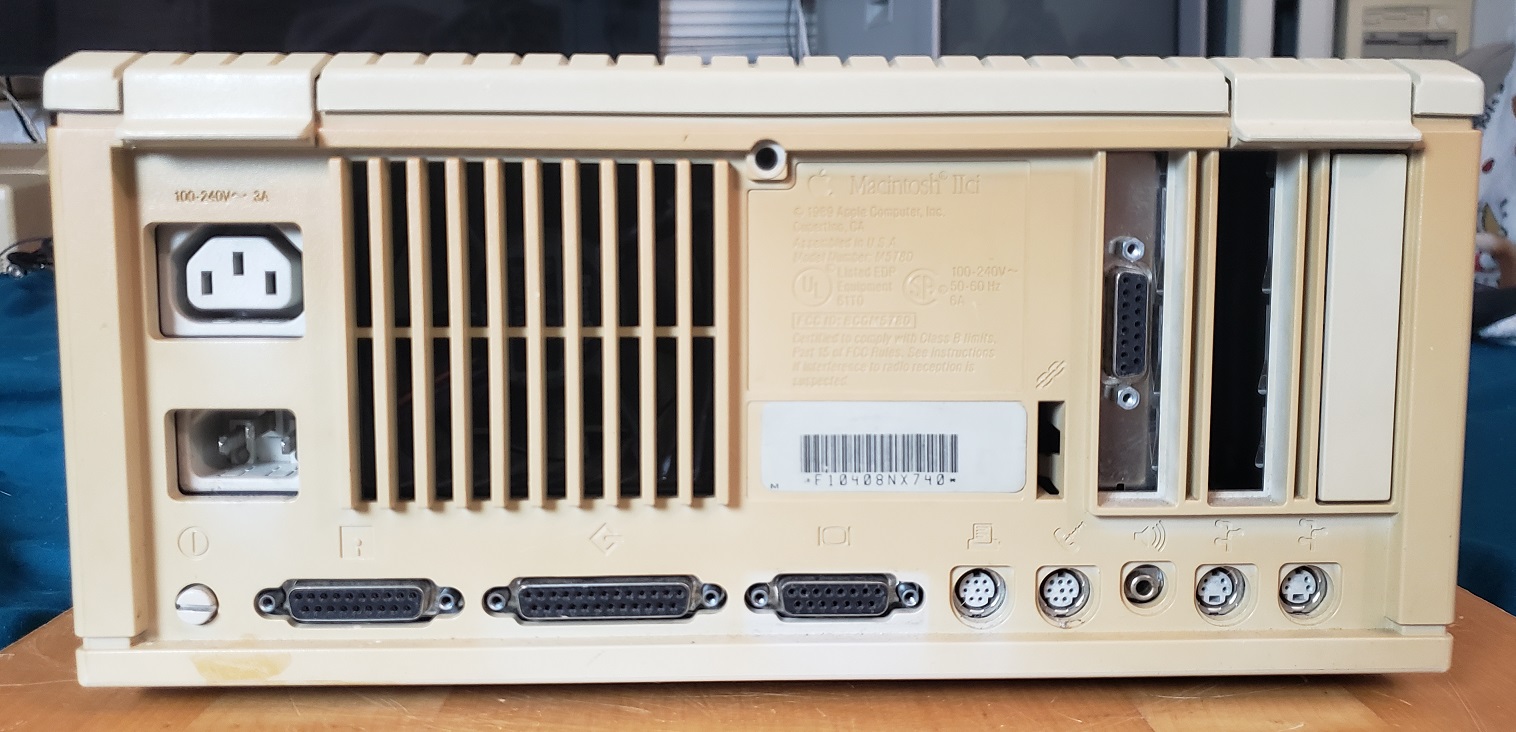
On the rear of the case if you look at the top you can see the two plastic tabs that latch the cover of the case on. On the far left we have a standard three-prong power connector as well as a power inlet above this for connecting a monitor.
Starting from the lower left side we have a power button though the IIci can also be soft powered on via a keyboard power-on key. The power button can also be depressed and turned with a screwdriver to lock it in the power-on position. to the right of this, we have an external floppy drive connector, a SCSI connector for connecting external devices such as hard drives or CD-ROM drives, etc. Next is the video port for the built-in video. The on-board video for the IIci uses a shared framebuffer meaning that the video does use a small amount (about 320k) of system memory from the first RAM bank, which can affect performance negatively under certain situations. Next are the printer and modem ports followed by a 1/8 audio jack for connecting external speakers and last we have two ADB ports for connecting things like a keyboard and mouse.
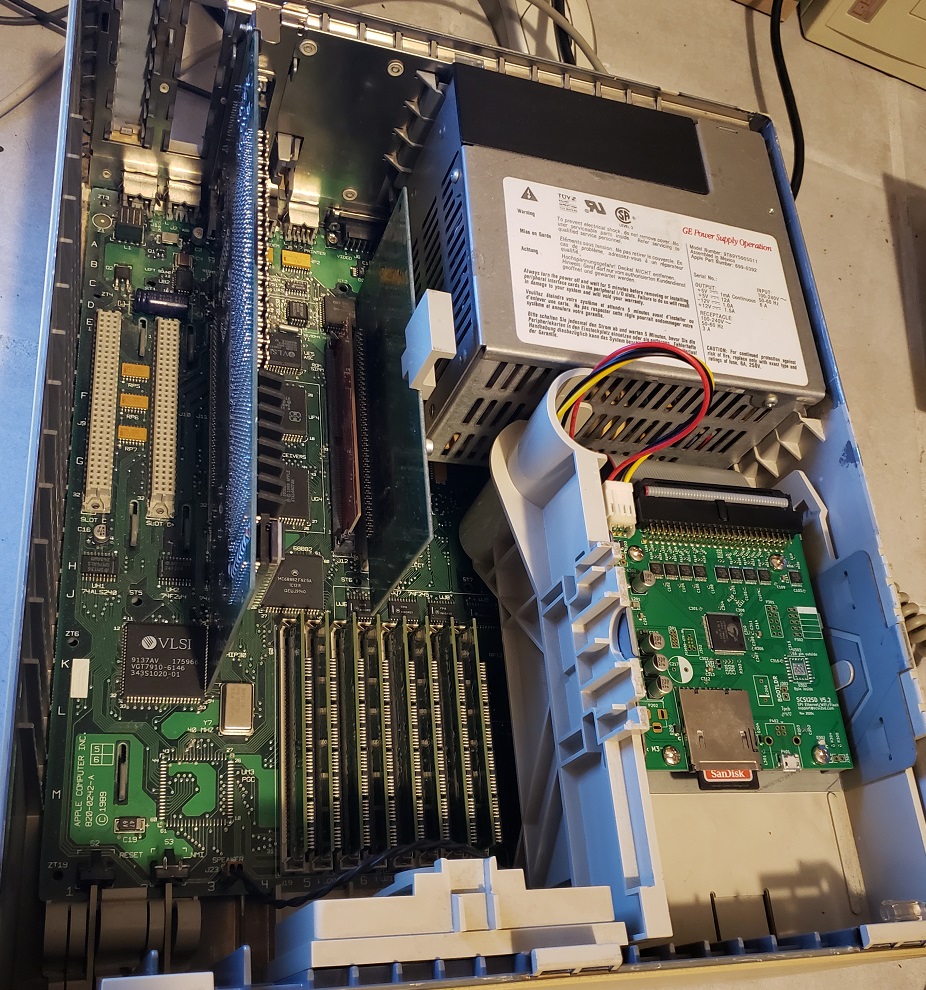
Next, let’s take the lid off and take a look inside.
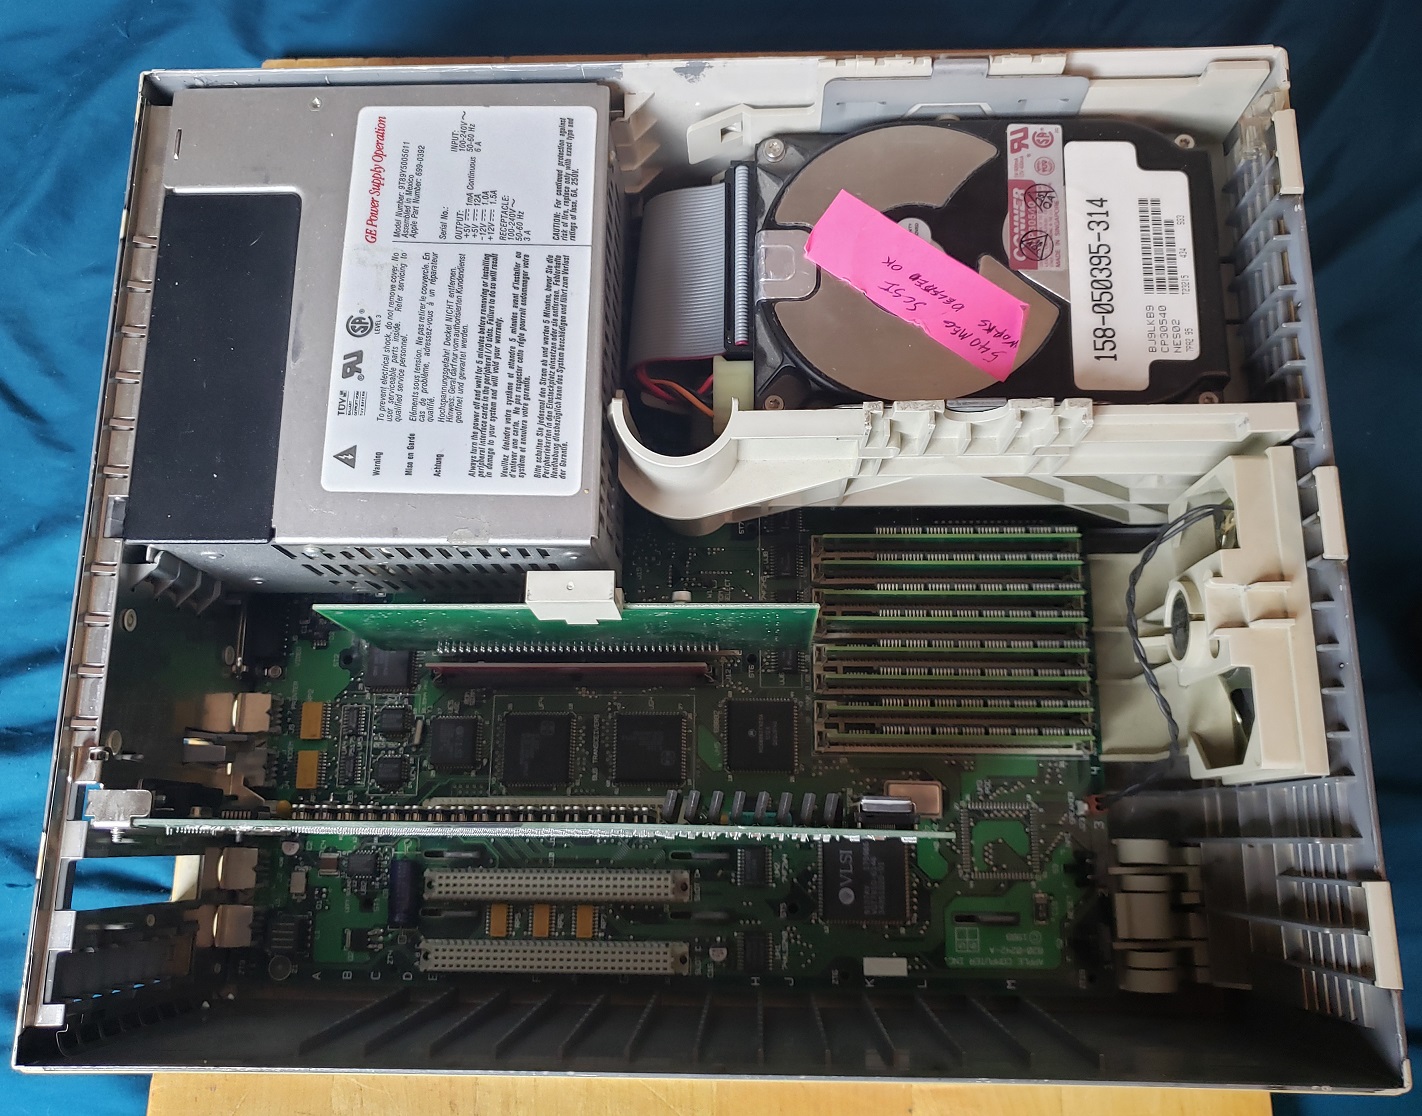
we can start in the upper right-hand corner with the power supply.
Depending on the maker of the PSU the reliability can vary. Most Macintoshs I’ve come across from this era are either dead from leaked capacitors or dead power supplies. The GE power supply in this Macintosh IIci is still functional.
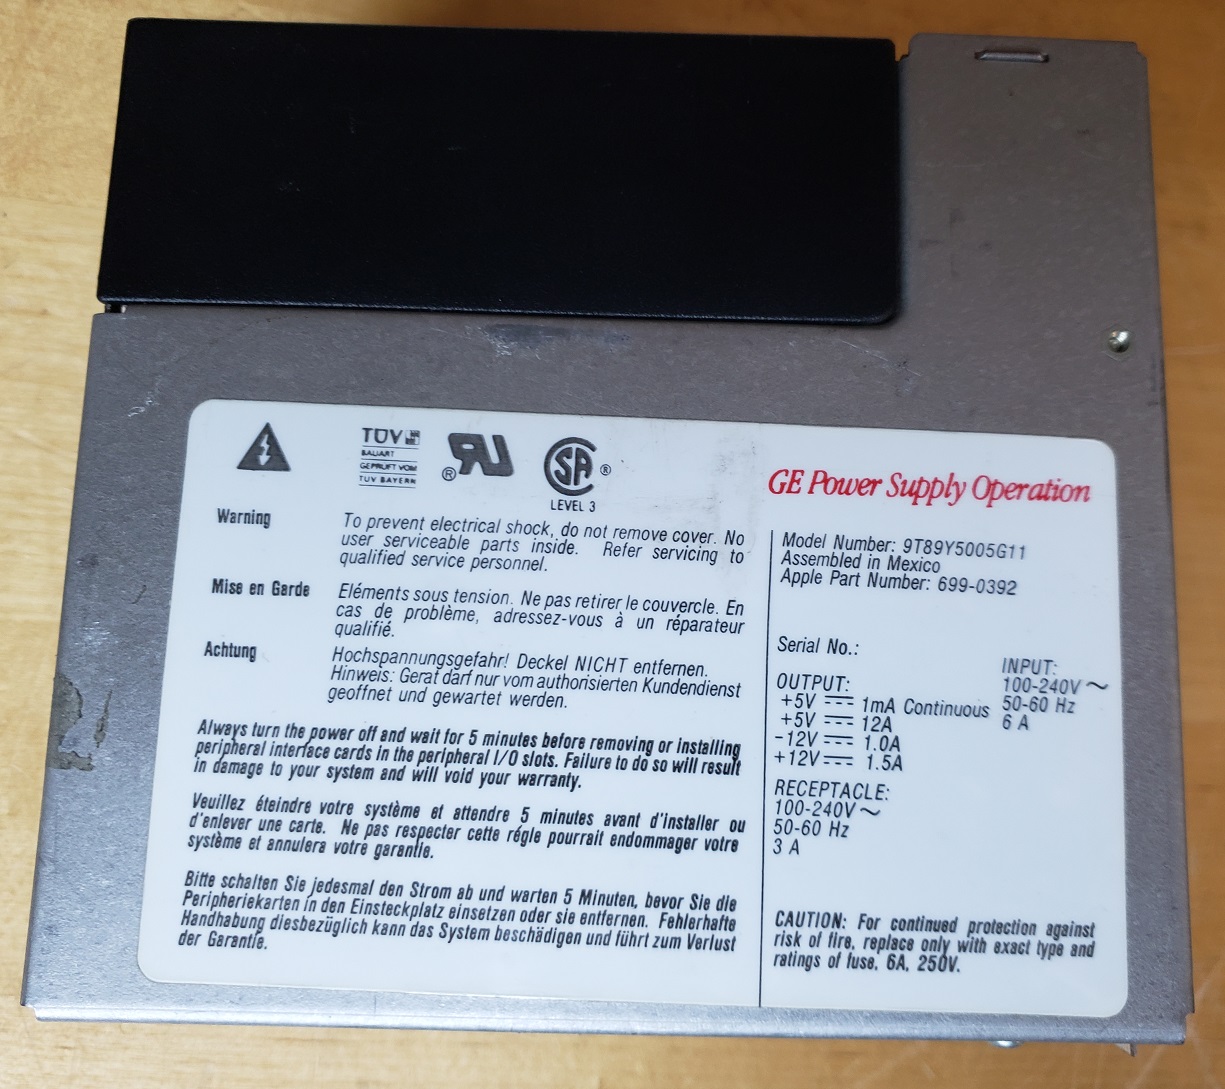
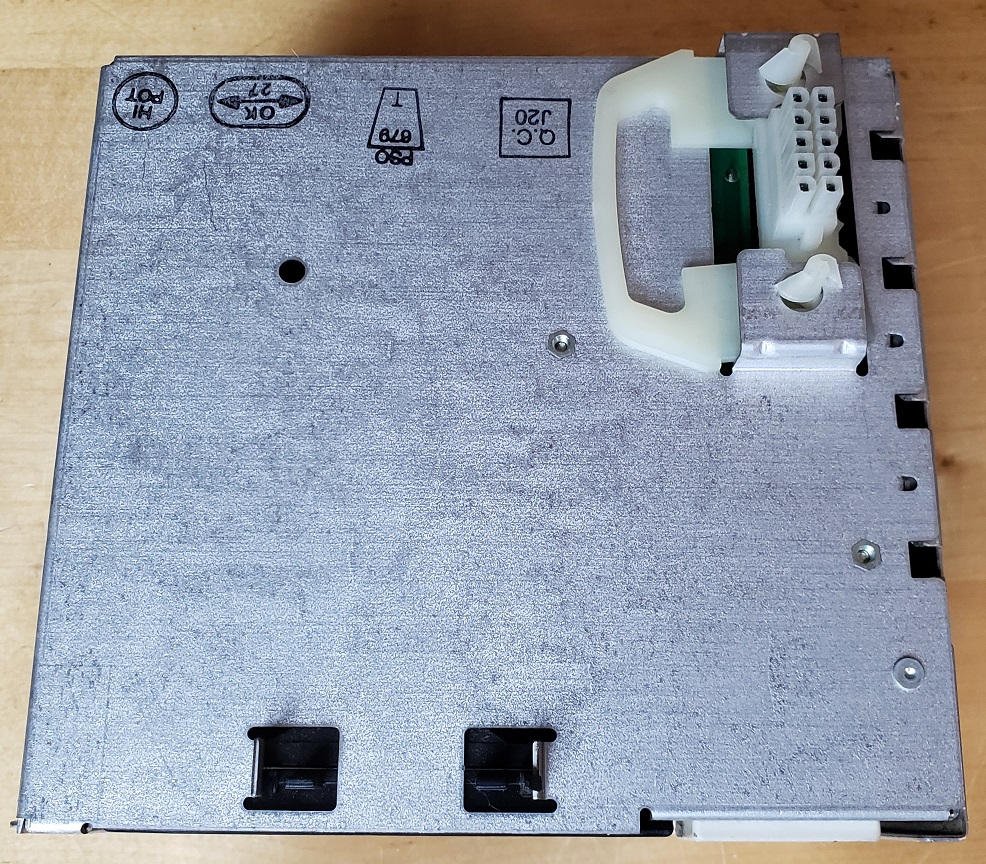
These power supplies connect directly to the motherboard underneath and basically sit on the connector.
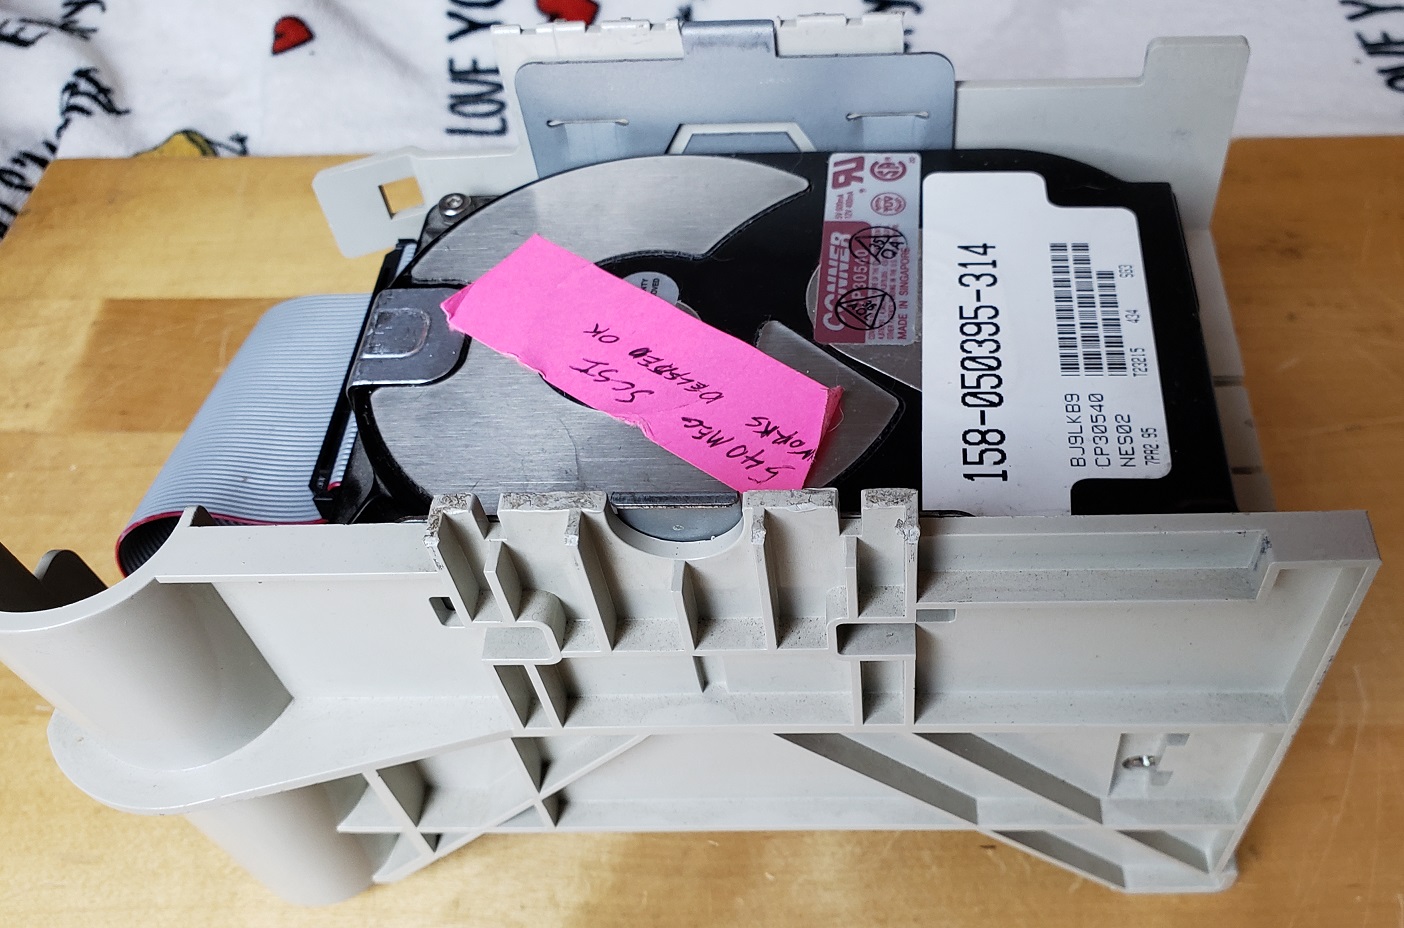
At first, I installed this rather chunky 540MB SCSI hard drive which although mechanical like the stock drives you would have found on this Mac, was much larger than their 40MB and 80MB size.
I eventually did decide to remove the older 540MB drive for a whopping 2GB SD2SCSI solution as you can see above.
Let’s take a look at the motherboard before we check out the lone expansion card I have installed.

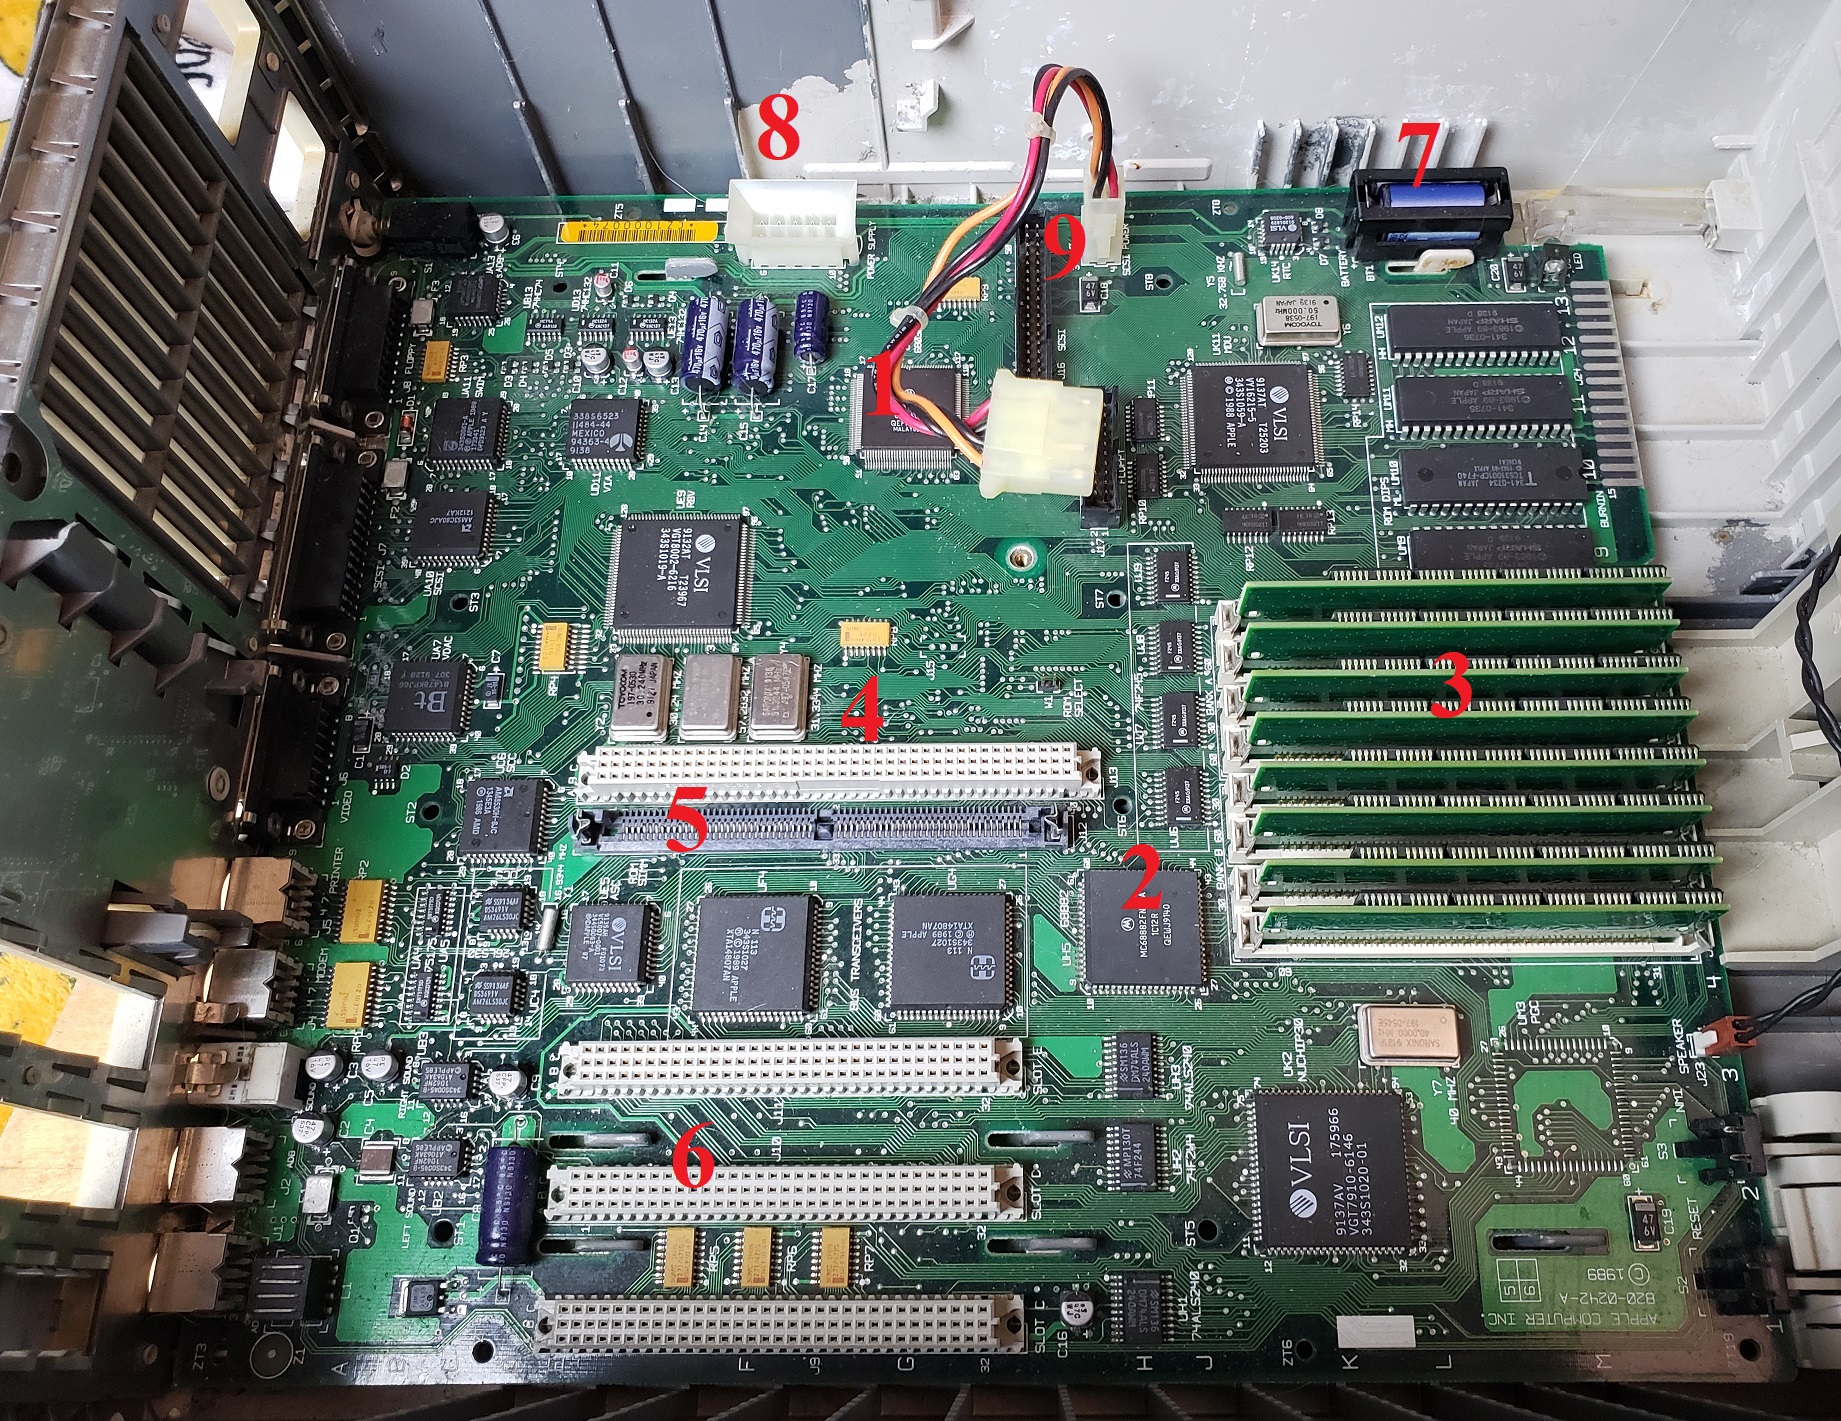
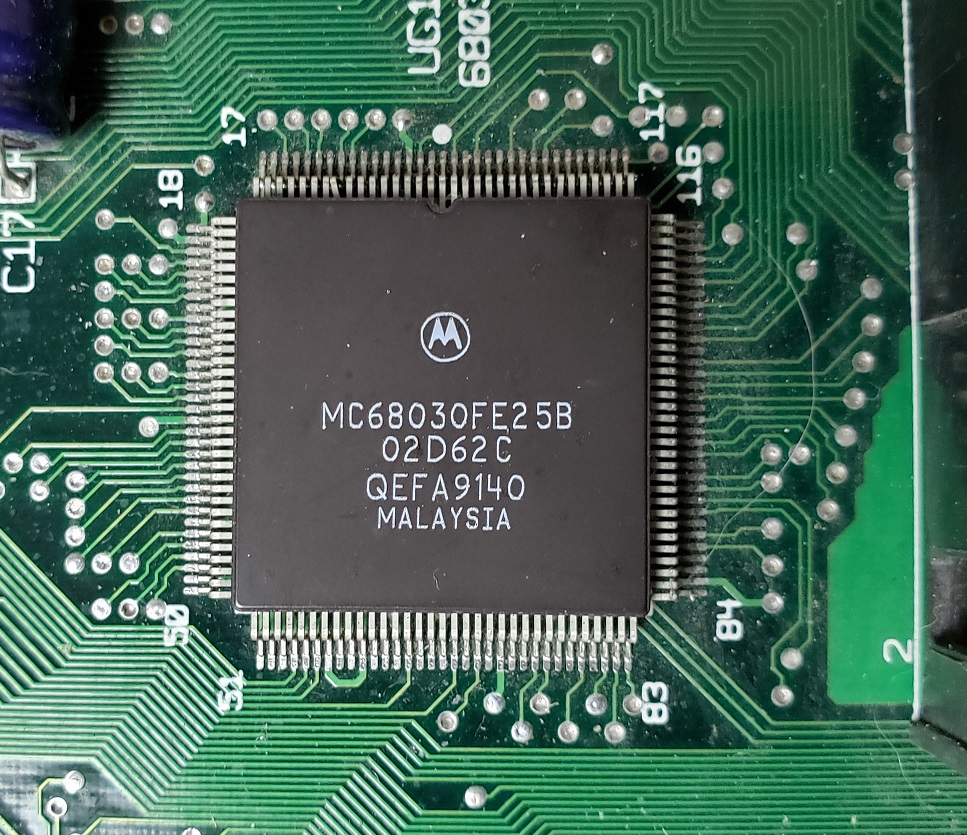
1 ) CPU – The CPU is the Motorola 68030 running at 25MHz as well as running on a 32-bit bus motherboard meaning that, unlike some Macintoshes that featured a 32-bit CPU and a 16-bit bus, nothing was holding the CPU back in the IIci. Despite this, some games can still struggle even at 320×200 resolution such as Wolfenstein3D though I have been told there is a patch to improve performance on a 68030.
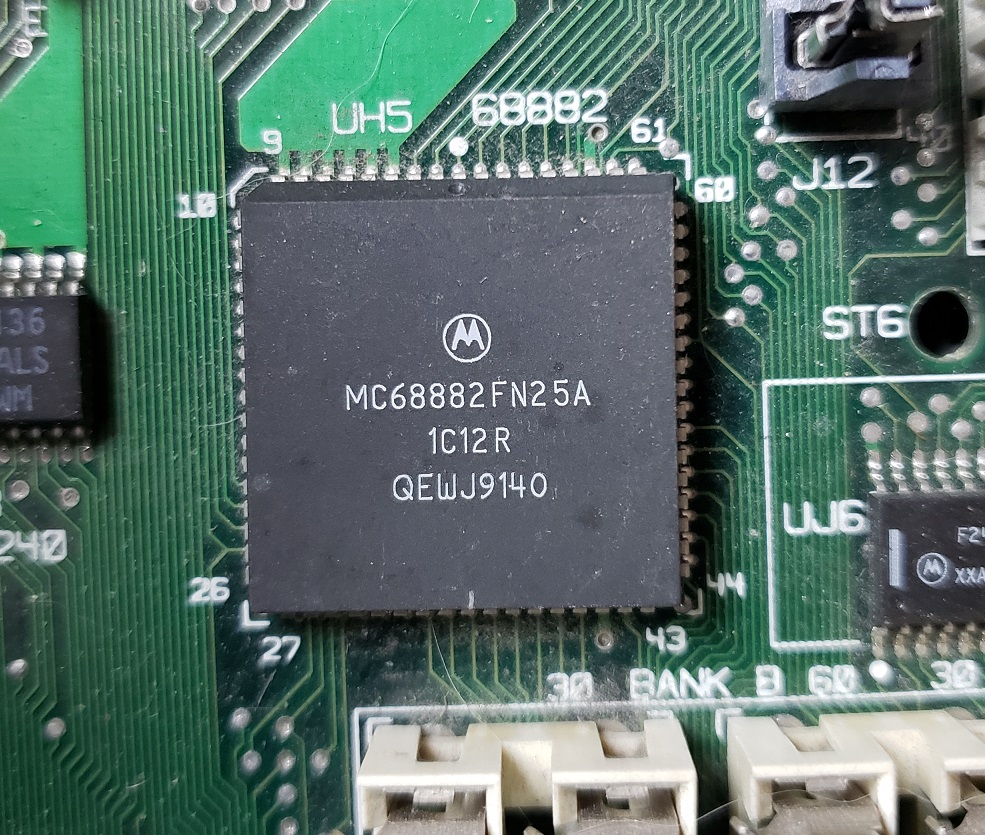
2 ) FPU – The IIci also has a math co-processor on the board in the form of the Motorola 68882. I’m not completely sure if like on the PC, this is underutilized or if more games on the Mac support it.
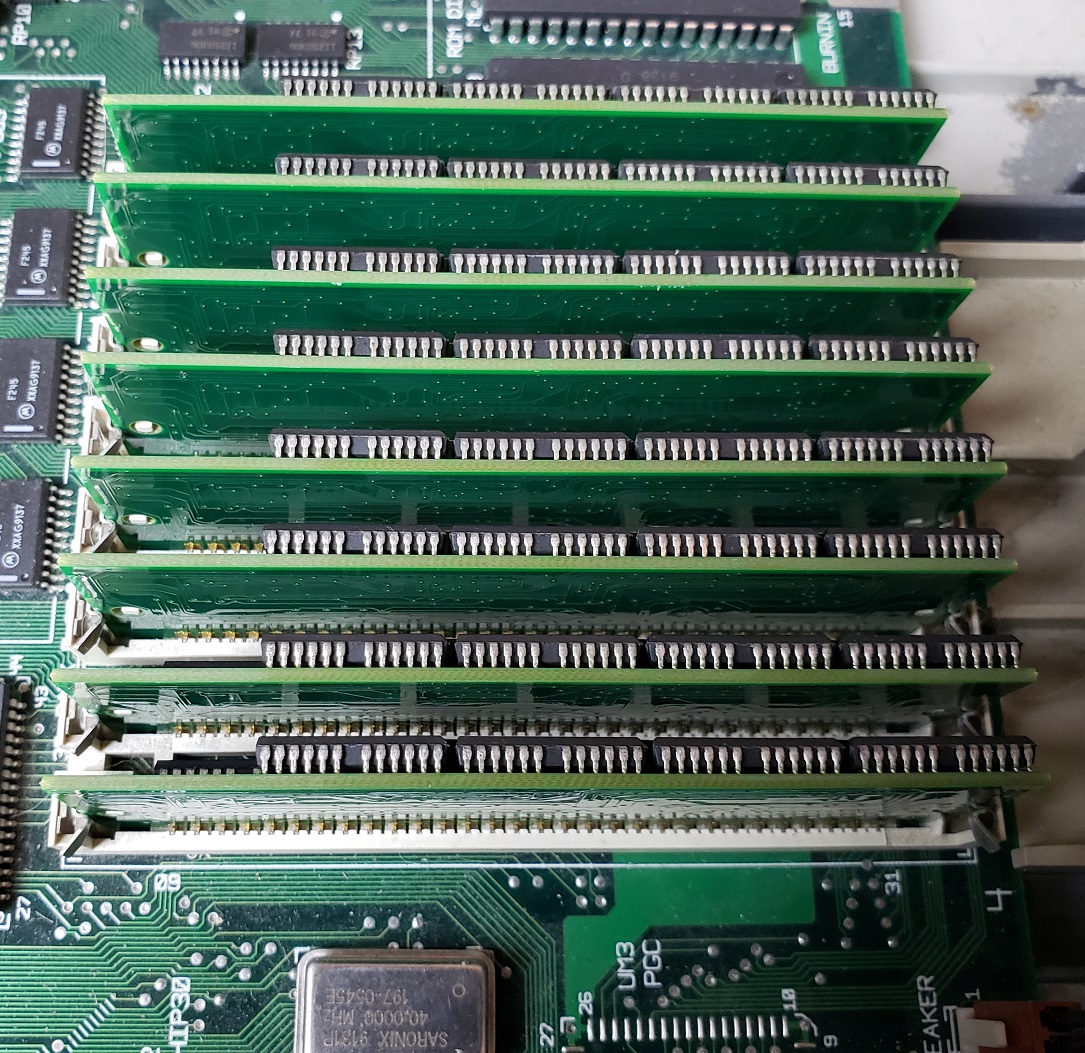
3 ) RAM – Like many classic Macs the IIci can take much more RAM than was practical for the time. Typically a IIci of the time would have had 1-4MB of memory installed but due to its 32-bit clean ROM and 8 memory slots the IIci can accept a total of 128MB of memory via 30-pin SIMMs. I maxed my memory out though this is far more than any program would need.
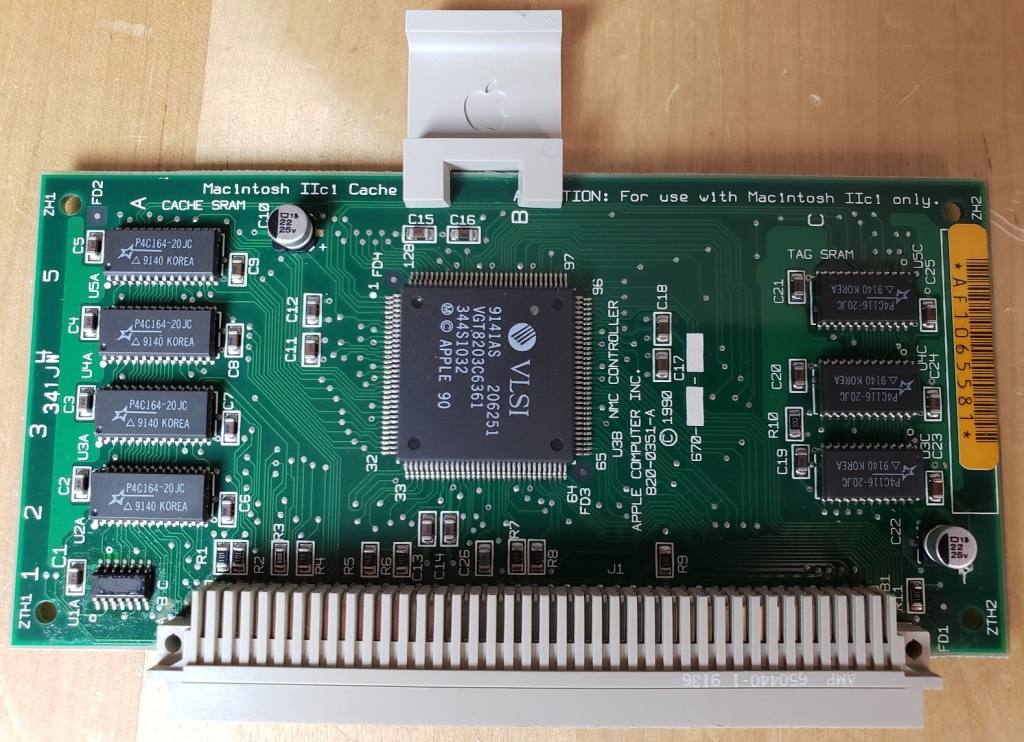
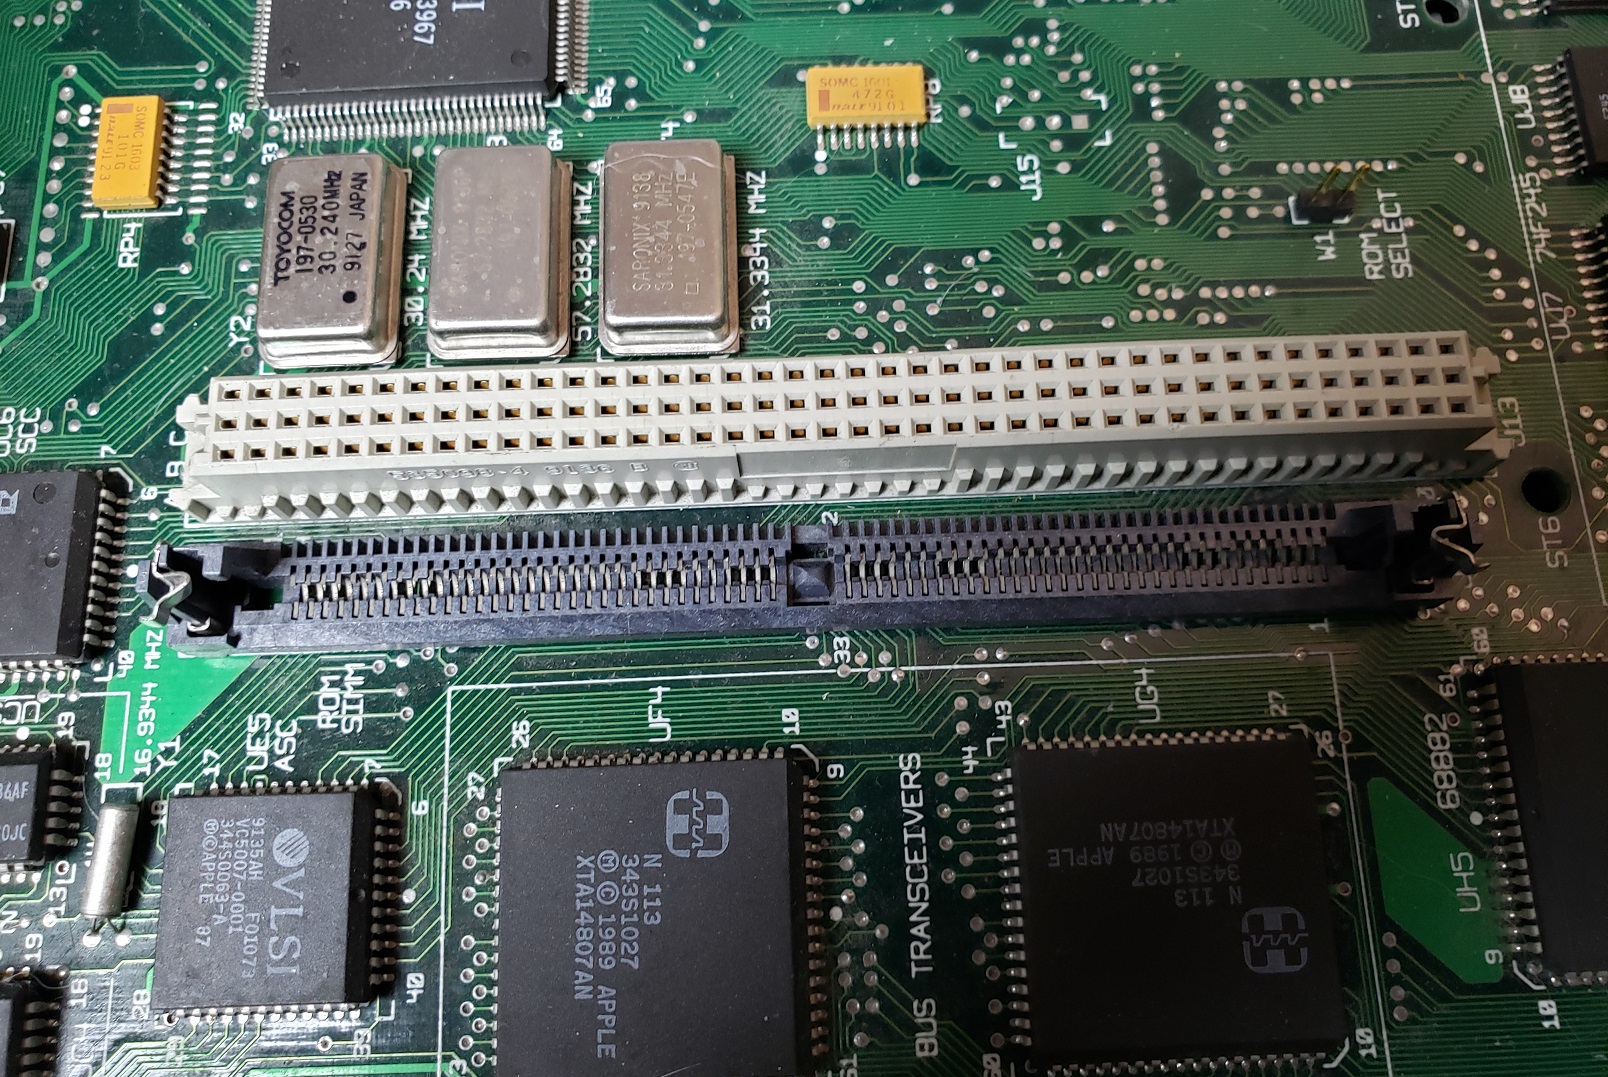
4 ) Cache PDS slot – The PDS slot located near the center of the motherboard is most commonly used for L2 cache upgrades, having a function similar to COASt module slots on early Pentium motherboards. It can be hit or miss whether you find one of these cards in any IIci one may pick up as they seemed to be optional at first before Apple began including them in the systems.
Official L2 cache card
The cache card is a highly recommended upgrade for the IIci as it is claimed to increase performance from 20% to, if you believe some sources, 130% though the vast majority of data indicated a general performance gain of 25% overall. The standard card from Apple contains 32k of L2 cache although third parties did make cards with larger amounts. Expect greatly diminished returns in performance after 128k.
Several third parties also took advantage of this slot to release CPU/cache accelerator cards allowing faster 68000 CPUs and even PowerPC processors to be installed.
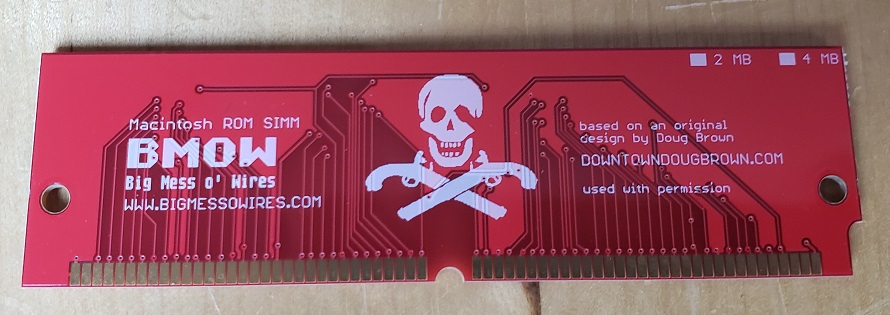
5 ) ROM slot – Right next to the cache PDS is a slot to install an optional ROM. The IIci was the first Macintosh to use a fully 32-bit “clean” ROM allowing much higher amounts of memory without modification or extra software. I decided to install a Macintosh “ROMinator” ROM SIMM from BMOW since it gives me several nice features like the ability to boot into System 7 from ROM in the event I have any issues with my HDD.
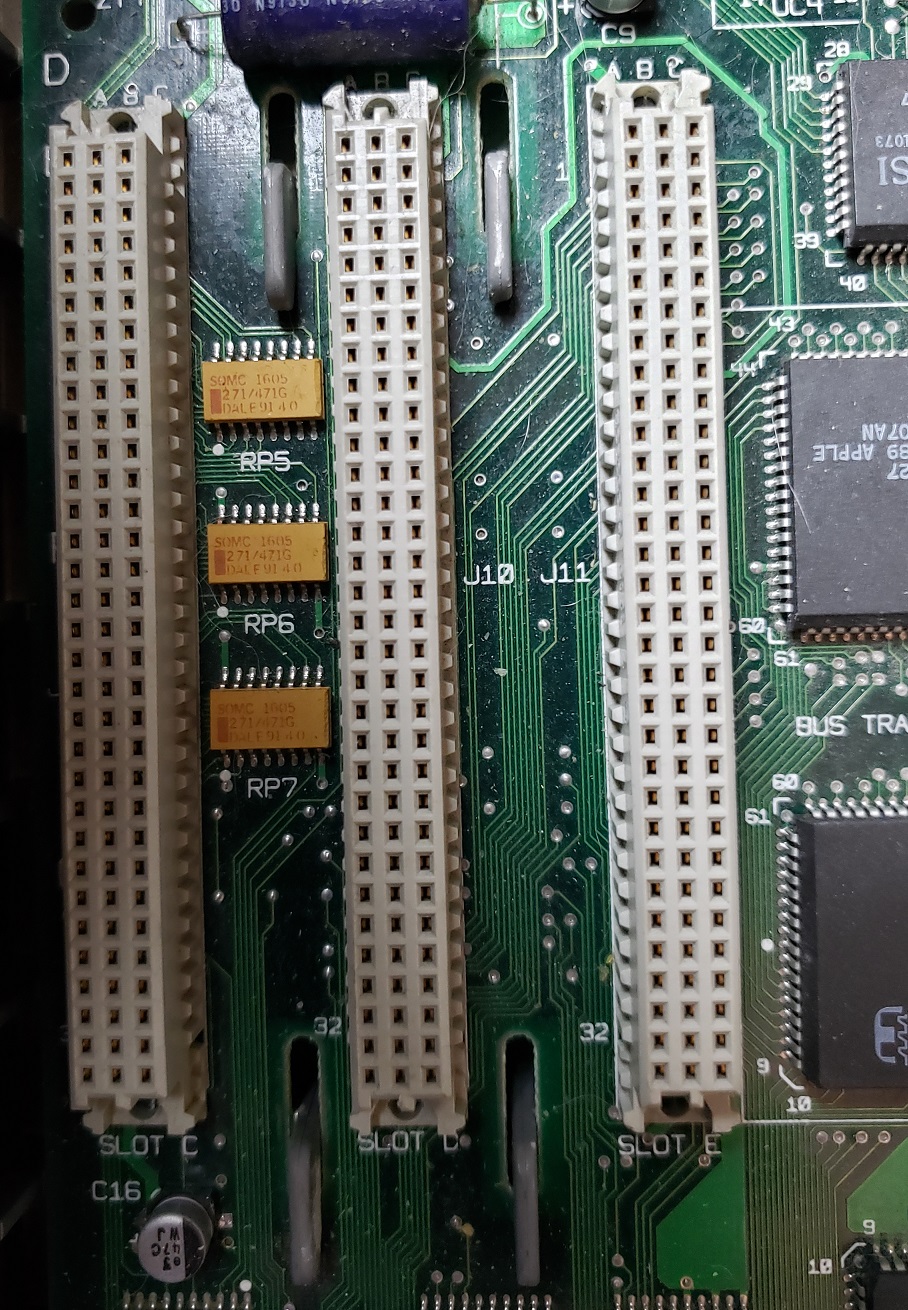
6 ) Nubus slots – The IIci features three Nubus slots for decent expandability although most users may not find a real need to add any cards. The general recommendation would be to add a more powerful video card as this can be beneficial for gaming purposes and allow more colors and higher resolutions. Another reason to add a discrete video card would also be to free up the memory used by the integrated video.
7 ) PRAM battery used for holding system settings
8 ) power connector for the system power supply
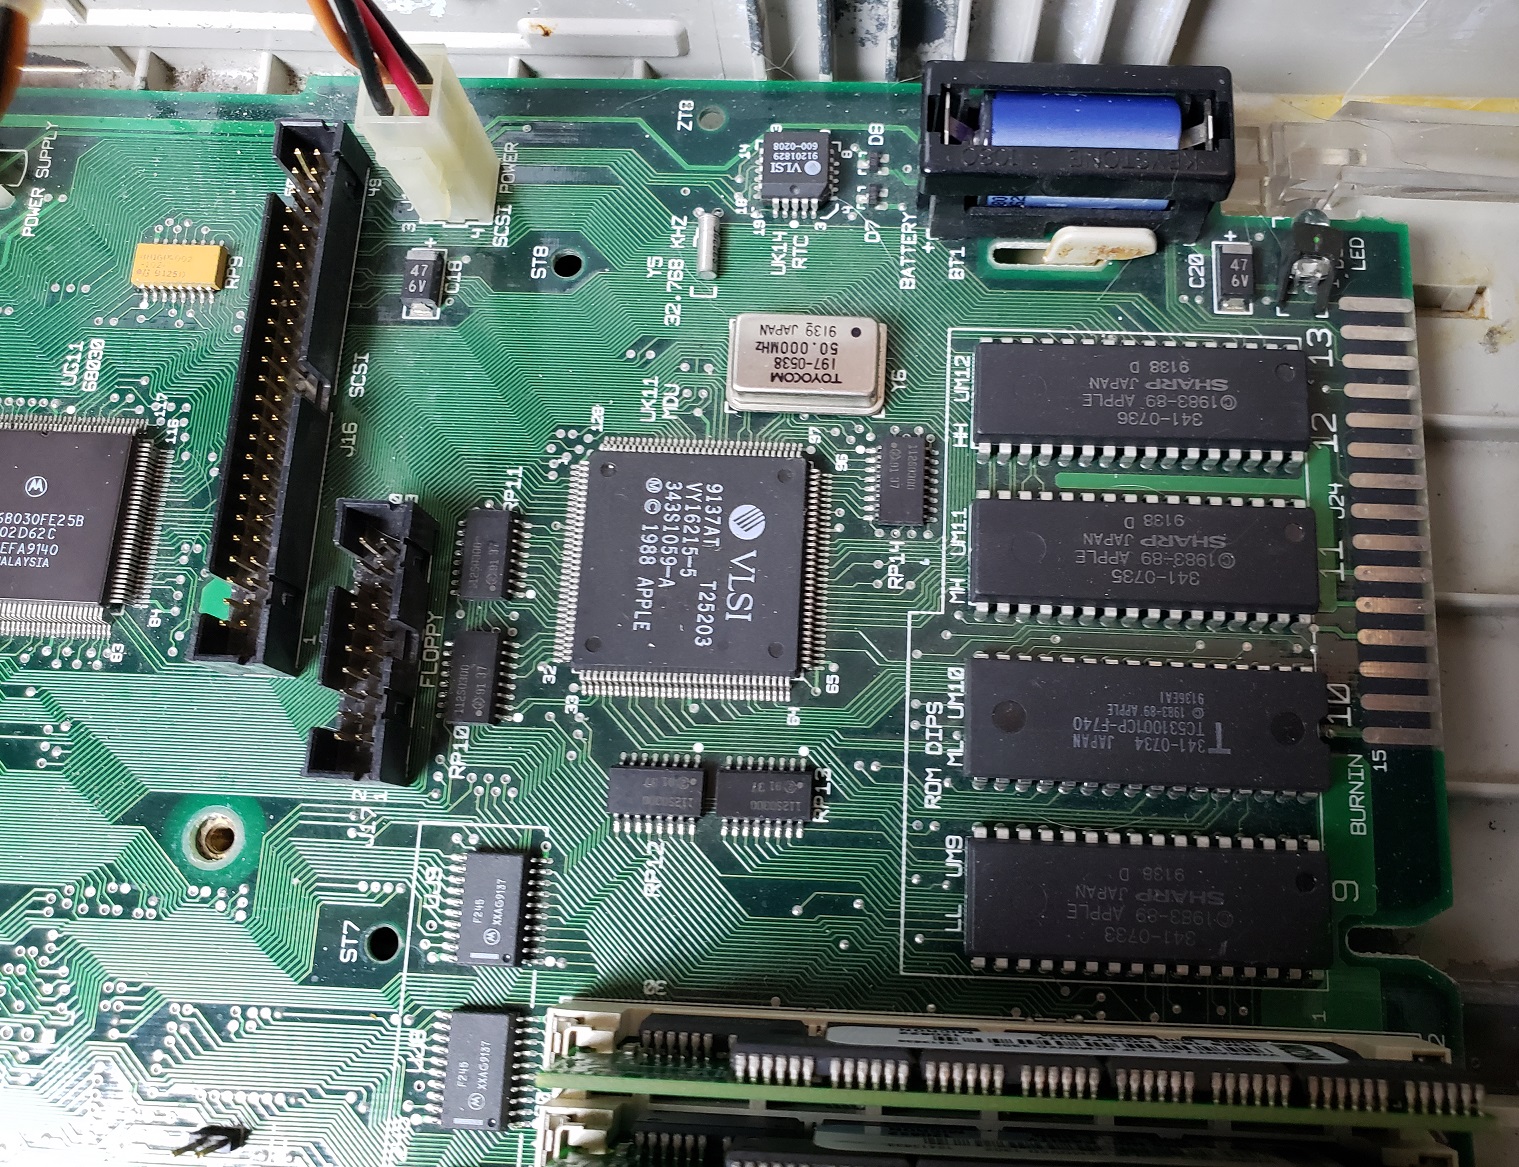
9) Interestingly the IIci does not pull power straight off the PSU but has a separate connector on the motherboard ending in a Molex connector for powering the hard drive. The floppy drive is powered via the floppy drive cable.
The sole expansion card I have added is a video card, the Radius PrecisionColor 8-24X
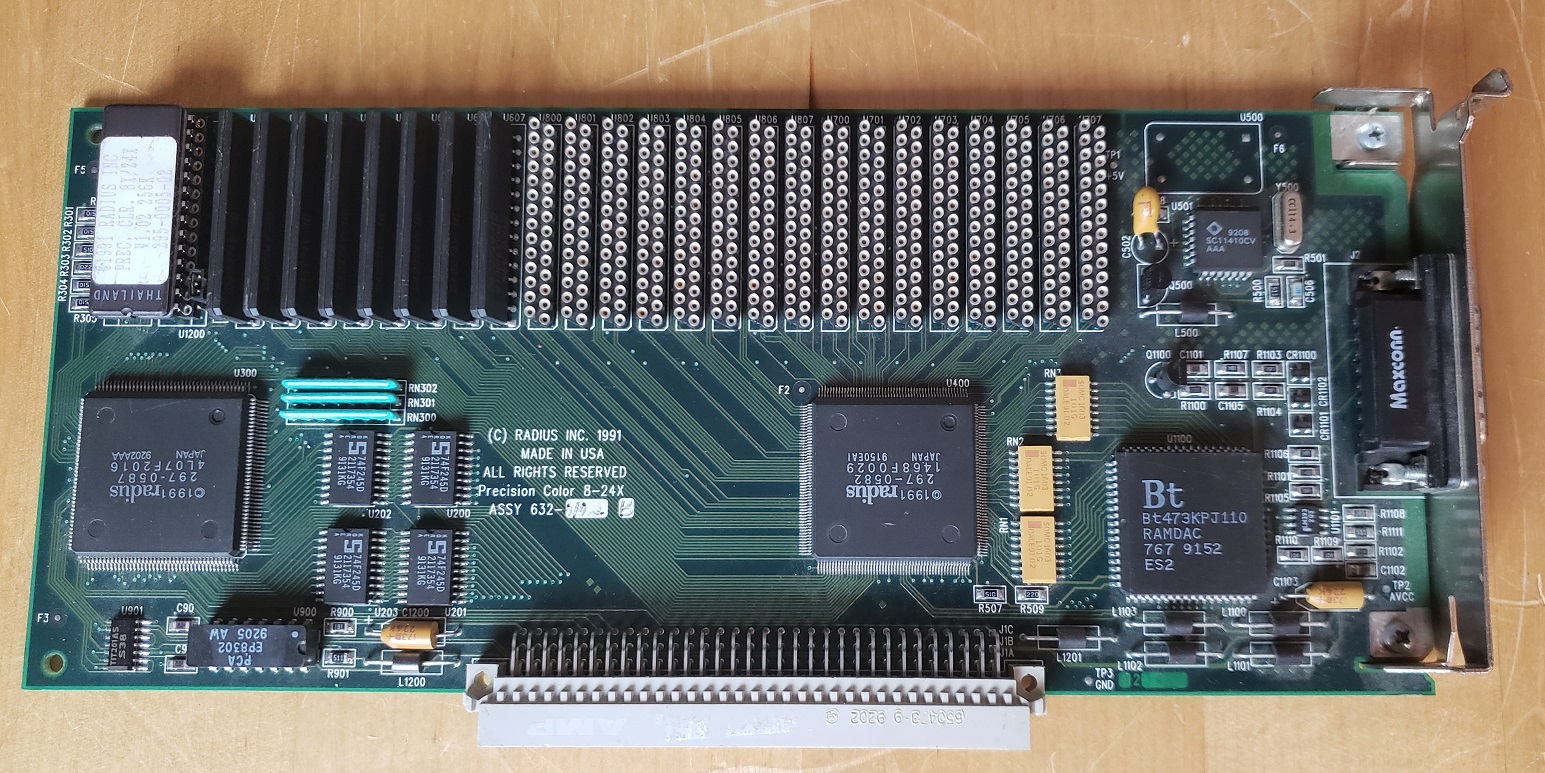
I wouldn’t say it’s the best video card option to upgrade to as although it supposedly has QuickDraw acceleration I haven’t noticed any performance improvement in games but at the very least it is an improvement over the built-in video as it allows more colors and has its own video memory.

I am currently running System 7.5 on my Mac as that is what feels most appropriate and it seems to run quite well overall.
In my opinion, the Macintosh IIci is Apple doing the Macintosh II right. The system offers good performance, especially with an added cache and video card as well as offer decent (for a Mac) expandability in a small case. I’d certainly recommend one for anyone wanting to set up a classic 68k Mac for gaming and as I said a full setup will not take up much space on a corner desk. Another bonus is that the IIci was sold in fairly large numbers over several years so despite rising prices on retro goods as of 2023 the IIci isn’t as pricy or hard to find as some other models, just be aware of the possibility of bad caps and PSUs to contend with as these plague most classic Macintosh models
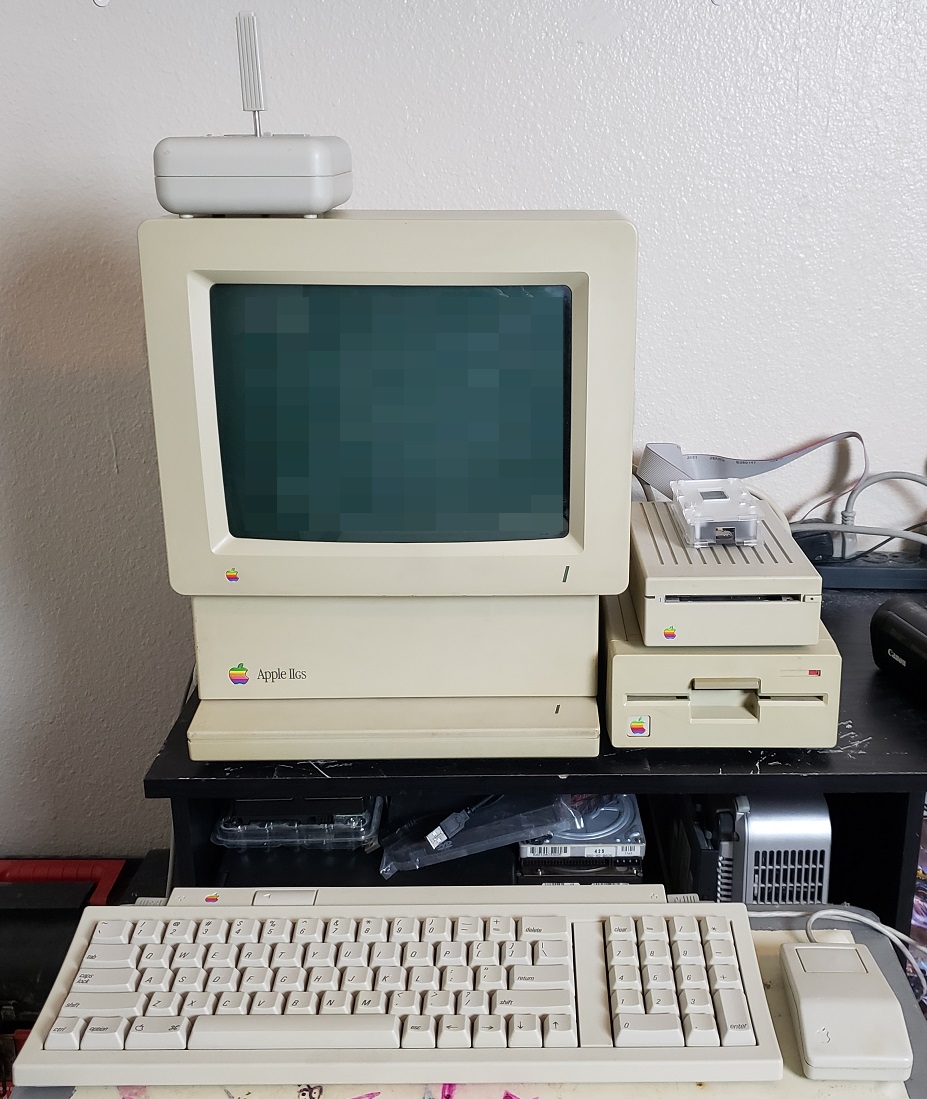
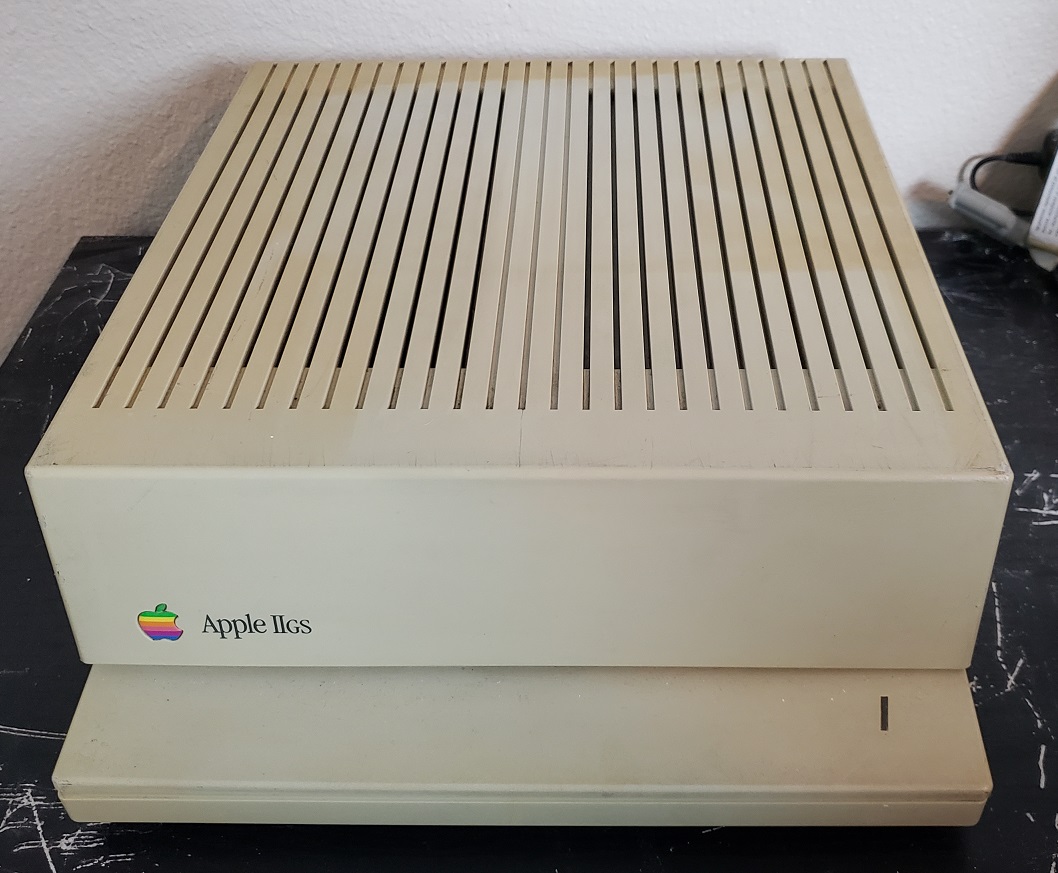
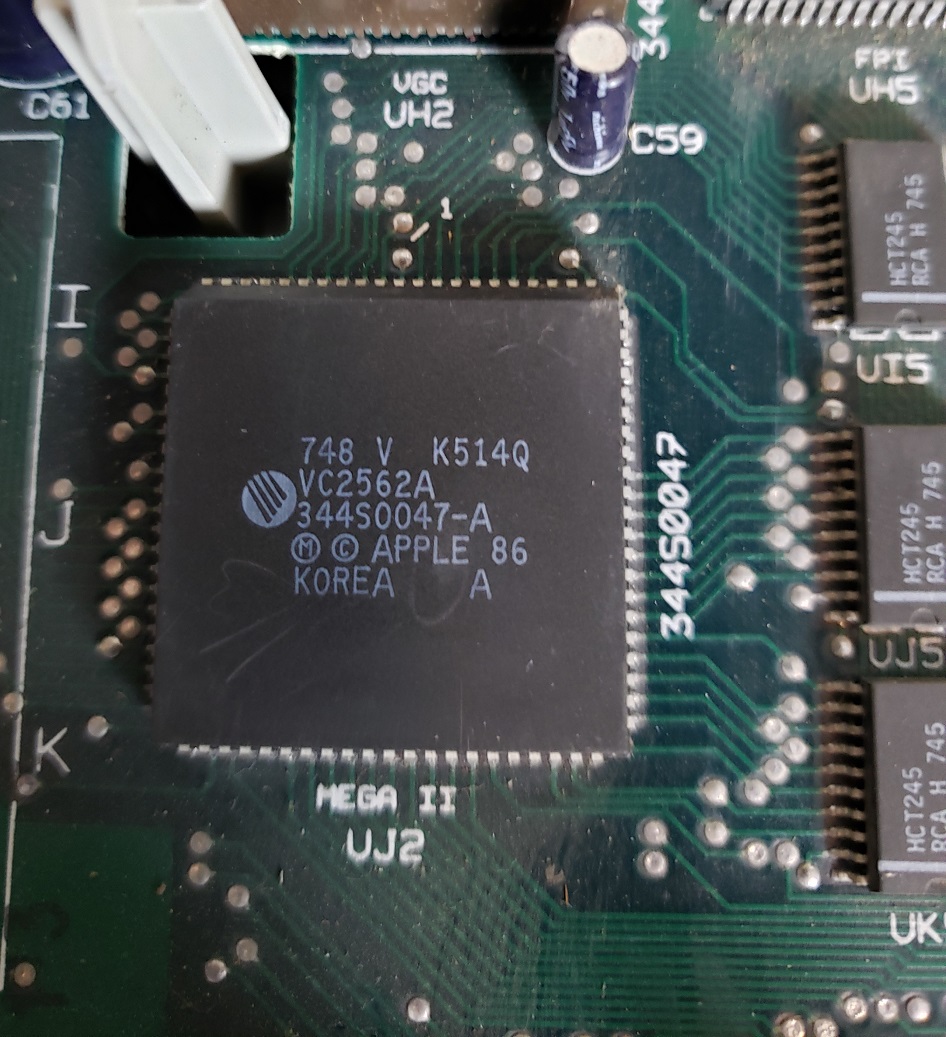
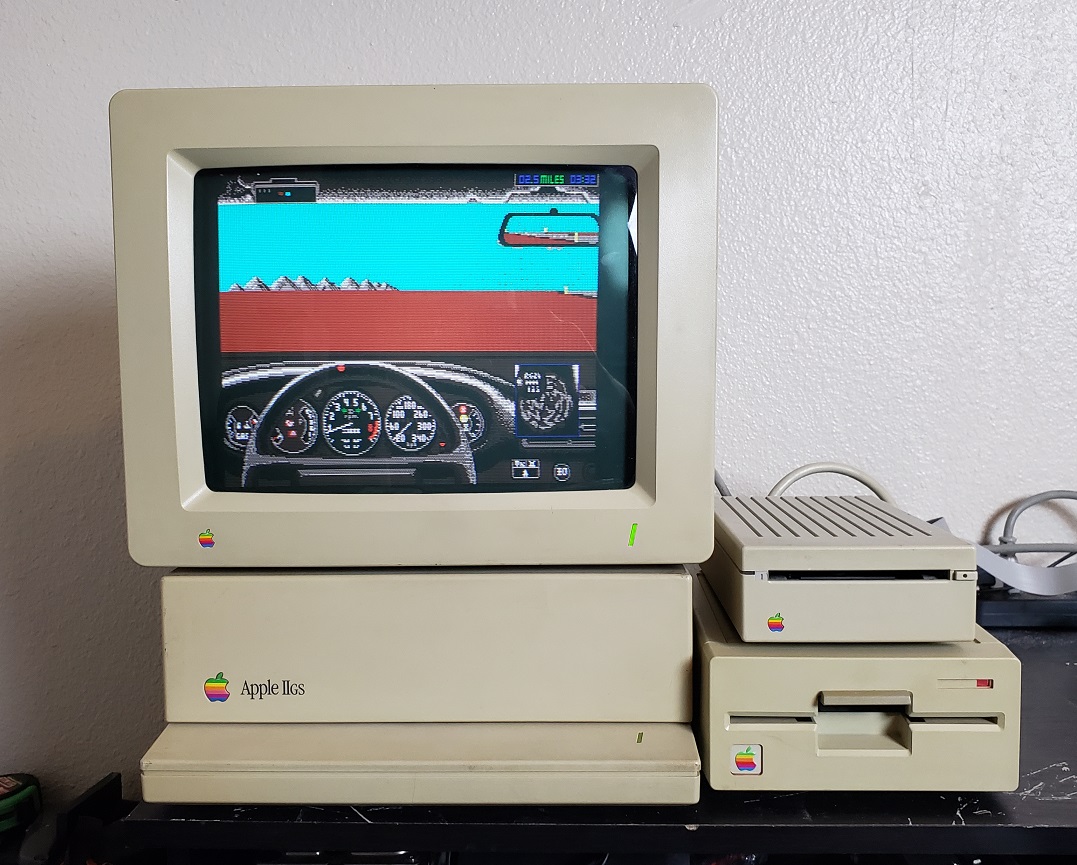
The Apple IIGS was released in 1986 and despite not being the final form of the Apple II released, would come to be the pinnacle of the Apple II line, despite having the IIe Platnium and IIc Plus released after it. Unlike the previously mentioned Apple IIe and Apple IIc which were minor improvements or portable versions of the previous Apple II the Apple IIgs was virtually an entirely different machine. The IIgs (which stands for graphics and sound) was a 16-bit PC as opposed to the 8-bit Apple II. Regarding sound and visual capabilities, the IIgs was more like the Amiga or the Atari ST than its fellow Apple IIs. The IIgs did however have very high compatibility with older Apple II software thanks to the Mega II chip on the motherboard which served as an Apple II on a chip. Unfortunately for the Apple IIgs its impact on the computing world was largely hampered due to Apple itself holding back the system due to a fear of it competing with its Macintosh line.
The Apple IIgs came in three major revisions, the ROM 0, ROM 1, and ROM 3 revisions. The best of these revisions is the ROM 3 due to the large 1MB of memory that came standard on the motherboard but today we will be looking at the still extremely capable ROM 1 revision.
Looking at the IIgs it’s immediately apparent this is a different case design from the earlier Apple line as well. Instead of the built-in keyboard design of the earlier models we have a very small and light case using the “snow white” case design. On the front, we have the Apple IIgs logo while on the right we have a slit located on the small ledge that comes out from the bottom of the case which is our green power LED light.
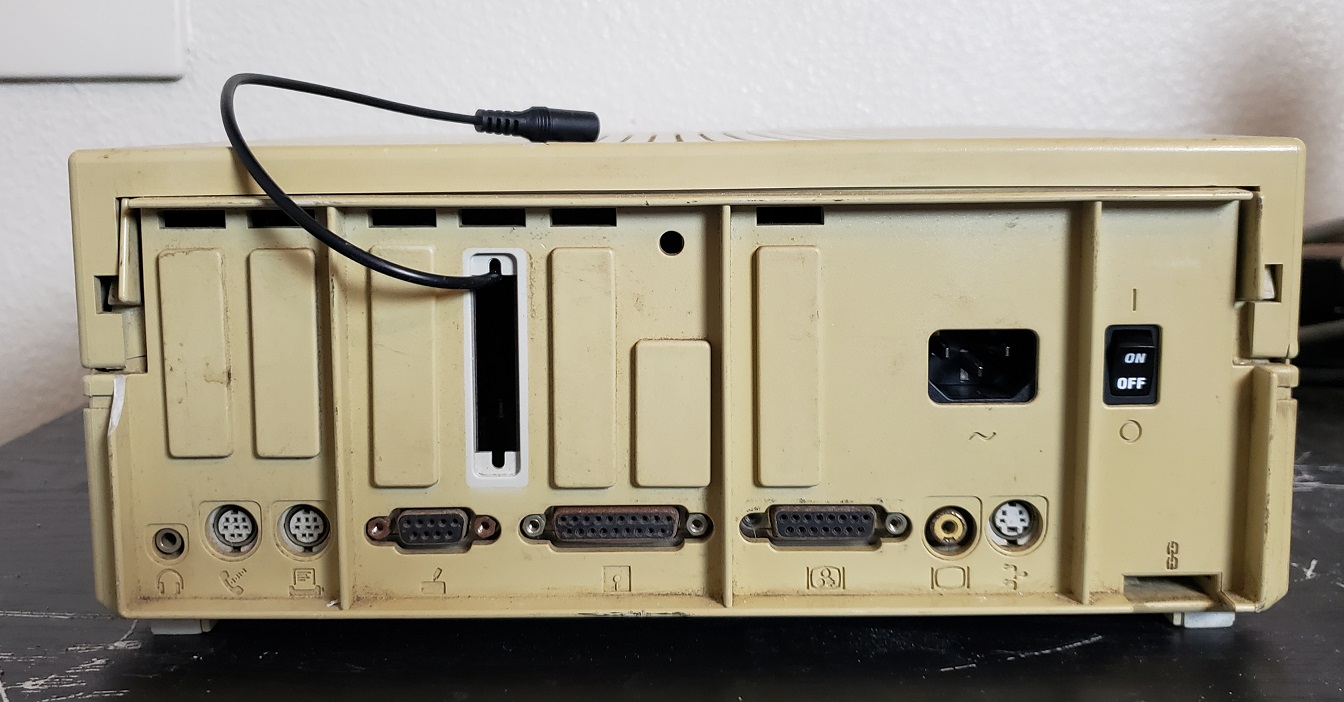
Looking at the rear of the case we can see that unlike the Apple IIe and previous Apple II’s the IIgs had a full complement of various ports built into the motherboard. starting on the lower left-hand side of the case we have a standard headphone audio jack (mono only), next an Apple-style modem and printer port, a joystick port, and then an external floppy drive port. Next, we have an RGB video out port. Note that this is a DA-15 Analog RGB video port and NOT a DB-15 video port as found on the Macintosh and is not compatible with VGA Macintosh monitors. Next to this, we have an RCA composite video jack for connecting to TVs or monitors like the Apple Color Composite monitor. Finally, we have an Apple ADB port for connecting various devices, most commonly a keyboard or mouse. The IIgs was the first computer to include this port and would become a standard port for Apple mice and keyboards much like the PS/2 port became that standard in the IBM compatibles world. Above these on the right is a standard 3-prong power connector and an on/off switch.
Before we take a look inside the case I think it’s worth looking at the external floppy drives as well as the monitor options available.
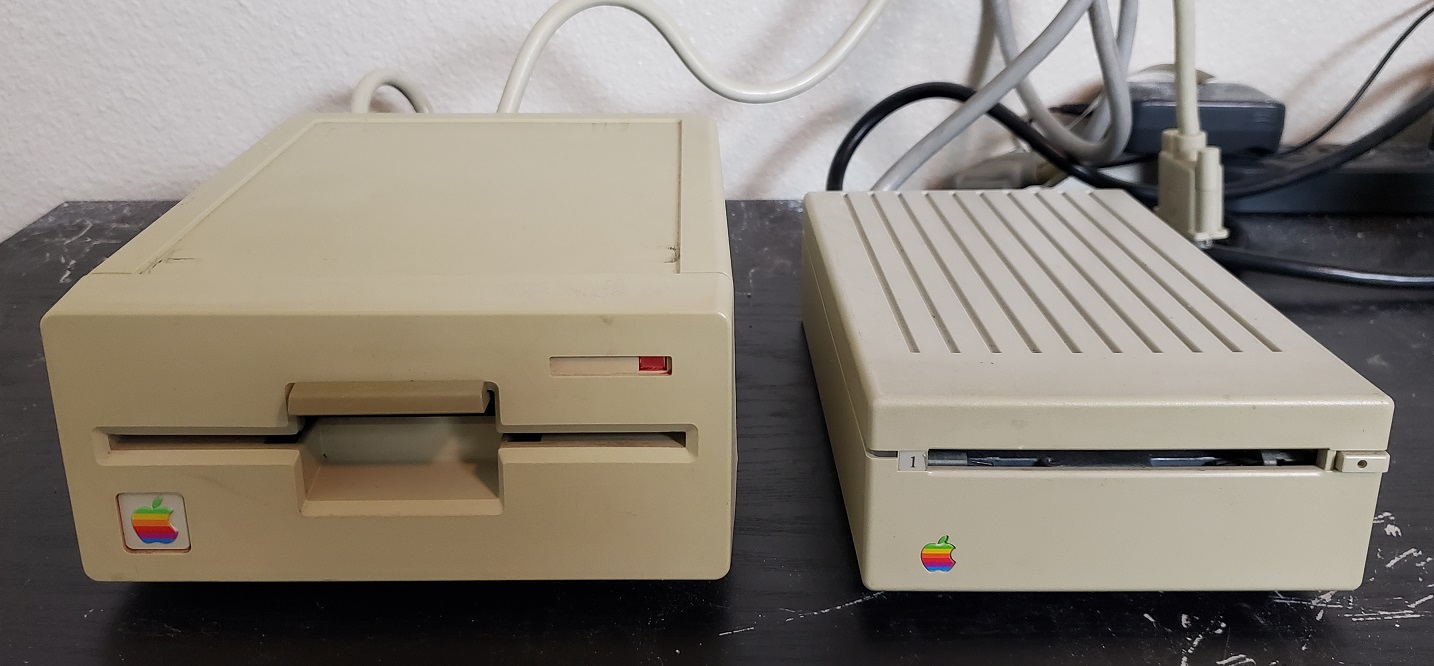
You’re most likely going to want to have both a newer style 5 1/4 Apple disk drive capable of reading 140k disks if you plan on running any Apple IIe software as well as a 3 1/2 Apple drive for running Apple IIgs specific software. These drives can be easily daisy-chained together to work on the single rear external floppy port. Older 5 1/4 drives like the Duo Disk drive can supposedly be made to work but some modification may be needed.
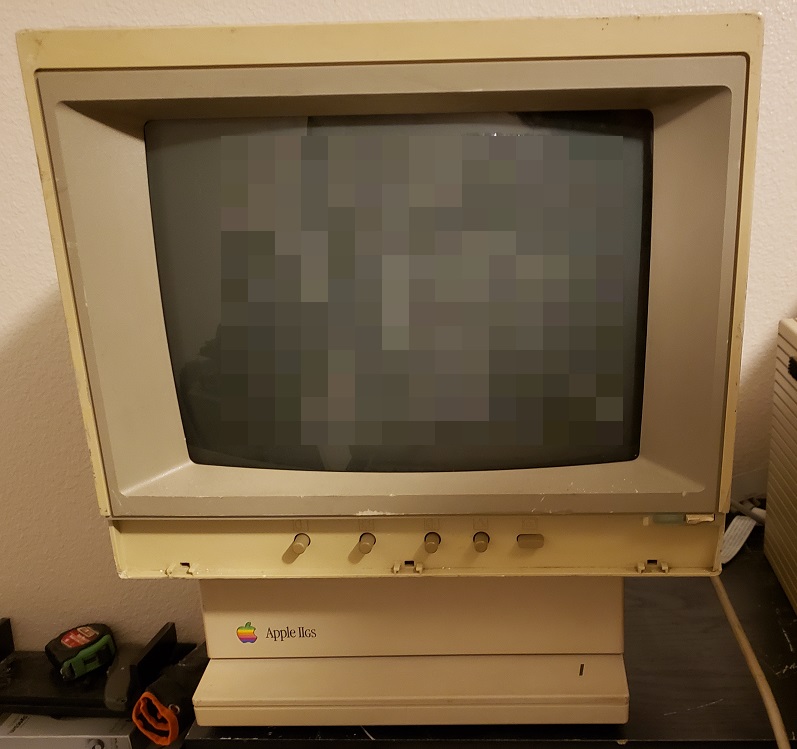
For a monitor, you can use the color composite out to display to any composite monitor or TV including the Apple Color Composite monitor. This is especially nice if you want to simply use the IIgs as an IIe and want a more authentic experience. The large composite monitor does look a bit goofy on top of the smaller IIgs case though.
There is however an official RGB monitor for the IIgs, the AppleColor RGB Monitor, model A2M6014.
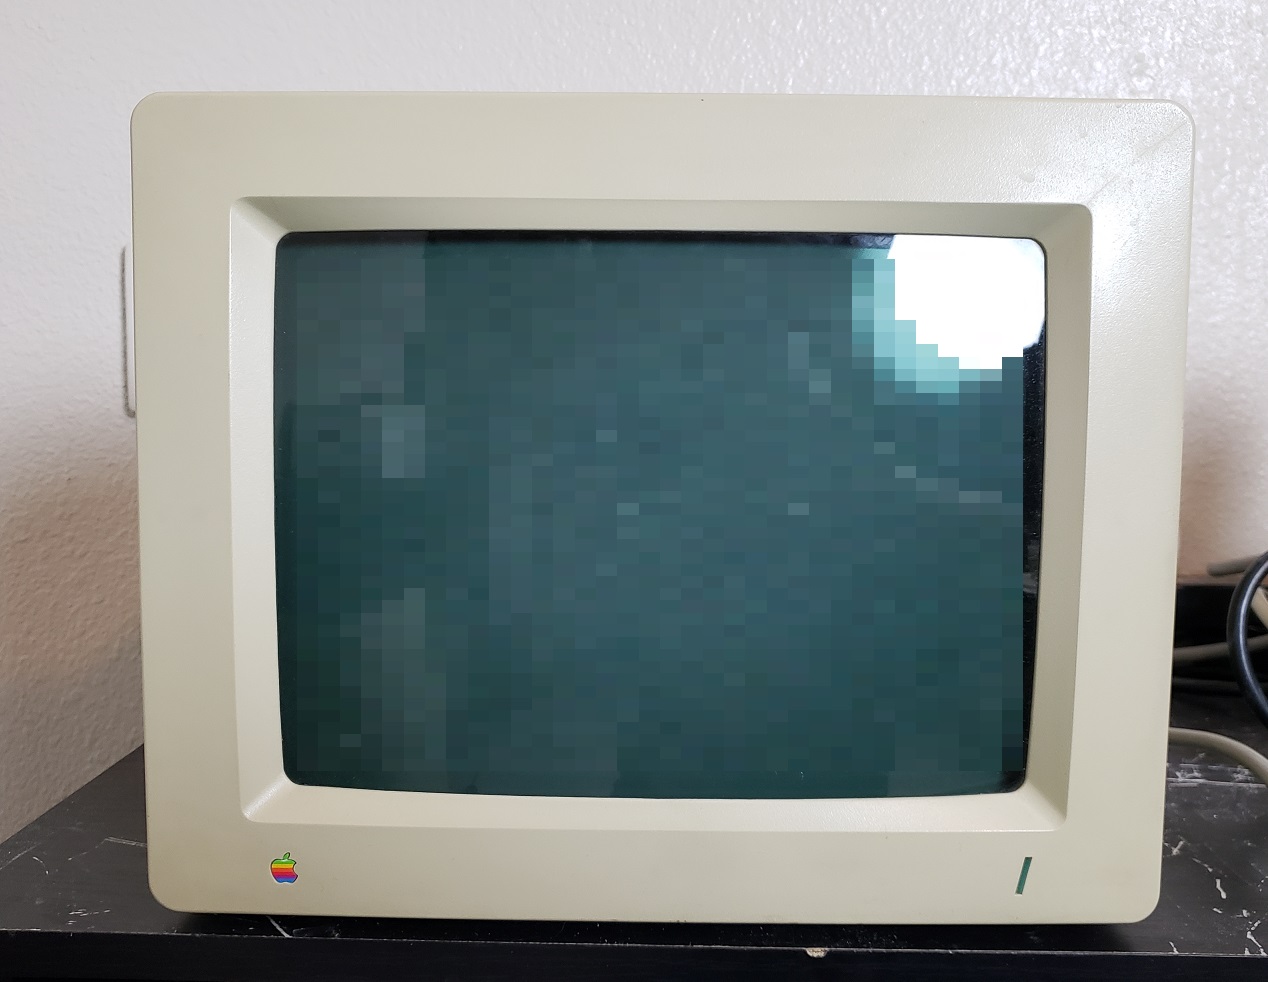
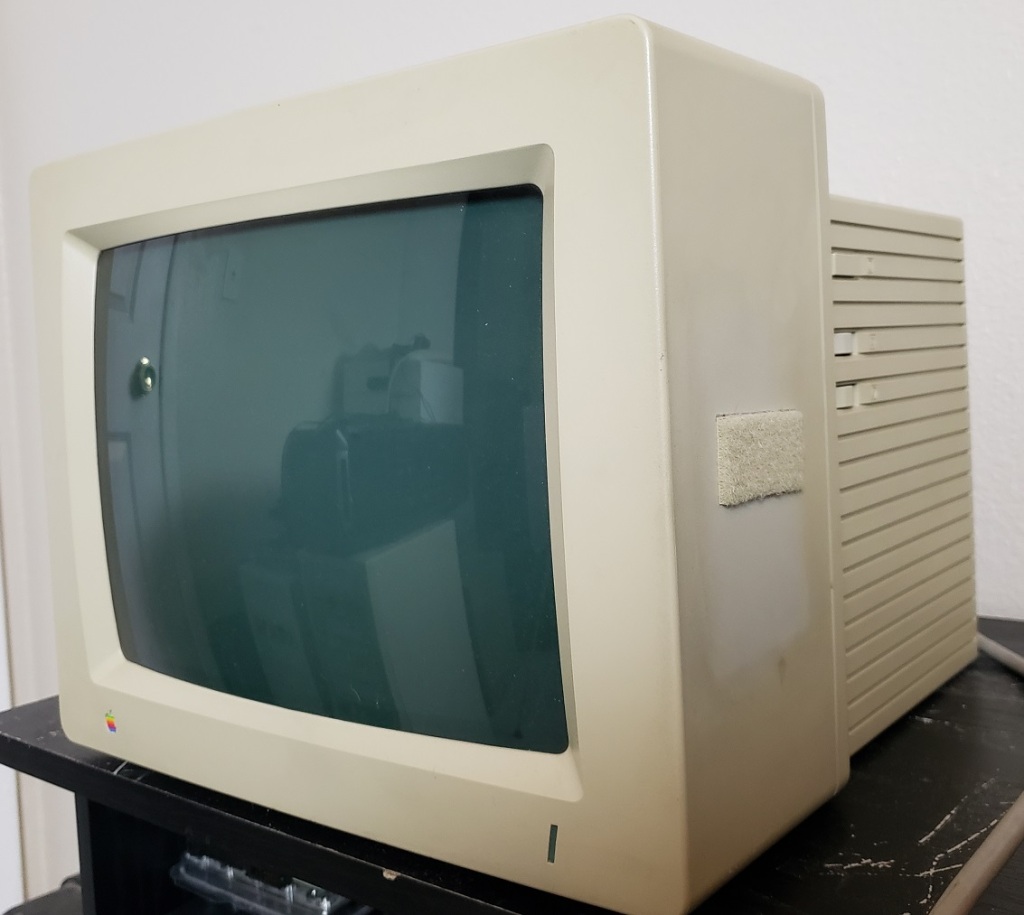
This 12″ monitor fits very nicely atop the small IIgs case and gives a very nice sharp image for both Apple II and Apple IIgs games. Take note that this is a 15KHz analog RGB monitor and not VGA and this is why monitors meant for the Macintosh, despite physically being able to connect to the rear RGB port will not work. Other RGB monitors such as ones meant for the Commodore Amiga SHOULD work but I’ve read mixed results.
One other thing to note is that using an RGB monitor with some games meant for the Apple IIe can theoretically lead to some games looking incorrect due to the software expecting to be displayed on and taking advantage of the quirks of a composite monitor though I could not find any specific examples.
It’s also worth noting the IIgs will happily output from both its RGB and composite outputs simultaneously if one desires.
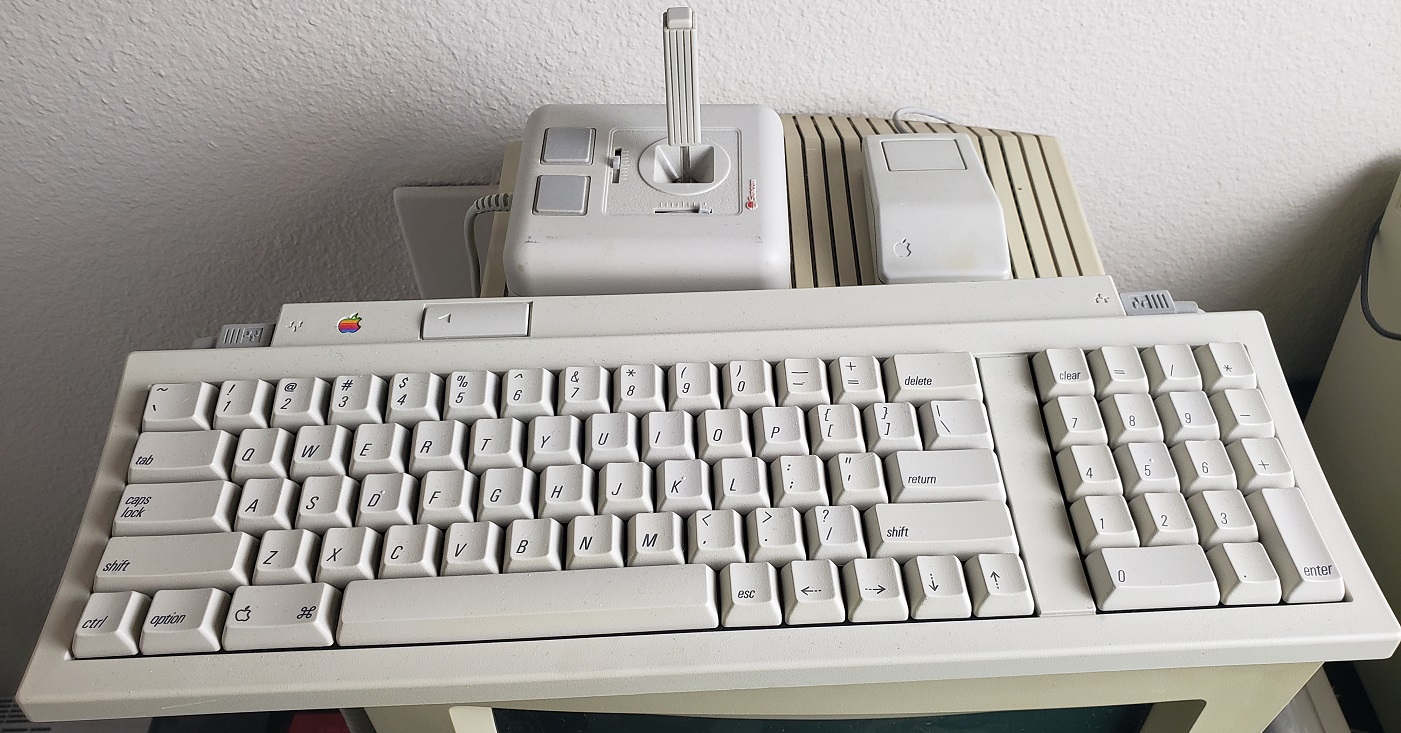
For mouse and keyboard I’m just using a standard ADB mouse and an Apple keyboard II. I do not believe these are the stock keyboard and mouse combo but they are very similar.
On power up the Apple IIgs if you hold down the option key on the keyboard the computer will boot into a control panel. From here you can adjust various things such as CPU speed, the internal clock, or the border and background colors, among other things.
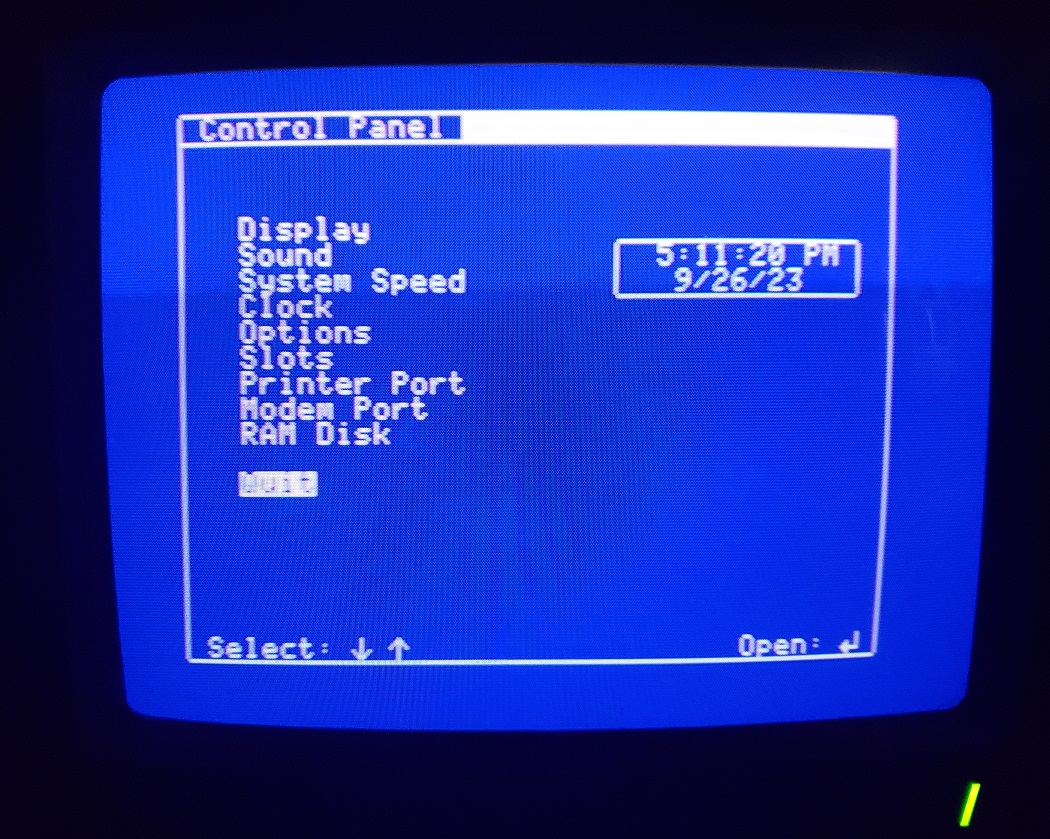
Although you can play Apple IIe games on the faster settings for best compatibility it is suggested that the CPU speed be changed from “fast” to “normal” which downclocks the CPU to the original Apple IIs speed of 1.023MHz. For a more authentic experience, you can also change the border and background colors to black to mimic the look of the original Apple II line.
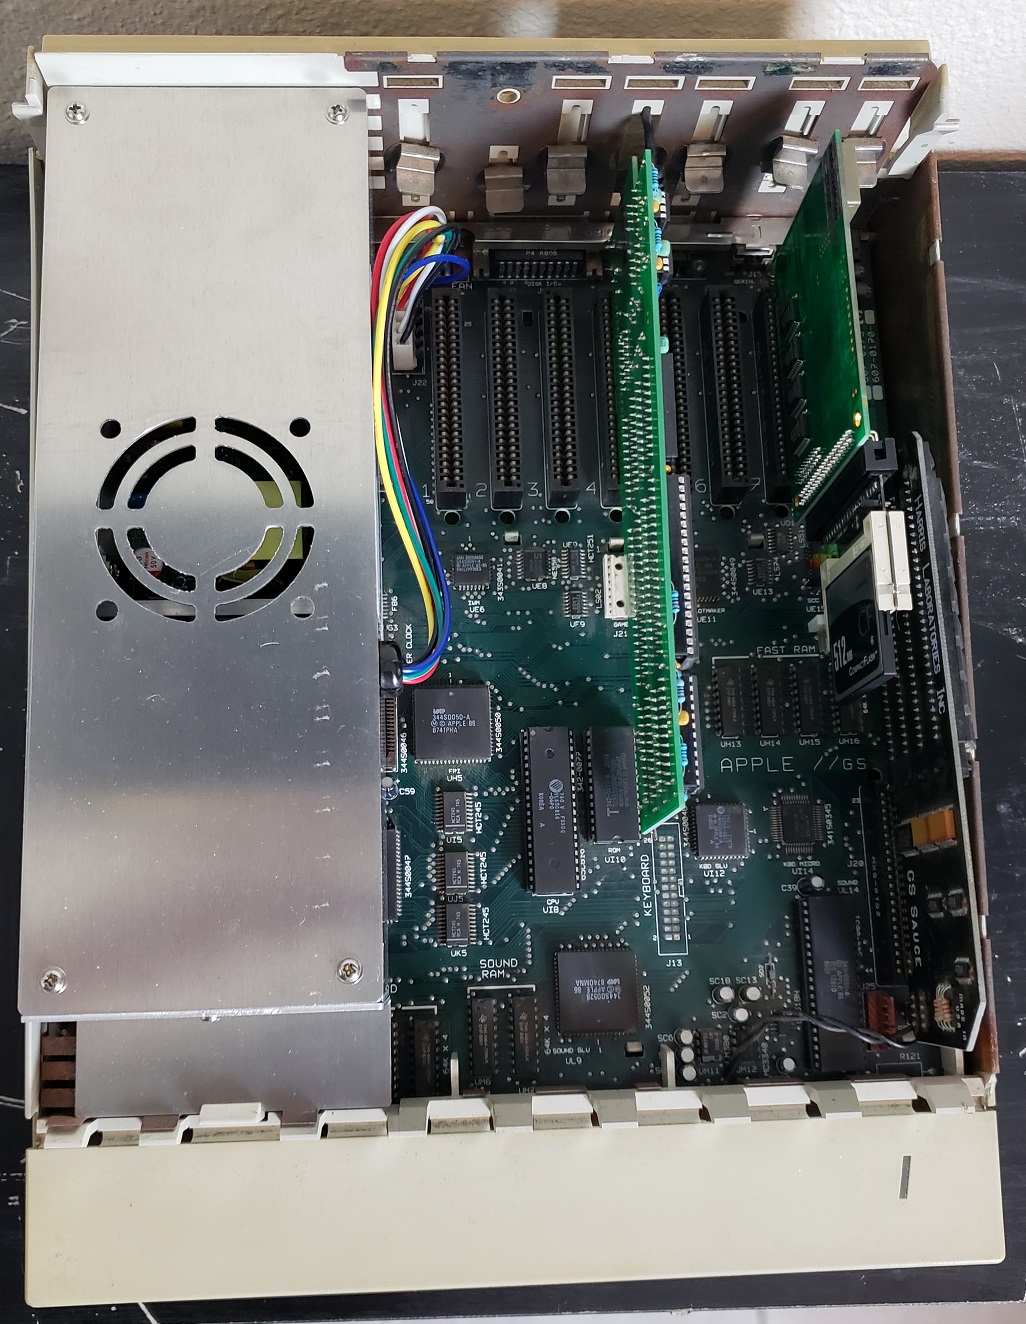
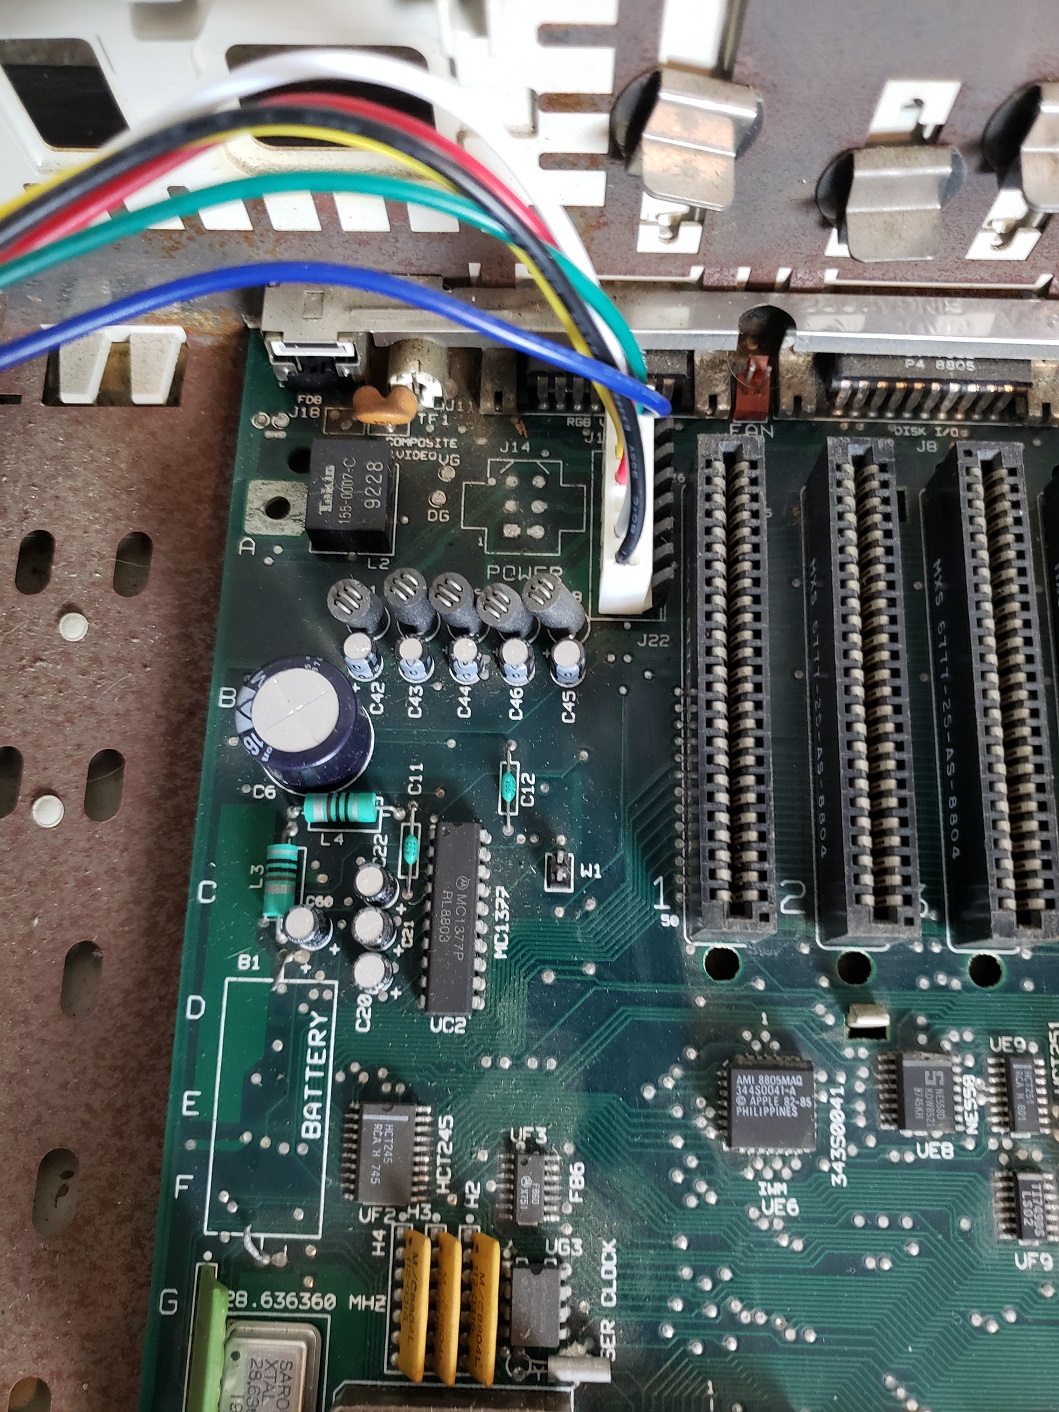
Here we have the inside of the case with my chosen expansion cards installed. I have replaced the power supply on the left with a modern equivalent as the original PSU swiftly failed upon acquiring this machine. The two main expansion cards I have installed are transfers from my Apple IIe which are my mockingboard sound card clone and my ReactiveMicro Turbo HDD controller card paired with a 512MB compact flash card acting as a hard drive.

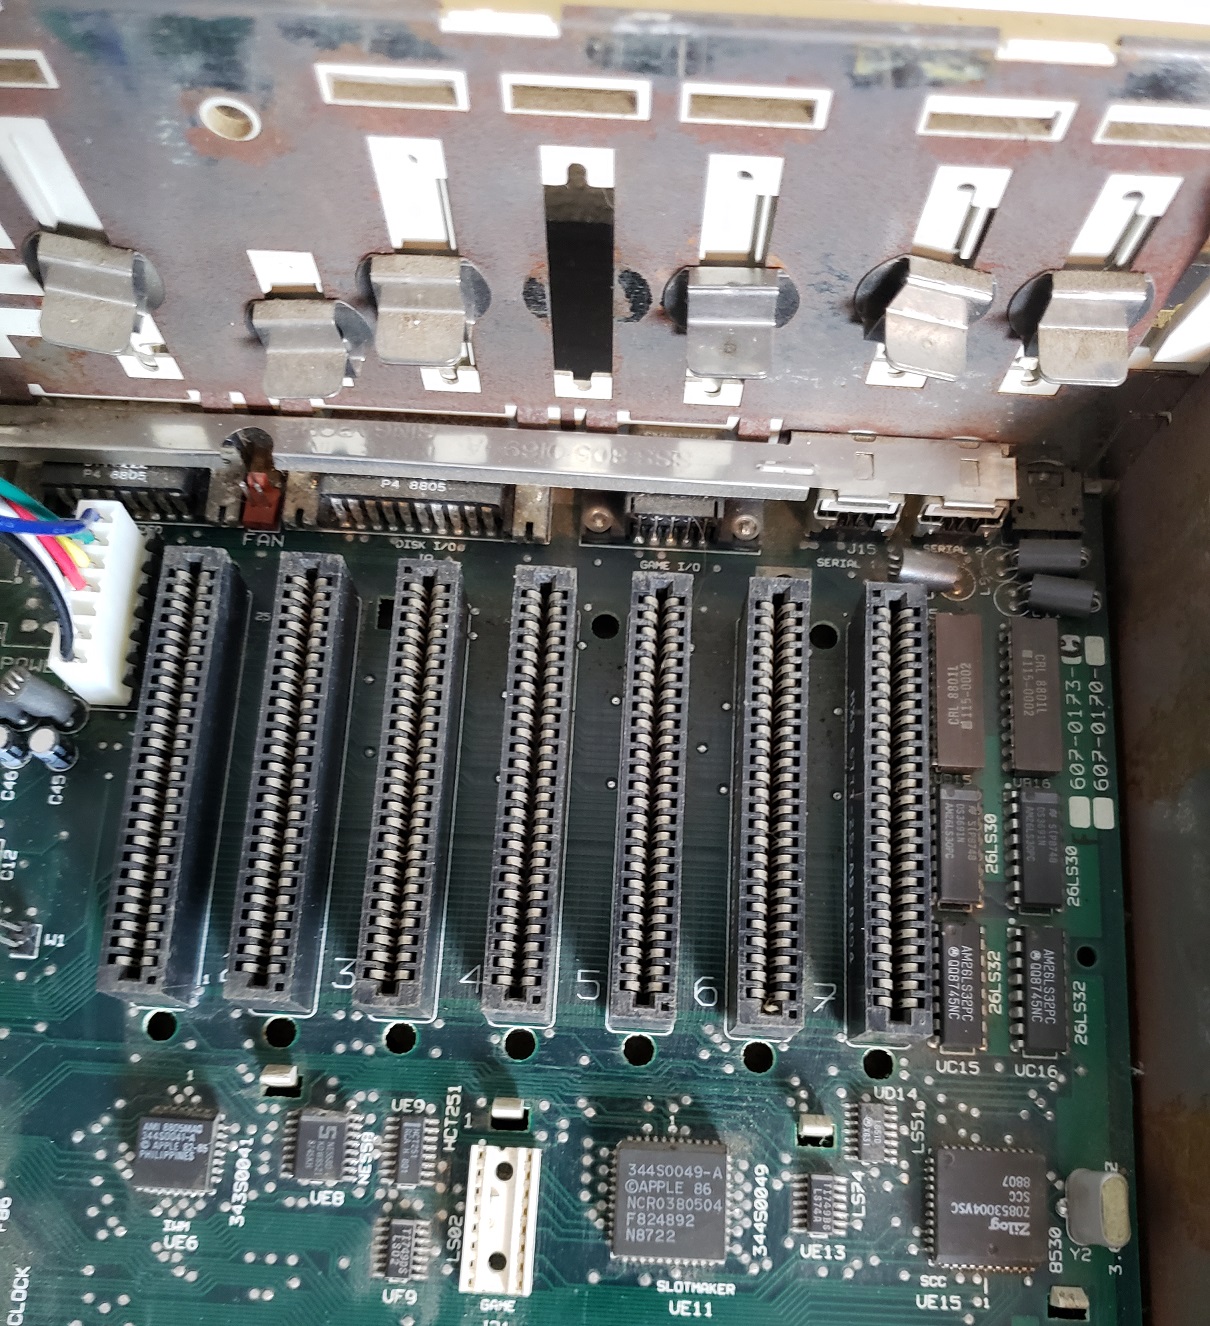
Just like the previous Apple II computers the IIgs motherboard provides seven expansion slots. These slots are identical to the slots found on other Apple IIs and should be compatible with most if not all cards meant for the Apple IIe and earlier.
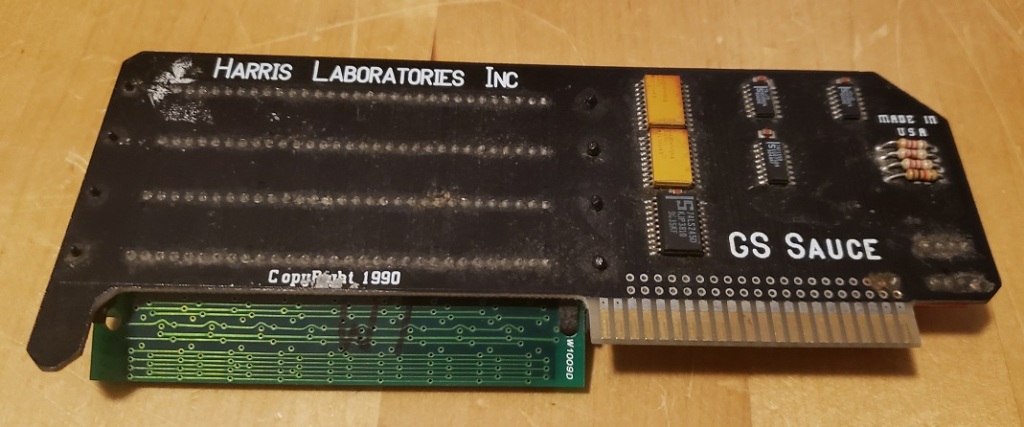
On the bottom right-hand corner of the motherboard, we have a connector for the internal speaker and above that we have another expansion slot, this slot is reserved for memory expansion cards. My ROM 1 revision has 256k total memory on the motherboard but I did add an expansion board to bring the memory total up to 1.25MB. This is enough memory to run most if not all Apple IIgs games and the graphical OS. Later ROM 3 revisions would ship with 1MB of memory soldered directly on the motherboard. The IIgs are capable of being expanded up to a total of 8MB.
I’m using an old Apple “GS Sauce” memory expansion board but newer boards are available.
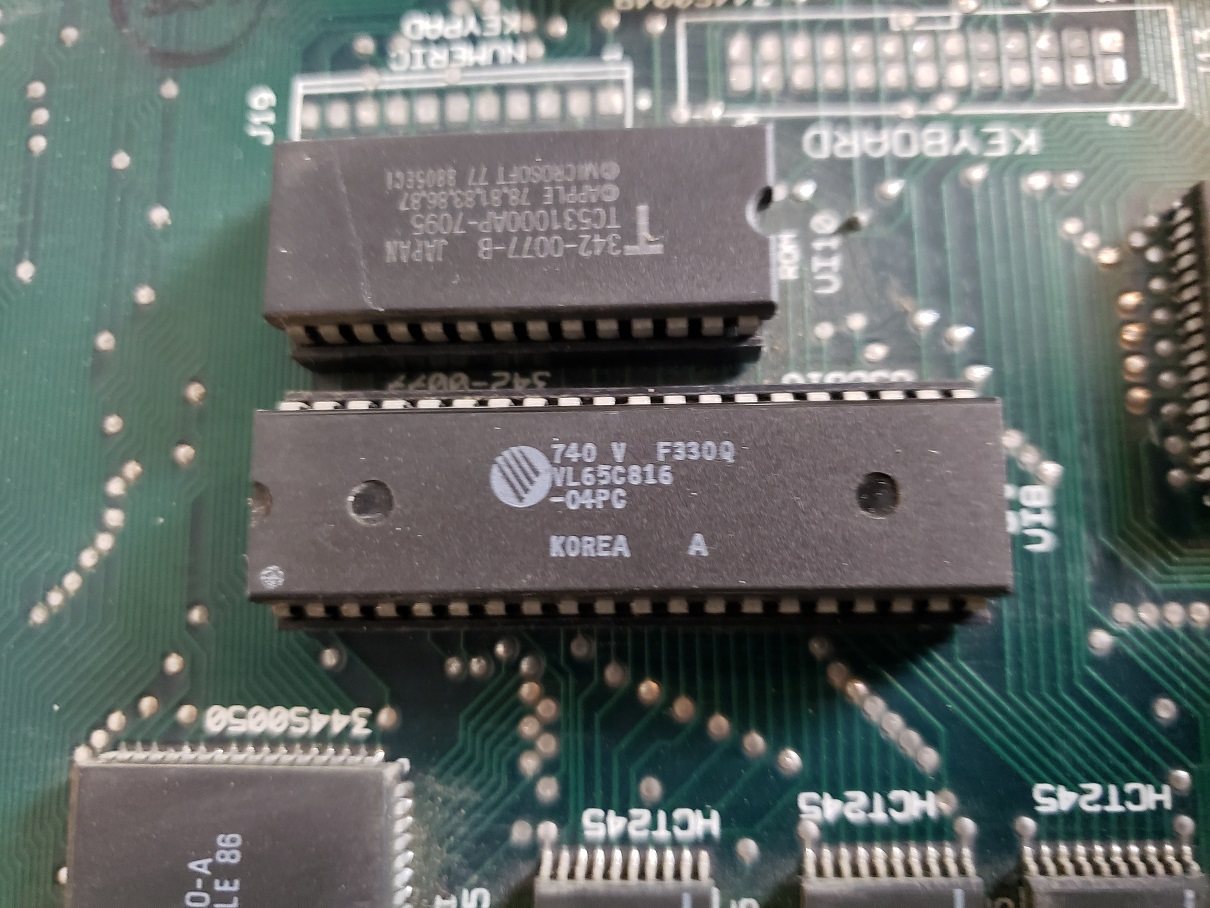
CPU) The Apple IIgs uses a 16-bit 65C816 running at 2.8MHz. Unfortunately despite being a capable CPU the low clock speed can hinder performance in more demanding IIgs games and generally it is recommended to install an accelerator if you wish to fully utilize the potential of the IIgs. The 65C816 was available at higher clock speeds (up to 14MHz) though Apple chose to hobble the IIgs, supposedly so it wouldn’t compete with the company’s then-new Macintosh line of computers.
RAM ) The memory map of the IIgs is a bit convoluted with memory being located on several positions on the board labeled as “sound”, “standard” and “fast”.
Understanding how it works can be complicated so I’ll just quote Tofro, a member over at the Vintage Computer Forums.
“The lowest 128k are set up like in the IIc: (48k main memory + 16k “Language Card” memory) * 2. The language card memory is bank-switched with the Apple II ROMs, because when in 6502 mode, the IIgs can address no more than 64k without bank-switching ) and the IIGS needs to behave like an “old” Apple II.
The rest of the standard 256k is only accessible when the 65816 runs in its native, 16-bit mode. Any memory expansion that goes in simply linearly attaches to the 256k upwards.
The Apple II memory emulation is controlled by the “Mega II” chip that basically emulates a classic Apple II memory layout in the lowest 128k. This lower half of the IIGS standard memory is run at 1MHz, just like in the Apple II (so it’s “slow” memory).
The upper half of the 256k is run outside the bank-switched area controlled by the Mega II at full speed of the 65816, so it’s “fast memory” ran at 2.8MHz (and any memory you add using IIGS memory expansion cards is also “fast memory”).
None of the marked PCB areas are actually ROM. To make things even more complicated, the IIGS also has “slow” (i.e. Apple ][-compatible) ROM and “fast” ROM only used in IIGS-native mode”
Video ) The Apple IIgs can output resolutions up to 640×200 in various different palette modes. graphics in Apple IIgs software are roughly comparable to the Atari ST and Amiga in terms of looks. In Apple II emulation mode Apple II games will be displayed in RGB if an RGB monitor is connected, generally, this is not an issue though some games could theoretically look off due to the difference in quality and lack of composite dithering.
Sound ) Sound capabilities are a stand out on the IIgs and are provided by an Ensoniq 5503 DOC providing a maximum of 32 channels of sound. The memory labeled “sound” on the motherboard is 64k of dedicated memory for storing wavetable samples.

Mega II) The Mega II chip is basically an “Apple II on a chip”. When playing non IIgs, Apple II software this chip takes care of most of the functions of an entire Apple II computer. Apple claimed 95% compatibility with older 8-bit Apple II software though that percentage from what I can find on the internet may be even higher.
Battery ) On the earlier ROM 0 and ROM 1 machines the battery is soldered directly to the motherboard and will likely be dead and require replacement or removal to avoid battery leakage. This will require snipping the connections to the board. Be sure to snip the connections close to the battery since this will make it easier to either solder on a battery holder or clip on a new battery. Later ROM 2 revisions of the IIgs used a battery holder similar to ones found in many Macintosh computers.
The Apple IIgs may be simultaneously the greatest of the Apple II line as well as the biggest missed opportunity. The excellent backward compatibility with the previous Apple II line gave this machine a massive backlog of software right out of the box while, besides its lower-clocked CPU, its video and sound capabilities gave the machine great potential to rival the Amiga, Atari ST, and other 16-bit competitors. Unfortunately Apple never really supported the IIgs in the way they should have and thus it never reached that potential. Although there is a good deal of Apple IIgs specific software it tends to be pricy while also available on other platforms. There really weren’t any exclusives for the IIgs with only the mediocre game Task Force coming to mind as an exclusive although the IIgs port of the arcade title, Rastan is said to be the best of the home conversions.
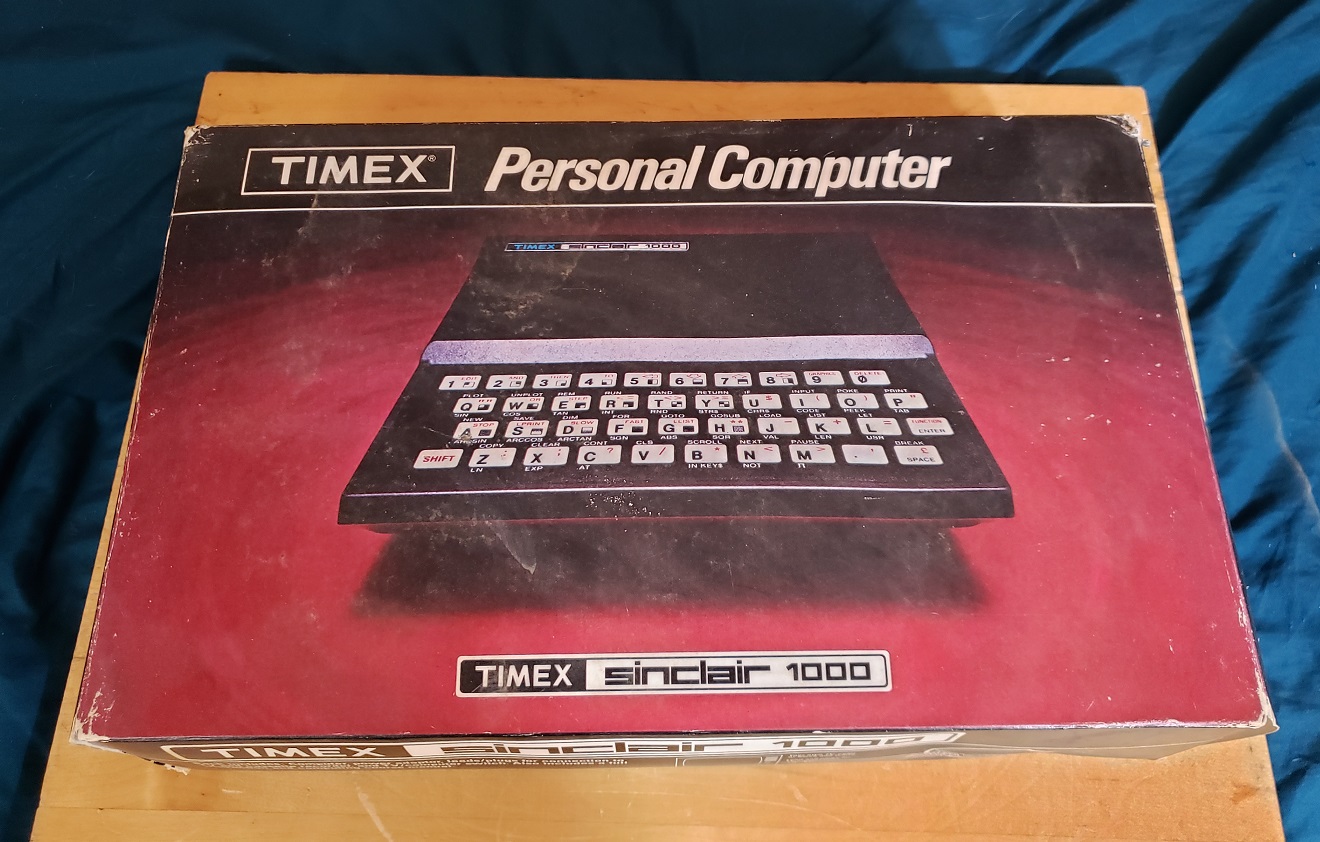
Sinclair is a name well-known in the retro computer scene, well at least in Europe. They are most well known for the Sinclair Spectrum line which was a very influential and widespread home microcomputer in the UK and Europe. Prior to the Spectrum Sinclair had the ZX80 and ZX81.
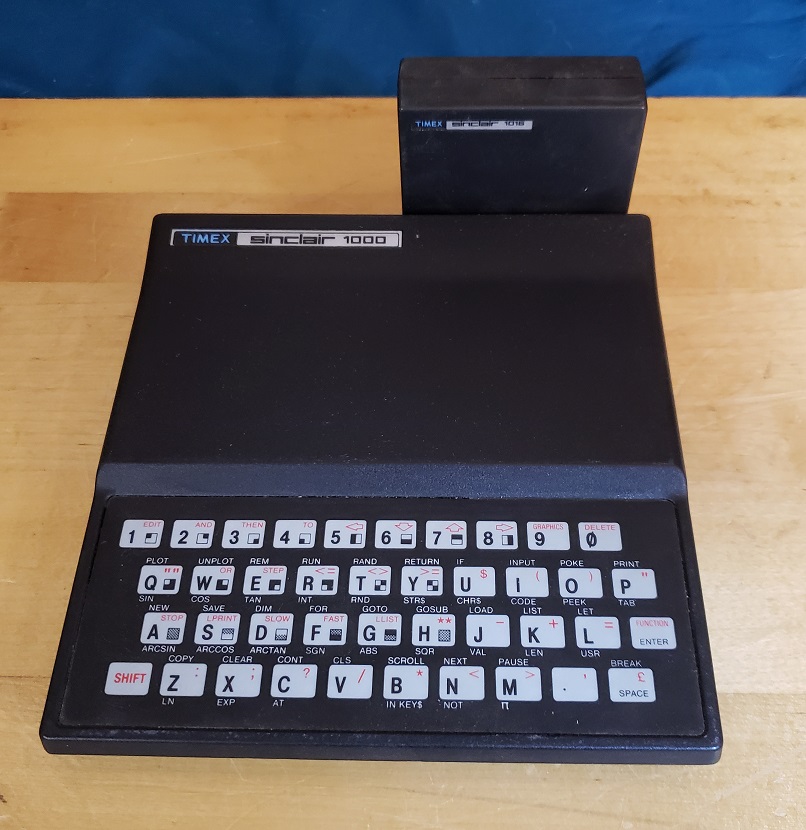
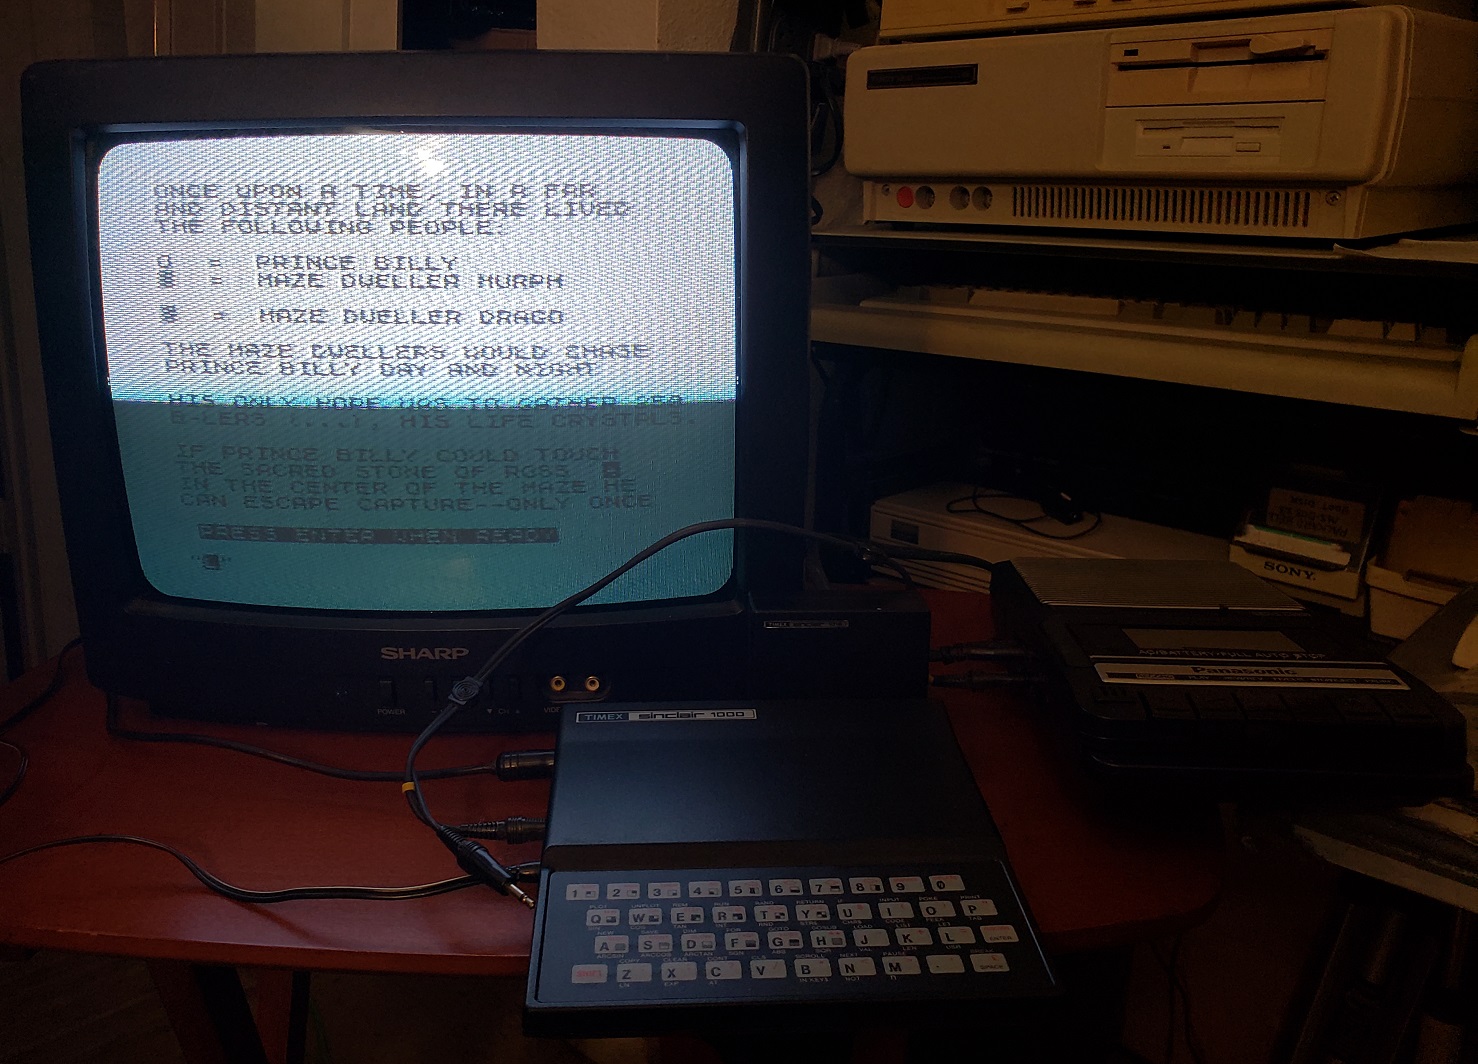
The Timex Sinclair 1000 released in 1982 is the officially licensed American version of the ZX81. The Timex version is mostly similar to the UK ZX81 with a few exceptions such as having an RF out for NTSC as opposed to PAL, a revised motherboard and it doubles the memory from a measly 1KB to a measly 2 KB.

The TS 1000 is very small and lightweight, weighing less than a pound. The keyboard, to be blunt, is terrible. It is a membrane keyboard with most buttons having multiple functions. It’s usable but just feels terrible and is completely useless for any serious typing.
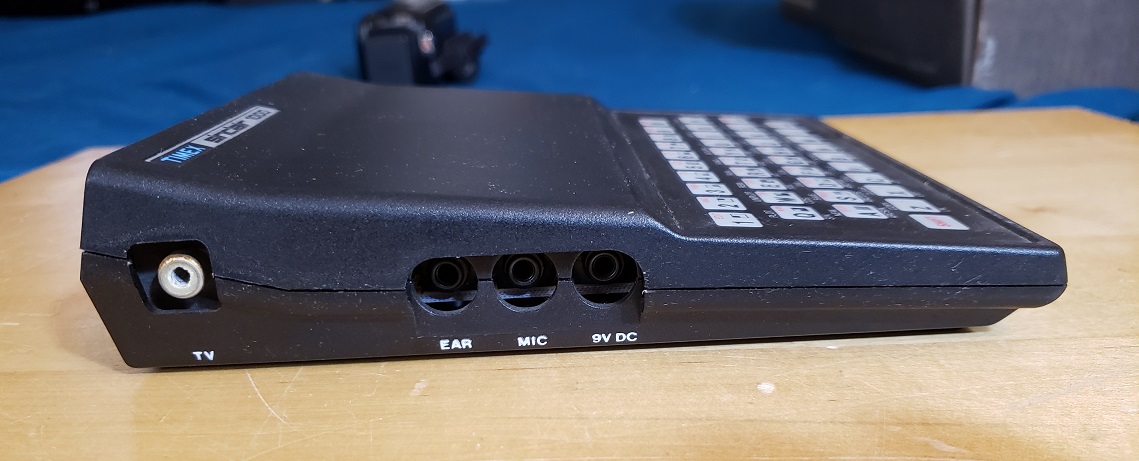
On the left side of the computer are all of the output and input jacks. Near the rear of the system is a large RCA-style video output labeled “TV” this is not composite but is an RF output. You’ll likely need some sort of adaptor piece or RF switch box to connect the RCA-style RF cable to your coaxial TV RF input. Further down the case, we have a series of three 1/8 jack inputs. The first two labeled “ear” and “mic” are for connecting a cassette recorder used for loading programs which all come on cassette tapes. The third jack is the input for the 9v power supply. There is no on/off switch. once plugged in the computer is always on.
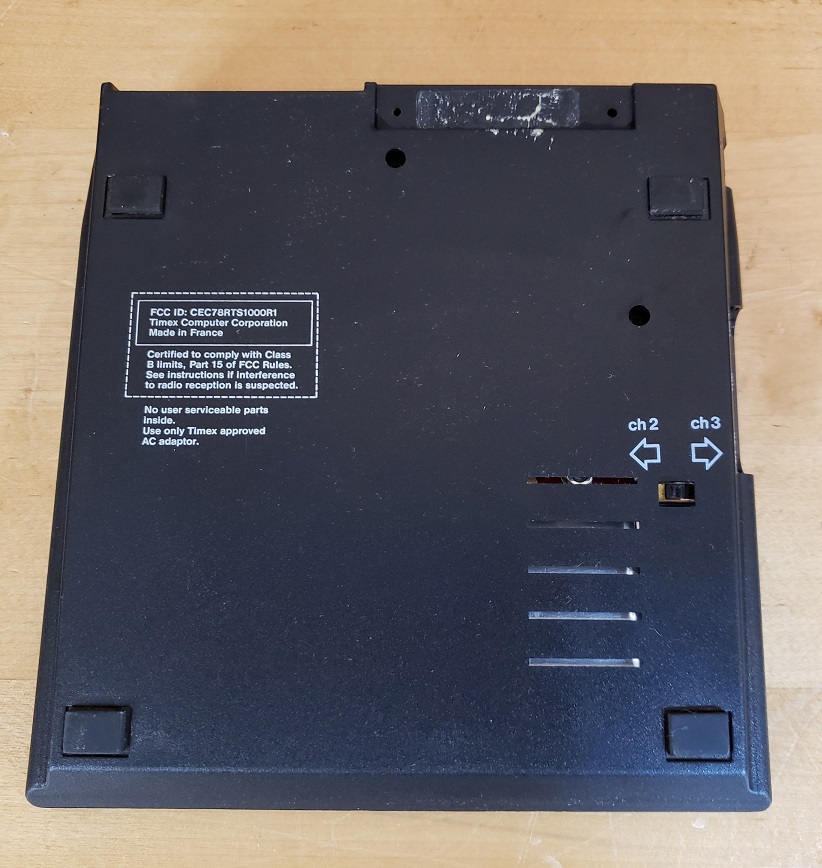
The RF channel select switch is located on the underside of the case and allows selecting between channels 2 and 3.
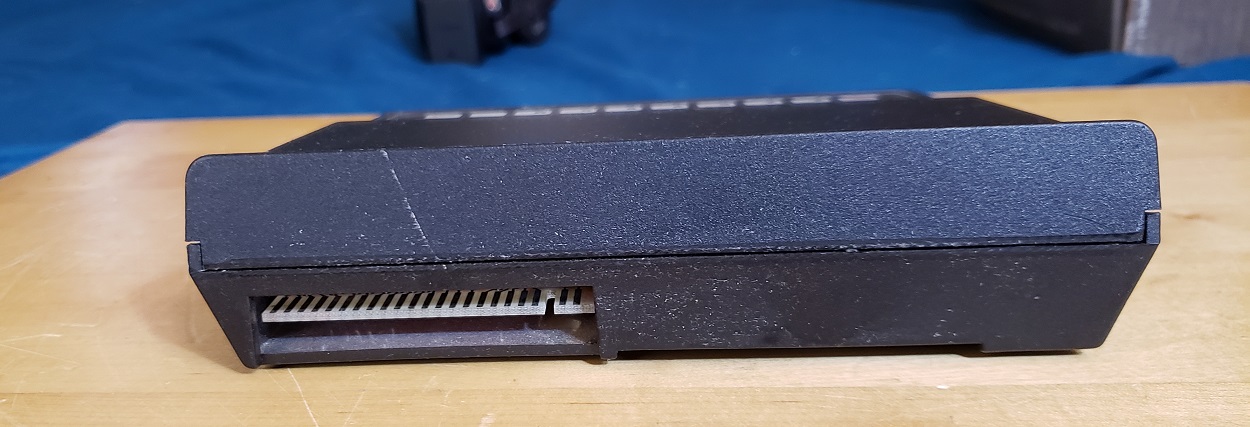
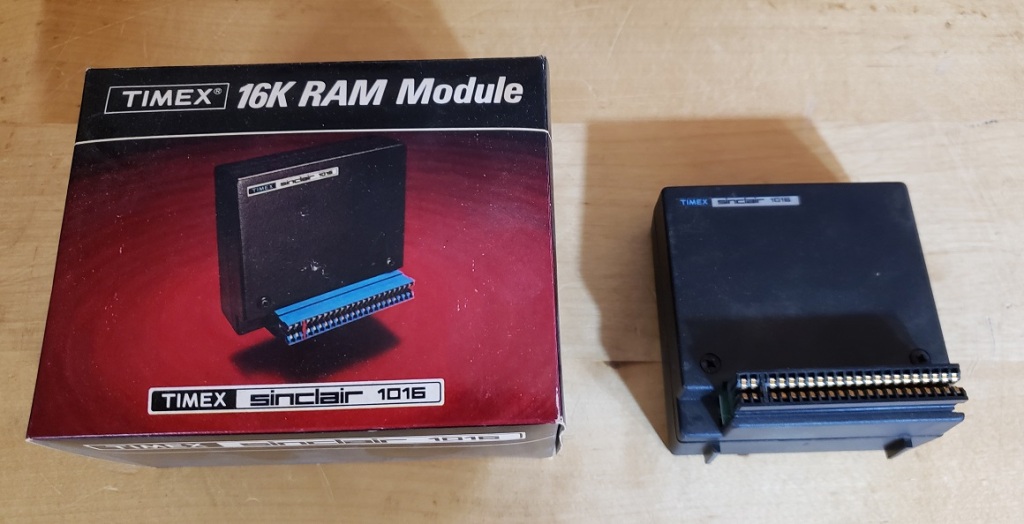
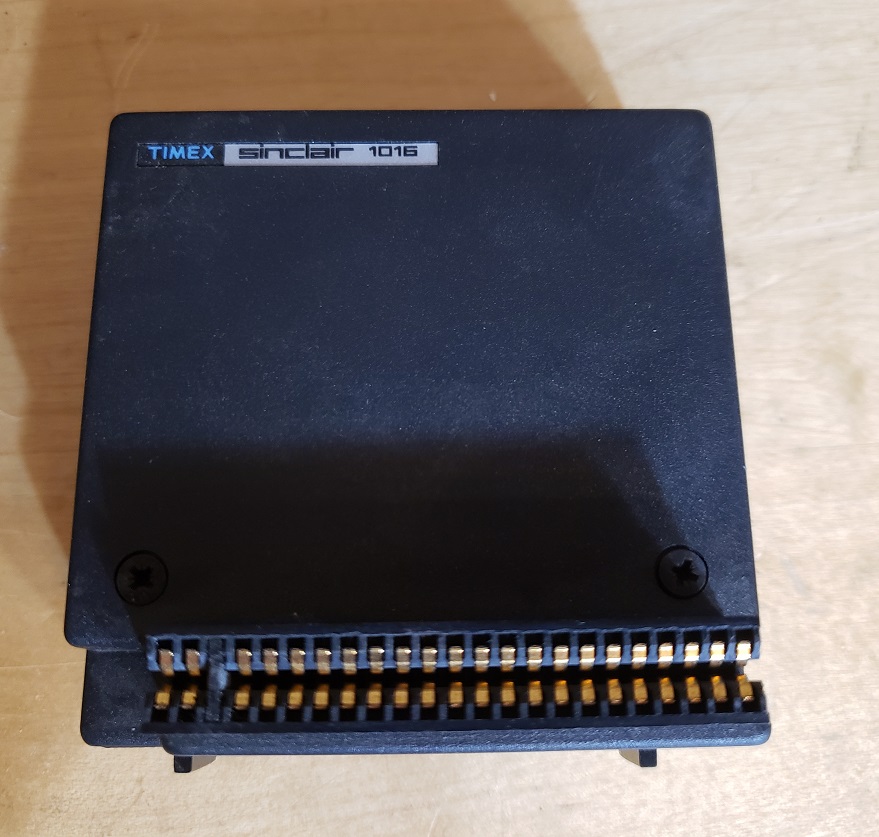
On the rear of the unit, we have a single edge style connector. The most common expansion unit used with this rear port is the 16k memory expansion. The TS 1000 is capable of addressing a total of 64k of memory though I’m unsure if any existing software could take advantage of that much memory.
This is more or less a must-have component as many games require extra memory to run. The connection between the extra memory and the TS 1000 can be finicky and an untimely jostle of the unit while in operation may corrupt your current session.
Opening the TS 1000 isn’t difficult but be careful of the keyboard ribbon cable as it may be fragile and difficult to reinsert into its connector.
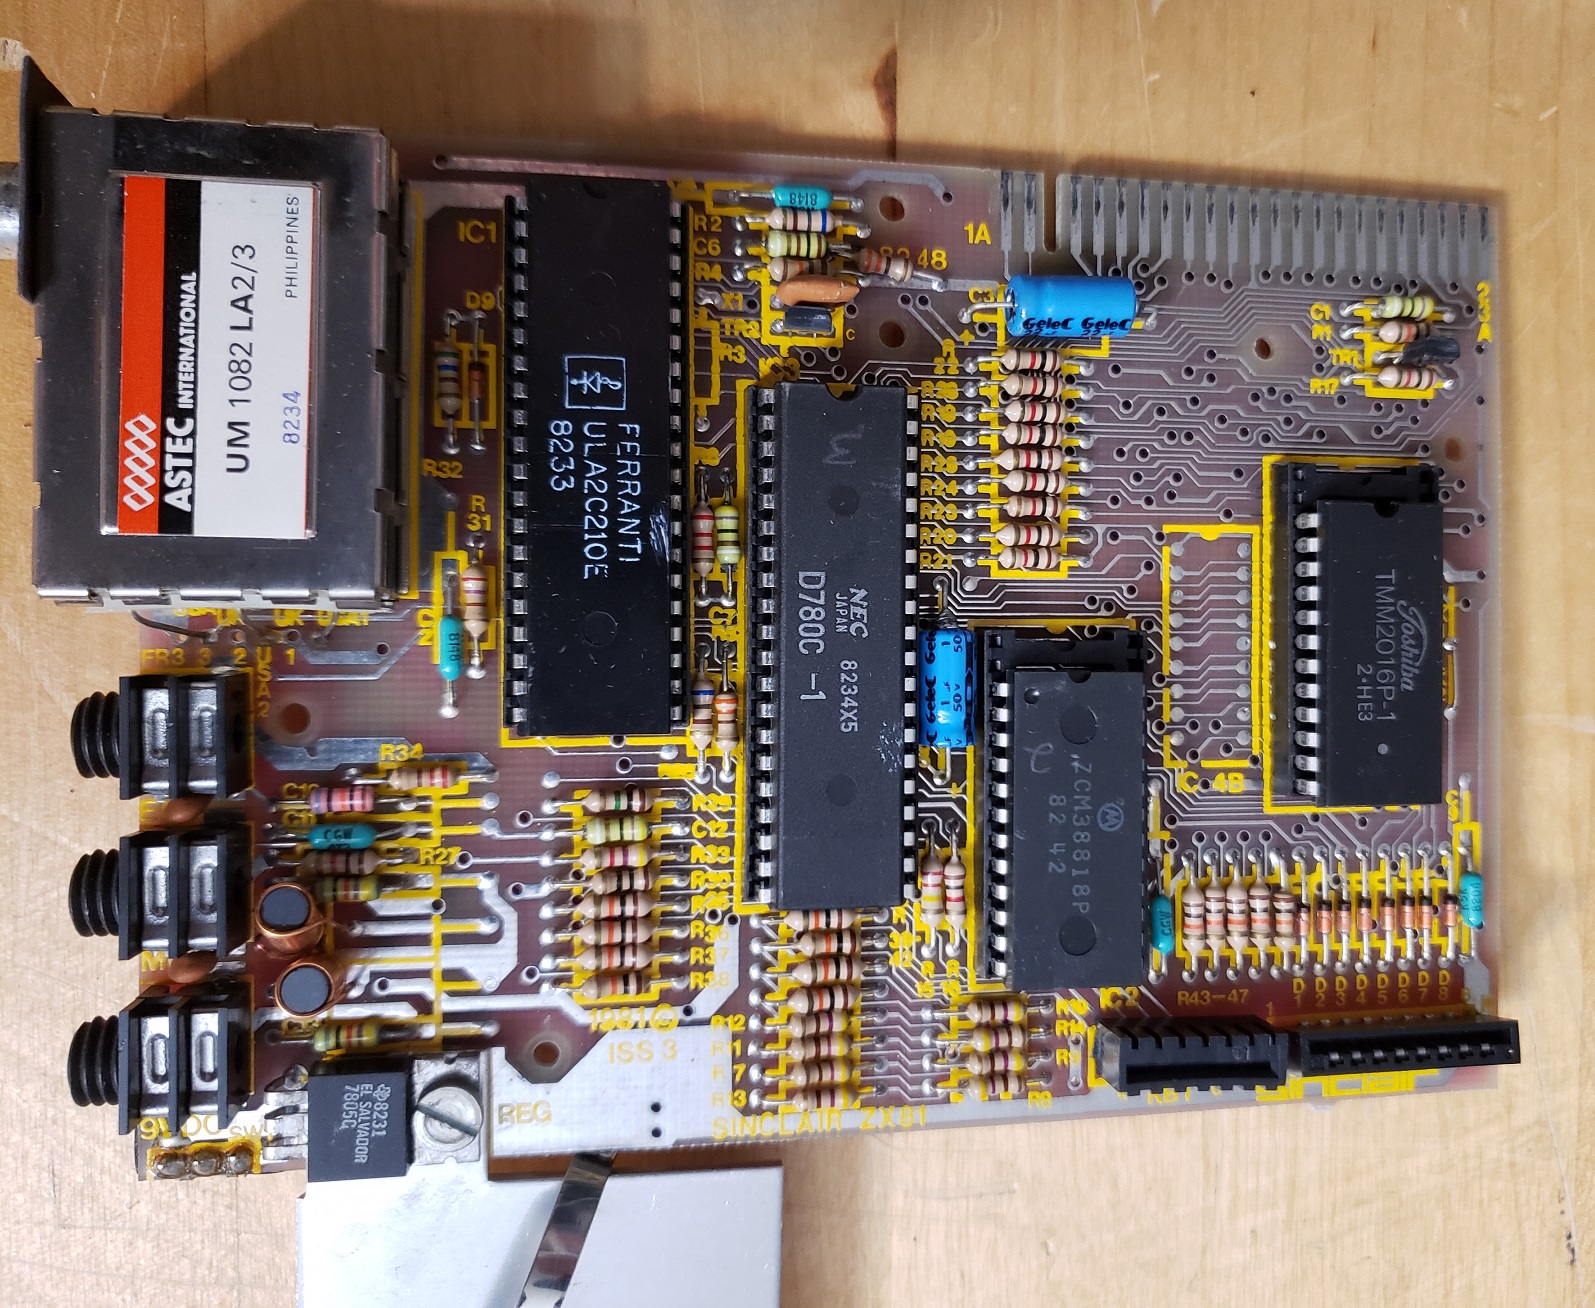
Starting from the far left I believe the first chip is the ULA chip.
The second chip is labeled NEC D780C -1, I was expecting a Zilog Z80 CPU running at 3.25MHz in this socket but the D780C -1 is a pin-compatible replacement. I’m unsure if this CPU is stock or was installed by the former owner as a CPU upgrade, sort of like replacing an Intel 8088 with an NEC V20. I am unsure what if any benefits a D780C would have over a Z80 though.
The third chip from the left is the ROM chip and the last is the system memory. It is nice that all these chips are socketed, at least on my revision. In the event of any particular chip going bad, this should make replacement quite a bit easier.
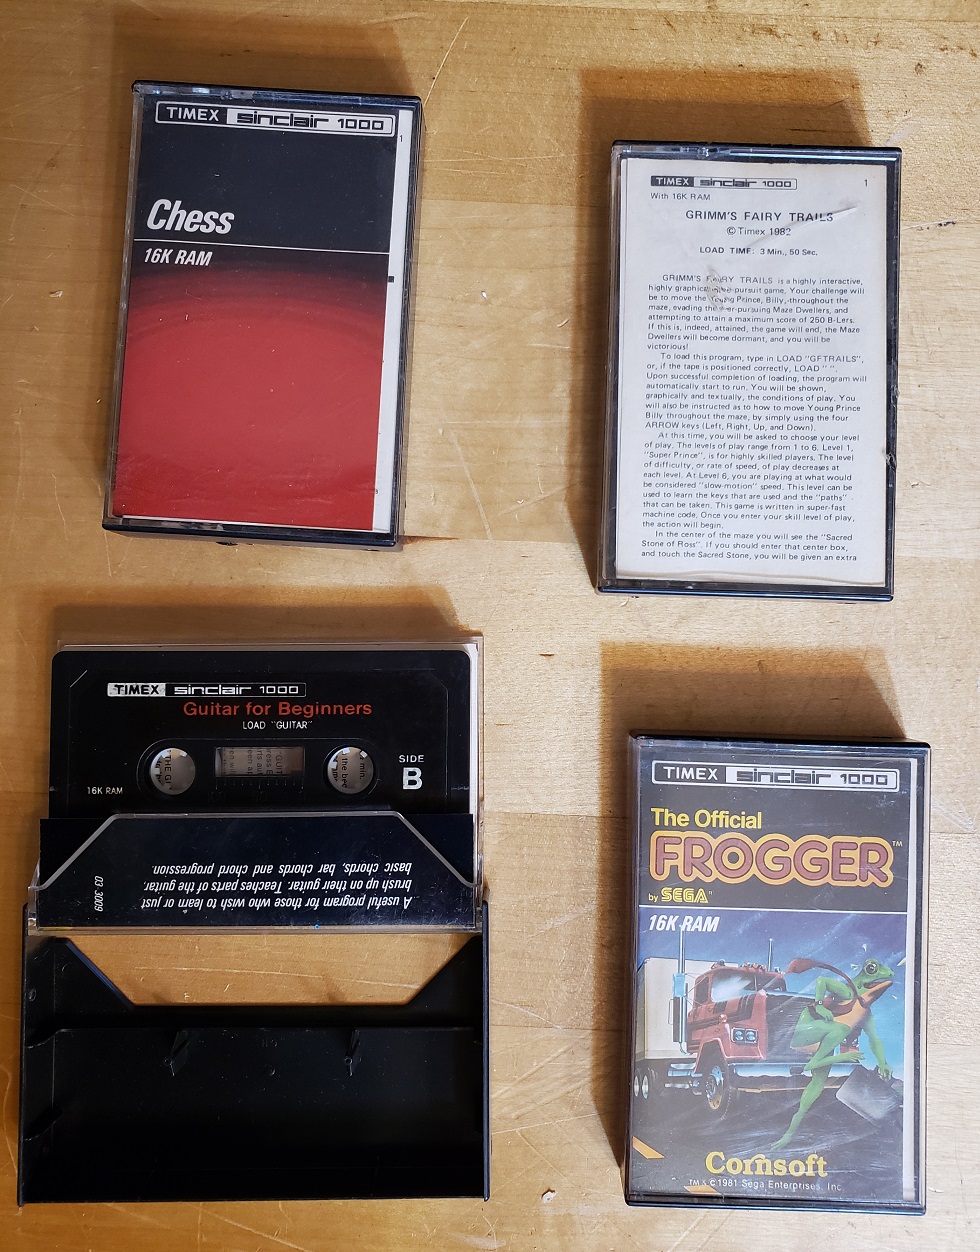
You could program your own simple games into the TS 1000 and in fact, many programmers got their start on this little machine. Commercial software however came on cassette tapes and mostly required 16k of RAM to run. this required a separate cassette recorder in order to load up the games. I used a Panasonic model and got good results loading games.
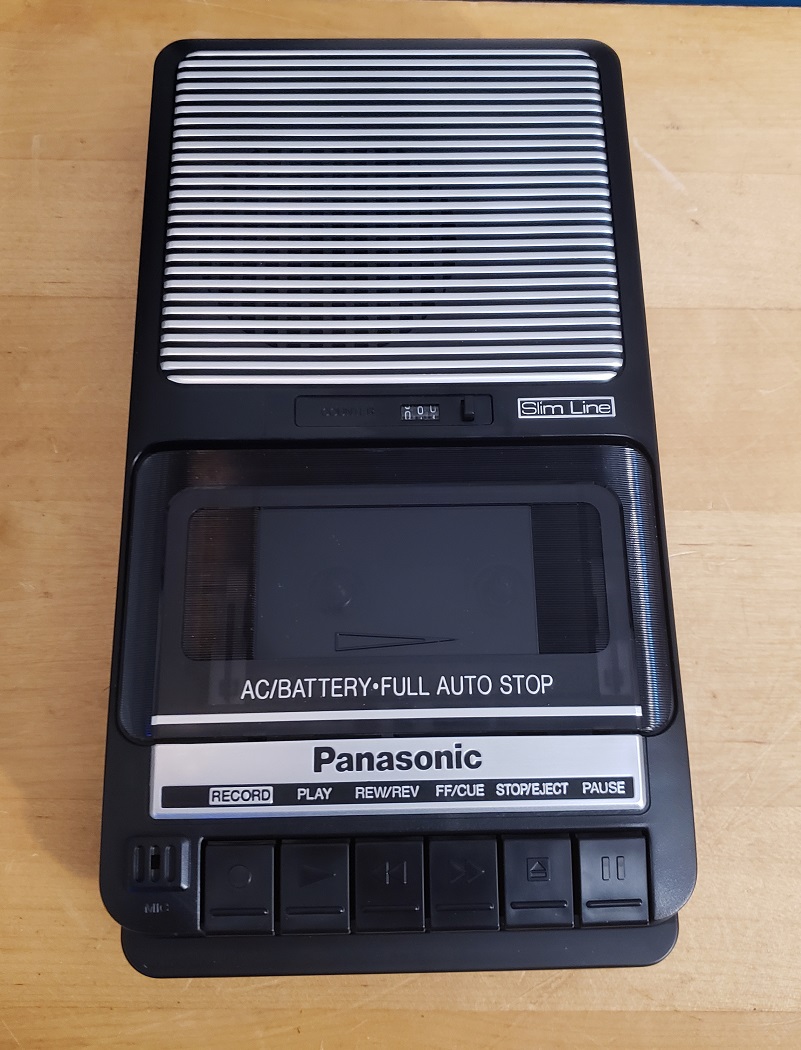
I did find some games just require the “ear” jack to be hooked up and not the mic and most games seem to want your volume control on the recorder to be about mid-way.
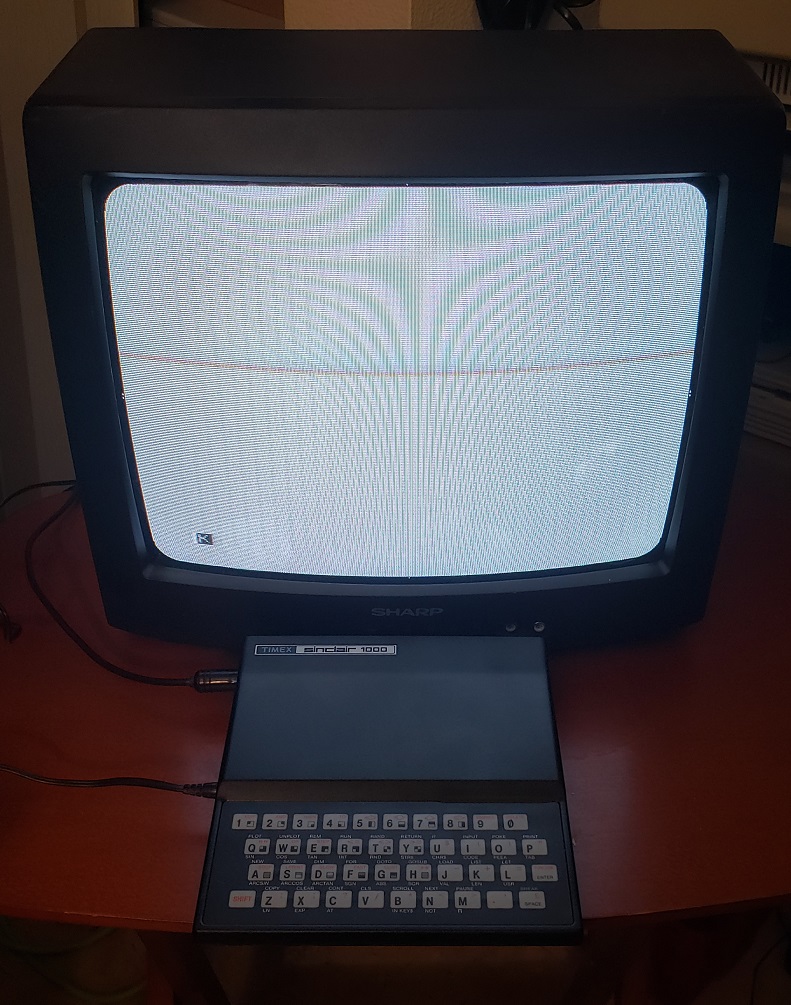
Funny enough, with all my CRT monitors I actually lacked anything smaller that had an RF input. Luckily I was able to source this nice late 90s Sharp TV set with composite and RF inputs. It’s also worth noting at this point that the TS 1000 only will display in black and white and has no sound capabilities.
The Timex Sinclair 1000, along with the Z80 and Z81 were influential microcomputers. They were relatively affordable and simple allowing many people to own a computer which otherwise may not have. It also seems many programmers first cut their teeth on programming on a Timex Sinclair 1000 or the like. As a serious retro computer in 2023, it’s really more of a novelty to own one, though prices are low enough to certainly pick one up if only for the collection. It is fun to learn some basic programming and if you’re willing to put up with the terrible membrane keyboard there are plenty of books or online instructions for making simple fun games but unless you have nostalgia for this micro I doubt you’ll spend much serious time with it. There are a few great games like 3D Monster Maze but if you’re looking for anything more complex or on the scale of something like Wizardry look elsewhere.
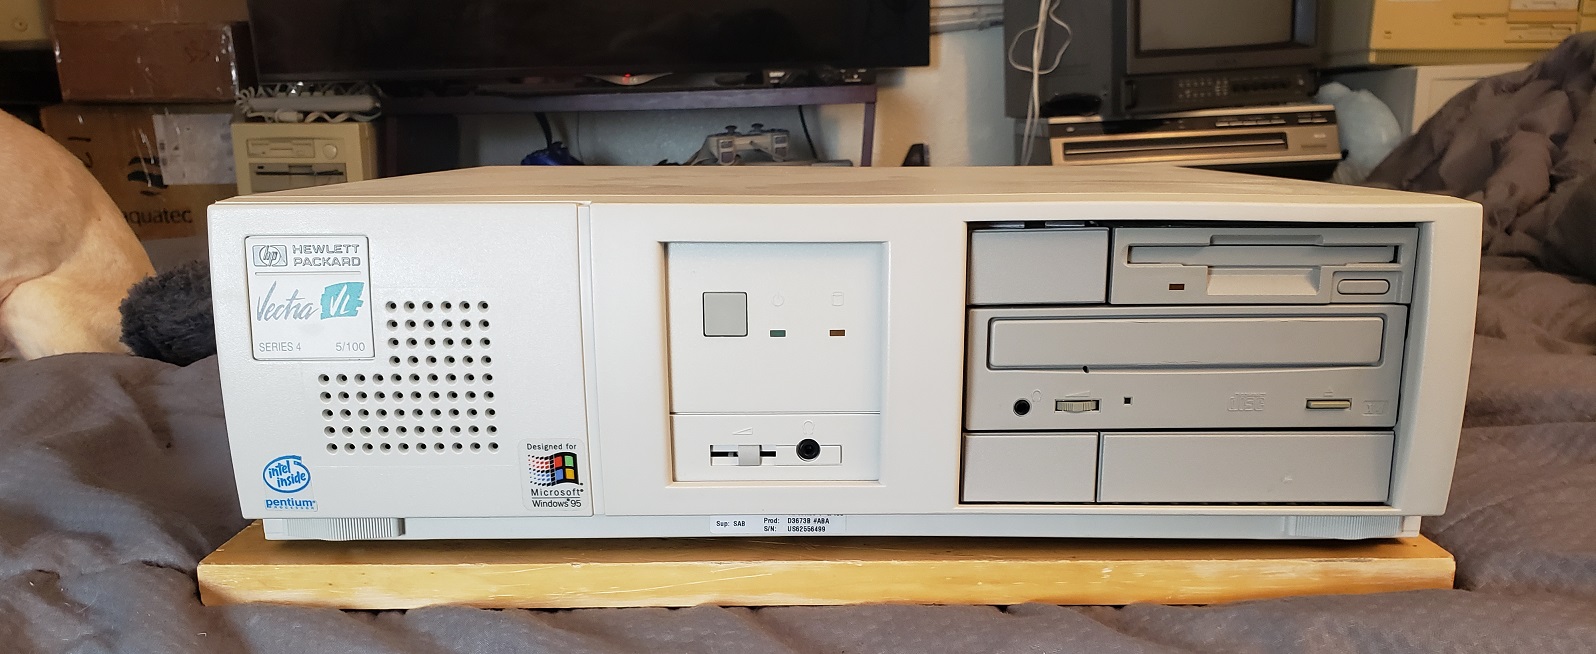
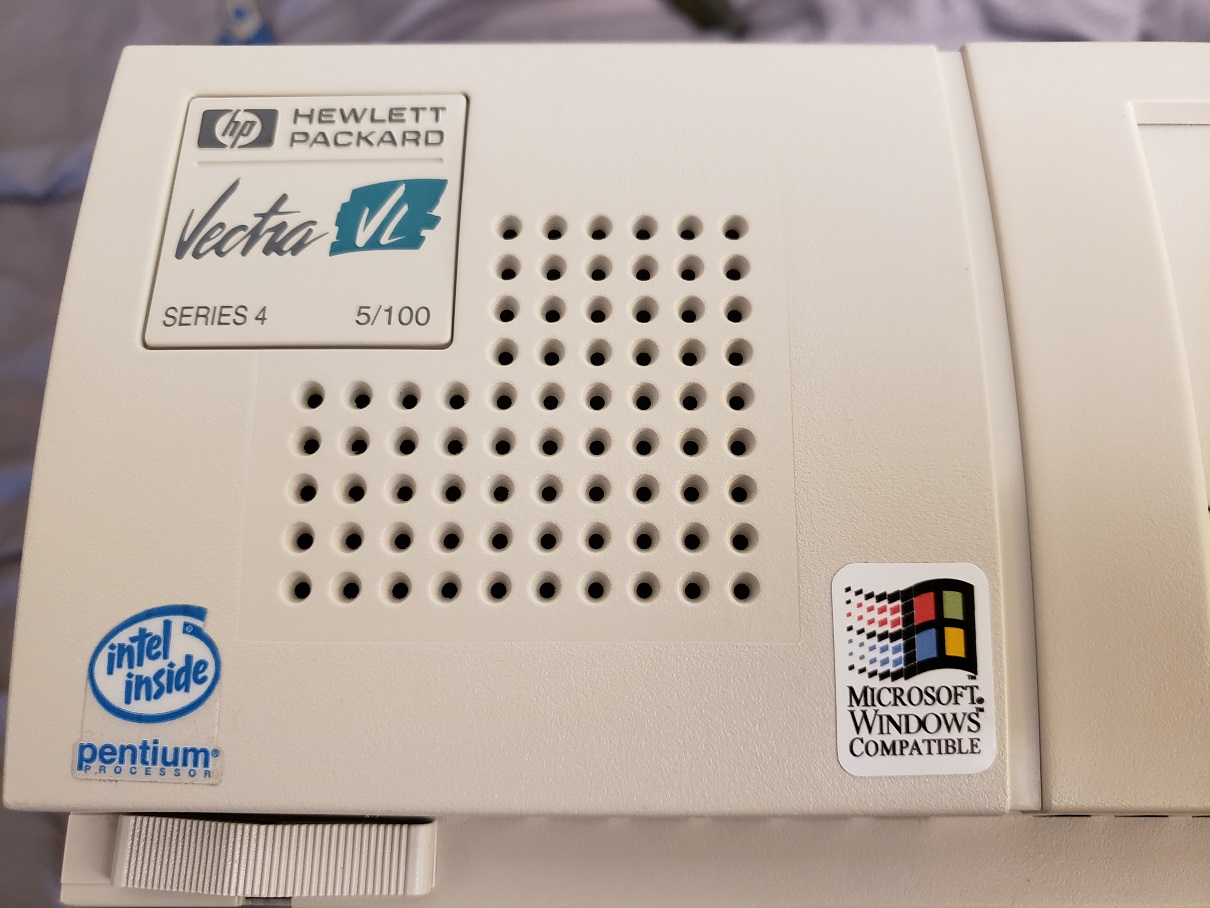
Today we’re going to be looking at another Vectra, This time the Vectra VL series 4 5/100. This Vectra uses a similar case to the Vectra VL series 3 5/90 that I did an article on some time ago although this one uses a socket 7 motherboard as opposed to the series 3 socket 5 board. The Vectra series were more designed as an office or work computers than anything else but with a few additions, I’ve found they make excellent DOS and Windows PCs. This Vectra has a designed for Windows 95 sticker but I decided to install DOS and Windows 3.11 instead.
On the front of the case we have a large speaker grill on the left side of the case. This Vectra does have a rather large full speaker behind this grill so one could get sound without speakers if you had no option though I really wouldn’t recommend it.
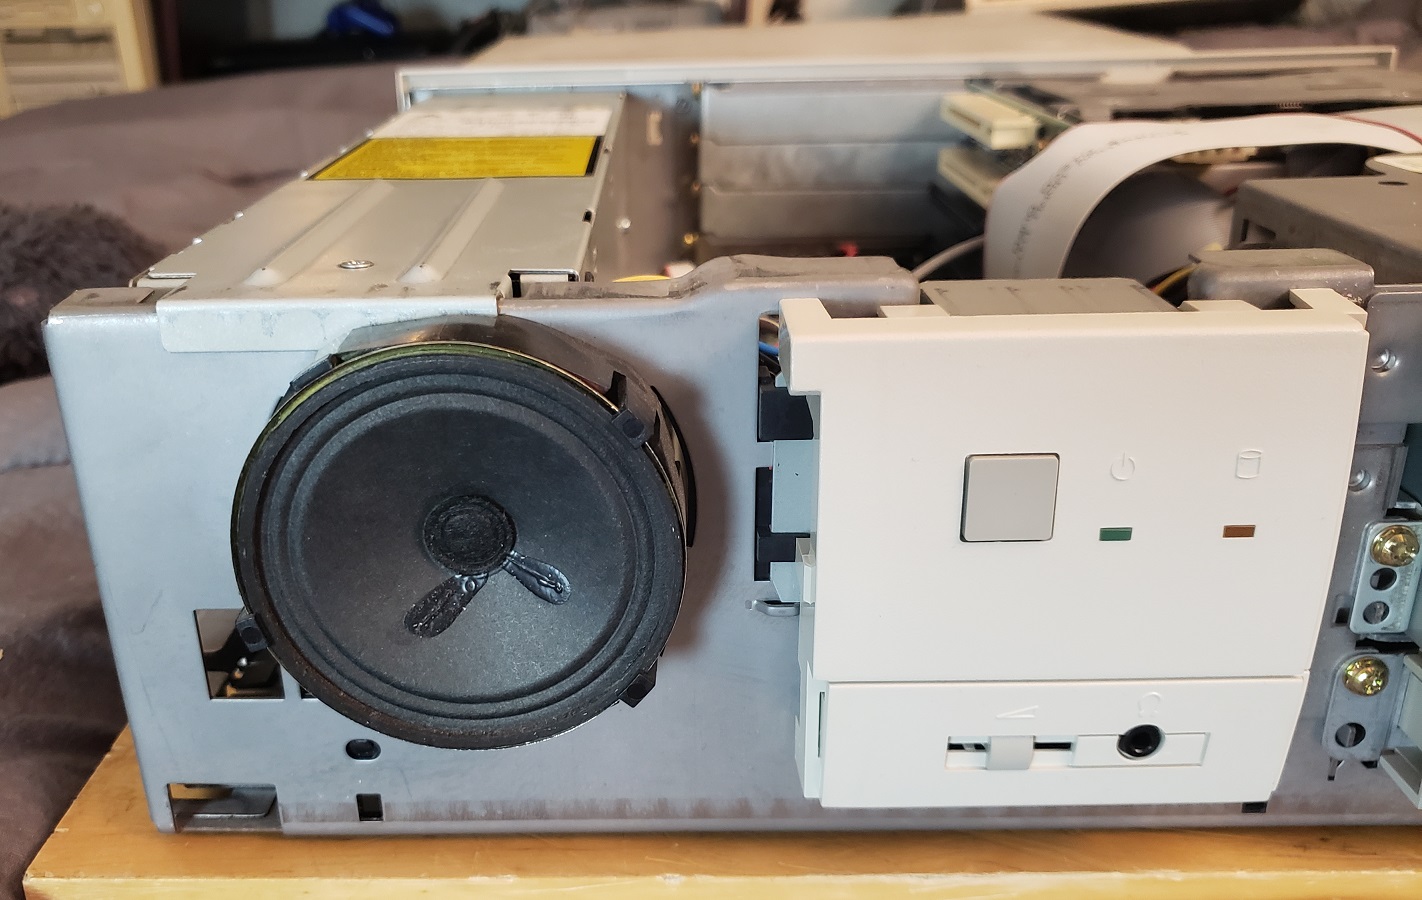
At the center of the front of our case we have a rather large square power button as well as LEDs for power and HDD activity, no reset button is to be found though. Below this we have a conveniently placed volume slider as well as a 1/8 headphone jack.
To the far right we have dual 3.5 bays as well as a single 5.25 bay though I think I would have preferred dual 5.25 bays. My current setup has the original CD-ROM drive and one 1.44MB floppy drive installed though I’ve considered adding a ZIP drive to the lower 3.5-inch bay.
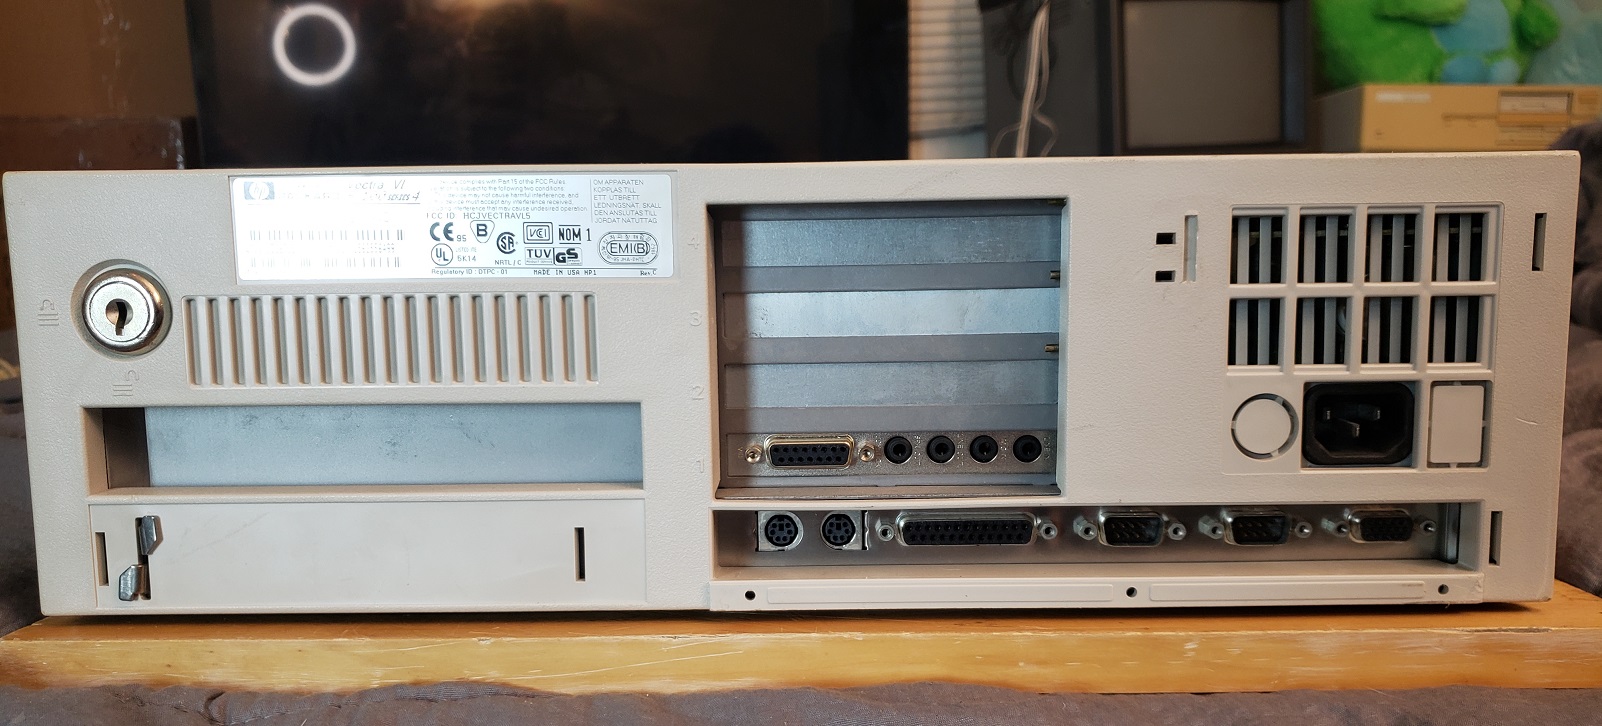
On the back of the case there is what appears to be a slot on the left side. I believe on some models that this slot is used for an optional network connector card but on this model the slot is not present.
Next to this we have four vertically oriented expansion slots. below the expansion slots we have multiple built-in I/O. starting on the left we have dual PS/2 ports for the keyboard and mouse followed by a parallel port, two serial ports and then finally a VGA out port for the built-in video. Lastly, we have a standard 3-prong power connector on the right of the case.
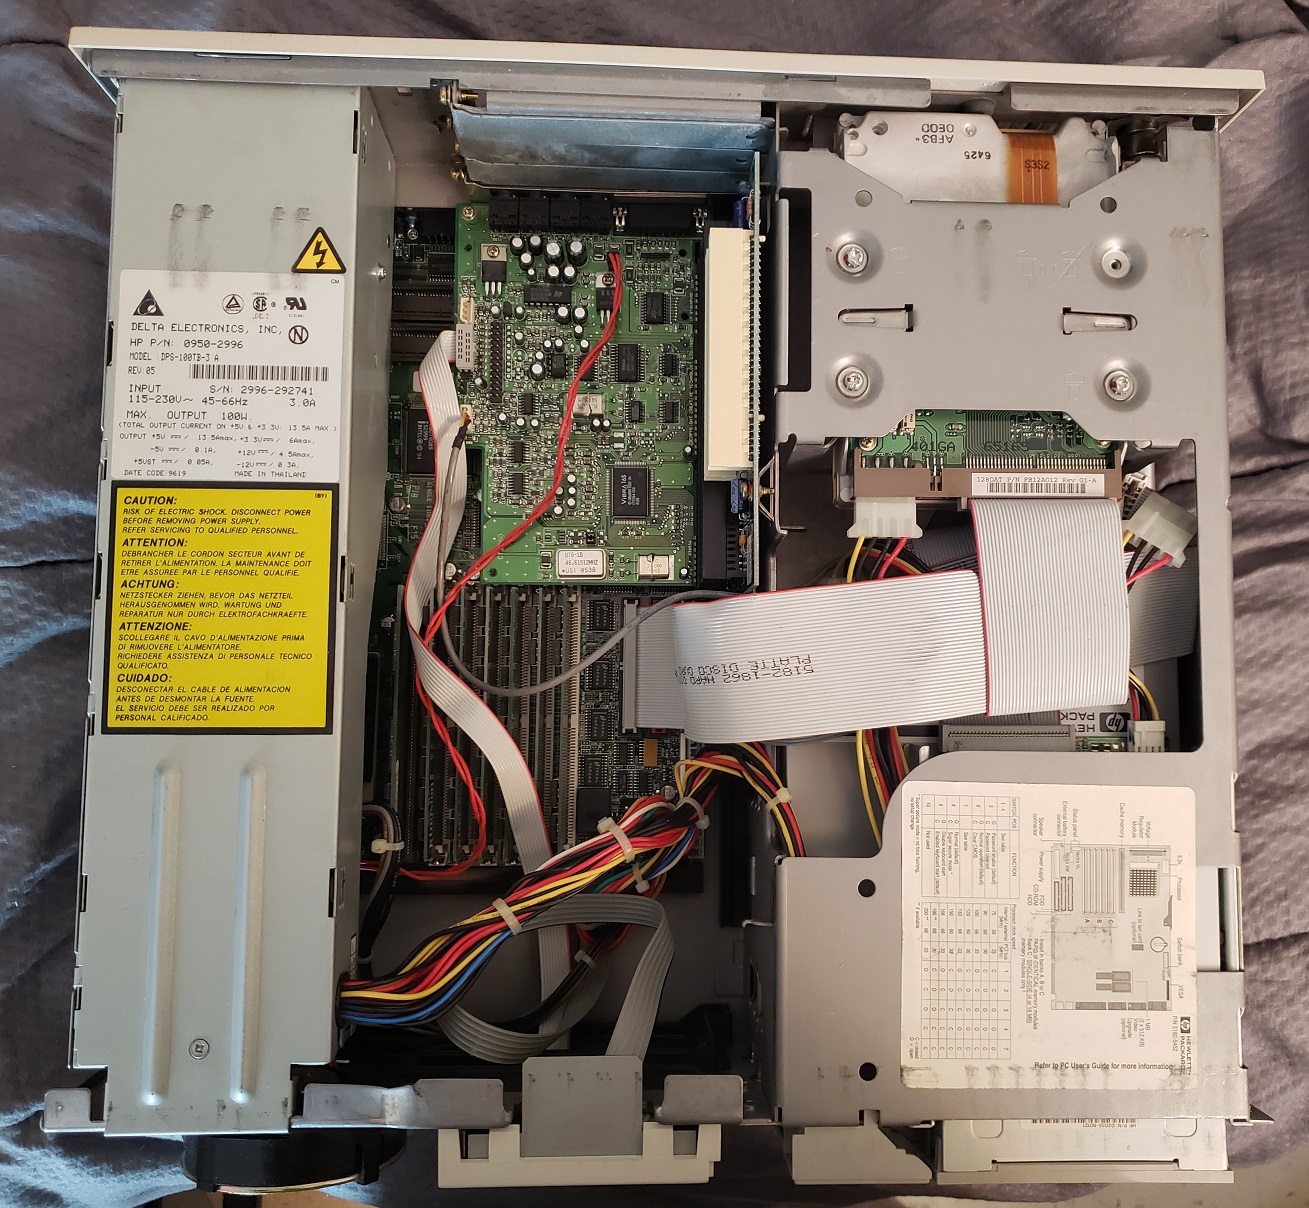
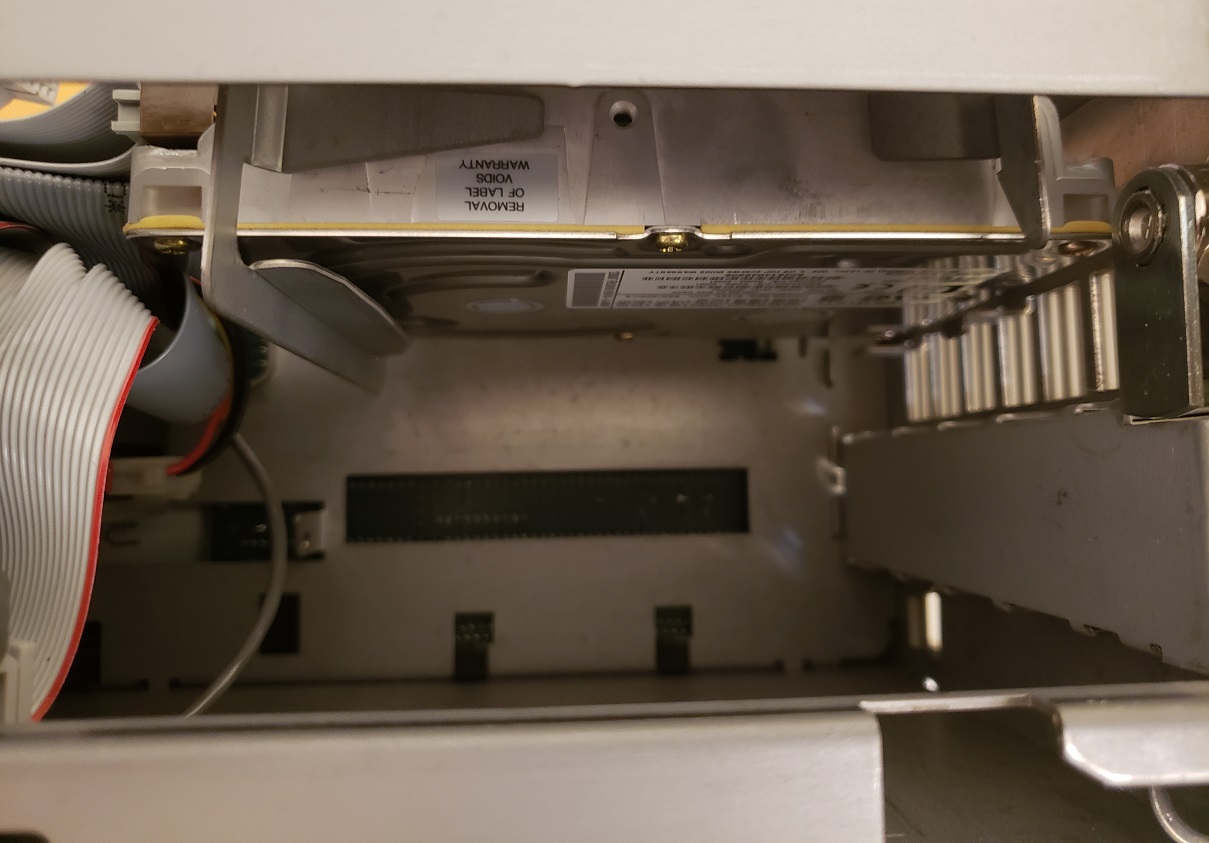
Here is the Vectra with the top cover removed. The proprietary power supply on the left which also acts as a cooling fan for the CPU can easily be removed by pulling it up and out. On the right we have the drive bays to the front of the case and behind these we have a spot for a hard drive to be mounted in a horizontal upside down orientation.
The motherboard as we can see above uses the Triton 430FX chipset and uses a riser card for connecting expansion cards.
1) CPU – The CPU on this Vectra VL is a 100MHz Pentium. This is a good all around CPU for late DOS titles and Windows 3.1 or even Windows 95. The socket 7 board does allow for a wide range of CPUs to be installed from 75MHz to 200MHz non MMX. There is a voltage regulator module next to the CPU socket and I believe with the proper module MMX CPUs can be installed.
Next to the CPU socket on the left is also an AUX power connector for the proprietary power supply.
2) L2 cache – This board uses a pipeline burst COAsT module for L2 cache memory. COAsT modules or cache on a stick was a fairly common method of adding L2 cache on the early socket 7 motherboards. The module on my board was a standard for the time 256KB though larger ones may be available. running without the module installed can significantly degrade performance.
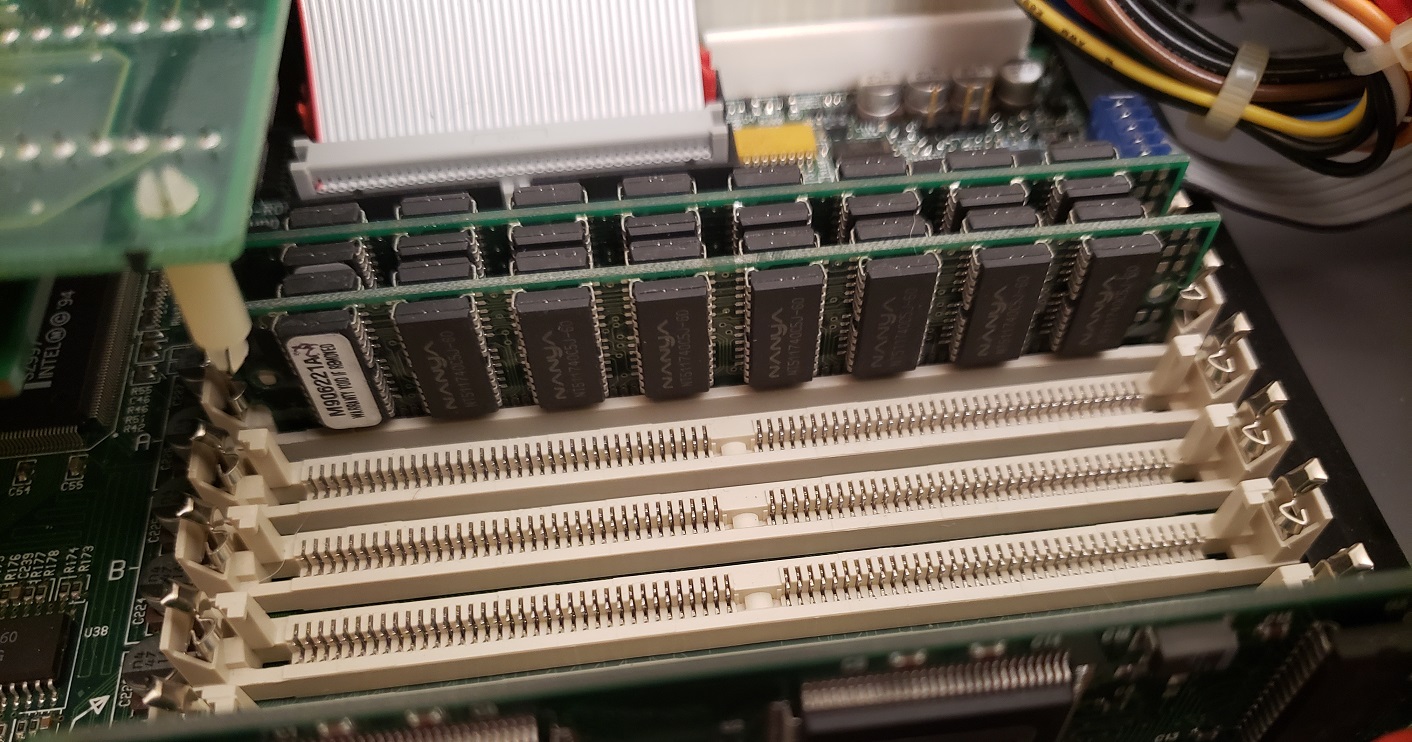
3) RAM – This board has six slots for accepting 72-pin memory modules. The max memory wasn’t stated but going by the chipset the maximum memory should be 128MB. When I received this PC I believe it had 16MB of RAM installed but I upgraded it to 64MB total via two 32MB sticks of memory as seen below.
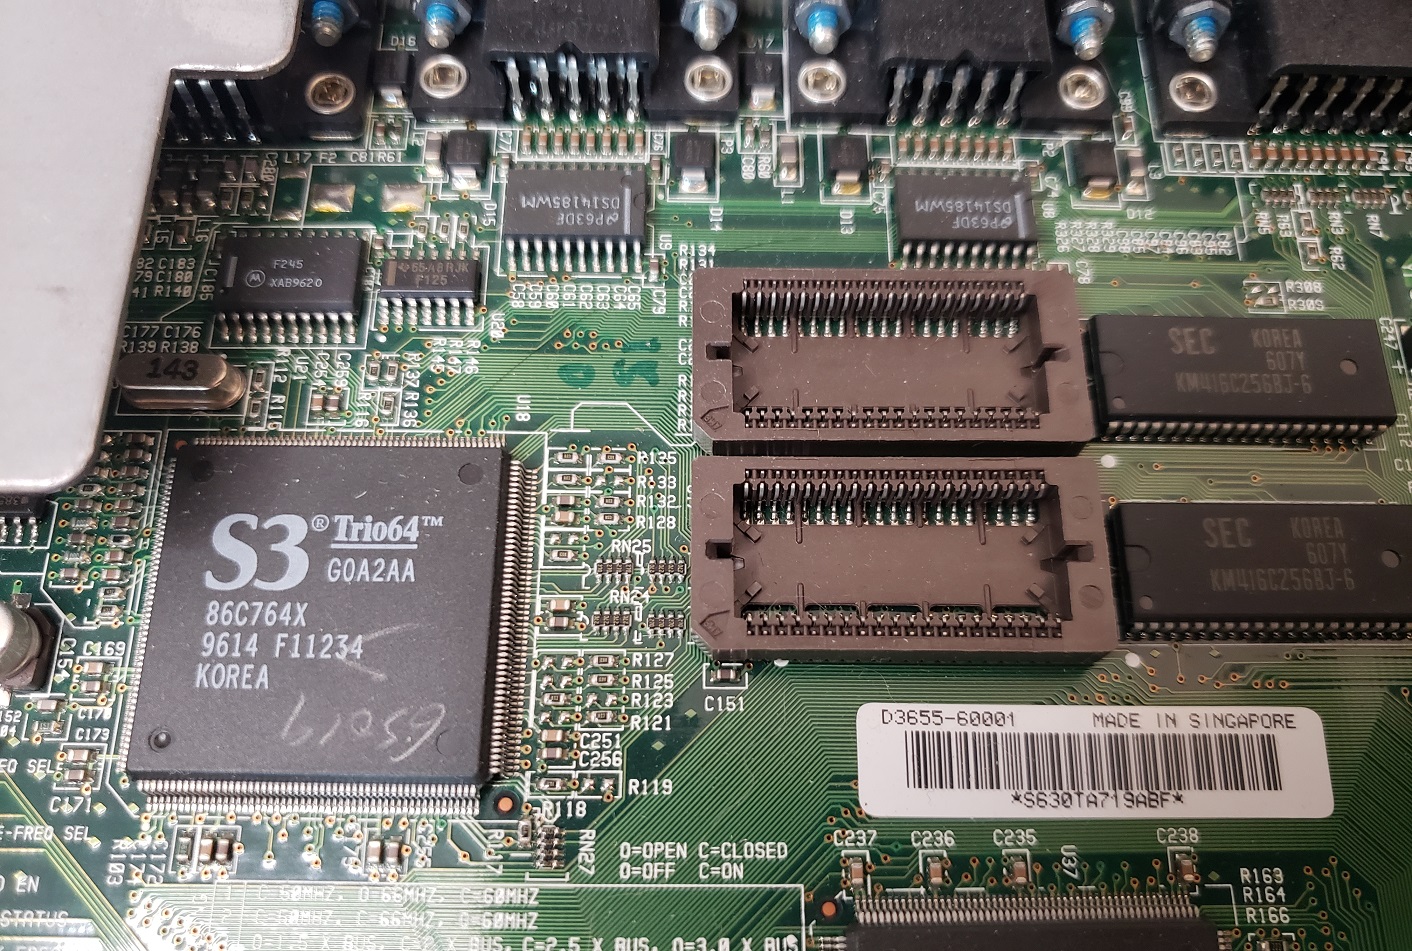
4) Video – on-board video is provided by a Trio64 video chip and 1MB of video RAM expandable to a full 2MB. The S3 Trio64 is an excellent 2D chip for DOS gaming and should provide maximum compatibility with games. If you’re building a pure DOS PC the built-in Trio64 should be sufficient for most needs but There are faster options available if you’re willing to install a PCI video card.
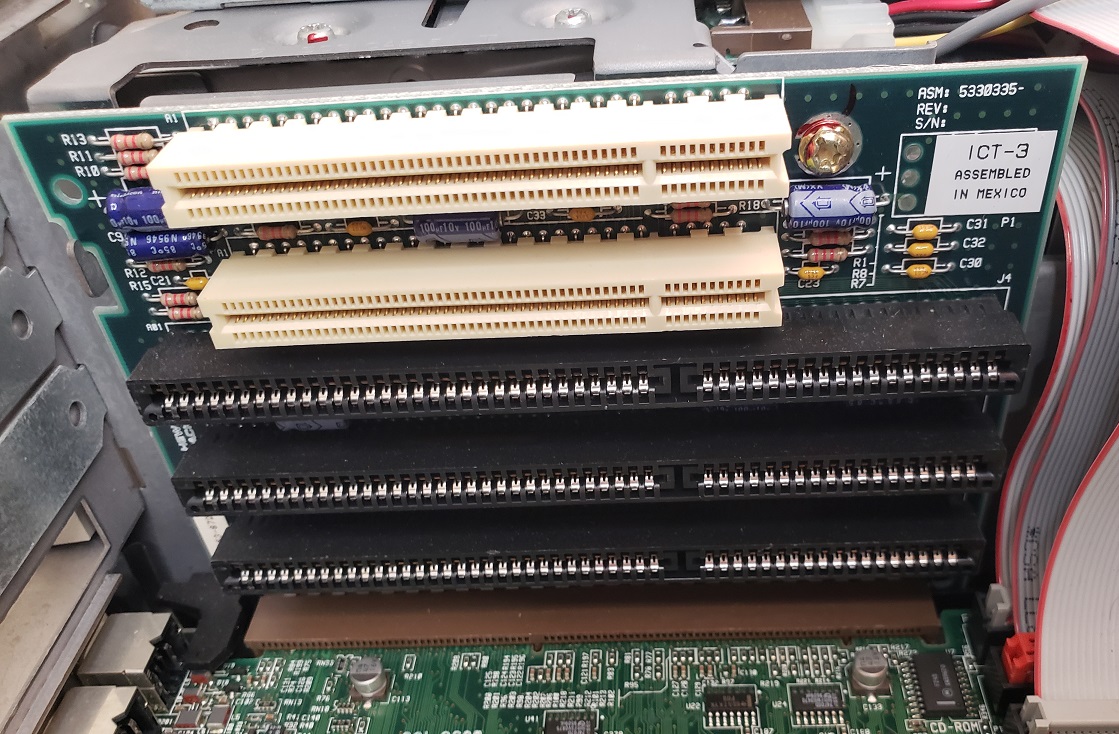
5) Riser Card – The riser card provides five expansion slots in total, two PCI and three 16-bit ISA. The two PCI slots can be utilized for a primary video card as well as a Voodoo card for 3D if desired for a significant video upgrade.
6) IDE and a floppy connector supporting two floppy drives and four IDE devices.
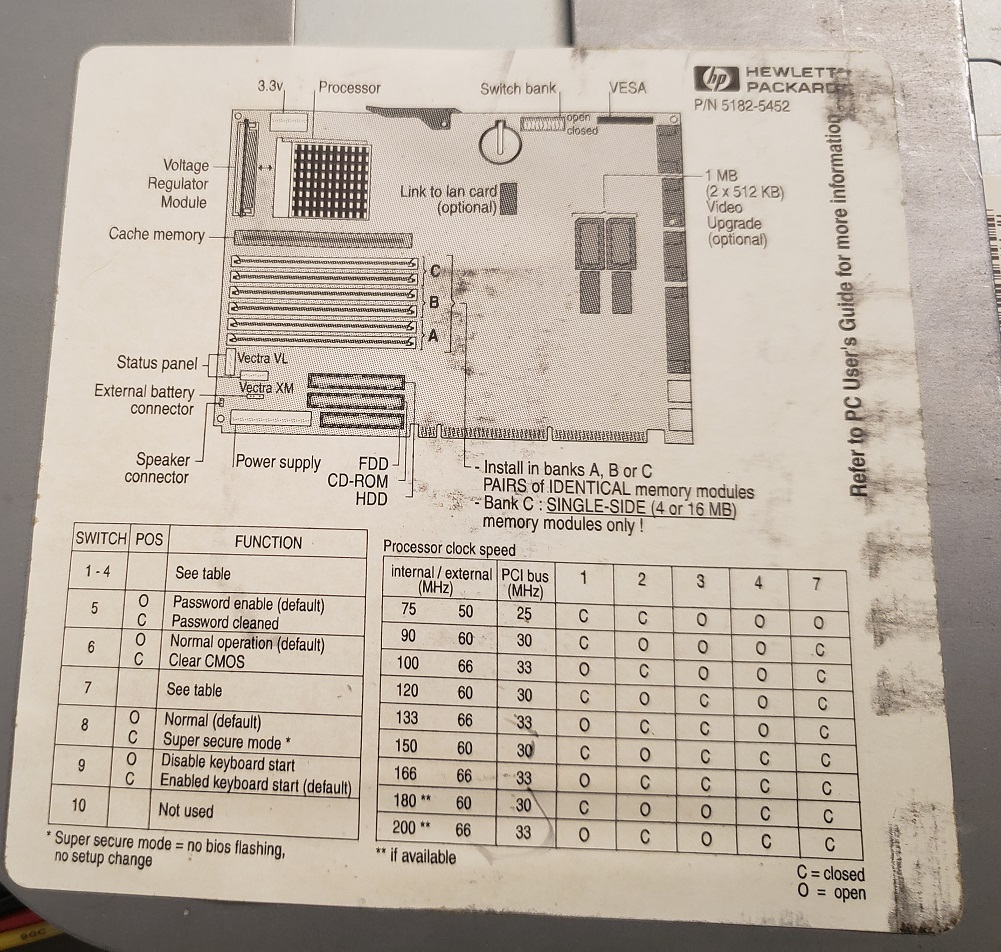
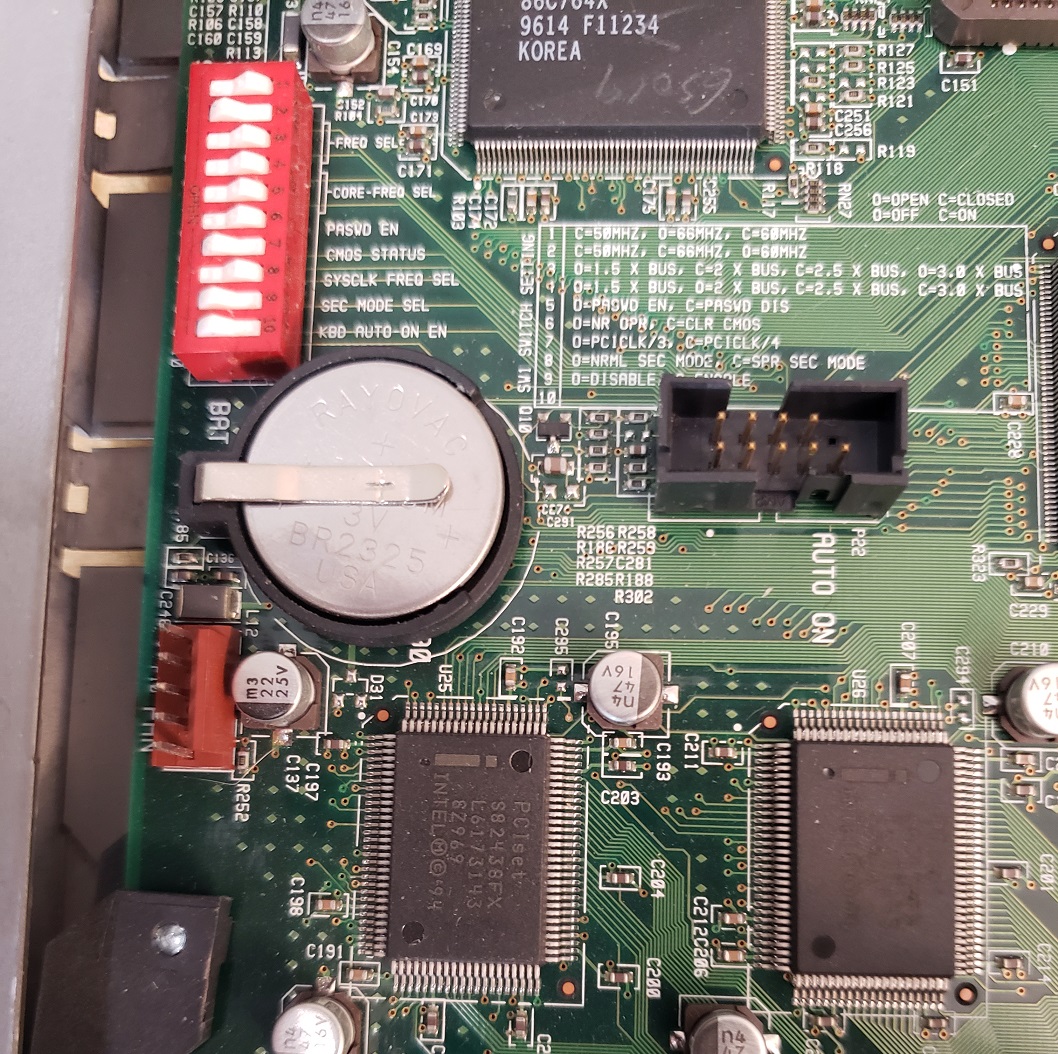
7) CMOS battery and switch box – The switch box is used to configure things such as enabling passwords, clearing the CMOS battery and most importantly configuring the board to the CPU you have installed. please refer to the chart further up the page for settings. settings can be found on the case sticker over the drive bays as well as silkscreened onto the board itself.
Expansion Cards
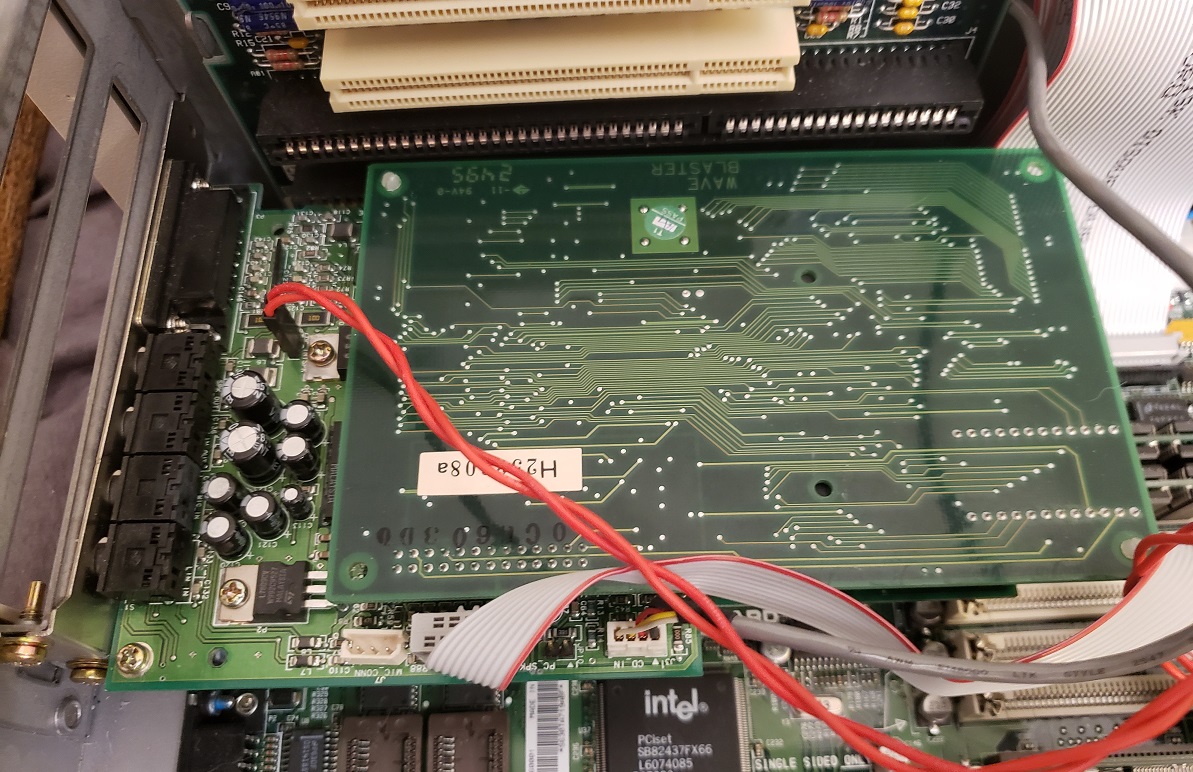
Sound – The Vectra VL series 4 5/100 did not have sound built into the board but my machine did come with what appears to be an OEM Sound Blaster ISA card which had a connector to interface with the front panels’ audio.

The card is a 16-bit ISA Sound Blaster model CT2860 with the Vibra16S chip on board. This board does provide a real Yamaha OPL3 chip as well as a wavetable header, midi/joystick port and a speaker connector as well as a connector to the front panel audio that I have never found on any other Sound Blaster card. Unfortunately, this card does suffer from the hanging midi bug if using it with a wavetable card. I also read online when researching these cards that several users described it as a “noisy” card though when I used it myself I found it quite adequate and it sounded just fine in my testing (though I’m not an audiophile).
You can replace this card with any ISA or PCI sound card though you will lose the ability to connect the new card to the front audio controls on the case. Despite the hanging note issues with this card I did decide to keep it installed and even installed my Creative Wave Blaster midi card.
Video – For video I decided to upgrade to a faster PCI card. Although PCI 2D/3D combo card options are abundantly available I decided to go with a discrete 2D and 3D card. For 2D video I decided to go with a ArkLogic based card.
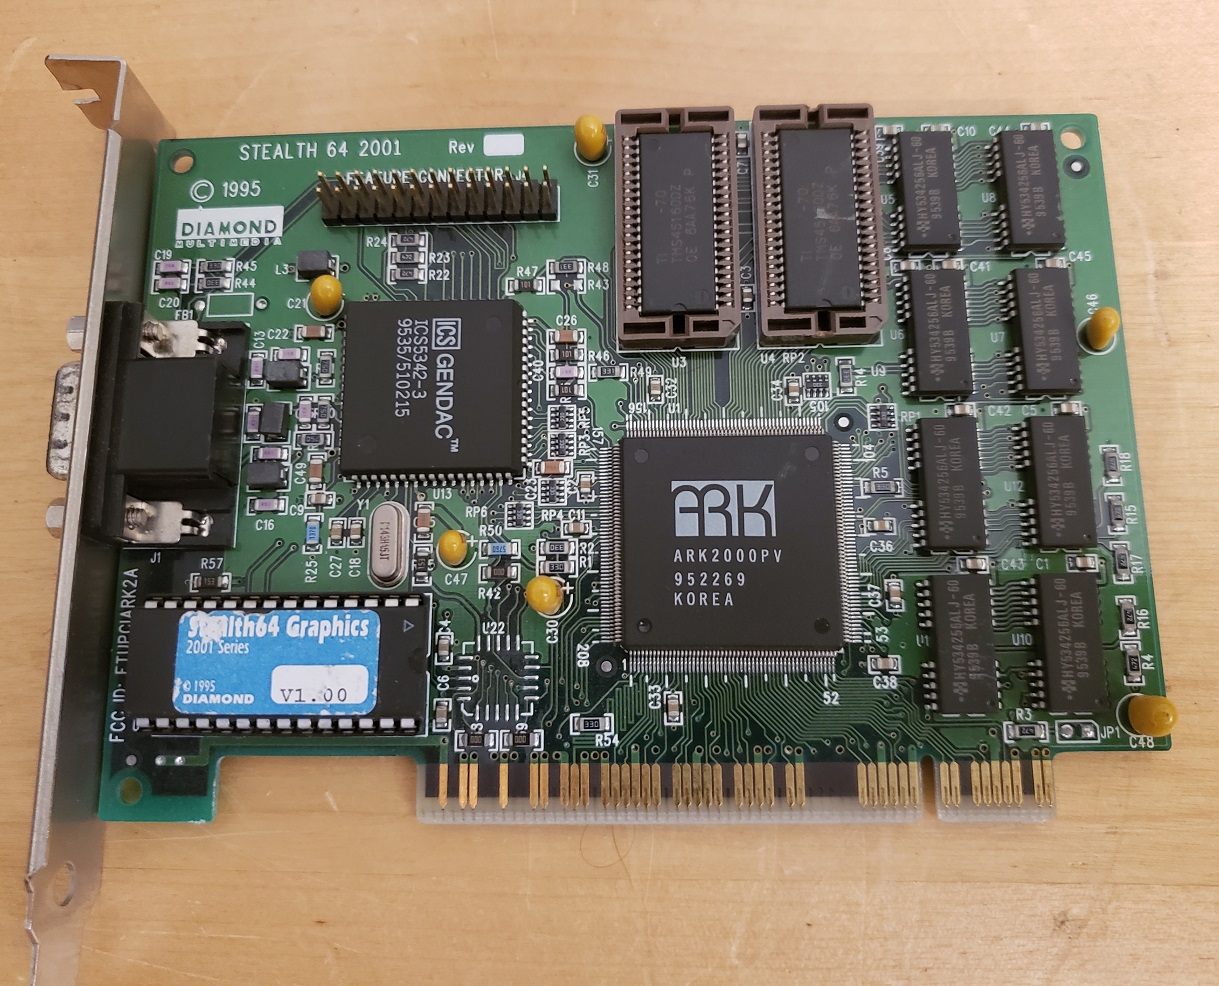
The card I used is the Stealth 64 2001 from Diamond multimedia and it is based on the ArkLogic 2000PV chip. My card is maxed out to its full 2MB of memory and provides excellent 2D compatibility and speed in DOS and early 2D windows titles though possibly slightly less compatibility than the Trio64 chip.
I did do some benchmarking between the ArkLogic card and the built-in Trio64 and found the ArkLogic card to be noticeably although not overwhelmingly faster than the Trio64.

For 3D I decided to pair the ArkLogic 2D card up with a 3DFX Voodoo 1 card which previously was installed in my older HP Vectra VL. Since I did build out this machine to be more DOS and Windows 3.1 oriented I felt the original Voodoo card and its better compatibility with DOS based Glide games would be most useful.

I still really like the HP Vectra line and this machine is now in my personnel permanent setup as a faster DOS/Windows 3.11 PC. There are some small annoyances like the proprietary power supply but they seem to be pretty durable overall. Although this PC was designed and mostly sold as a business or work at home computer it’s very easy to tweak them into very capable DOS and early Windows gaming PCs.


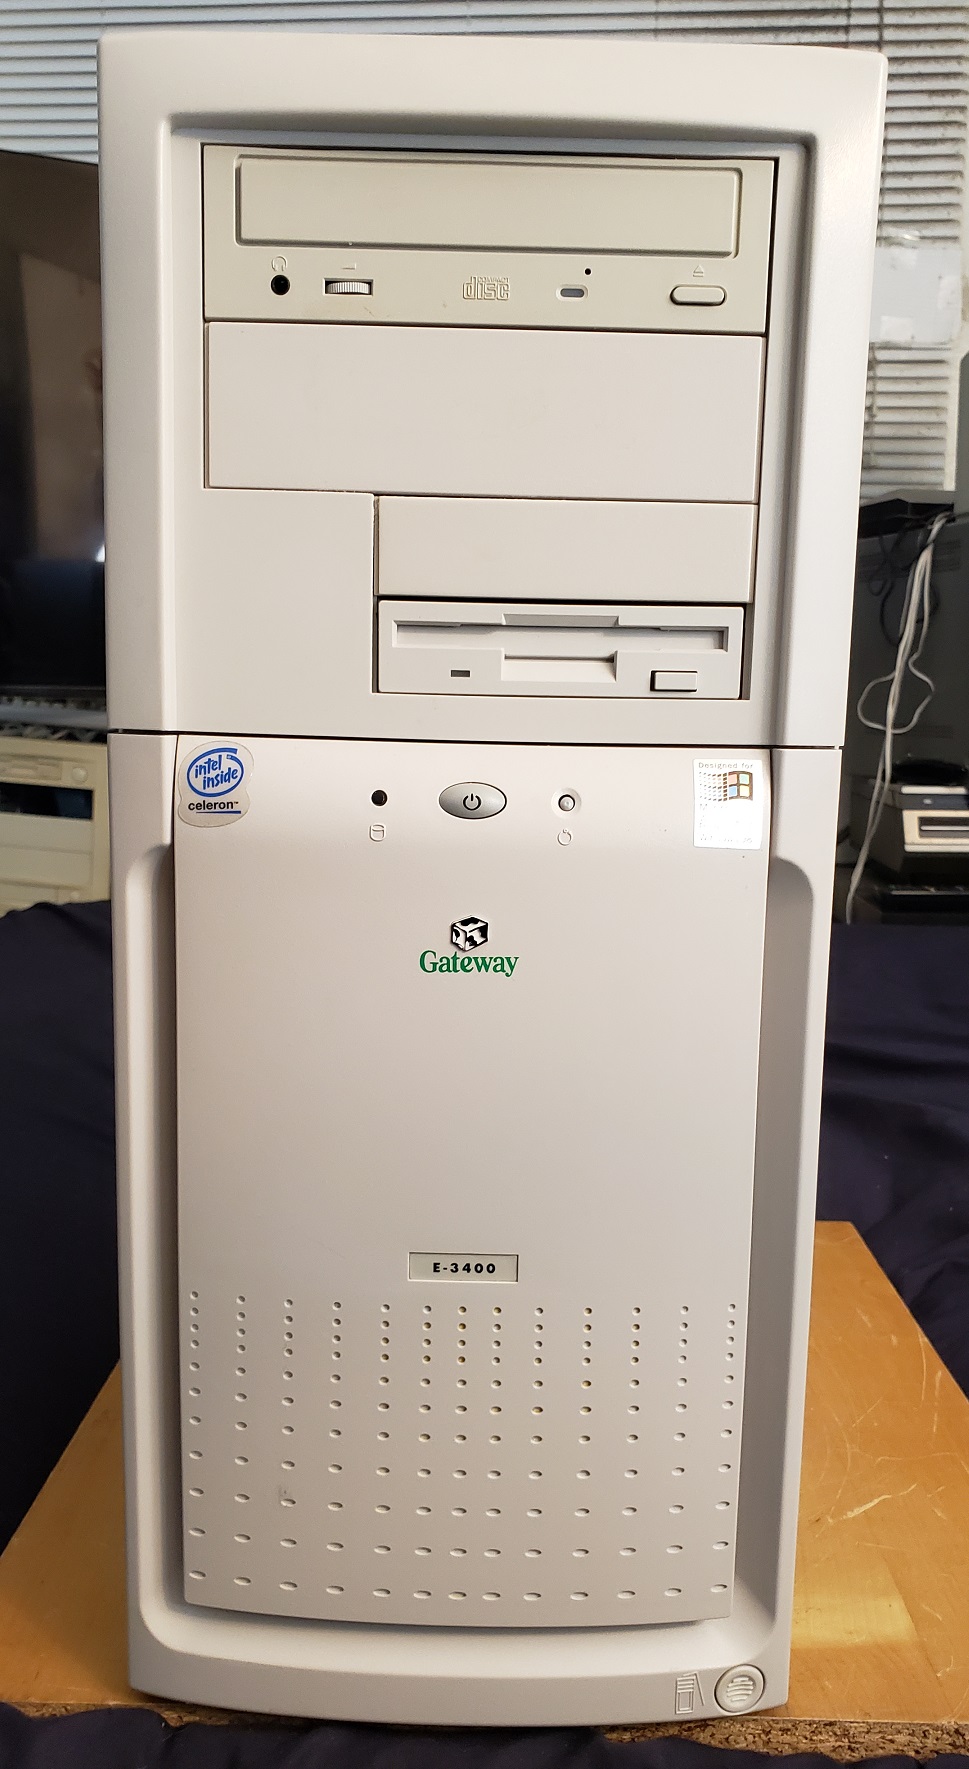
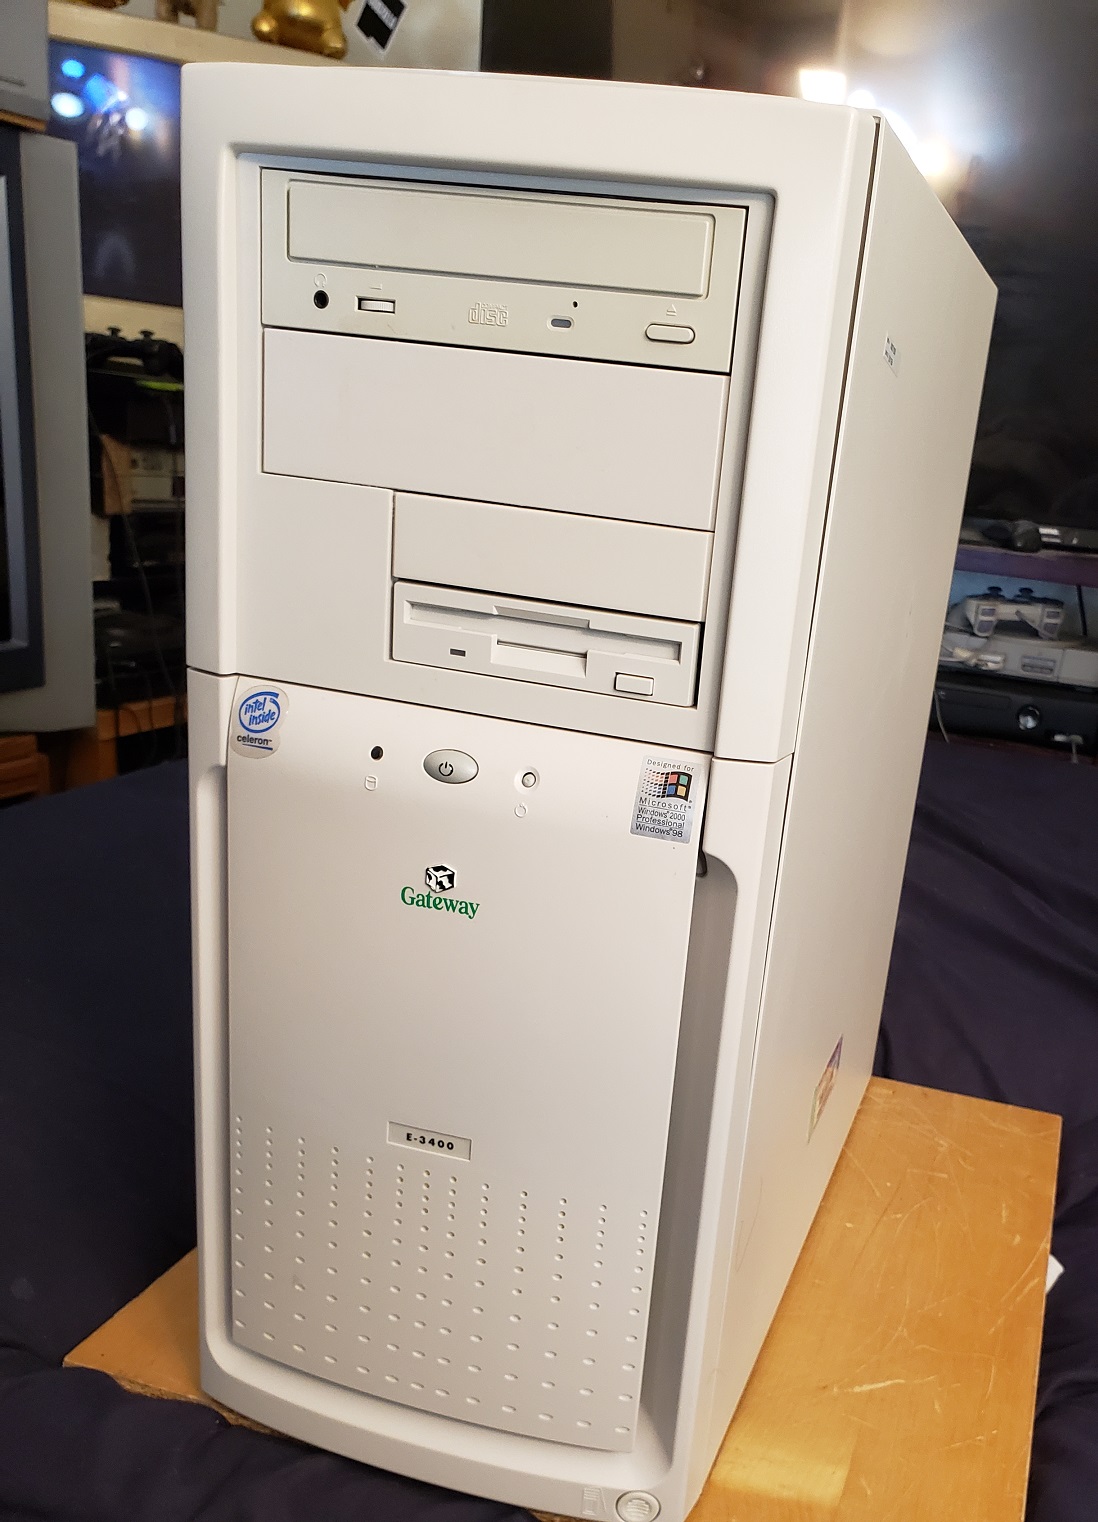
I picked up this beige Gateway E-3400 at the same time as my Dell Dimension XPS T700r that I covered in a previous article. Looking at the case it seems like a pretty standard beige box from the late 90s though when we turn it around we will see it’s a little bit different. There are two 5.25 and two 3.5-inch bays in this mid-tower which although is more than enough for most users is a little lacking compared to other full tower cases which have three or four 5.25-inch bays. Mid case we have a power (that lights up) and reset button along with an HDD activity light. On the very bottom right we have a button you press when removing the side of the case.

Looking at the rear of the case we can see it looks a little nonstandard. This is due to the motherboard form factor which we will take a look at in a moment but my first reaction was that this was some kind of server or workstation type PC. Near the top of the case we have a strange open slot, this is actually a slot for the AGP video card which we will look at after looking inside the case. To the right of the opening we have various I/O ports starting with a printer port and a standard VGA port which on my machine was covered up with a cap. Next we have dual serial ports followed by PS/2 ports for both keyboard and mouse. Lastly, we have dual USB ports (most likely USB 1.x as the user manual dated March 8, 2000 does not specify) and some audio jacks for line out, microphone, and line in. At the bottom of the case we have five expansion slots and at the very bottom of the case we have our power supply. Having the power supply at the bottom of a PC tower case as opposed to the top was fairly uncommon in the 1990s and early 2000s.
Taking off the side of the case on the E-3400 also removes the top of the case.
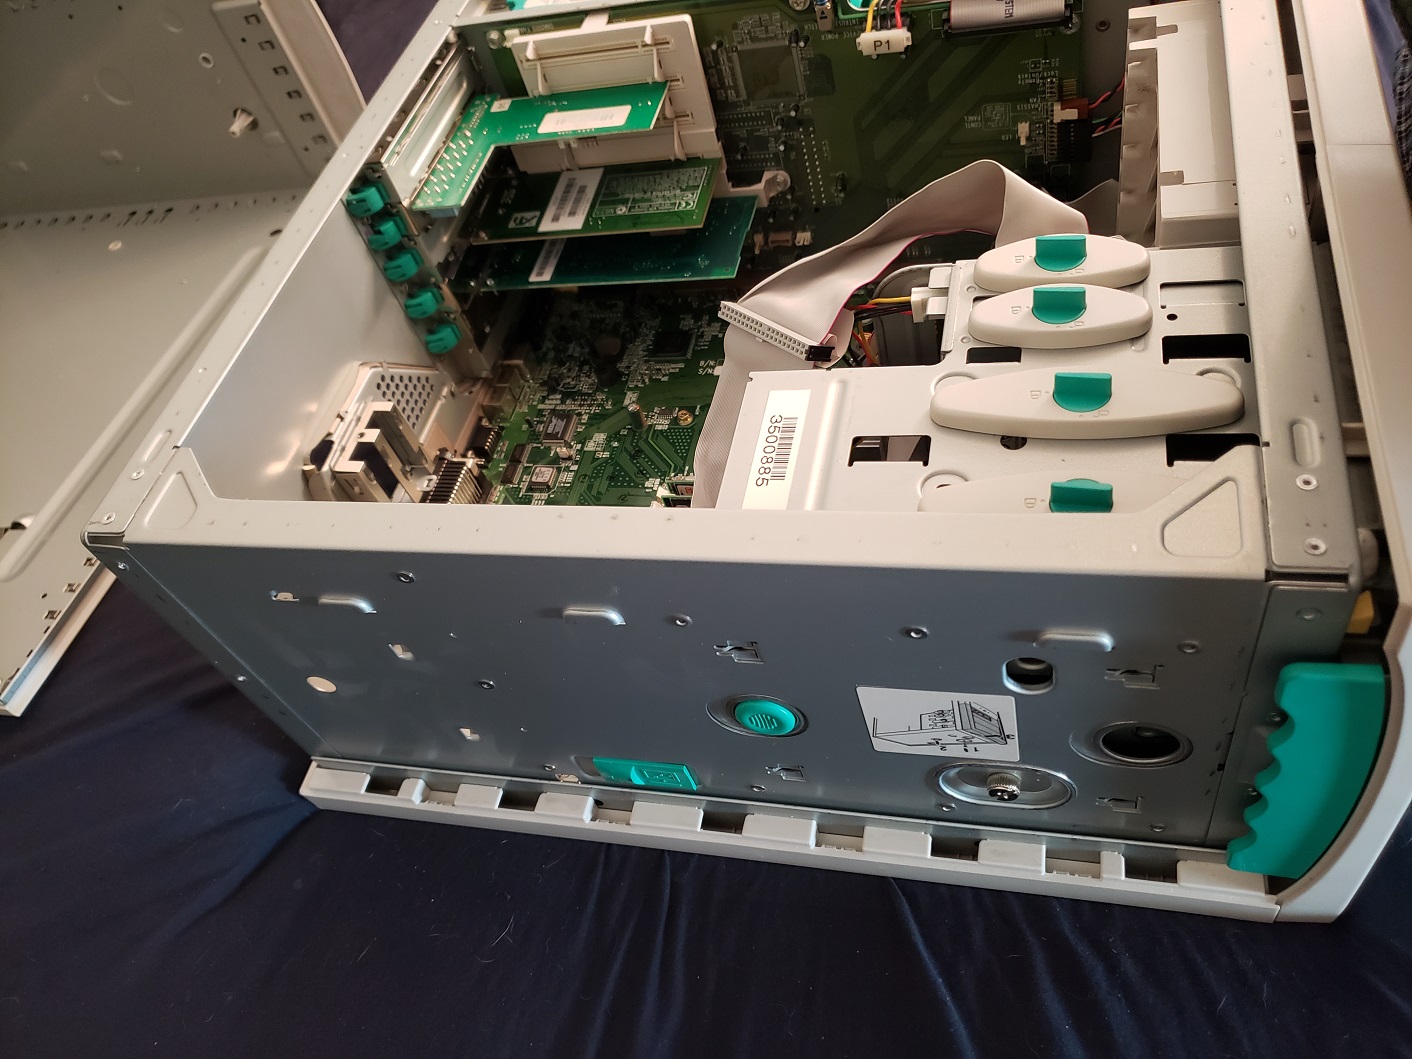
With the case open we can see the E-3400 uses the NLX motherboard form factor which is a motherboard form factor that some OEMs like IBM and Gateway used in some PCs in the mostly late 90s and early 2000s. I also covered my IBM 300PL Type 6862 which also used this motherboard form factor. Other than the form factor this is a pretty standard socket PGA370 board using the Intel i815 chipset. The most immediately noticeable difference are the PCI slots being located on the daughterboard and the AGP slot being completely separate from the other expansion slots.
On the bottom of the case across from the power supply are three bays for housing hard drives via guide rails. My E-3400 came with two 40GB hard drives.

1) CPU – My E-3400 came equipped with an 800MHz Celeron CPU running on a 100MHz FSB. I decided to upgrade this to an 800MHz Pentium III running on a 133MHz FSB as a nice little speed bump. The E-3400 should be able to handle all Coppermine Celeron and non-Tualatin Pentium III CPUs up to 1.13GHz
2) RAM – With only two slots for memory expansion the E-3400 is only capable of supporting up to 512MB of SDRAM, at least according to the manual. This is fine if you’re planning to run Windows 9x or even early XP titles though it may become a hindrance if you wanted to make your PC into a more capable Windows XP gaming machine where you may want at least a gig of memory.
3) Expansion slots – For expansion slots on the daughterboard we have five PCI slots. On the E-3400 there is also a neat little plastic guard that goes over all the slots, it really doesn’t do much but it does look neat. It would have been nice to have a 16-bit ISA slot or two if for DOS but seeing as this is a Pentium III class motherboard the vast amount of users that plan to use this PC for retro gaming are likely looking to build out a Windows 9x or XP machine.
4) AGP slot – The AGP x4 slot, unlike on most motherboards is located away from the other expansion slots. Because of the form factor you will need an NLX video card and a special NLX style bracket. Fortunately Diamond Multimedia made a large number of video cards with various different graphics chips in the late 90s that comply with the NLX standard.
5) Daughterboard – Other than the PCI slots the second half of the NLX motherboard also houses the floppy and IDE connectors with Ultra DMA/66 support as well as some power connectors and connectors to the front buttons and LED lights
6) CMOS battery and a piezo speaker.
Expansion cards
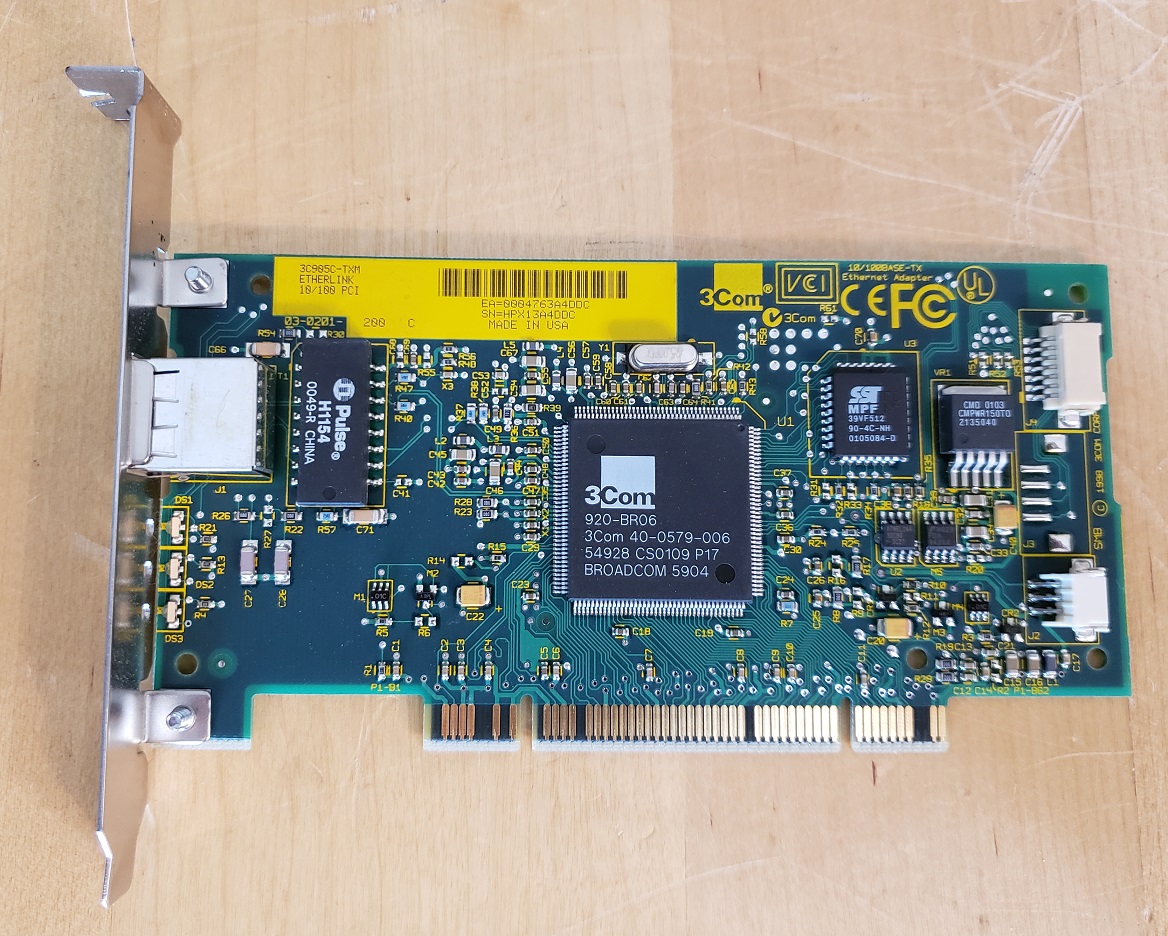
The first expansion card is an Ethernet card, I believe the one pictured is a 3Com Tornado LAN card which I also believe came standard with this PC.
Sound
Looking my motherboard over I could not seem to locate an obvious sound chip for the built-in audio (a reader did comment that the sound chip should be the chip located between the audio jacks and the CMOS battery) but the user manual indicates the sound is Integrated audio using a AC’97 compliant audio Codec chip.
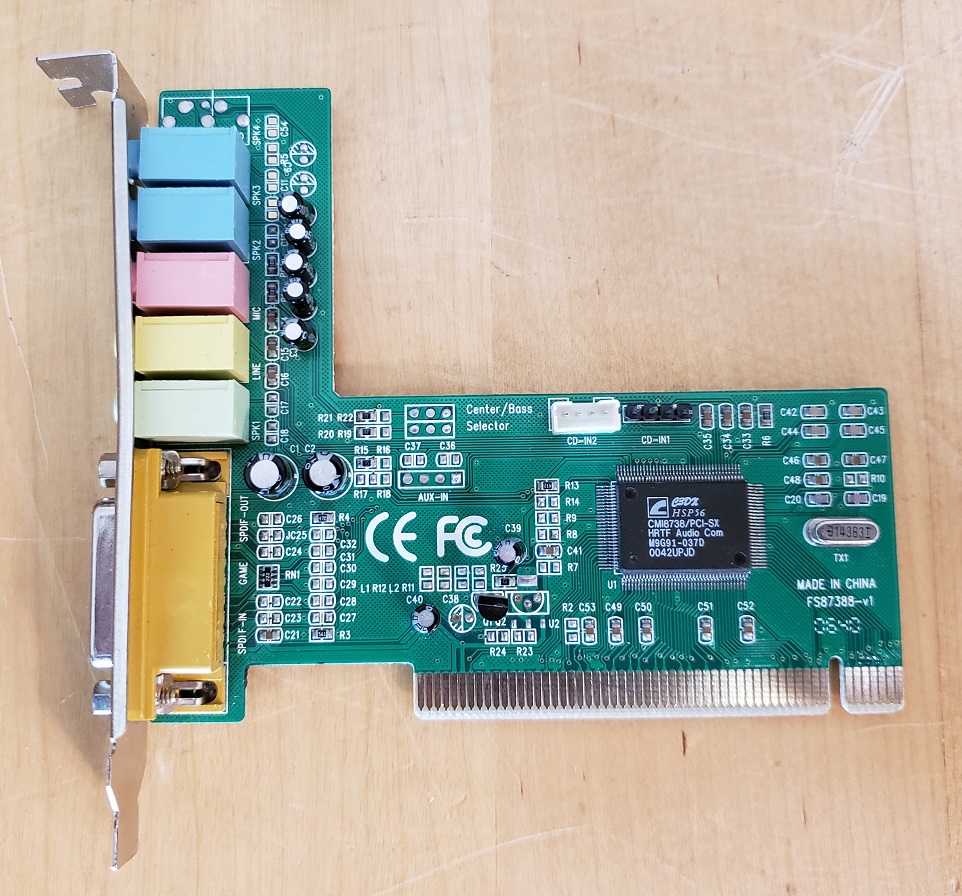
My PC did however come with a discreet PCI sound card powered by the CMI8738 chip. Nothing very fancy but perhaps better than the built-in audio. The sound chip seems to have decent adlib/FM support but spotty Sound Blaster DOS support as well as EAX support in Windows though it doesn’t sound as high quality as a true EAX card from Creative. You do get a joystick/controller port with the card which is a bonus.
Video
Some E-3400s according to the manual do have integrated video though some like mine came with a discreet ATI Rage video card.
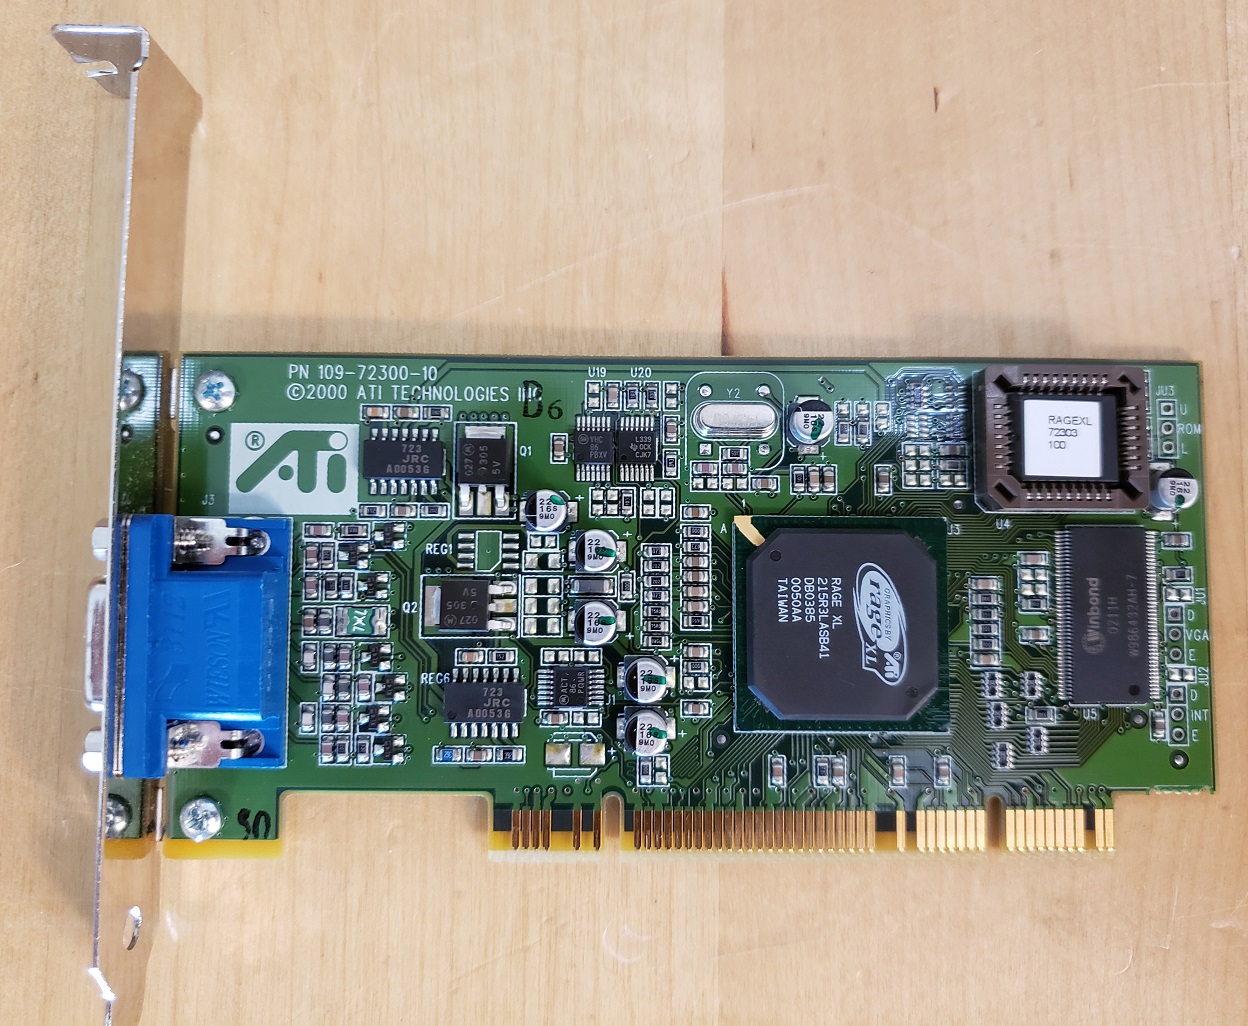
My PC came with an ATI Rage XL based card in the PCI variety as opposed to an AGP card. The Rage XL could be considered the pinnacle of the original Rage line of video cards and was widely used as a low cost video card in servers and workstations into the early 2000s. The card actually performs surprisingly well in games and I was honestly impressed with its performance. I found games like the original Quake under DOS as well as Forsaken under Windows 9x ran quite well and looked good. Games from around 2000 such as Quake III did not perform so well though and you should turn down settings if you want better performance. In theory the Rage XL should be the best card for playing ATIs proprietary API CIF on though unfortunately this is not possible mainly due to the newer drivers which are not compatible with CIF supporting games that the XL card requires.
There’s nothing wrong with the Gateway E-3400 and with some effort it can be turned into a good Windows 9x or early XP gaming PC but I didn’t find it quite worth the effort. The strange form factor doesn’t really hurt this PC but it does limit you a little on what AGP cards you can use. The limit of 512MB of RAM can also be a hindrance if you want to build a more powerful XP gaming PC. I also had some issues with the side of the case fitting correctly and the plastic tabs on my PC broke fairly easily. There are just better and more convenient options out there for retro gamers than the E-3400. If it’s all you have go ahead and pimp it out but if you have other options just go with those.
I’m a fan of the Dell Dimension and XPS series, especially of the late 1990s. We’ve looked at a few of these PCs in the past such as the Dimension XPS D and R series and the Dimension 4100. The Dimension series PC we’re going to take a look at in this article falls somewhere between those two in terms of when it was produced and its power.
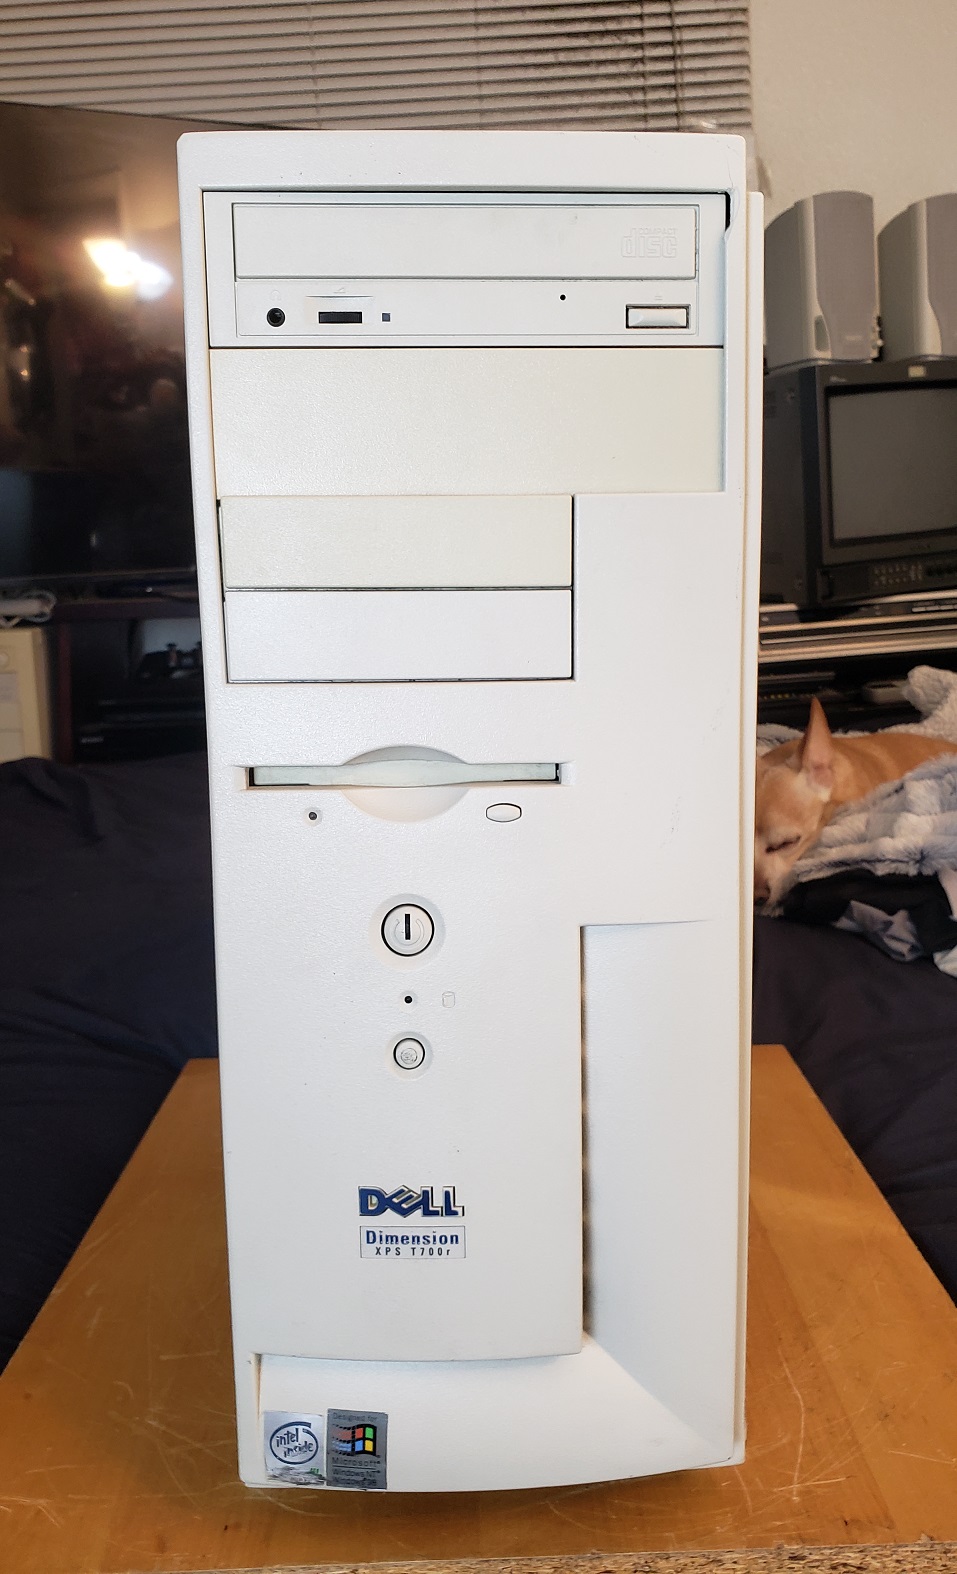
The T___r series as seen here features the same slim tower case as the D series and the 4100 series I looked at in previous articles. My computer specifically is an XPS T700r, the number between the T and r designates the CPU speed so it can vary between PCs of this series from 600 to 850MHz.
The T___r series uses a tower case that is slightly thinner than most beige PC towers of the era. Several models of the Dell Dimension line use this tower case and I quite like it. It features dual 5.25 inch bays as well as dual 3.5 inch bays and then a special slot and cutout for a 3.5 inch floppy drive, typically of the 1.44MB variety.
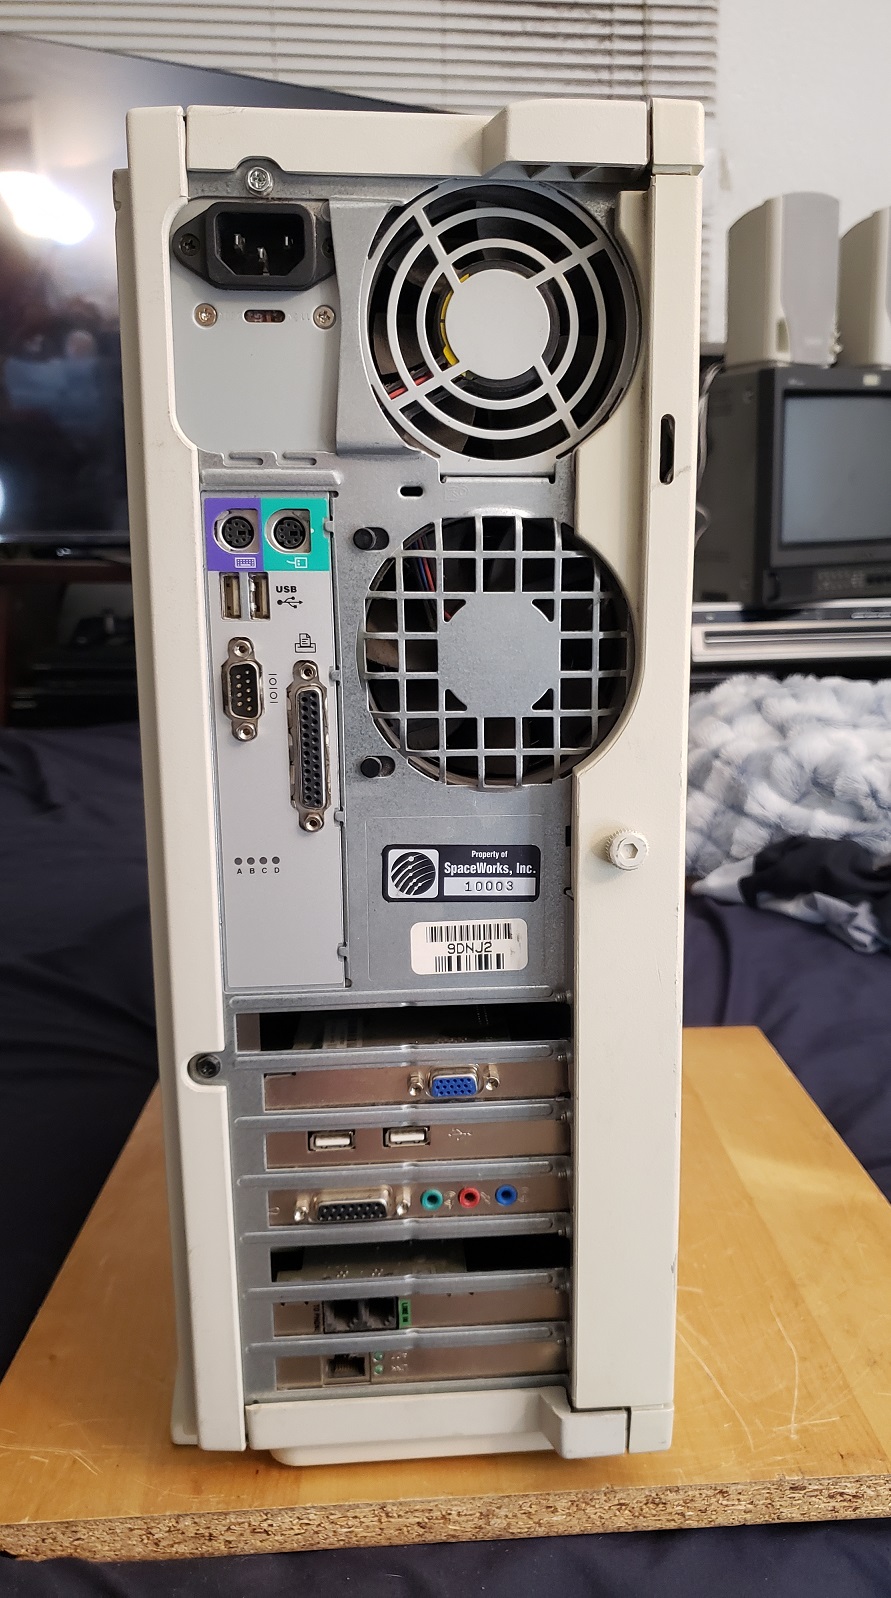
The rear of the case is fairly typical with the PSU up top and a large case fan located underneath it. The built-in I/O is pretty sparse but has everything you need including dual PS/2 ports for keyboard and mouse. Two USB 1.0 ports (assumed 1.0 or 1.1) and a single serial and parallel port. There are four LED lights below the parallel port to help troubleshoot problems if they should occur with the PC.
There are seven expansion slots for adding video, sound, etc but generally, the computer was pre-equipped when it was purchased. my PC came fully equipped though several of the blank expansion slot plates were missing.
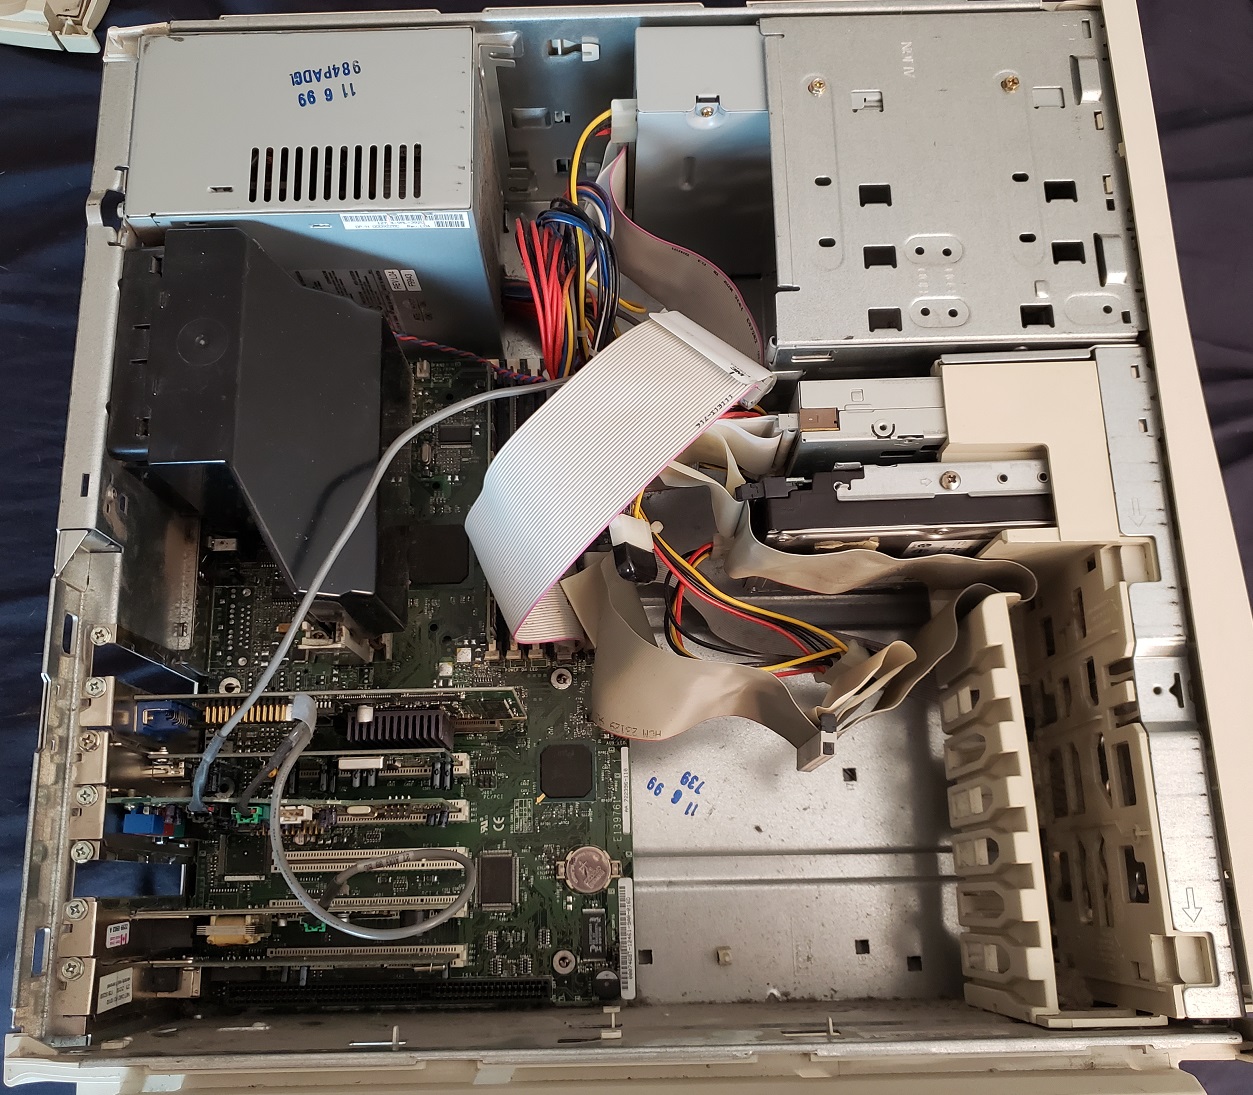
Here is our Dell with the side panel removed. You can see there is an extra 3.5 inch bay under the floppy drive where I currently have the hard drive installed but the hard drive can also fit vertically in the spot underneath. The CPU on this PC is cooled via the case fan and uses a black plastic shroud to direct air from outside of the case to flow over the CPU. The OEM Dell motherboard uses the Intel 440BX chipset.
Motherboard with CPU shroud and expansion cards removed.
1 ) CPU – The T___r series all use the Coppermine Pentium III CPUs in the slot 1 form factor. My T700r predictably uses the 700MHz version of the CPU. The T___r series used Pentium III CPU speeds between 600MHz and 850Mhz. The CPU can be swapped with another slot 1 CPU and if the shroud is removed one could use a CPU with its own heatsink and fan attached. The 700MHz Pentium III is sufficient for most Win98 gaming needs although everything up to the Coppermine 1.1GHz slot 1 CPU should work though this may require the latest BIOS.

2) RAM – With three memory slots, this PC can accept up to 768MB of PC100 SDRAM which is overkill for a Windows 98 PC and adequate for an early Windows 2000 or XP type build. My PC came with two 128MB mismatched sticks of PC100 RAM for a total of 256MB of memory.
3) Expansion slots – The motherboard for the T___r series comes equipped with one x2 APG slot, five PCI slots, and a single 16-bit ISA slot. The ISA slot makes this machine a good candidate for DOS games as one can install an ISA sound card for better compatibility with DOS titles.
4) dual IDE connectors
5) Floppy connector
6) Proprietary power connector.
Like most of the Dell Dimension PCs from this time the T___r series uses a proprietary power connector that is split into two parts looking like a standard ATX and additional AUX connector.
7) Piezo speaker
8) CMOS battery
Expansion Cards
My PC came with the above modem and ethernet cards.
duel USB PCI card.
Sound Card
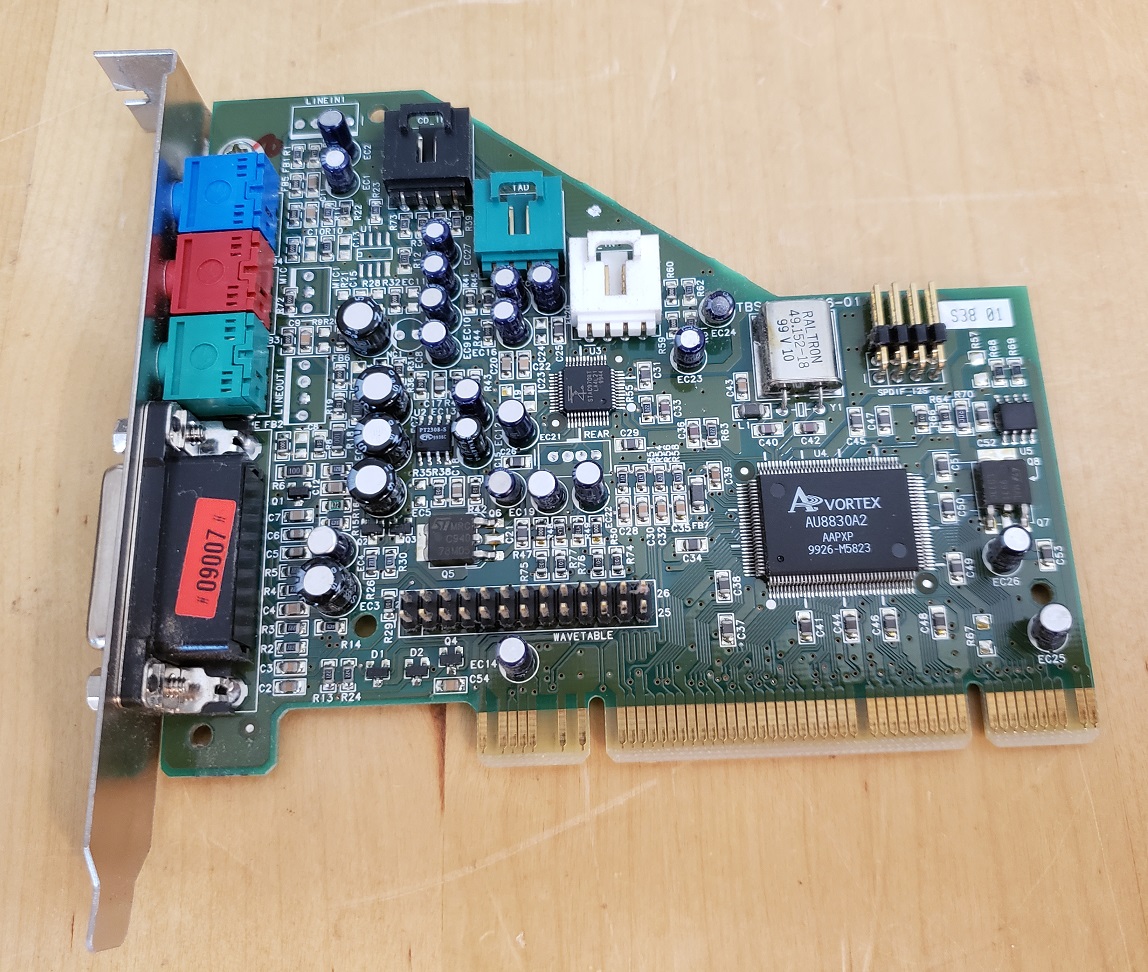
The sound card in my Dimension was a Turtle Beach Montego II, a sound card based on the A2D Vortex 2 chip. Despite its odd form factor this is a very nice card for Windows 98 and early XP gaming as it supports Aureal A3D and A3D 2 3d sound in games and was a major competitor to Creative’s EAX standard. The A3D chip worked reasonably well in DOS as well despite being a PCI card and is an overall good choice for gaming. The one downside is the awkward positioning of the wavetable header so not all midi daughterboards are going to fit comfortably.
Video
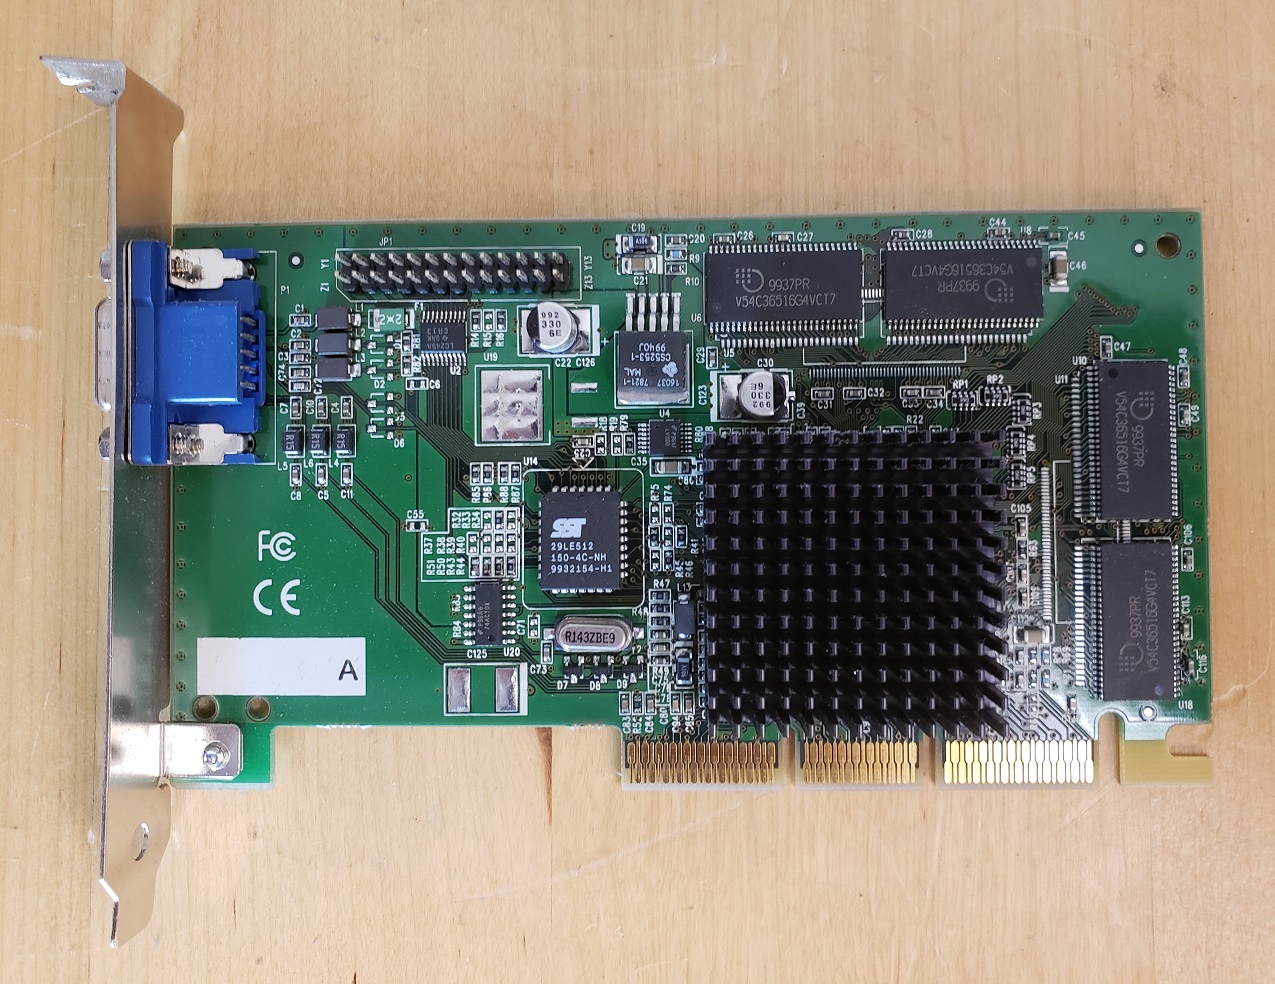
For the video card, we have an AGP TNT2 M64 which is a fairly typical lower end OEM video card. In power, this card falls somewhere between the original TNT and the TNT2. This card supports both DirectX 6 and Open GL as well as performs adequately under DOS. The TNT2 line is the last Nvidia card to retain compatibility with certain games such as Incoming as later cards will display graphical errors. Overall it is an okay pick for a late Windows 98 gaming build but a TNT2 will do everything this card does including graphical compatibility with games like Incoming but better.
I love the Dell Dimension series of the late 90s and very early 2000’s and this PC is no exception. The case has plenty of room for upgrades but the thinner form factor saves some room. The setup of this particular build screamed low-end business machine and capable but not high-end gamer build. If you have access to the cards this machine could very easily be turned into a Win9x powerhouse. The m64 could be easily swapped out with a true TNT2 or an early Geforce or Radeon card. The single 16-bit ISA slot also leaves room to turn this into an overpowered DOS build as well by swapping the Montigo II out for an ISA AWE32 or 64. The CPU can also be easily swapped for a more or less power one depending on your tastes.

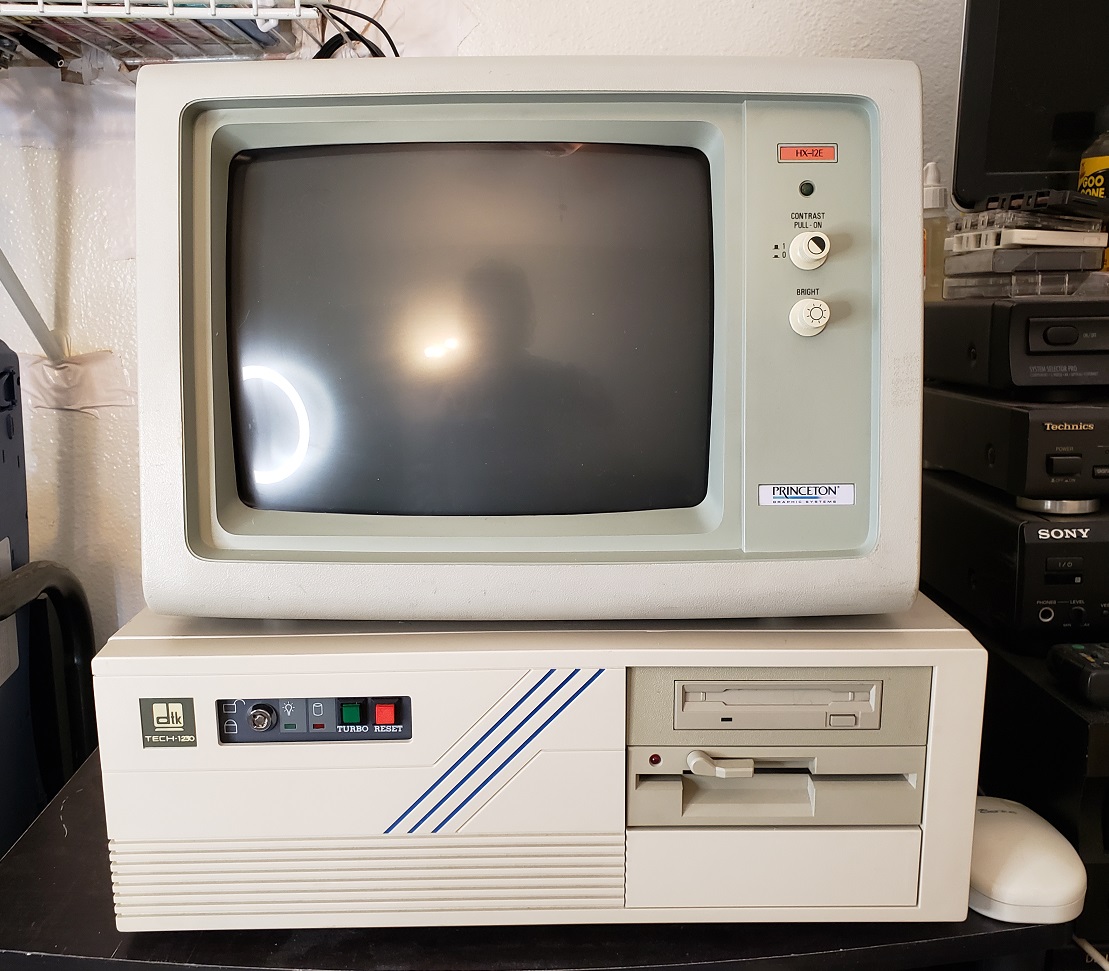
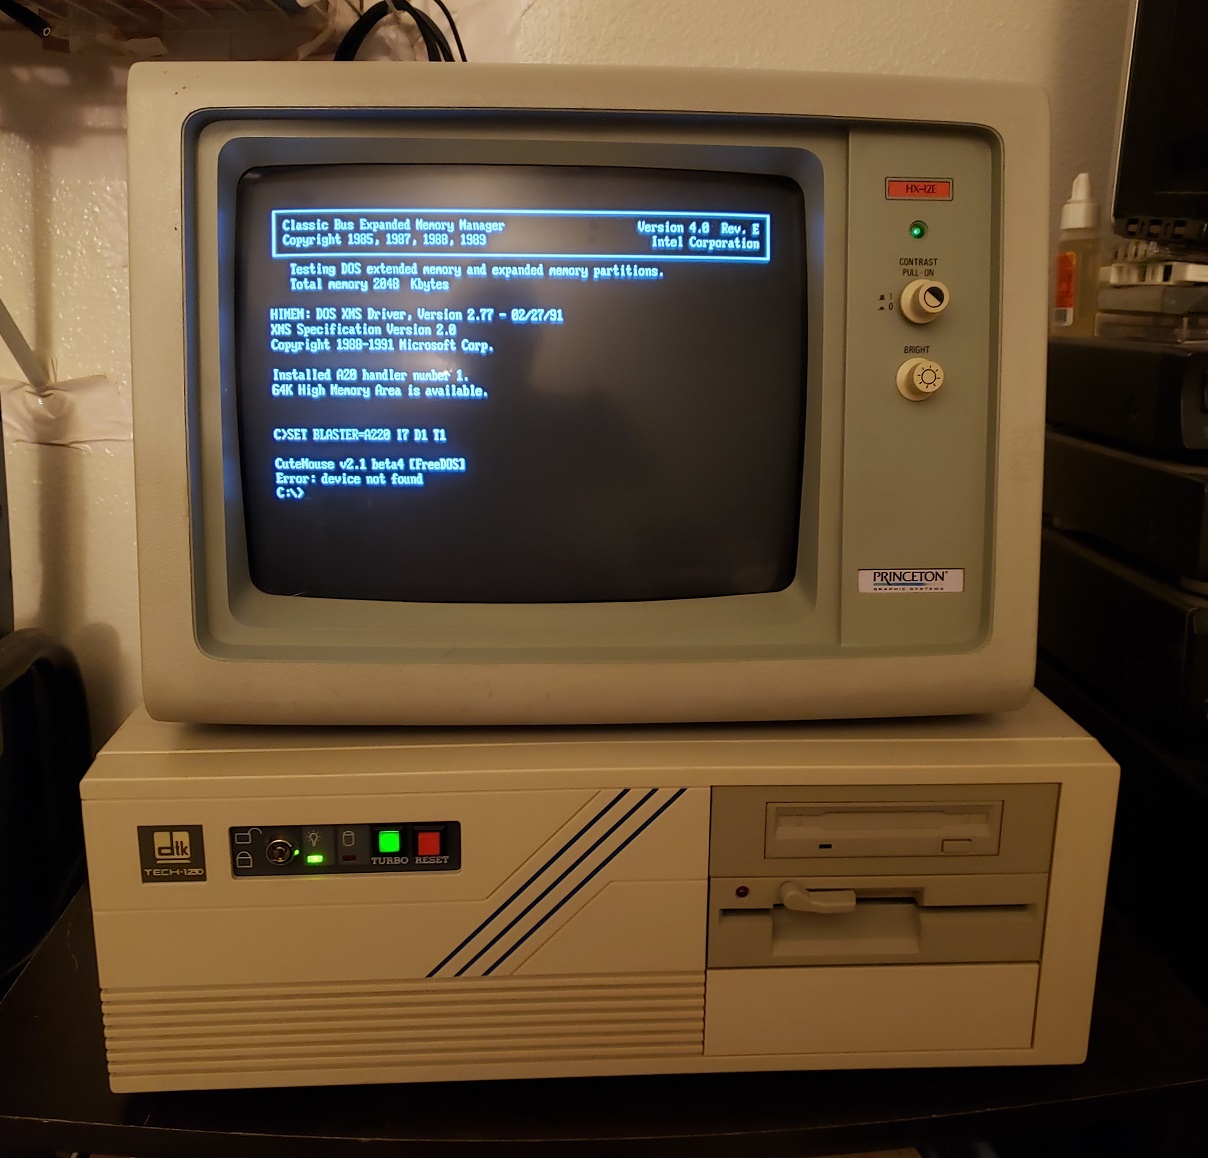
Today we are going to take a look at one of my newer PCs which has recently taken its place as my flagship example of a 286 class PC. DTK or Datatech Enterprises is a Taiwanese PC manufacturer that was a fairly large player in the 1980s computer world and even into the 1990s. The DTK tech-1230 we see here is one of their earlier PC compatibles from 1989 and is considered a “mini-desktop”.
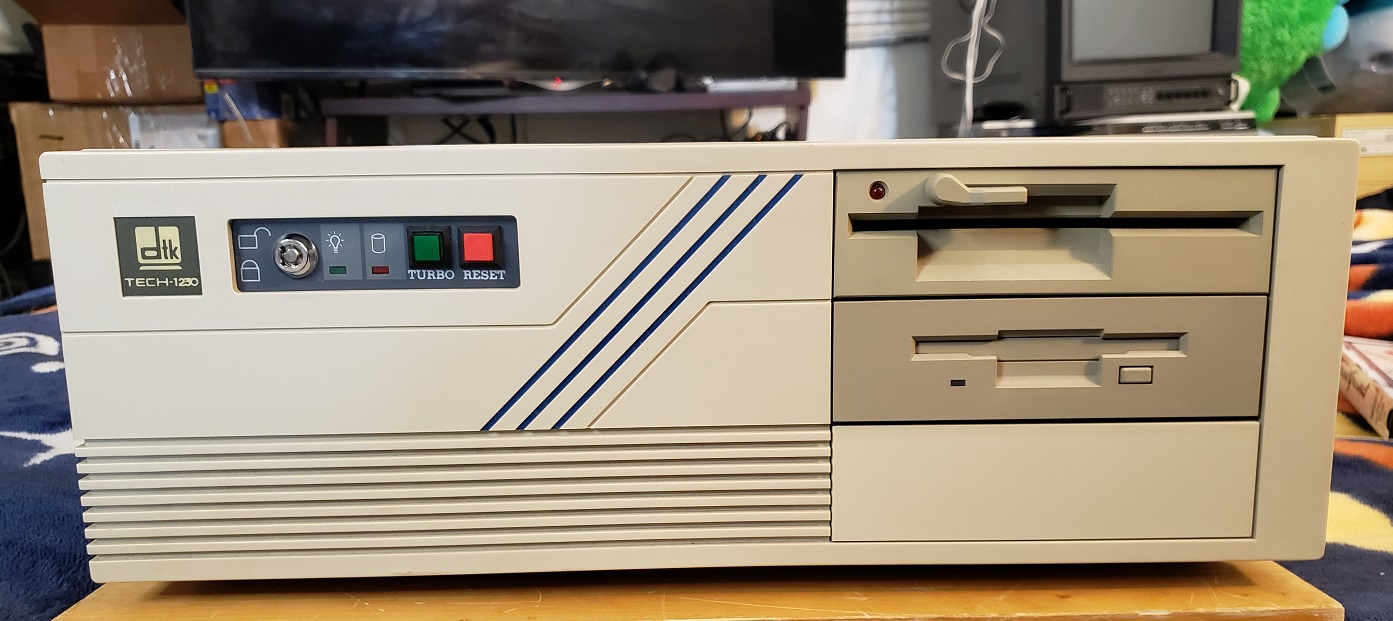
The DTK tech-1230 has three frontal 5 1/4 bays for expansion. I currently have installed a pretty standard for the time setup of dual floppy drives, one 1.2MB 5 1/4 drive paired with one 1.44MB 3.5 drive in an adaptor bay. Although not common or particularly era correct a CD-ROM drive can always be installed in the third bay if so desired.
Next to the case badge on the left, there is a keylock and LEDs for power and HDD activity. The dual buttons are a green turbo and a red reset button. The turbo button lights up green when pressed and is used to toggle the speed of the CPU which in the case of this PC is between 8 and 12MHz. One thing I really like about the look of this case is the three blue diagonal stripes at about the center of the case. They aren’t much but they work to differentiate this machine from the sea of beige boxes that existed at the time.
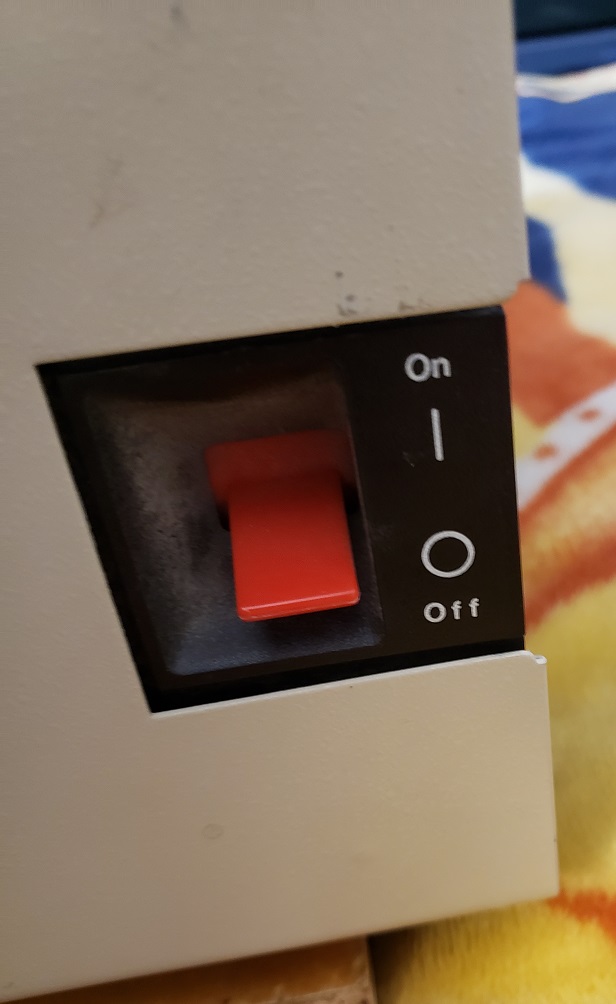
The power switch is on the right side of the case and is in the style of many early PC and XT style PSU switches.
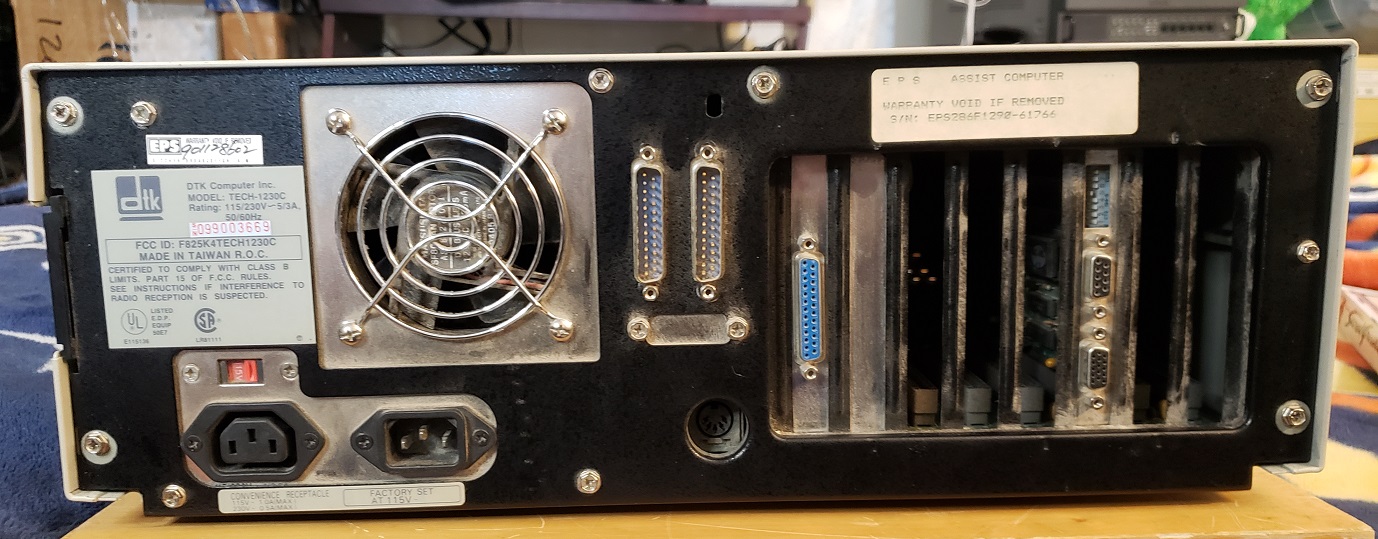
The back is pretty standard for a case of this type. We have a PSU with the additional connector for attaching a monitor directly which is always a nice option. To the right of the PSU are dual 25-pin serial ports. If you’re planning on using a serial mouse I would suggest getting a cheap and easy to find 25-pin to 9-pin serial adaptor.
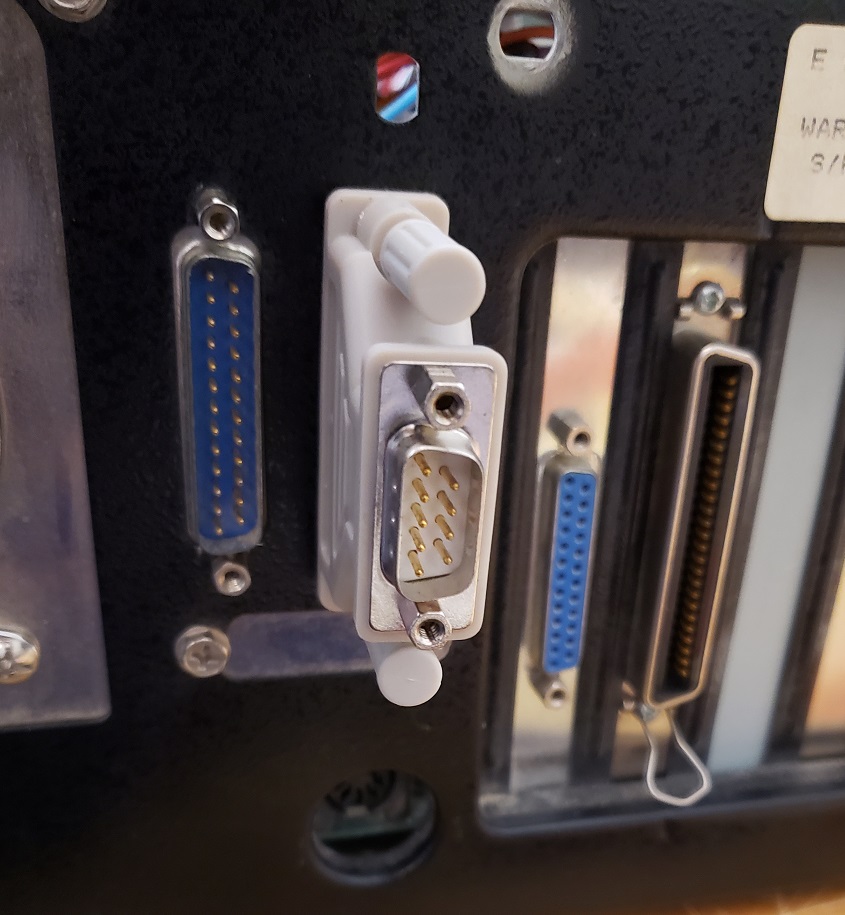
Next to that, we have a parallel port. Other than these connectors the only other card it appears we have installed is a video card. We will take a look at this card as well as what I added later in the article.
Okay, let’s take off the cover and get a look at the inside.

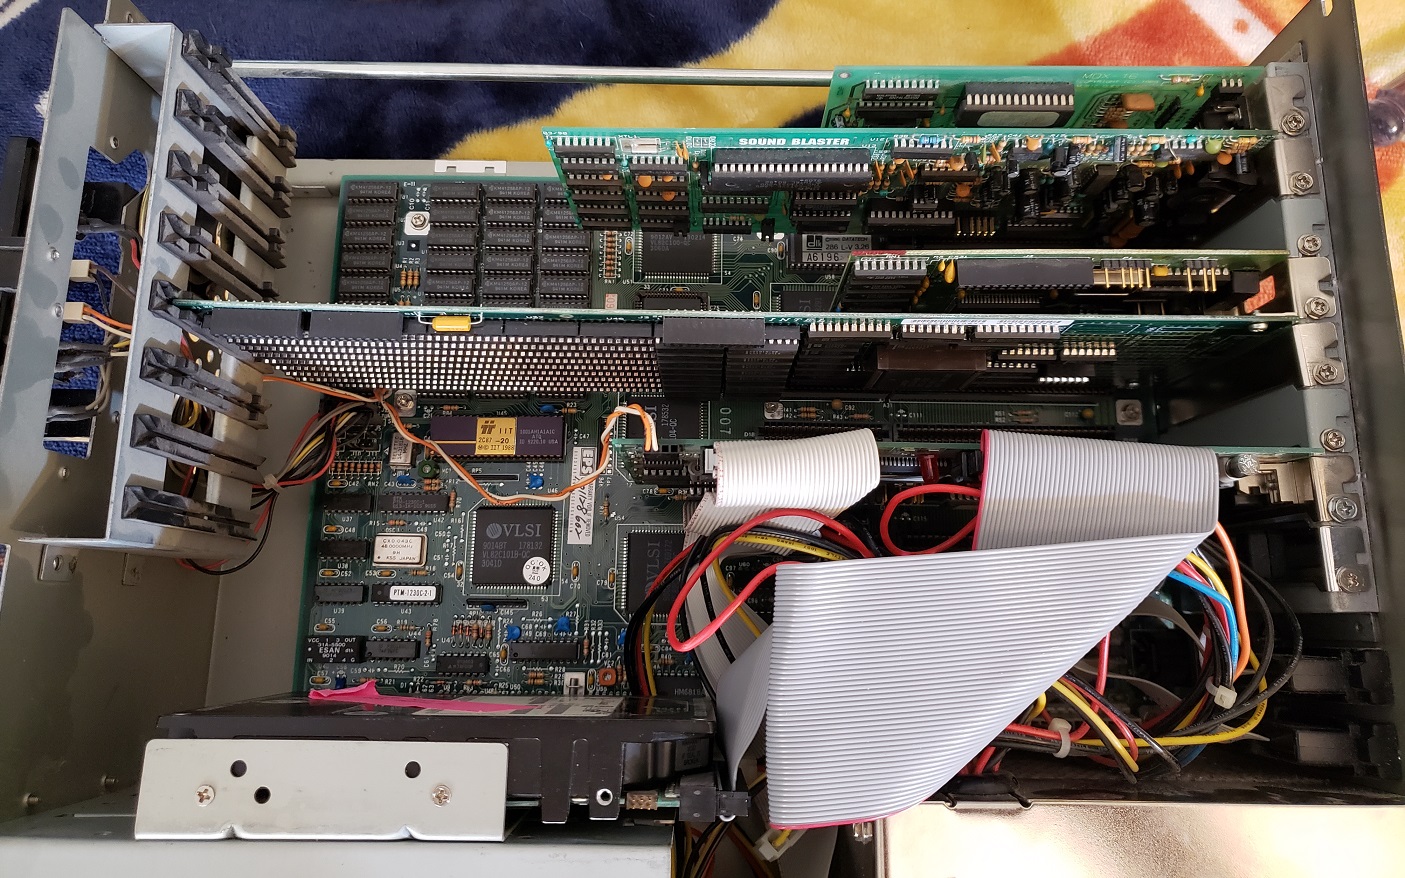
Pretty simple on the inside with just a video and an I/O expansion card installed as well as what looks like an IDE hard drive installed vertically on the side of the 5 1/4 inch bays.
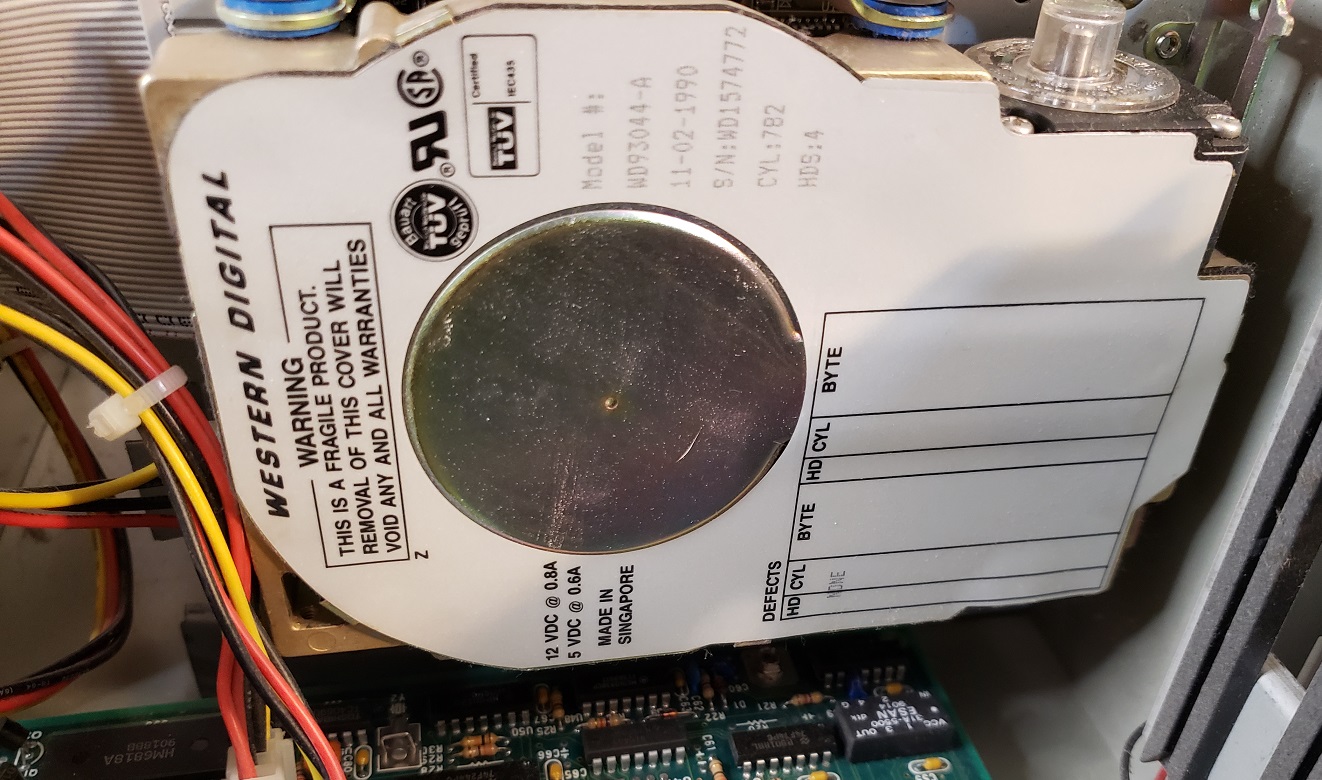
The hard drive is a 43MB Western Digital WD93044-A IDE drive being controlled by our multi I/O card. The drive did spin up but was not detected by the controller card.
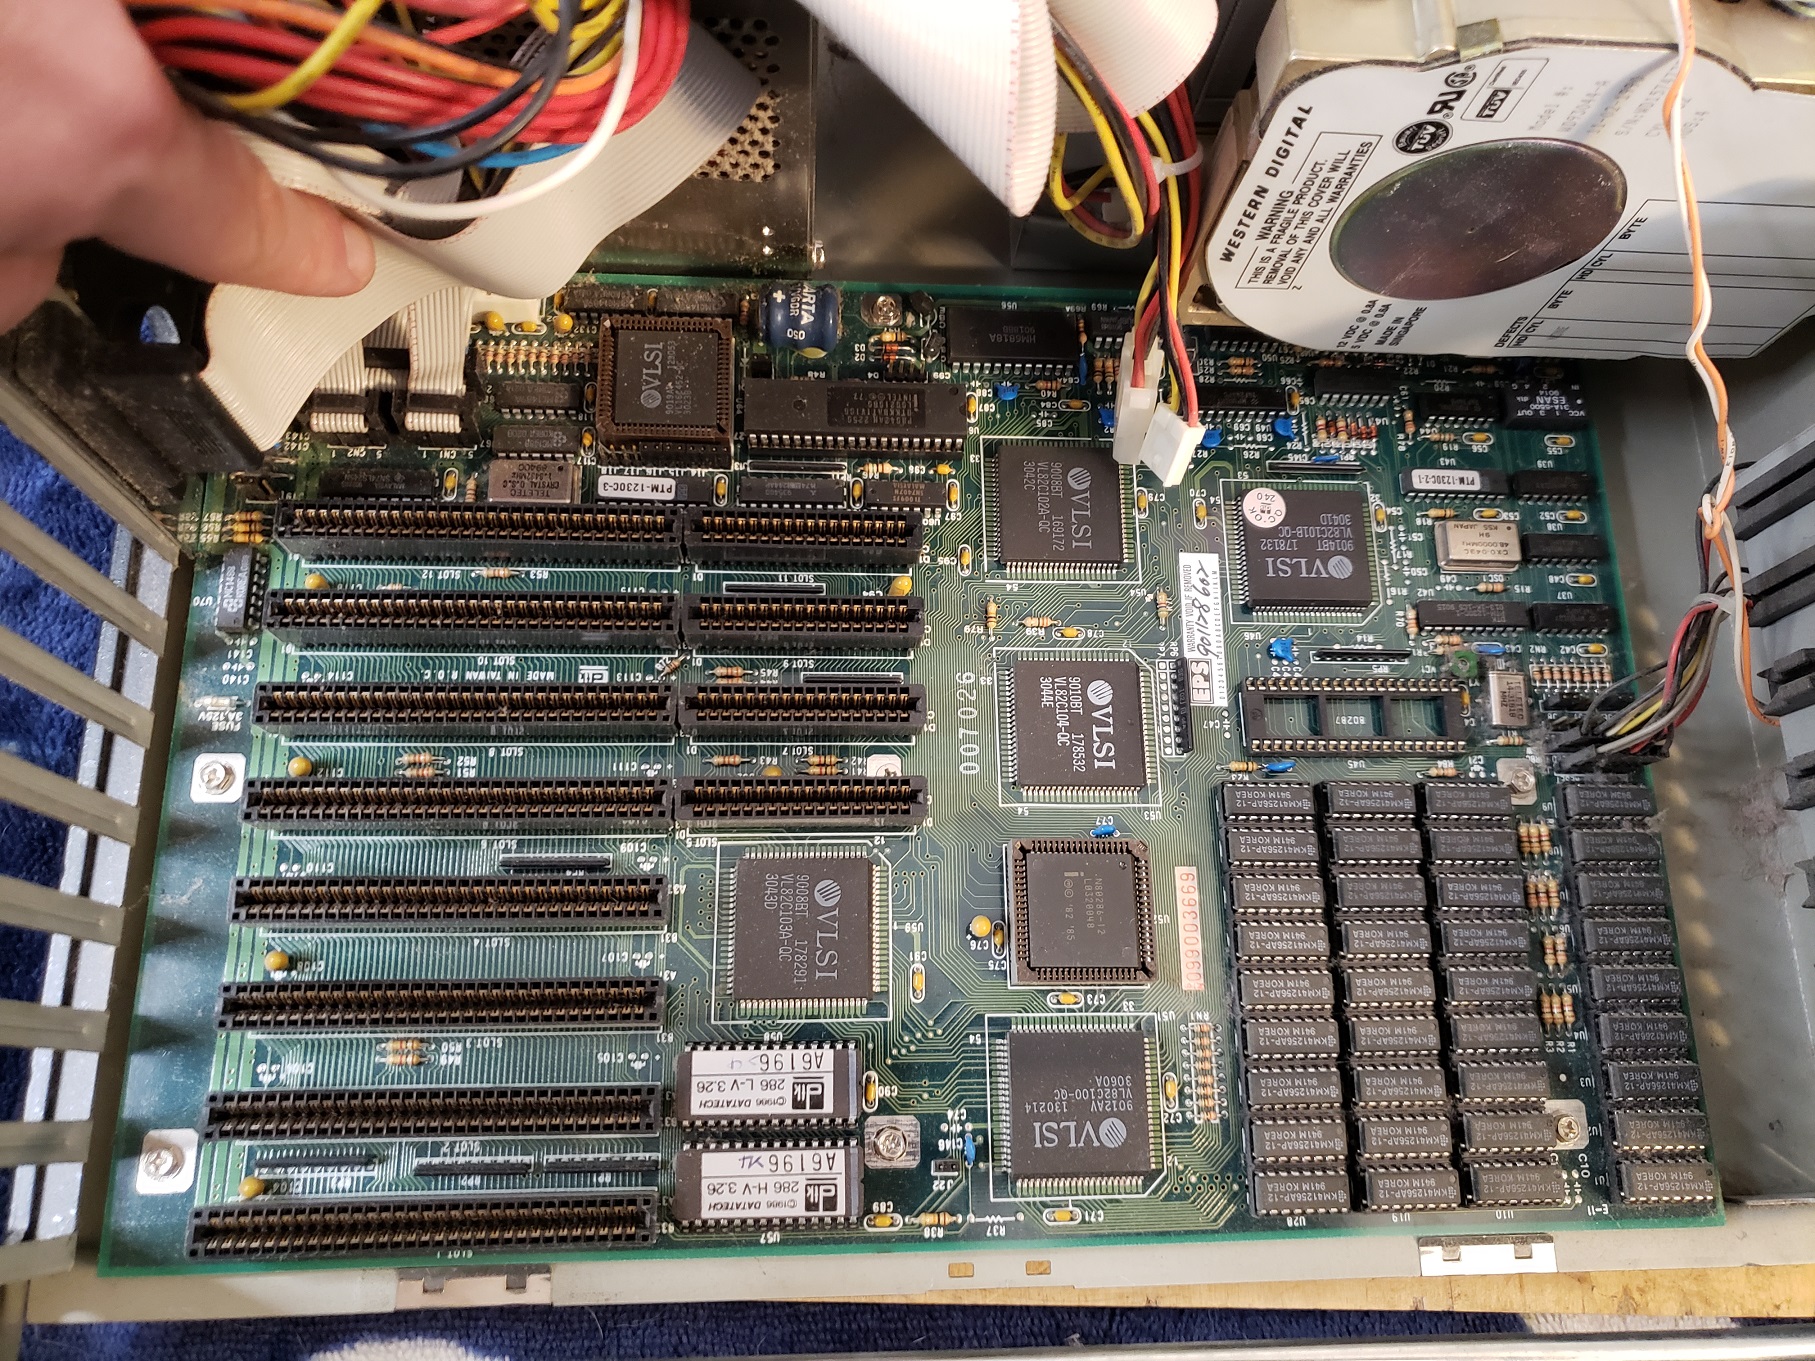
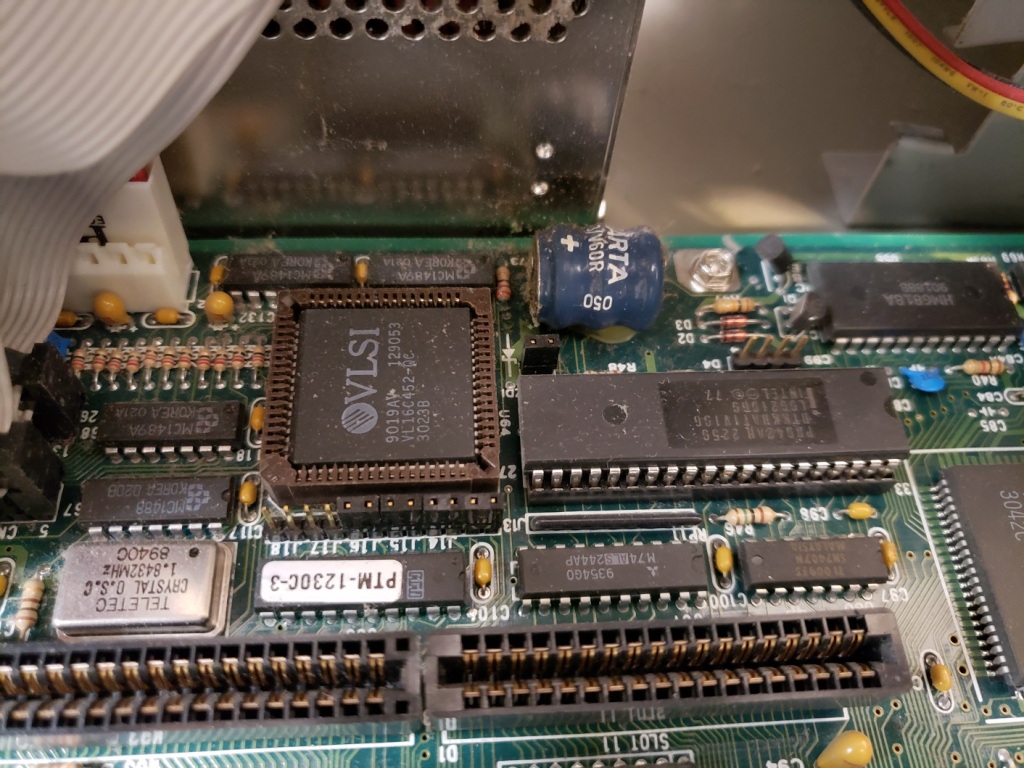
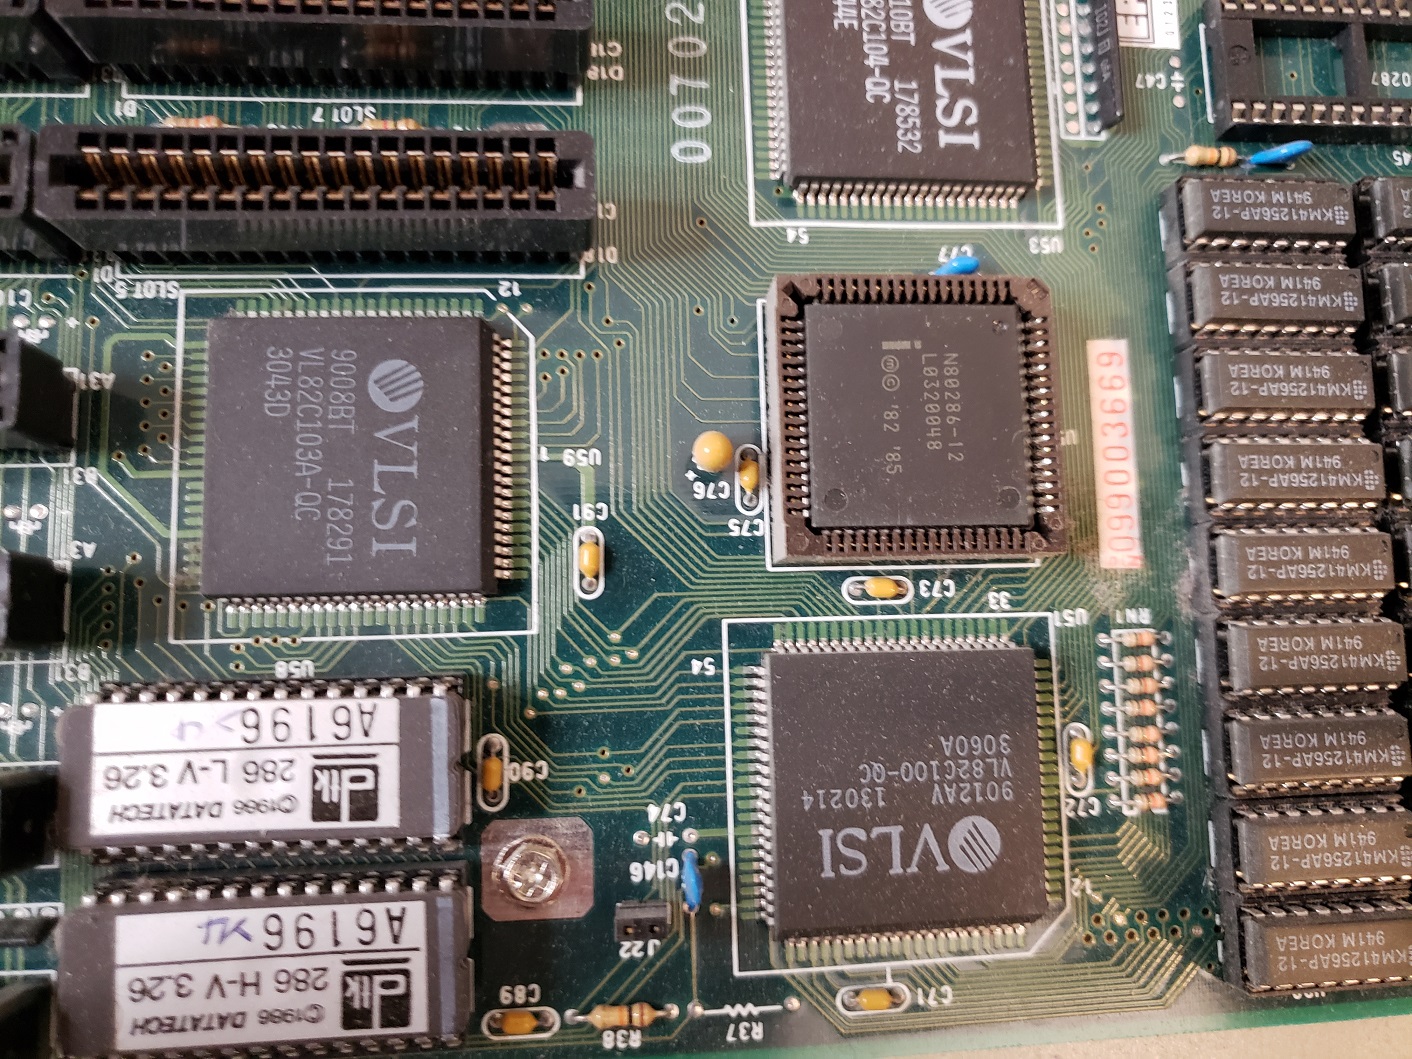
The motherboard is fairly well integrated for a 286 board though it does lack ZIP or 30-pin RAM sockets which I tend to find on the later 286 motherboards I tend to come across. Sorry for the dust on the components in some of these images as I took them immediately after getting the machine home and before proper cleaning.
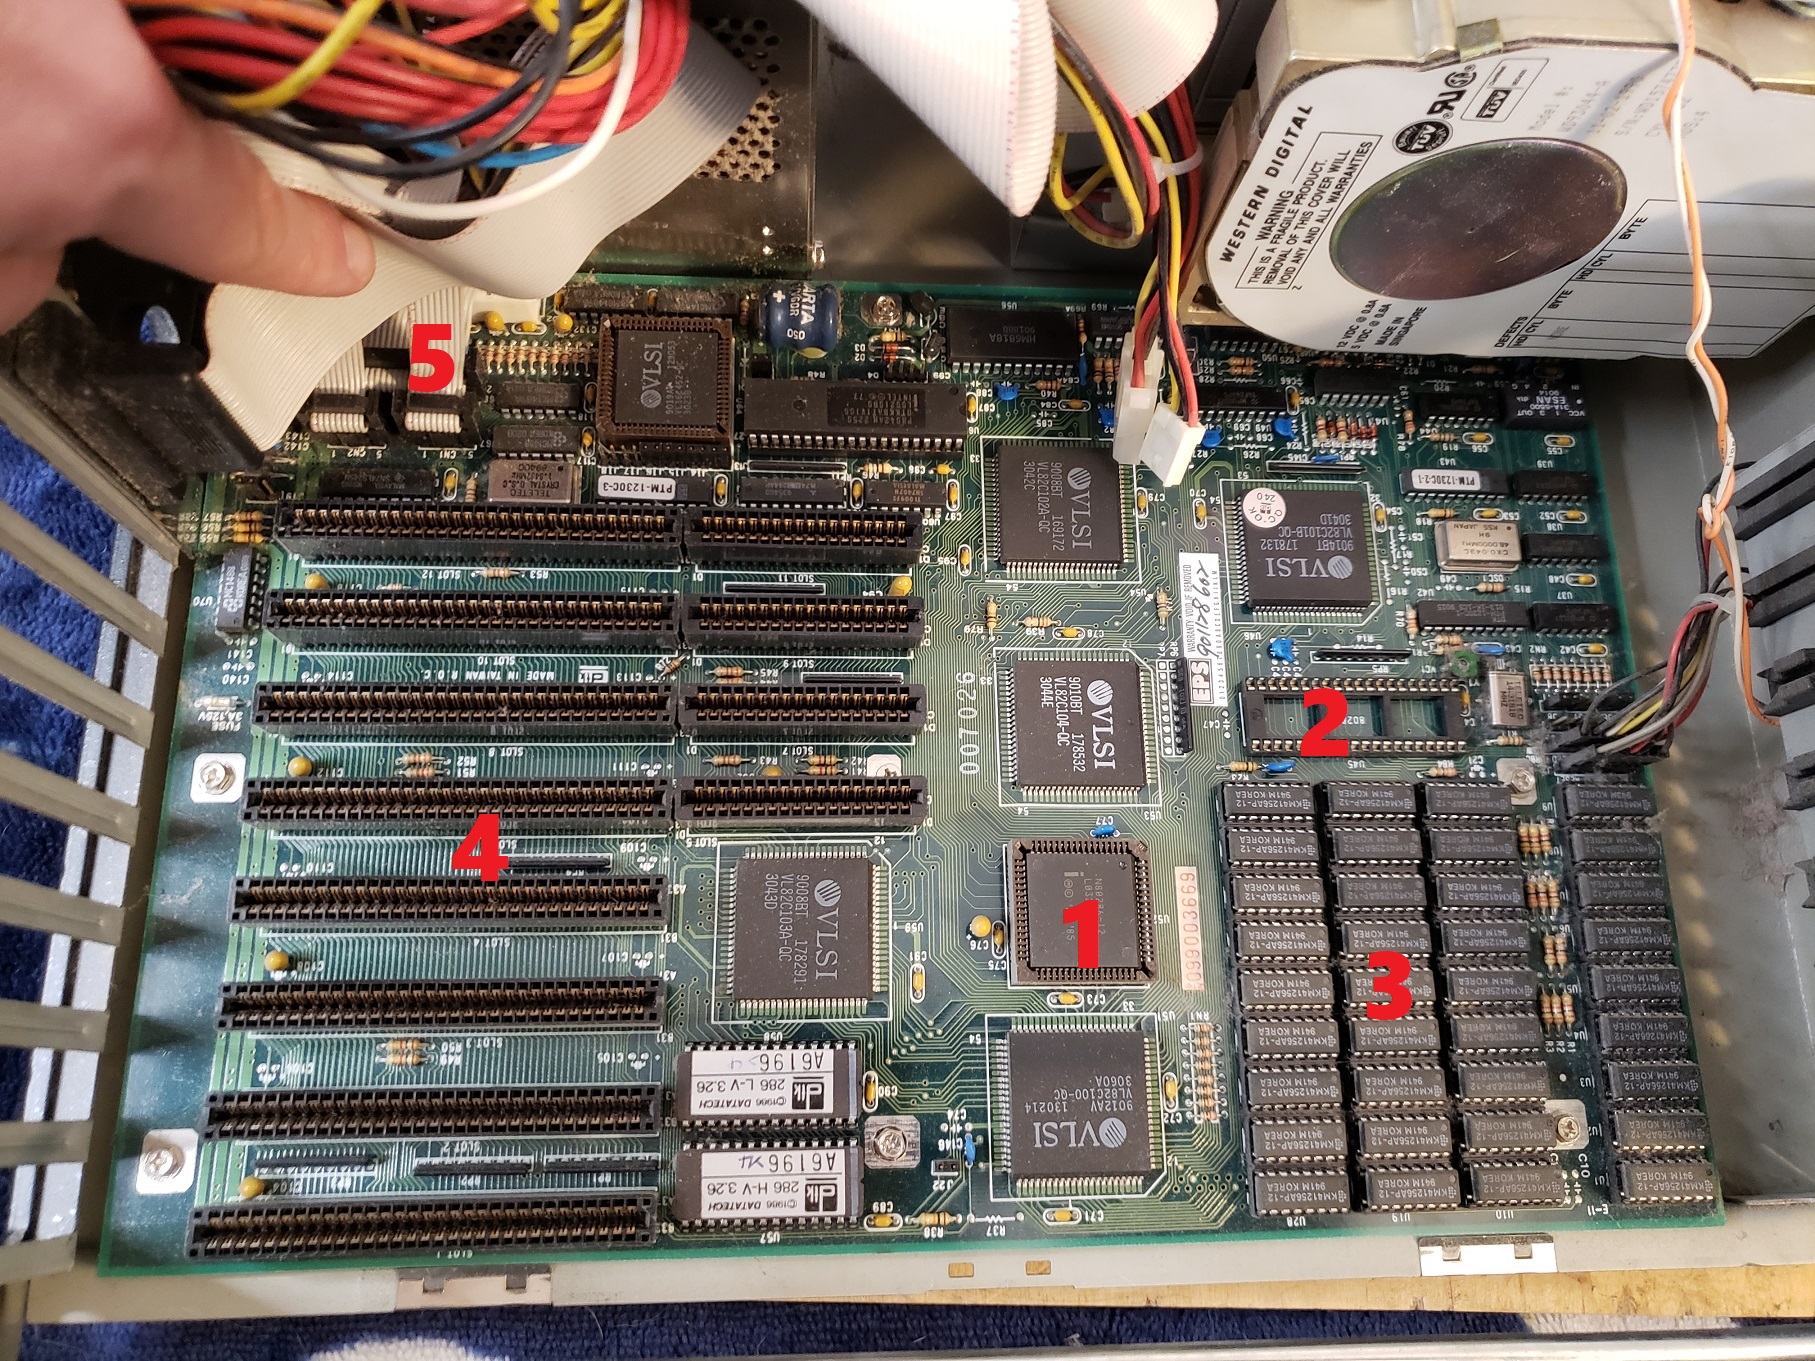
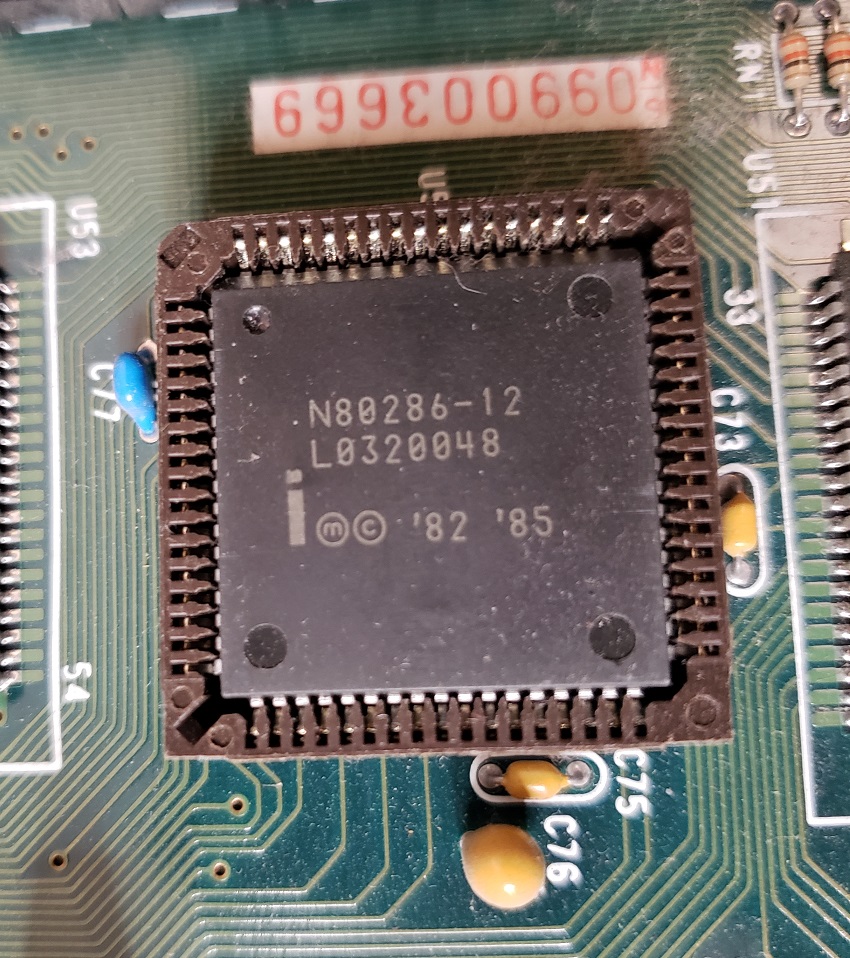
1 ) CPU – The CPU is an Intel 286-12 running at 12Mhz (though the turbo can cut this speed down to 8MHz). The 12MHz 286 could be considered, along with the 16MHz 286 one of the quintessential CPUs of its class. They were fairly common and are fairly capable as well being suitable for playing EGA as well as early VGA titles. The ability to use the turbo button to downclock to 8MHz isn’t incredibly useful as it’s still too fast for speed sensitive CGA titles but if you want something more akin to IBM AT speeds it’s nice to have the option.
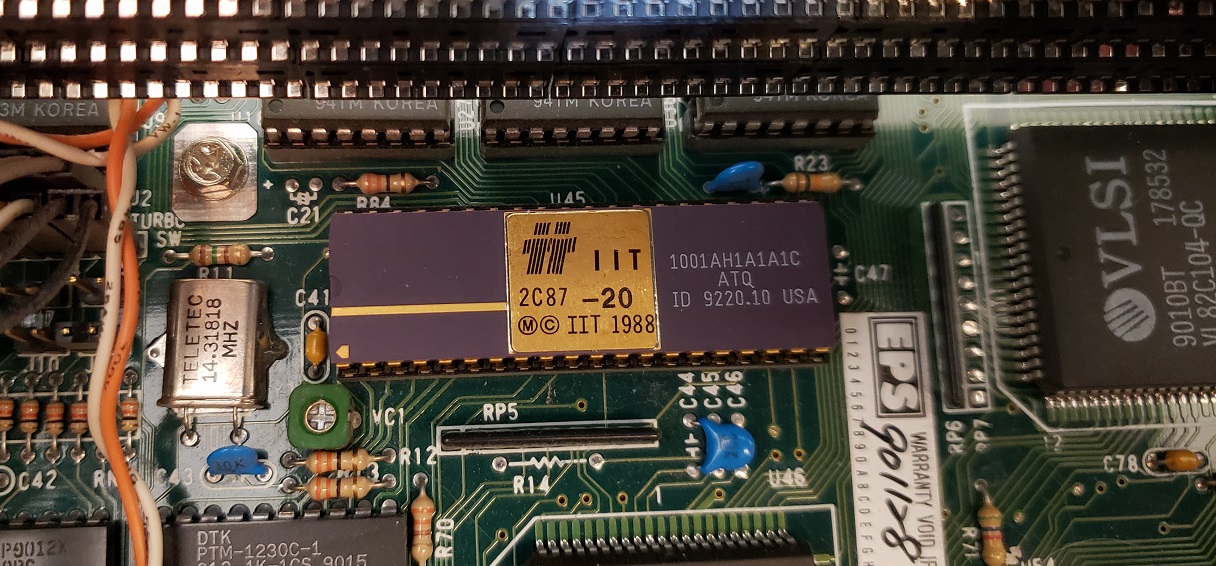
2 ) FPU – The board also has a socket for an optional math co-processor. Usually adding a math co-pro isn’t very helpful but a few games and CAD software can take advantage of one. My PC came to me with this socket empty but I added an ITT 2C87 math co-processor rated for 20MHz. This FPU is a little more powerful than a standard 287 processor but is a bit overkill in this machine. It was formally installed and paired with my 20MHz Harris 286 PC but after I replaced it there with a 287XL it found a new home in my DTK machine.
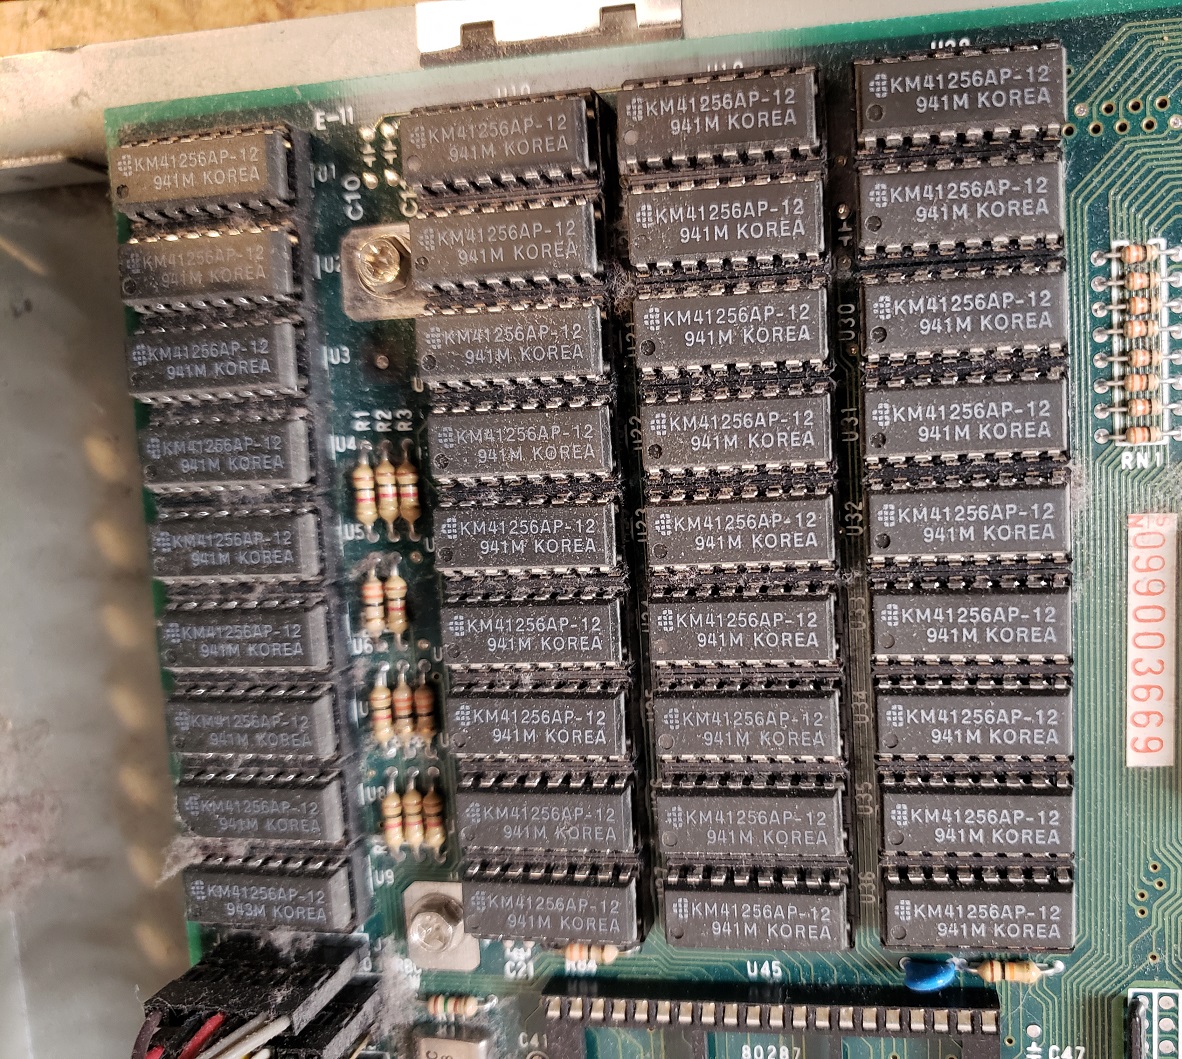
3 ) RAM – The motherboard comes with a full 1MB of DIP memory on board. This is a capable amount for a 286 and should be more than enough for any game that would play well on this system. For those wishing to push the DTK tech-1230 or wanting a bit more memory overhead you can always add an ISA memory card.
4 ) Expansion slots – This DTK motherboard sports eight total ISA expansion slots, four 8-bit and four 16-bit ISA slots.
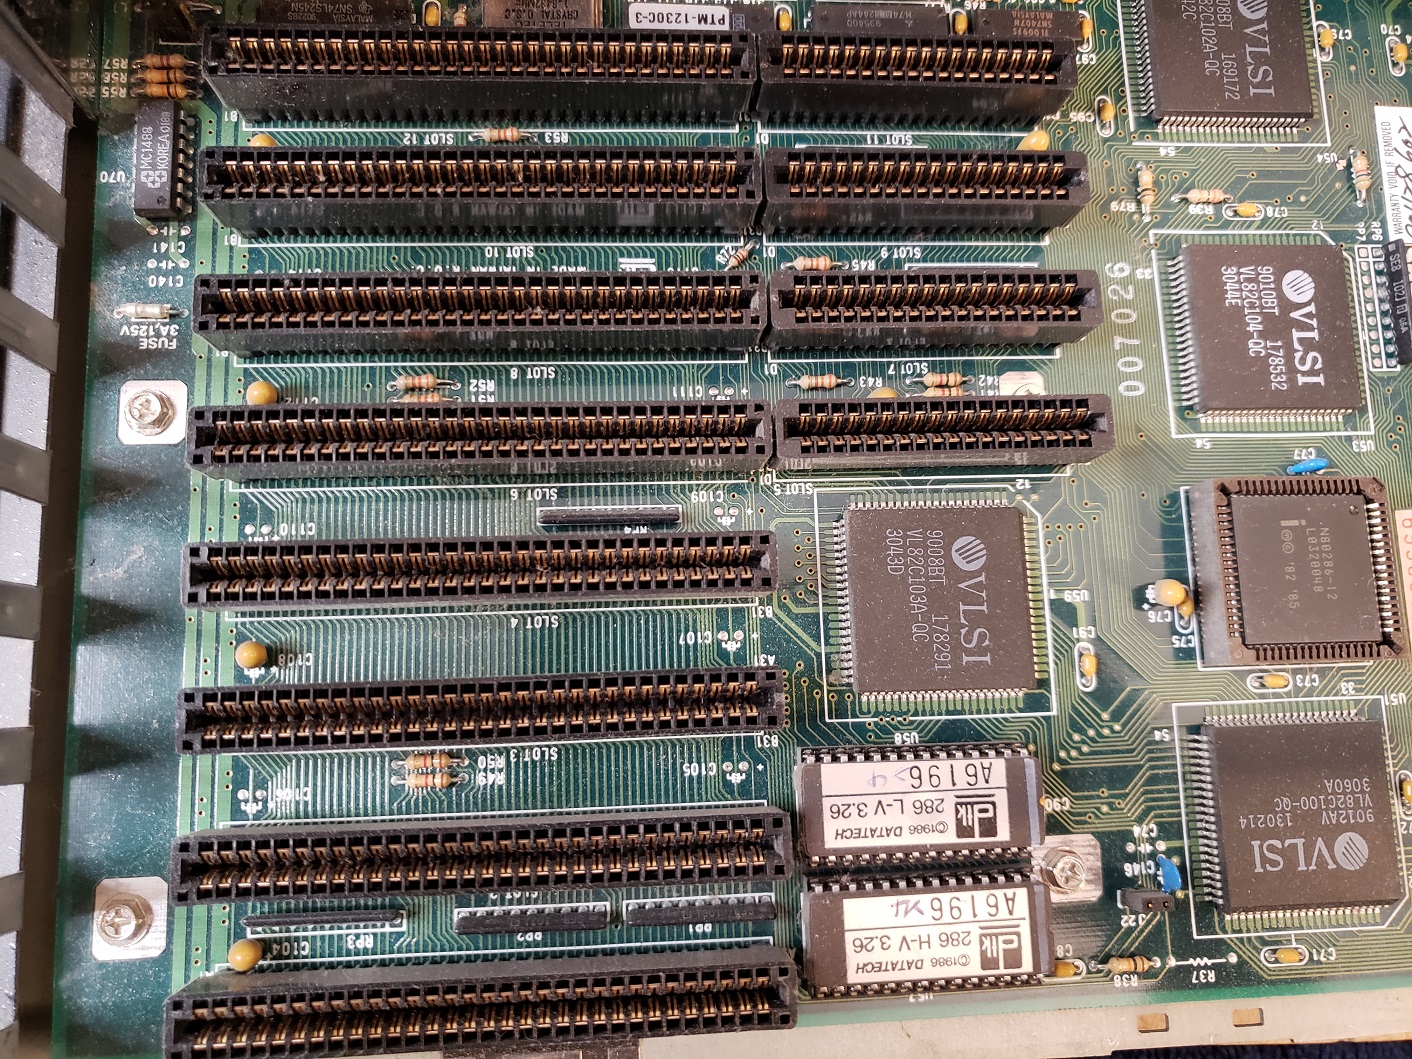
5 ) I/O – In the upper left hand corner of the board we have on-board connectors for the dual serial and single parallel connectors. This is also the location of the AT power connector.
Now let’s take a look at the two expansion cards that came with this PC.
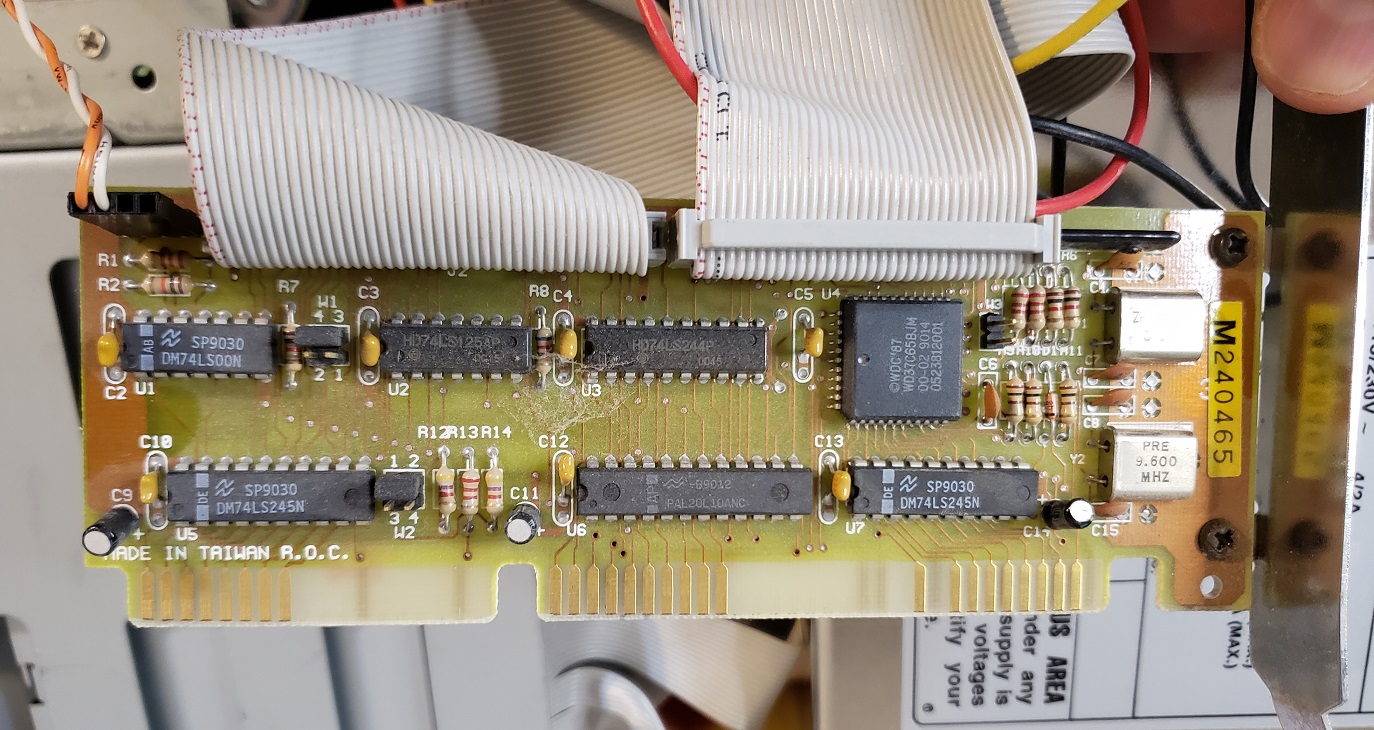
The first card is just a pretty standard I/O card from Western Digital. It looks pretty basic and comes with an IDE and floppy controller. I’m not sure if this and the HDD were factory stock but I think there’s a good chance they are.
When it comes to a video card I was pleasantly surprised at what I found when I opened this PC up.
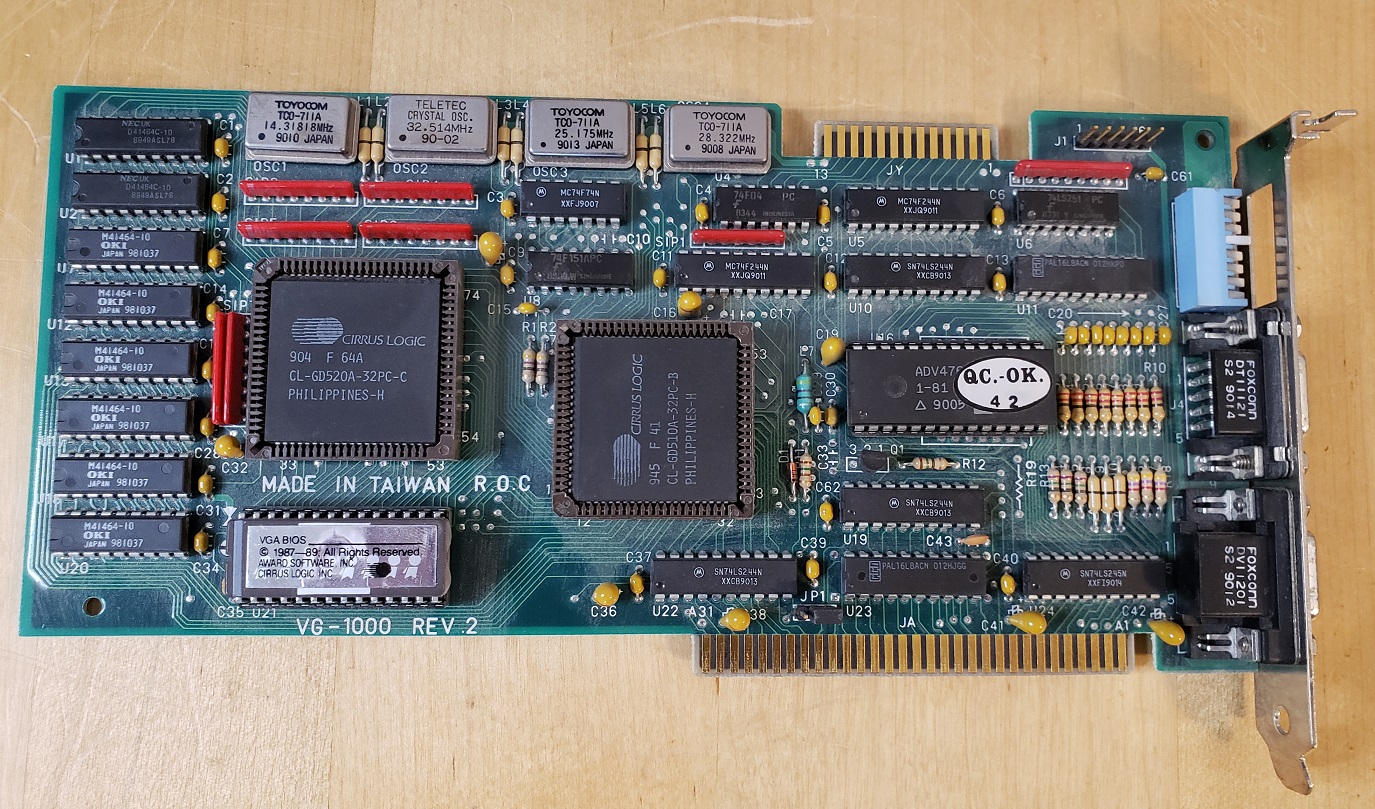
The video card I found installed was a fabled and quite uncommon Cirrus Logic “Eagle II” card. This 8-bit VGA card is one of Cirrus Logics’ earlier cards but is known for its excellent compatibility with CGA games.
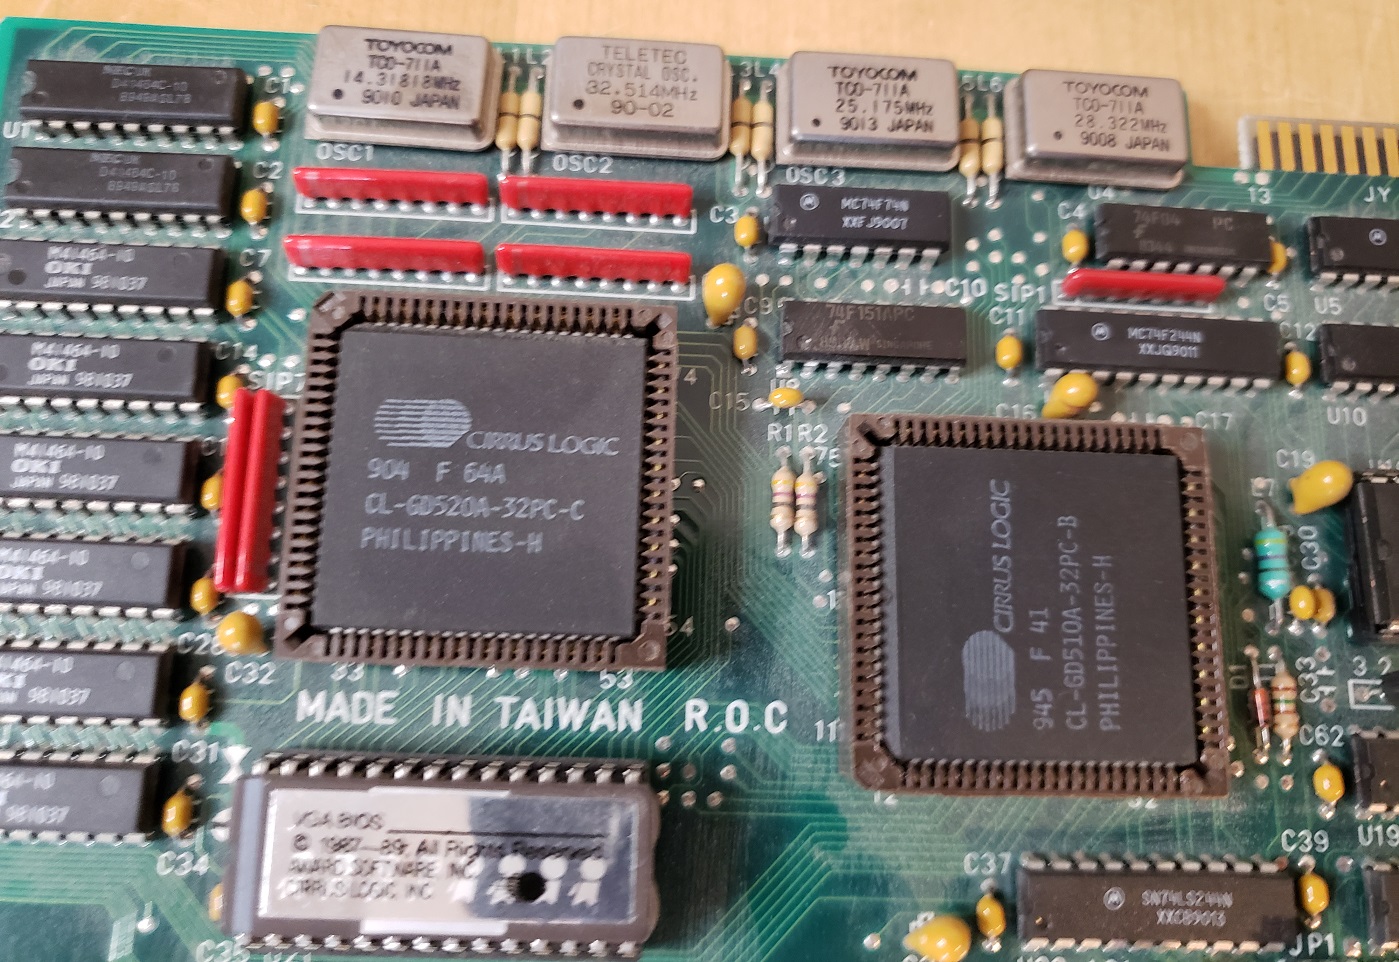
After personally testing this card I can confirm it runs several CGA titles that generally have problems when run on a VGA card without issue, this is without the use of any CGA compatibility TSRs or software being run. Games such as Digger which display garbage on my VGA cards ran without issue on the Eagle II. Starquake is a CGA game that shifts CGA palettes as well as color intensities as it switches screens. On most VGA cards it stays the Magenta, Cyan, and White palette we mostly associated with CGA but again, on the Eagle II it displays correctly. In my personnel testing I put this card up against a Trident 8900D, Tseng ET3000AX, ATI VGA wonder 24XL, and ATI Mach 8 video card and the Eagle II was the only card to display these games correctly “out of the box”, that is without any CGA mode software running.
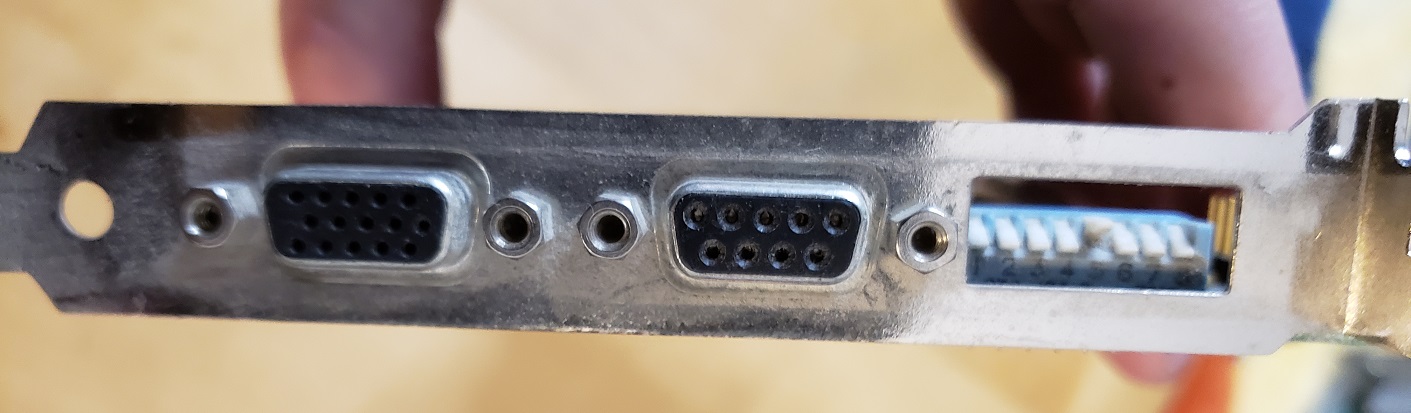
The card comes with both a 9-pin TTL connector for hooking up to older CGA/EGA style TTL monitors as well as a standard 15-pin VGA port. Output mode is determined by a switchbox next to the 9-pin TTL output.
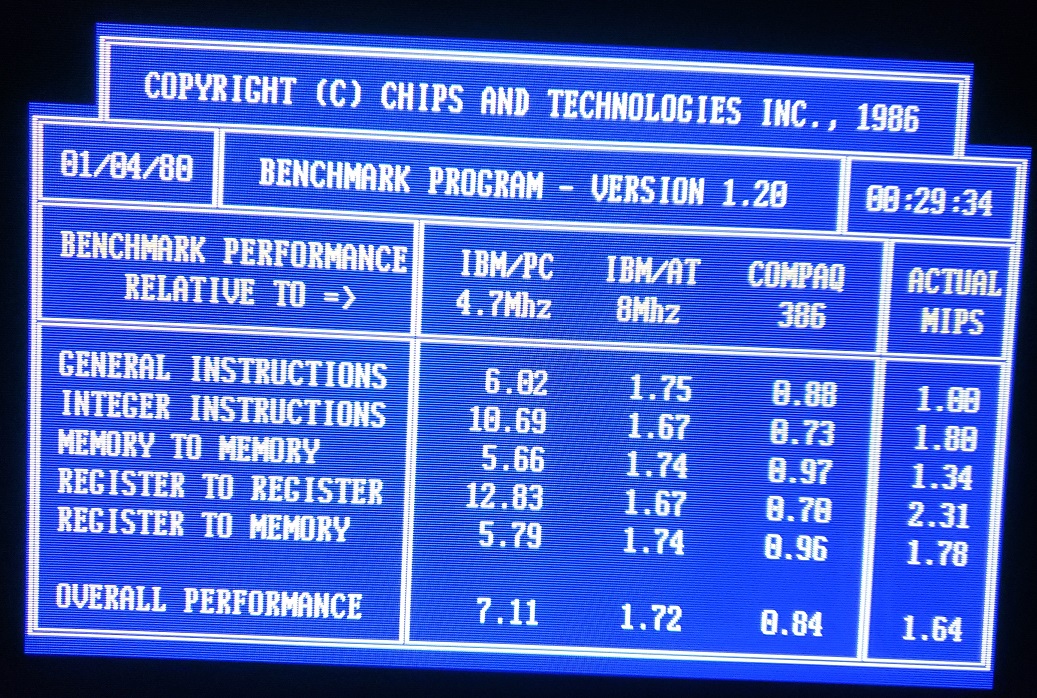
One thing to note is that my testing found the Eagle II VGA card to be a rather slow card, scoring in benchmarks generally lower than the other VGA cards tested. In a 286 class PC though this shouldn’t much of an issue.
MY UPGRADES
SIIG EIDE card
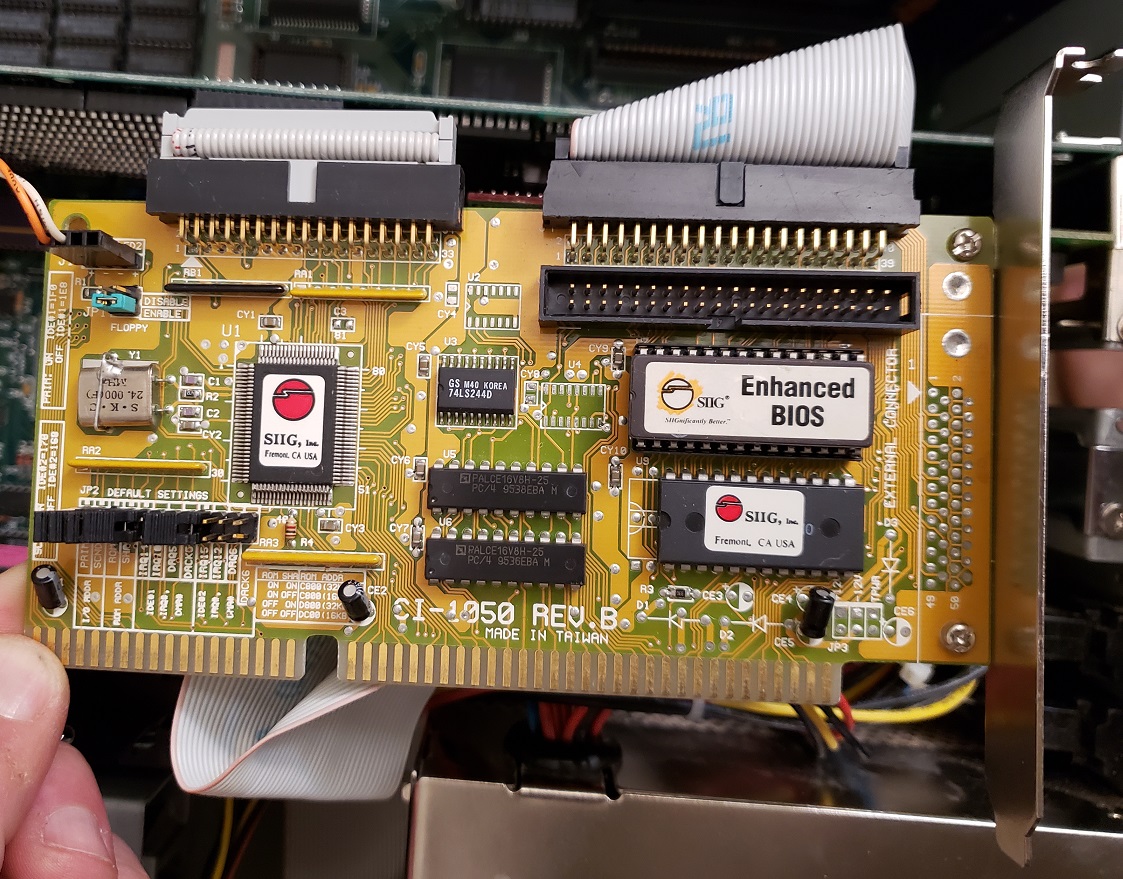
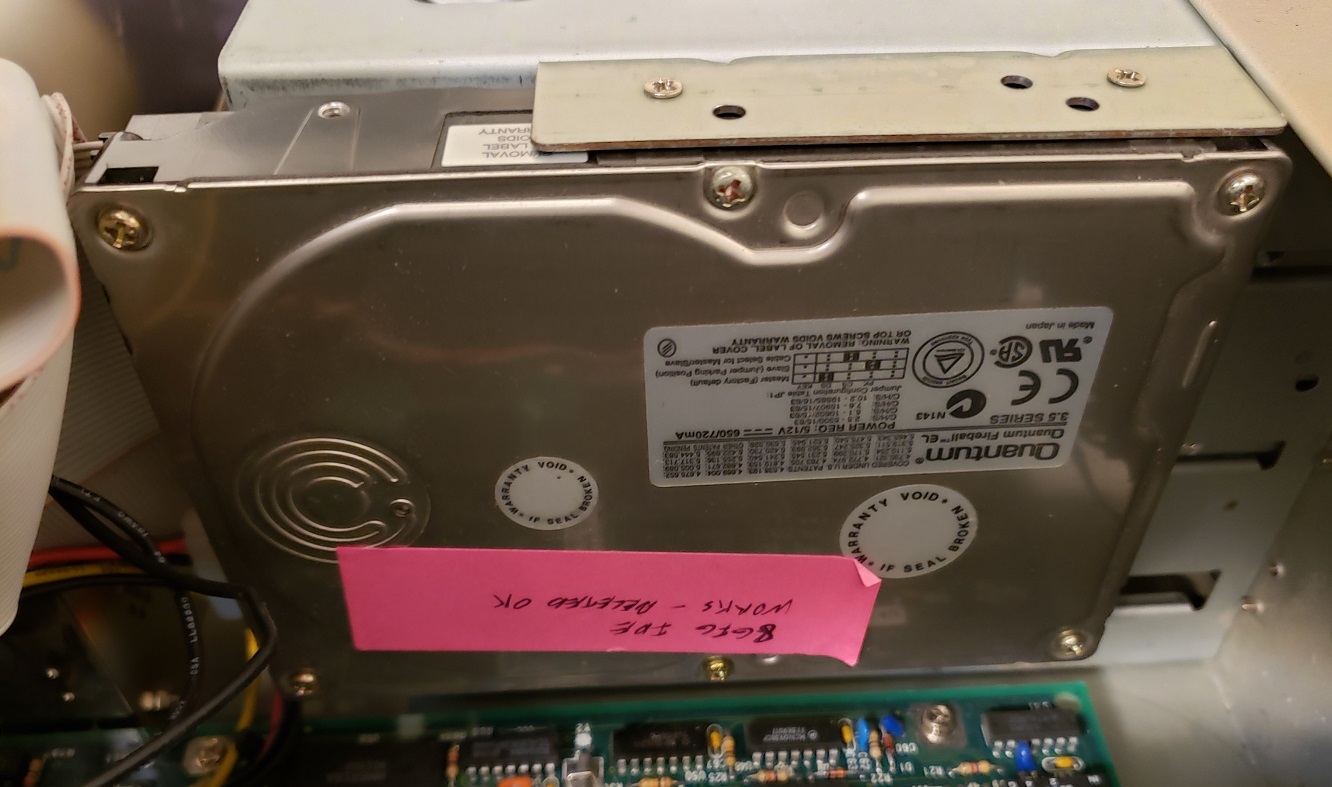
Originally I decided to upgrade the IDE with a SCSI card and drive but unfortunately, the SCSI controller card conflicted with my midi card so in the end I decided to upgrade the HDD to a Quantum Fireball 8GB (seen as 2GB by the OS) and this SIIG CI-1050 EIDE controller card which now controlled my hard drive and floppy drives.
VIDEO
The next “upgrade” could probably be seen as a downgrade as I decided to remove the Cirrus Logic VGA card and install a true EGA card. I feel EGA is probably a little more era correct for a 286 though it’s hard to champion era correctness for this build after adding EIDE and a whopping 2GB hard drive. I’ve really wanted to mess around with a real EGA card though so I thought this machine was the perfect opportunity. Whether you go with an EGA, CGA, or VGA card is up to you and your needs. In general the best all around option I would recommend is probably a VGA card since it’s probably the cheapest, most available and most all around compatible card that will also work with just about all VGA monitors.
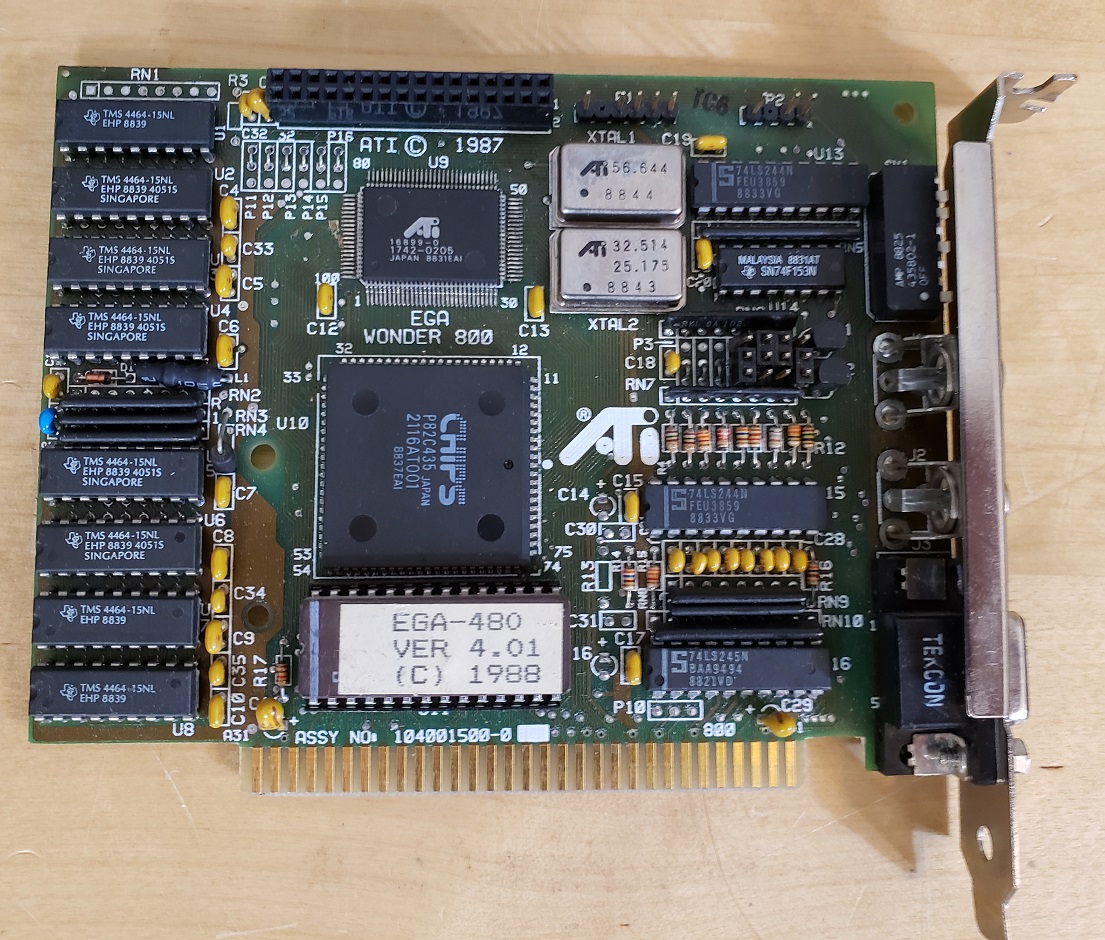
The EGA card I went with is the 8-bit ATI EGA Wonder 800 with 256KB of memory from 1987. This would be considered a higher end EGA card and is capable of extended EGA graphics mode as well as 16 color VGA modes (provided it’s attached to the correct monitor). One uncommon supposed feature of this card is that one of the RCA feature connectors (the upper one next to the switch box) is supposedly a true composite video out though I have yet to test this. The card does have a switch box for selecting a mode and it does require a TTL monitor to connect to via its 9-pin out. A MultiSync or EGA monitor is required to display higher resolution EGA modes but it will display low-resolution 16 color EGA to a CGA monitor just fine.
There is a higher end EGA wonder 800+ card that is completely jumper free and switchless but this card is supposedly a cut down VGA card that has compatibility issues with 25kHz monitors at 640×400, this is unconfirmed by me though.
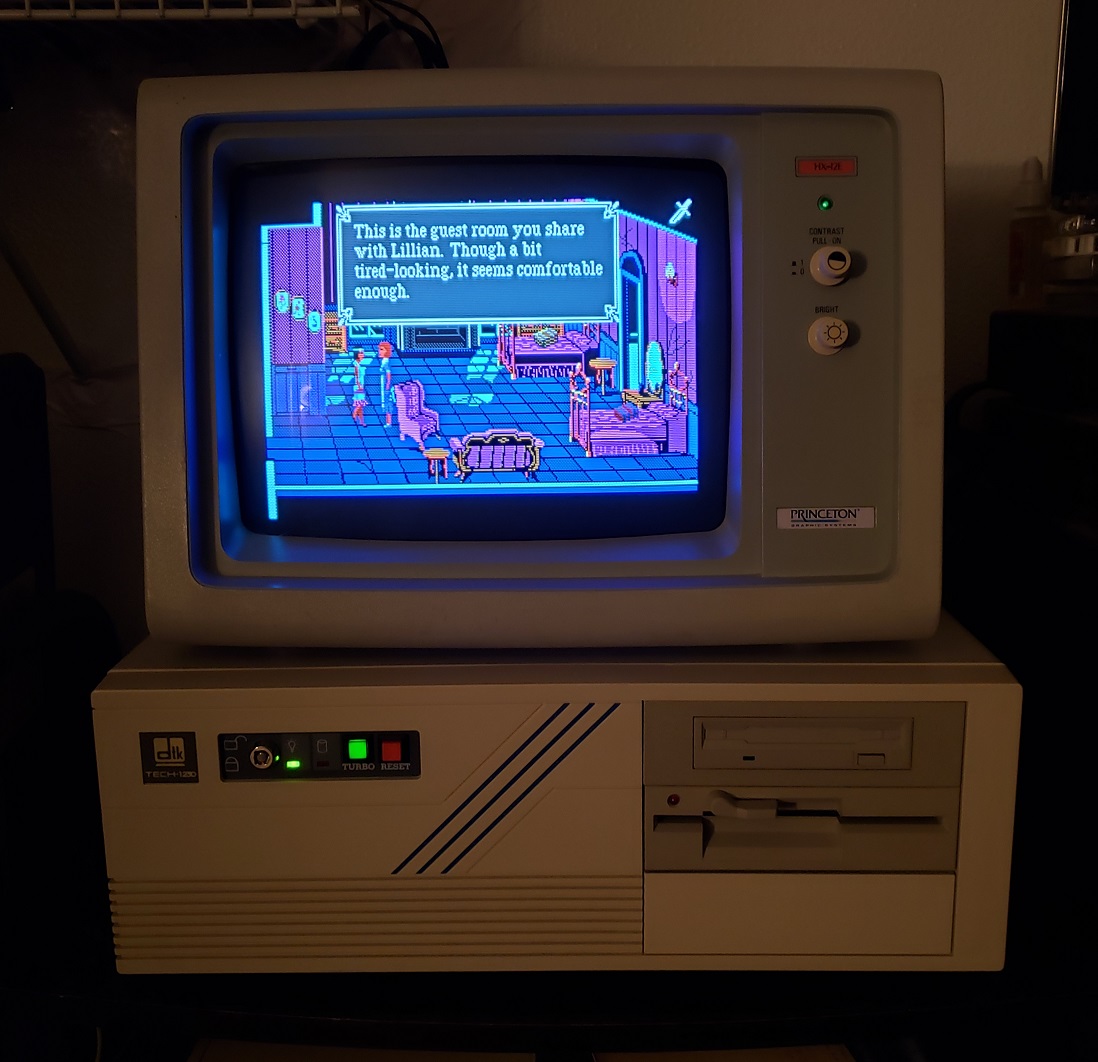
I have been displaying this card on a Princeton HX-12e EGA monitor and the results have been excellent. The Princeton HX-12e is an EGA monitor style in a similar fashion to the IBM monitors for the PC, XT and AT lines of computers.
Switch settings for this card can be found Here.
SOUND
For sound I decided to go with the old reliable Sound Blaster standard for maximum support among games of the era.
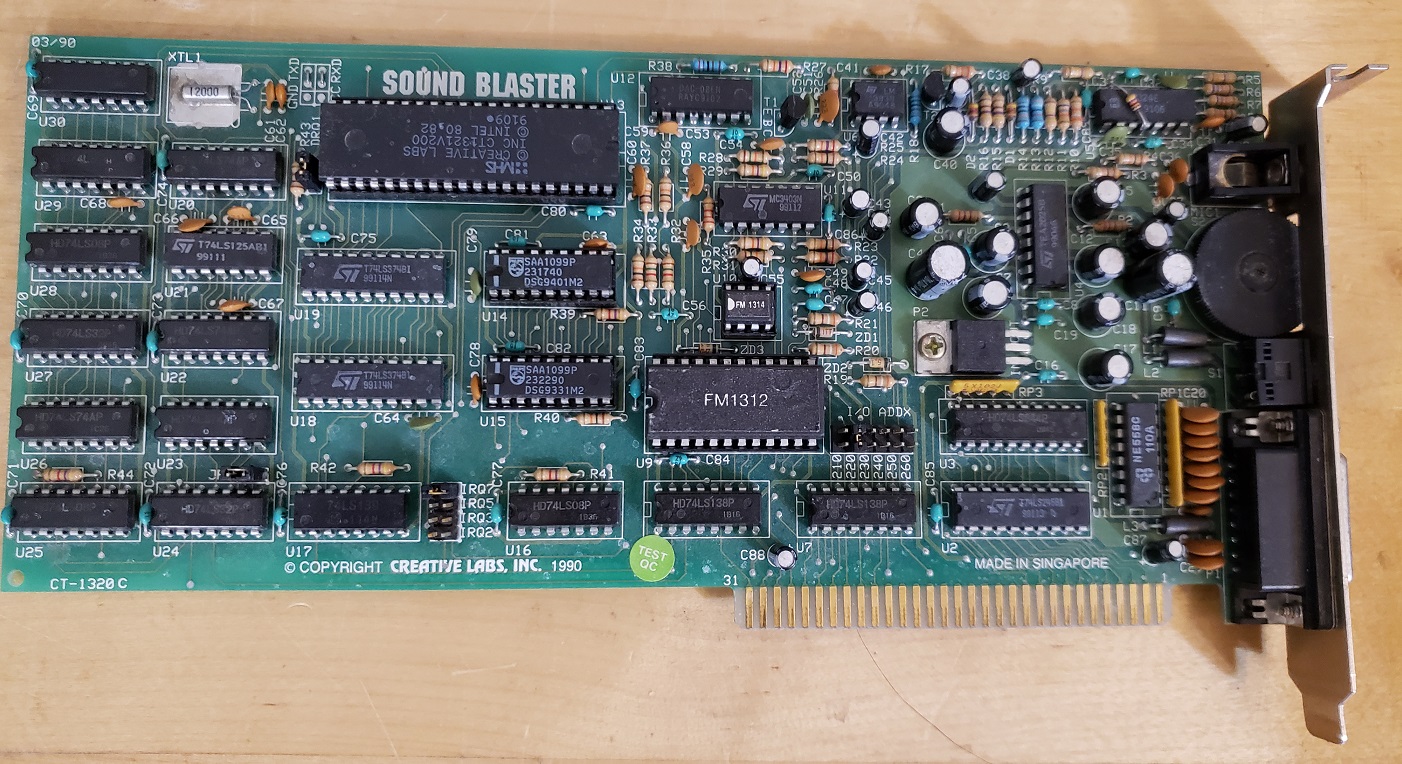
The card is a Sound Blaster 1.5 model CT1320C. This is an 8-bit sound card capable of digital sound effects as well as OPL2 FM synth and Adlib sound compatibility. My card has also been upgraded with the optional CMS (Creative Music System) chips for compatibility with most games that support this earlier sound mode. Seeing as Sound Blaster cards were the standard this card should support pretty much every game that will run well on this PC and that supports sound. The gameport is also a nice addition as it allows my PC to support a joystick or controller without adding an additional card.
The second sound card I decided to add was a midi card.
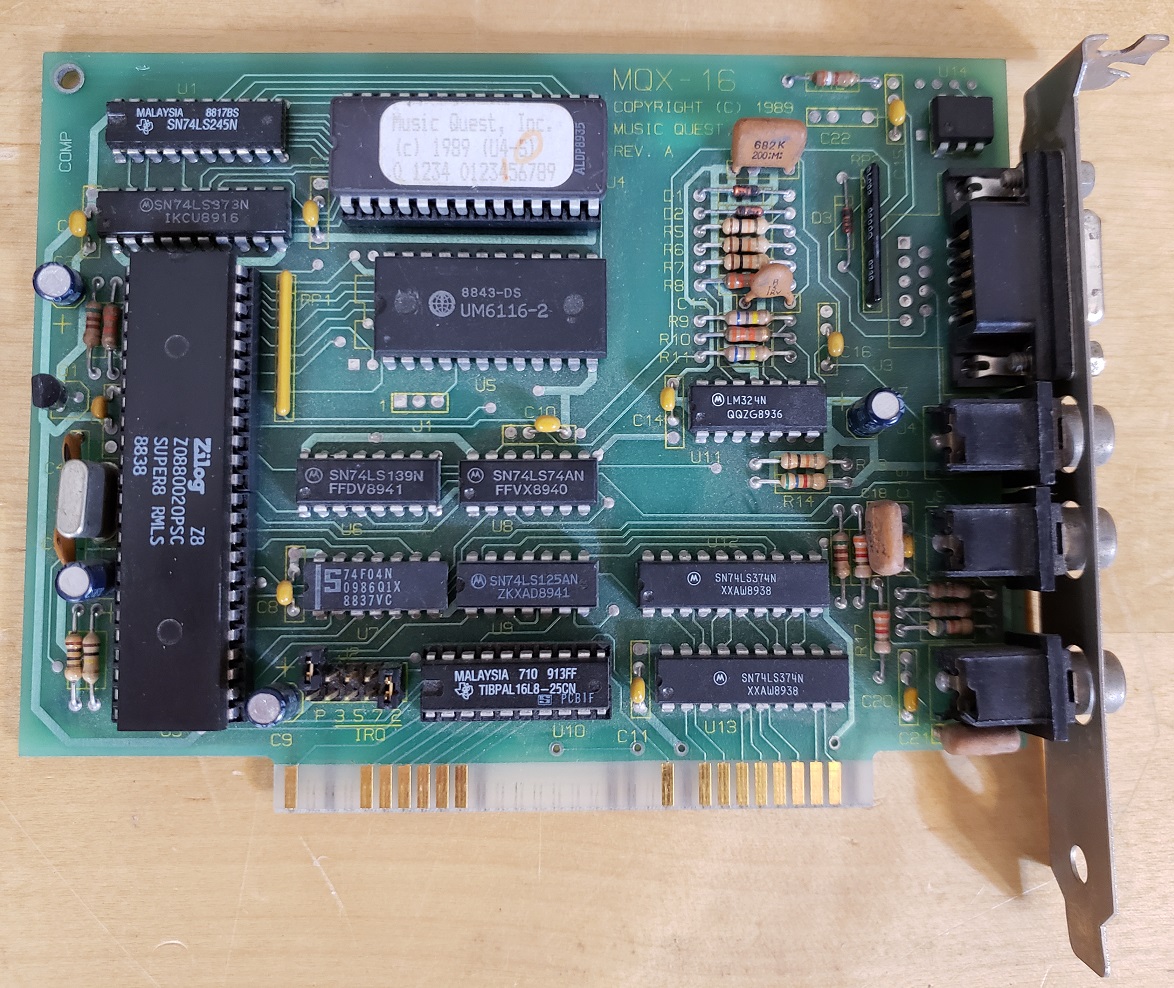
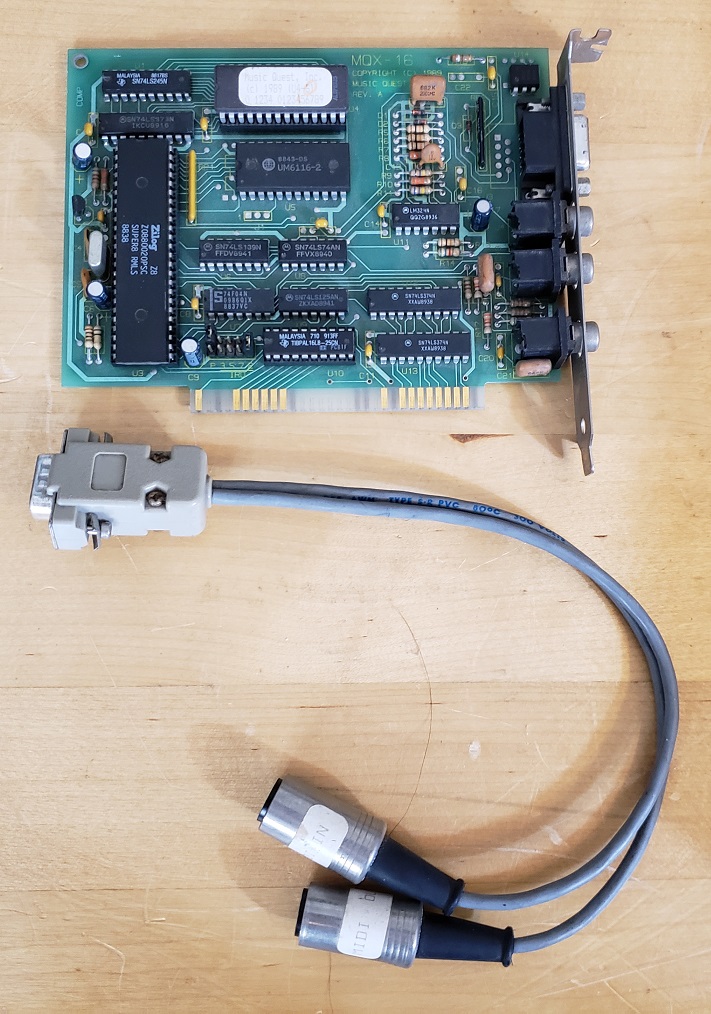
I decided to add a Music Quest MQX-16 8-bit card for any games that happen to support midi sound, most commonly in this era via a Roland MT-32 midi module. The card is also “intelligent mode” compatible so many games that use that mode, for example many Sierra adventure titles from the era, will run without issue when paired with a MT-32.
RAM
My last upgrade was an Intel Aboveboard memory expansion just to give me a little more memory overhead.
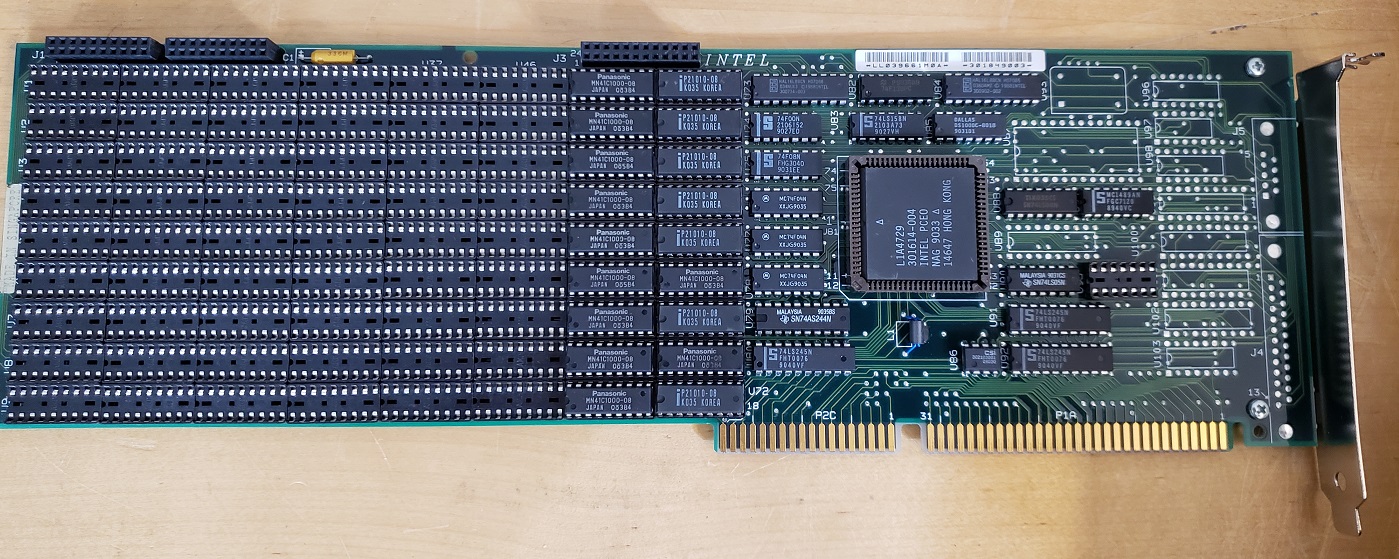
The Intel Aboveboard I installed is capable of adding a full 8MB of additional memory though I limited mine to 2MB giving my DTK tech-1230 a total of 3MB. This should be more than enough memory for any games I’ll be playing on this setup.
The DTK tech-1230 is currently my main 80286 class PC filling a small niche spot in my PC lineup. I really like this PC from the design of the case to the layout and capabilities of the board itself. My only minor complaint is I wish it supported RAM expansion on the board so I wouldn’t have to resort to using a card to expand the memory but this is a minor complaint. I may have also preferred a slightly faster 16MHz 286 to the 12/8 MHz one this machine received but it’s still only a minor complaint concerning my personnel desires for a machine of this class.
You probably don’t need a 286 in your collection as a 386 clocked similarly can do everything a 286 can but better but there’s still something magical about getting one of these beasts up and kicking again. Playing a game like the Colonel’s Bequest on a 286 and on an actual EGA monitor is just something to behold if you’re a retro PC geek like me.
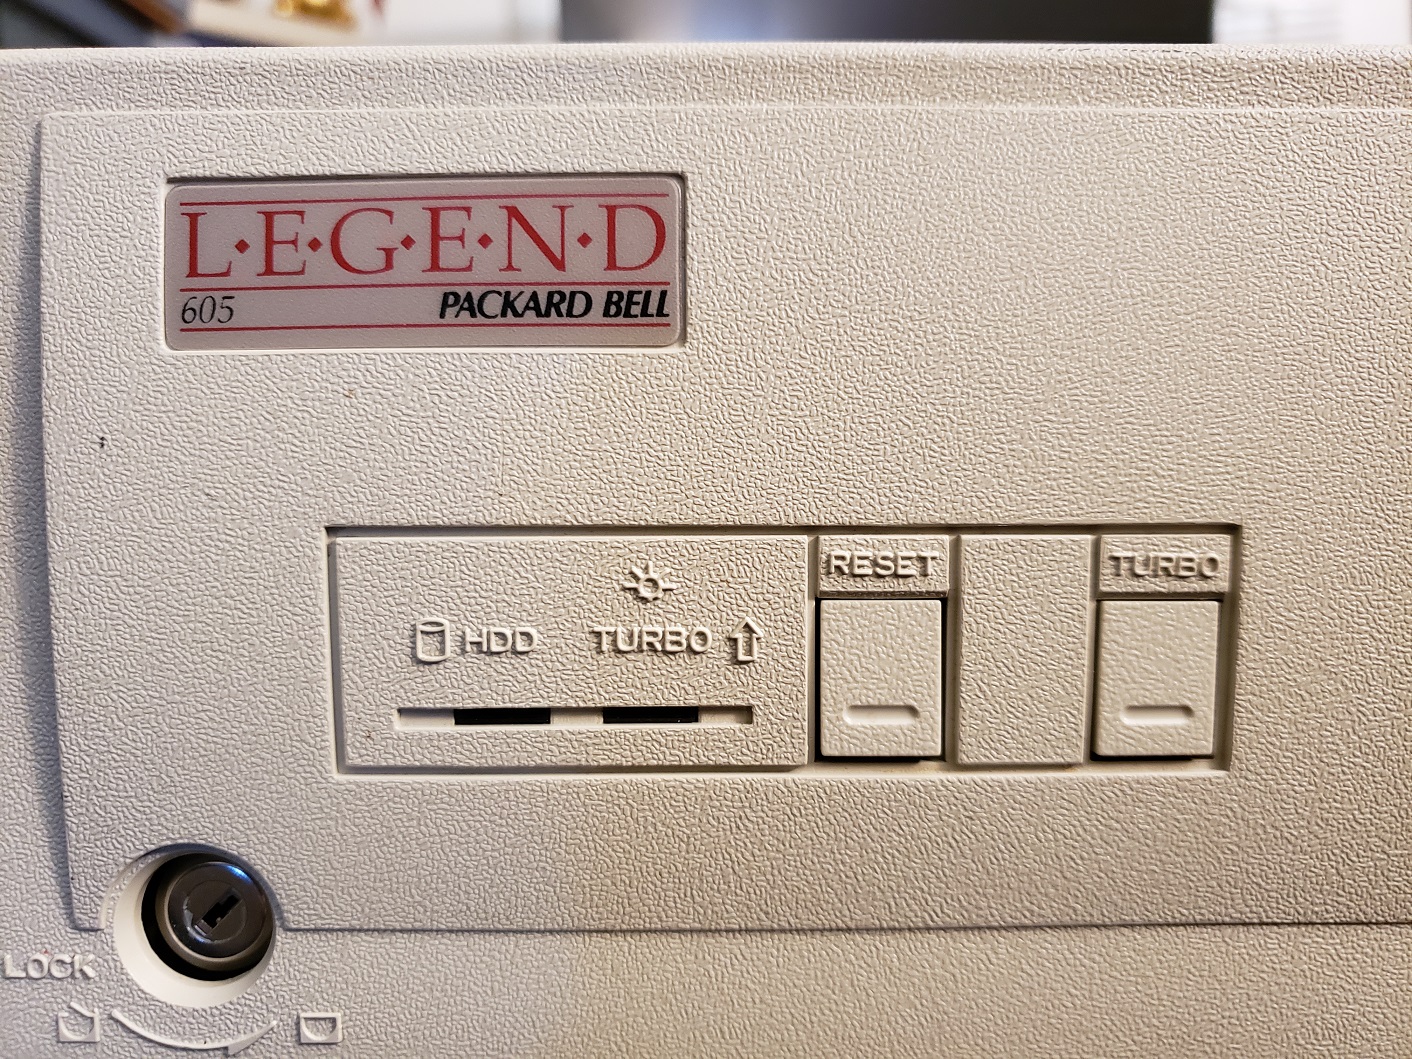
In today’s article, we will be looking at the Packard Bell Legend 605, an 80486 class computer from Packard Bell.
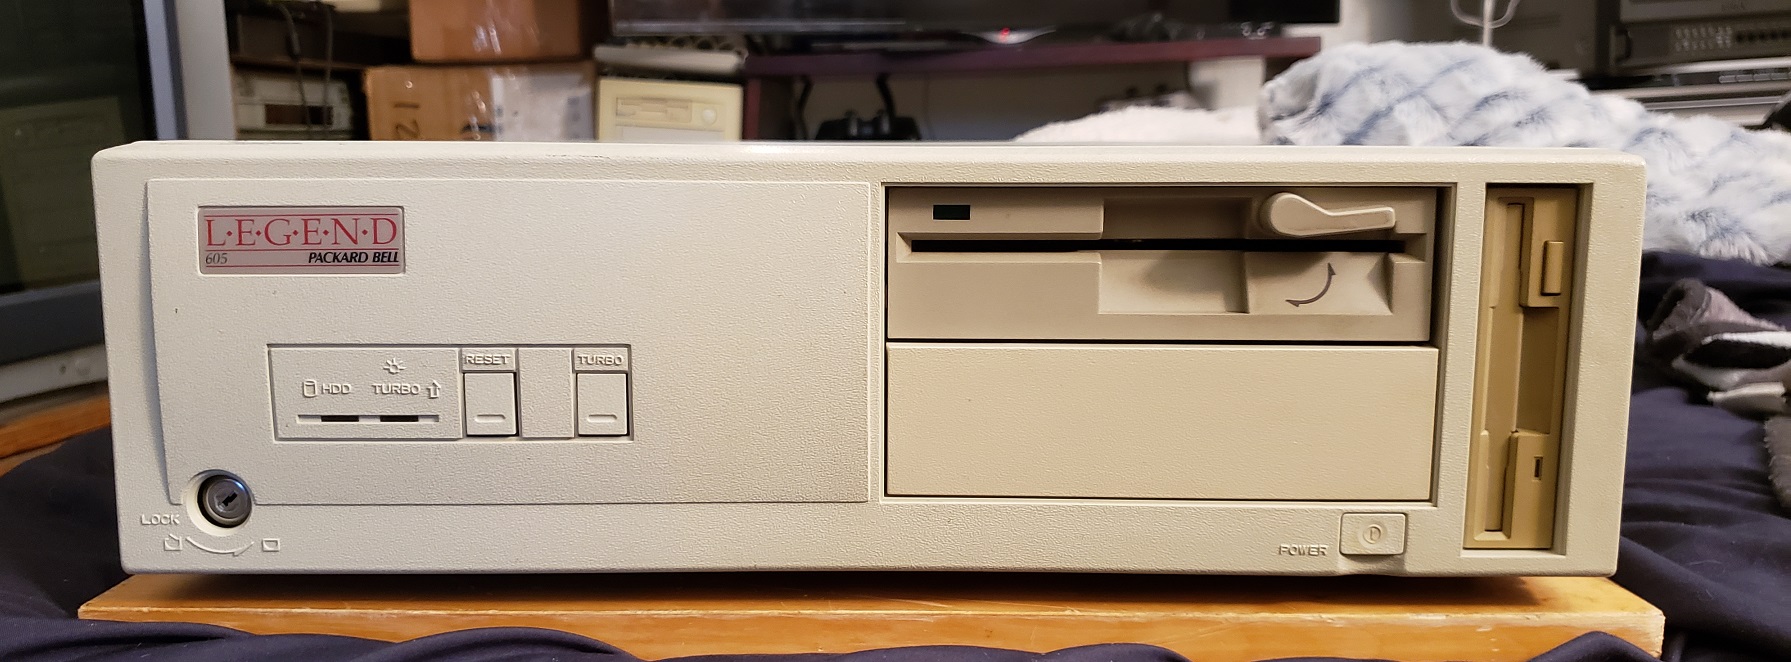
The Legend 605 is a fairly small and compact desktop machine. On the left of the case, we have a keylock as well as LEDs for HDD activity and power/turbo. Next to the LEDs are two buttons for reset as well as an actual turbo button. The buttons are more like loose plastic cut on three sides that when pressed bend inward and press on a real button.
On the right side of the front of this case, we have dual 5.25 inch bays and a single 3.5 inch bay in the vertical position. For a small 486 class PC, this is perfect as it gives you room for two floppy drives, 1.44MB as well as a 1.2MB 5.25 inch drive as well as leaving a single 5.25 inch bay open for a CD-ROM drive if you wish.
Below the bottom 5.25 inch bay is the power button which is connected to a long plastic rod that physically switches on the power.

On the left of the rear of the case, we have standard power connectors. To the right, the Legend 605 has four expansion slots in a horizontal configuration and several built-in I/O below.

From left to right we have a serial port, parallel port, and thirdly a gameport for attaching a joystick or something like a Gravis Gamepad. Usually, these are included in conjunction with some form of built-in audio but the 605 offers no audio abilities. Next to the gameport is a standard VGA port followed by dual PS/2 ports for keyboard and mouse, a nice addition to find on any 486 class PC.
The cover is removed by removing two screws in the rear of the case and sliding the case top forward.

A sticker with jumper settings and board layout should be on the inside of the top cover but I’ve added it here for reference.

In the image above the HDD caddy is already removed but a metal caddy that holds the hard drive fastens onto the dual 5.25 inch bays and can hold a hard drive in a vertical position.

My machine came to me with a 425MB WD HDD loaded with DOS 6.22.


1 ) CPU – The 25MHz 486SX seemed to be the go-to CPU for lower end OEM PCs. The 25MHz 486SX lacks a math coprocessor and does fall at the lower end of the 80486 power spectrum running on a 25MHz front side bus. The CPU on the Legend 605 is soldered to the motherboard. Thankfully the Legend 605 does offer a fairly good upgrade path for CPUs.

2) CPU upgrade socket – fortunately the 605 does have a secondary “upgrade” CPU socket to allow for relatively easily upgrades to your CPU. Unfortunately, this socket is a LIF (low insertion force) socket as opposed to a ZIF socket which has a lever mechanism to assist in easily swapping CPUs. Installing a CPU in this socket is fairly easy but without the correct tools, it can be tricky to remove.
The upgrade socket can support a wide array of 5 volt 486 class CPUs such as the 66MHz DX2 which will give your PC a very noticeable boost in performance. Installing a new CPU and then jumpering jumper JCPUP (as well as adjusting for front side bus if applicable) will let the PC know a CPU is installed in the upgrade socket and deactivate the soldered on 486-25 SX while enabling the CPU installed in the upgrade socket. My machine has been upgraded with an Overdrive chip. The overdrive chip has a built-in voltage regulator and runs with a x3 multiplier on a 33MHz bus giving it a speed of 100MHz. This is a huge speed upgrade over the CPU the Legend 605 comes stock with. Note that the Legend 605 does not seem to support the Pentium Overdrive CPU.
3) L2 Cache – The Legend 605 supports 64k, 128k, and 256k of L2 cache memory on the motherboard. Mine has been upgraded to the full 256k of L2 cache. Anything over 256k of cache on a 486 class PC usually results in small speed increases with diminishing returns so having 256k on this board is a good amount and I’d say is the general standard for a machine like this one.

4 ) RAM – The memory configuration on the Legend 605 is slightly unusual as it has a maximum memory amount of 20MB with 4MB of memory being soldered onto the motherboard. You can upgrade to a full 20MB by adding four 4MB memory sticks as I have. In my experience with PCs of this age, usually there is no memory soldered onto the board and usually, they at least allow up to 32MB maximum.

5 ) Video – The built-in video chip is from Oak Technologies and uses the OTI077 VGA chip. There is 512K of VRAM soldered onto the board with empty sockets next to these allowing for upgrading to a full 1MB of VRAM. The video on the Legend 605 is supposedly on the VLB bus and not ISA but I haven’t been able to verify this.
I don’t have much experience with Oak Technologies but from my research, they seem to be pretty middle-of-the-road type chips offering mediocre to adequate video but nothing extraordinary.

6 ) Riser Connector – slot for the riser card which has four 16-bit ISA slots for expansion cards.

7) Floppy connector and single built-in IDE connector for supporting two IDE devices
8) AT power connector (note the battery in the image below is a replacement, the old battery was removed and a new one soldered in its place by the previous owner)

The Packard Bell Legend 605 has the potential to make a really nice retro DOS or Win 3.1 build. In its stock configuration with the 25MHz 486SX it is a bit on the weak side for a 486 but it can easily be made to be as powerful as a 486 as you want with the CPU upgrade slot. adding an Overdrive CPU or even a AMD 5×86 at 133MHz makes quite a powerful machine. Although most later 486 PCs can accept at least 32MB of memory the 20MB limit shouldn’t be much of a hindrance as many games did not require such a large amount. Adding a fast ISA video card and a sound card along with a CPU upgrade makes the Legend 605 a quite capable machine.


A place for the pc collector
Probabilmente il miglior blog bilingue al mondo*
Game-related ramblings.
My Gaming Timeline
Lynn talks about video games, records and books ...
Sharing My Retro Video Game Collection.
Random electronics and gaming crap
Chronogaming project featuring reviews, screenshots, and videos of the entire Super Nintendo library in release order.
Random mutterings on retro computing, music, plus radio controlled scale modelling.
Work(s) in Progress!
1001 video games and beyond
retro computers and stuff
Stay Jispy!