
Subscribe to continue reading
Subscribe to get access to the rest of this post and other subscriber-only content.
Subscribe to get access to the rest of this post and other subscriber-only content.
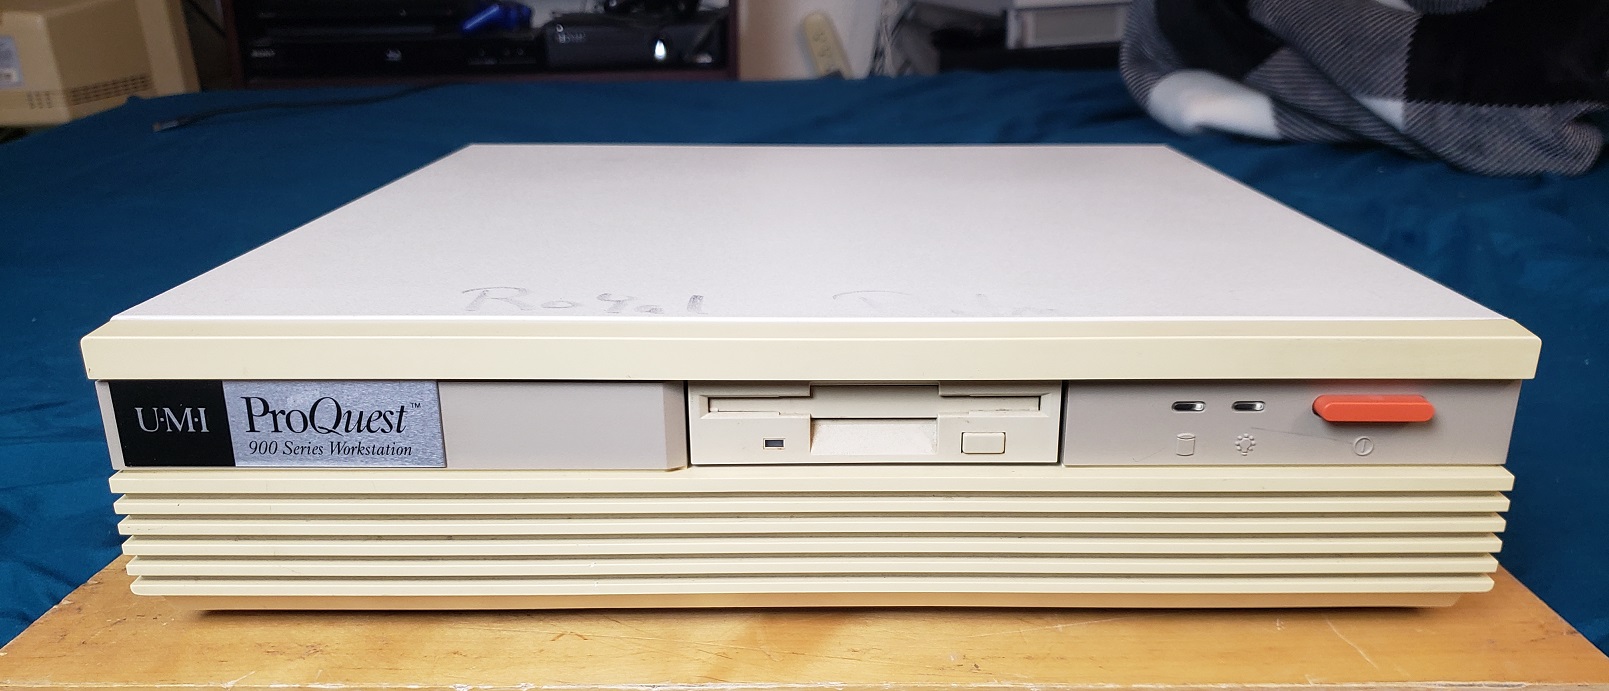
In today’s article, we will be taking a look at the U-M-I ProQuest 900 Series Workstation, a 286-class computer. There also seem to of been versions of this machine using the same case simply labeled as NCR or NCR-286. The motherboard components including CPU, video chip, and chipset seem to be mostly the same, only oriented differently. The motherboard in my ProQuest 900 Series may be a later revision as it does include a spot for a 386 socket to be soldered onto the PCB.
The case is a very slimline design fairly similar in proportion to the Tandy 1000RL HD (though a bit taller) leaving only enough room for a single 3 1/2-inch bay in the middle of the case. mine was outfitted with a 1.44MB 3 1/2 inch floppy drive which is the standard drive one would expect to be installed. To the right of the floppy drive are two LED lights for HDD activity and power. Finally, to the far right, we have a nice large oval power button.
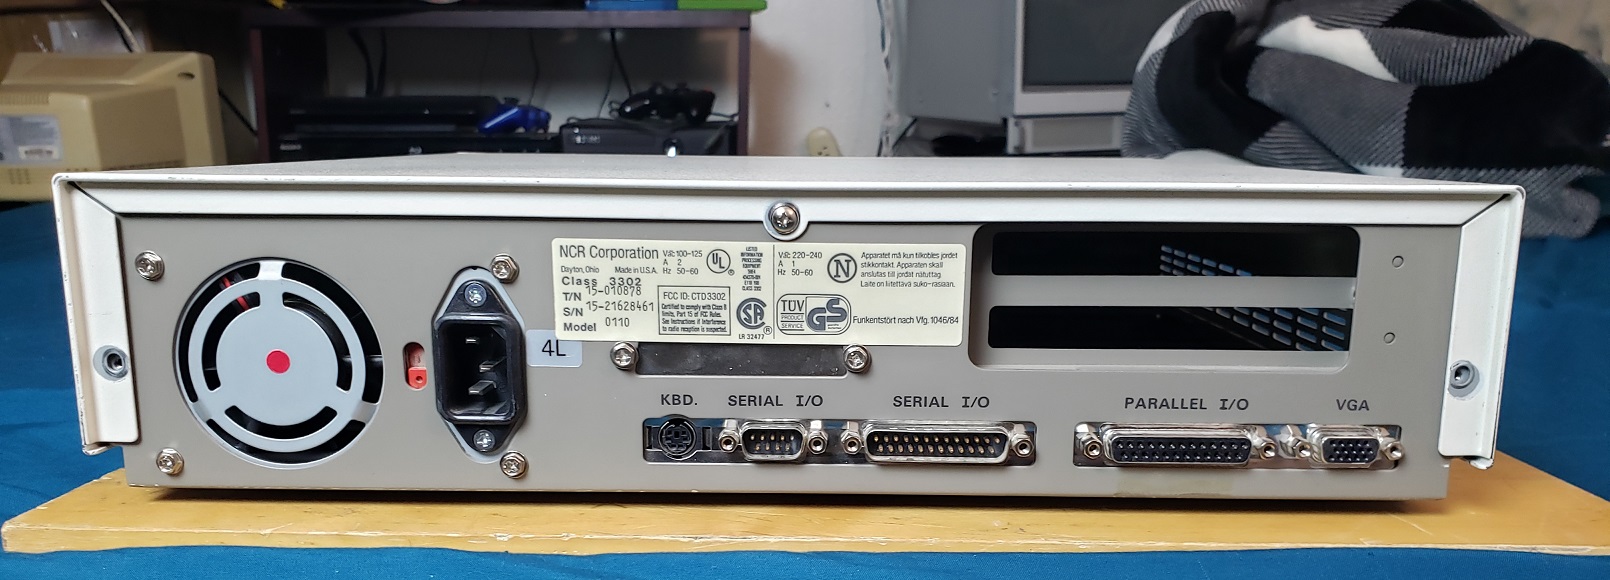
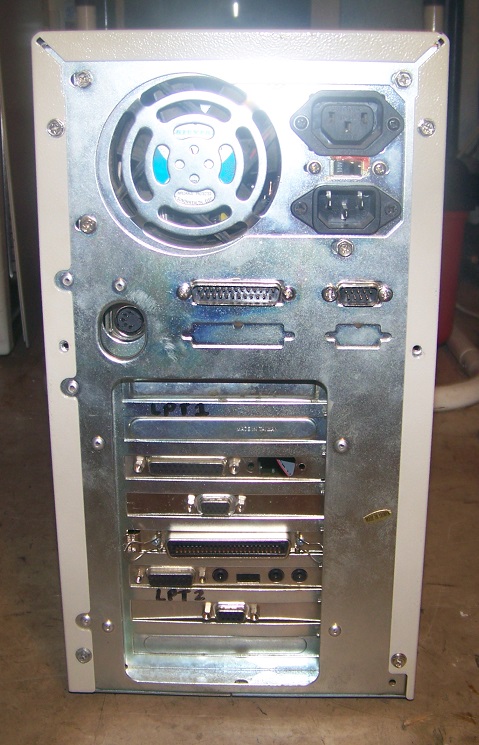
On the rear of the case, we have a fan exhaust port on the far left followed by a standard three-prong power cable connector. Next to that, we have what appears to be a small unused cutout of some sort with the I/O starting below it. First, we have a single PS/2 port labeled KBD, which is for a keyboard. Next, we have dual serial ports of different sizes, which is very slightly unusual since in my experience the serial ports are either one or the other but usually not one of each type. Lastly, we have a parallel printer port and a standard VGA port for the built-in video. all in all between the PS/2 and VGA ports we have a fairly modern assortment for a 286-class machine.
Above the I/O and on the right of the case we also have dual expansion ports for adding two discrete cards.
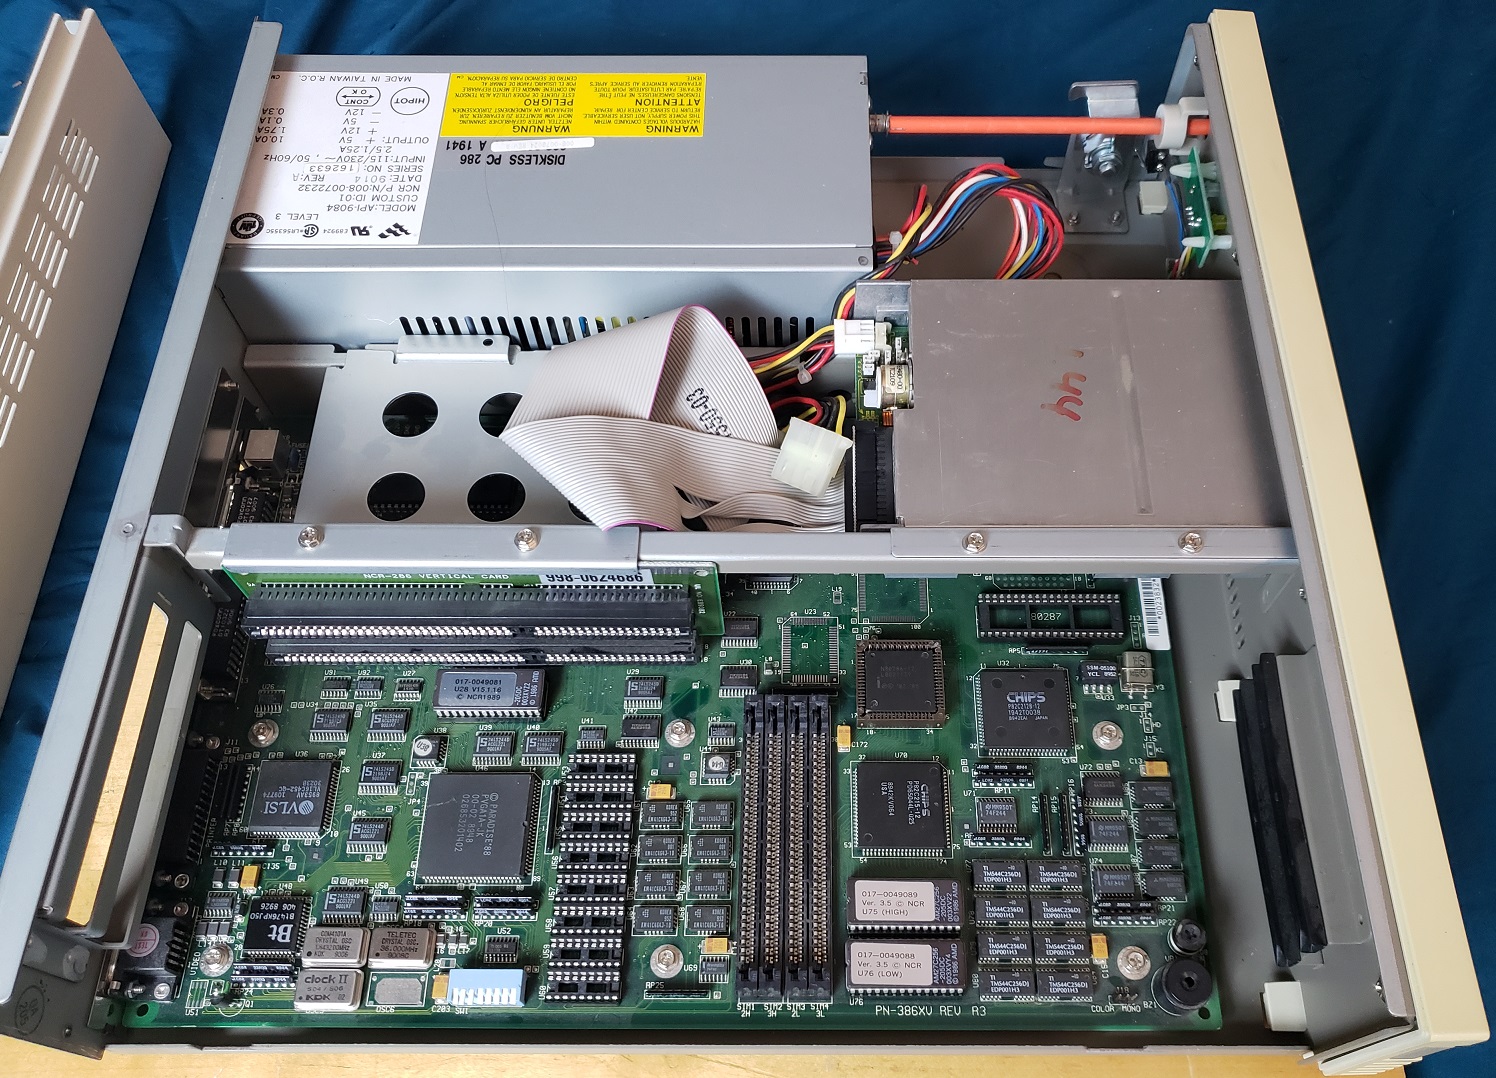
Here we have a look at the inside with the case cover removed. Next to the power supply we have removable sleds for both the floppy drive and the HDD, though my machine was missing the hard drive. From my understanding, these PCs can be quite picky about hard drives and lack any user HDD input in the BIOS setup.
We can also see a riser card labeled NCR-286 which has two 16-bit ISA slots allowing the installation of various cards such as a sound card or network cards if desired.
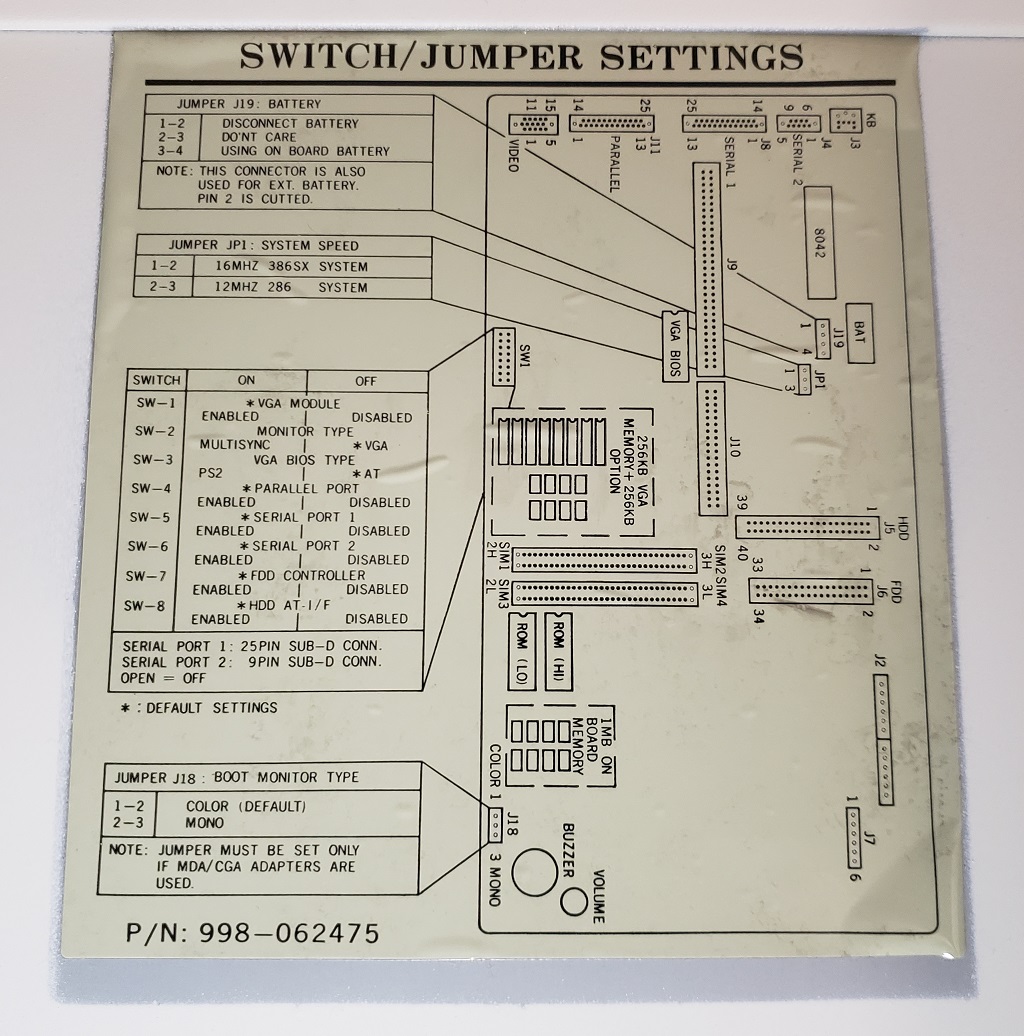
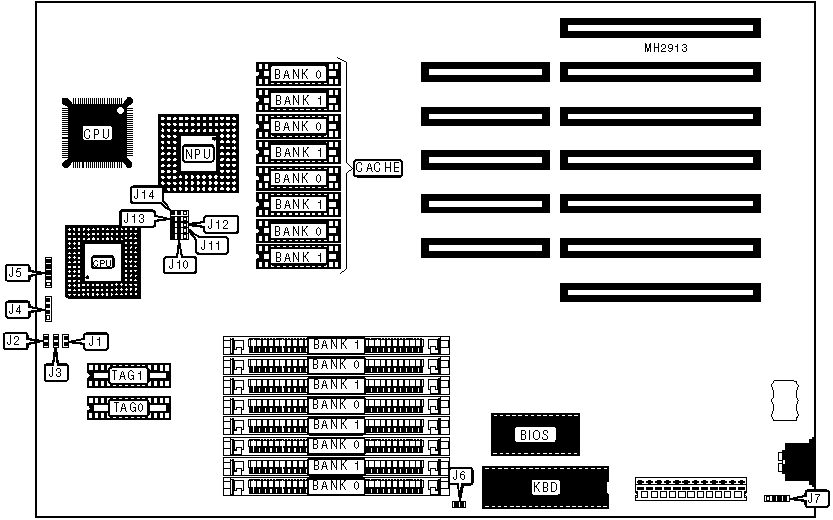
My machine also had one of those very handy stickers on the inside of the cover outlining the motherboard as well as jumper and switch box settings.
Here is a look at the board with the drive sleds removed.

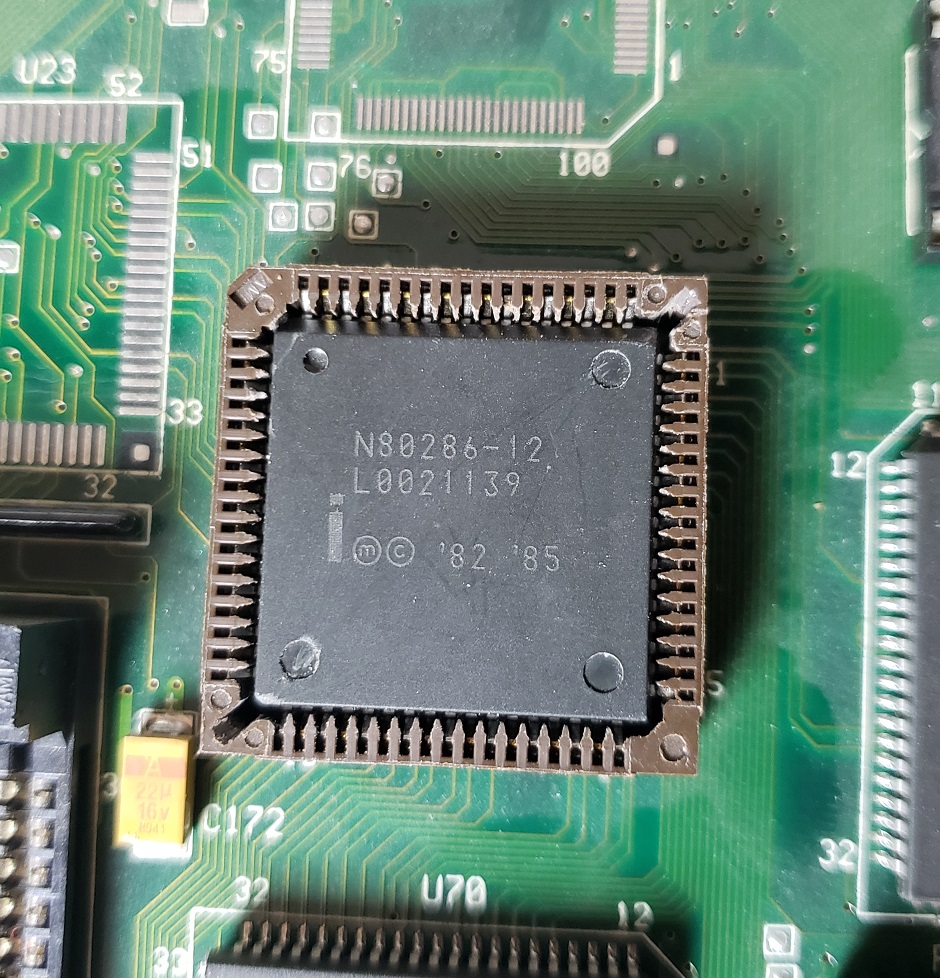
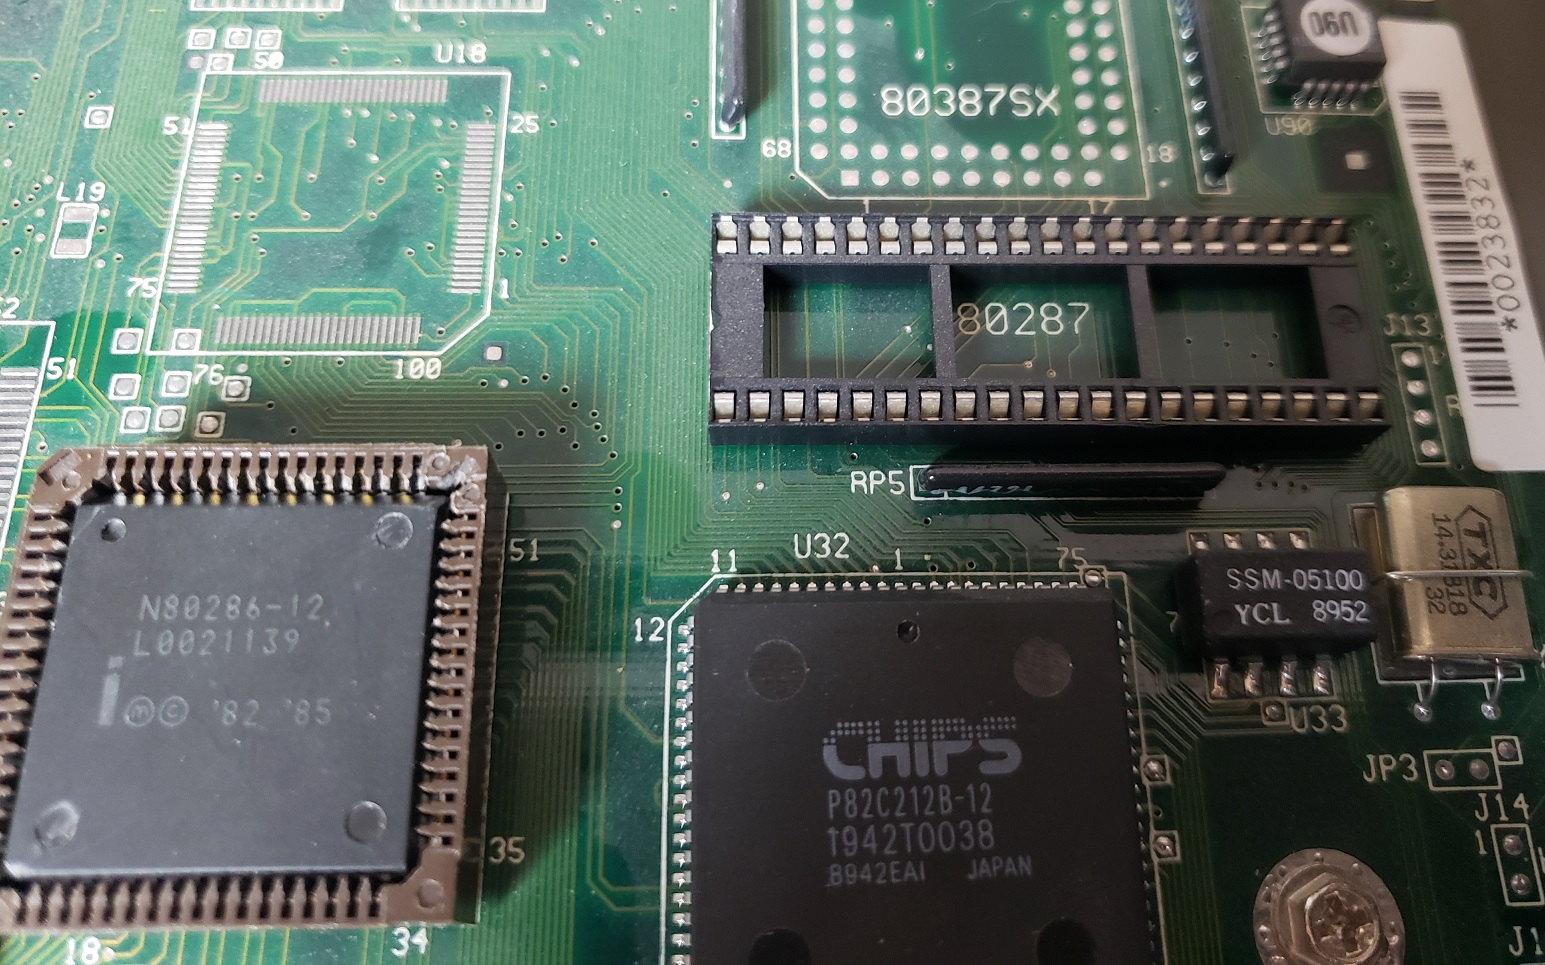
1) CPU – The CPU is an Intel 12MHz 286. Overall this is a great CPU as far as 286 boards go and should be able to play all of your late 80s and early 90s EGA games without issue as well as some early VGA titles. As far as I can tell the CPU is not upgradeable though there is a jumper for switching to a 16MHz 386 and a solder point for a 386 socket. It may be possible to swap out the crystal oscillators and install a 16MHz 286 but I can’t confirm this.
2) Co-Processor – There is a socket for adding a math Co-Processor though mine is unoccupied. This will help speed up some programs such as CAD design as well as a small handful of games from the time.
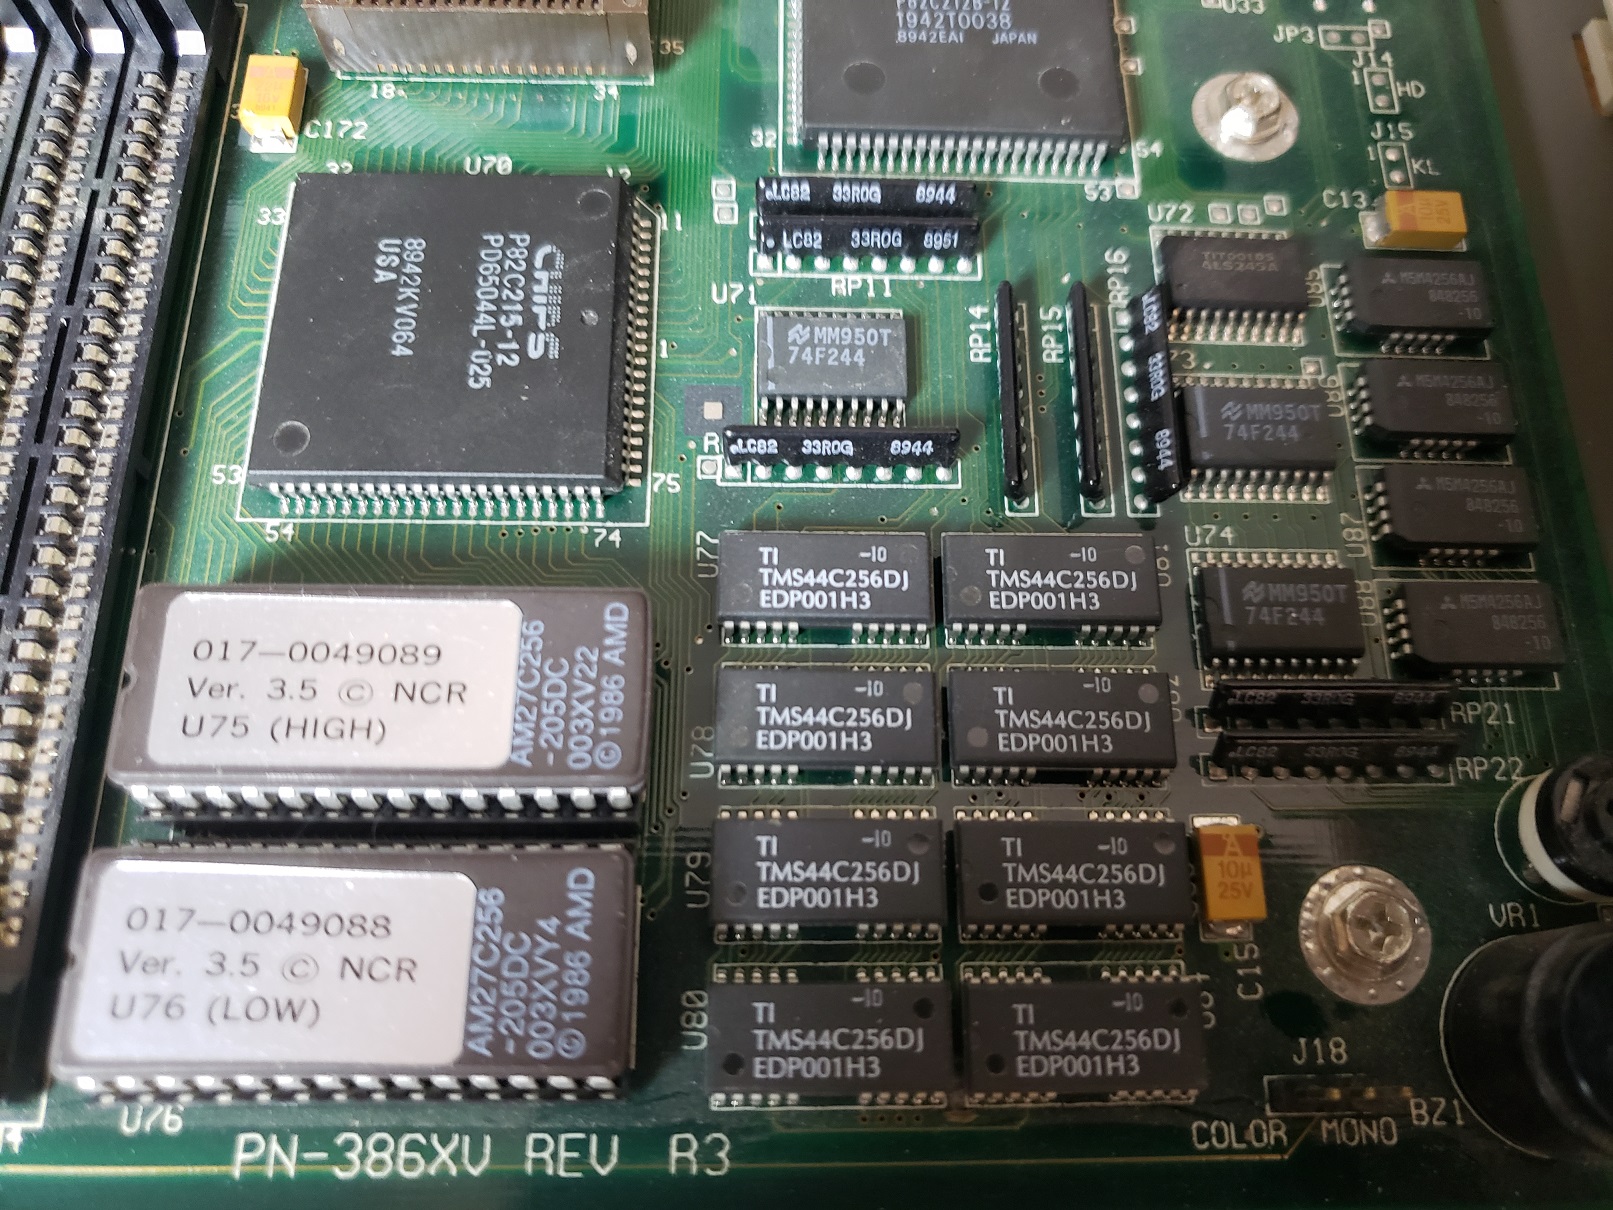
3) RAM – the ProQuest comes with a full 1MB of memory on the motherboard. On this board, the memory is located between the ROM chips and the Piezo speaker. Unfortunately, this memory is soldered onto the board as opposed to socketed making swapping out bad RAM somewhat difficult. 1MB should be sufficient for a large number of games that will run well on a 12MHz 286.
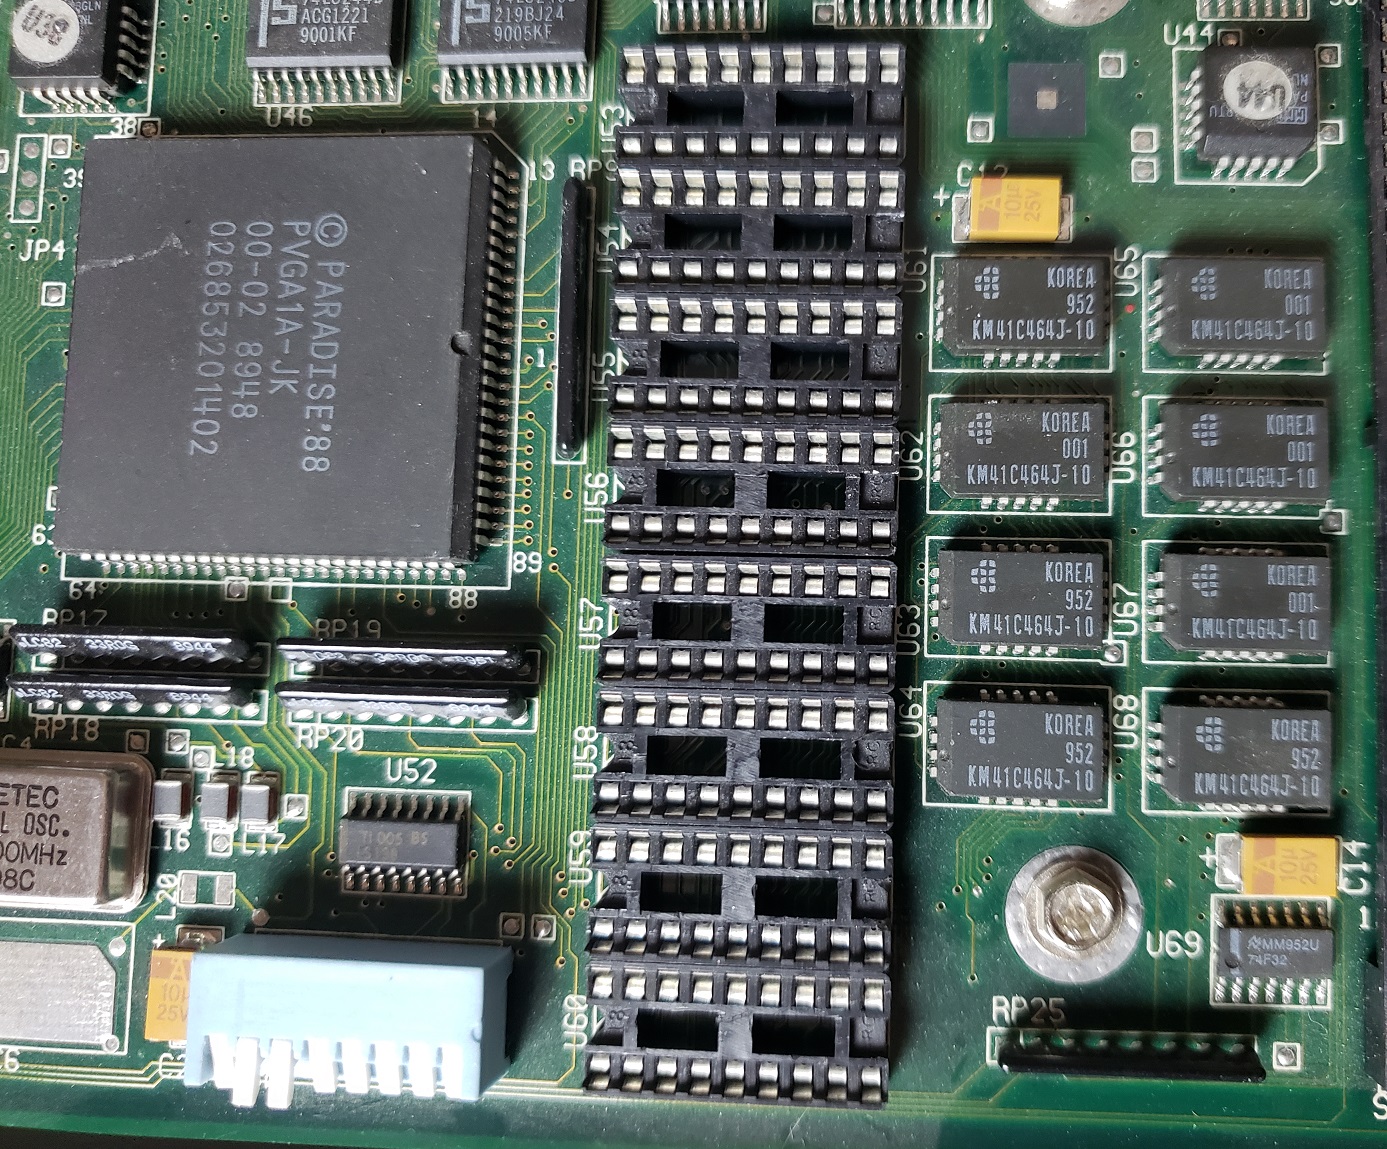
4) RAM – The ProQuest does feature four slots for expanding your RAM. I can confirm you can at least expand your system to a total of 2MB via 4x256k memory sticks though you may be able to expand it even greater I can’t confirm this. It has also been reported that this board is very picky about what kind of memory it will accept.

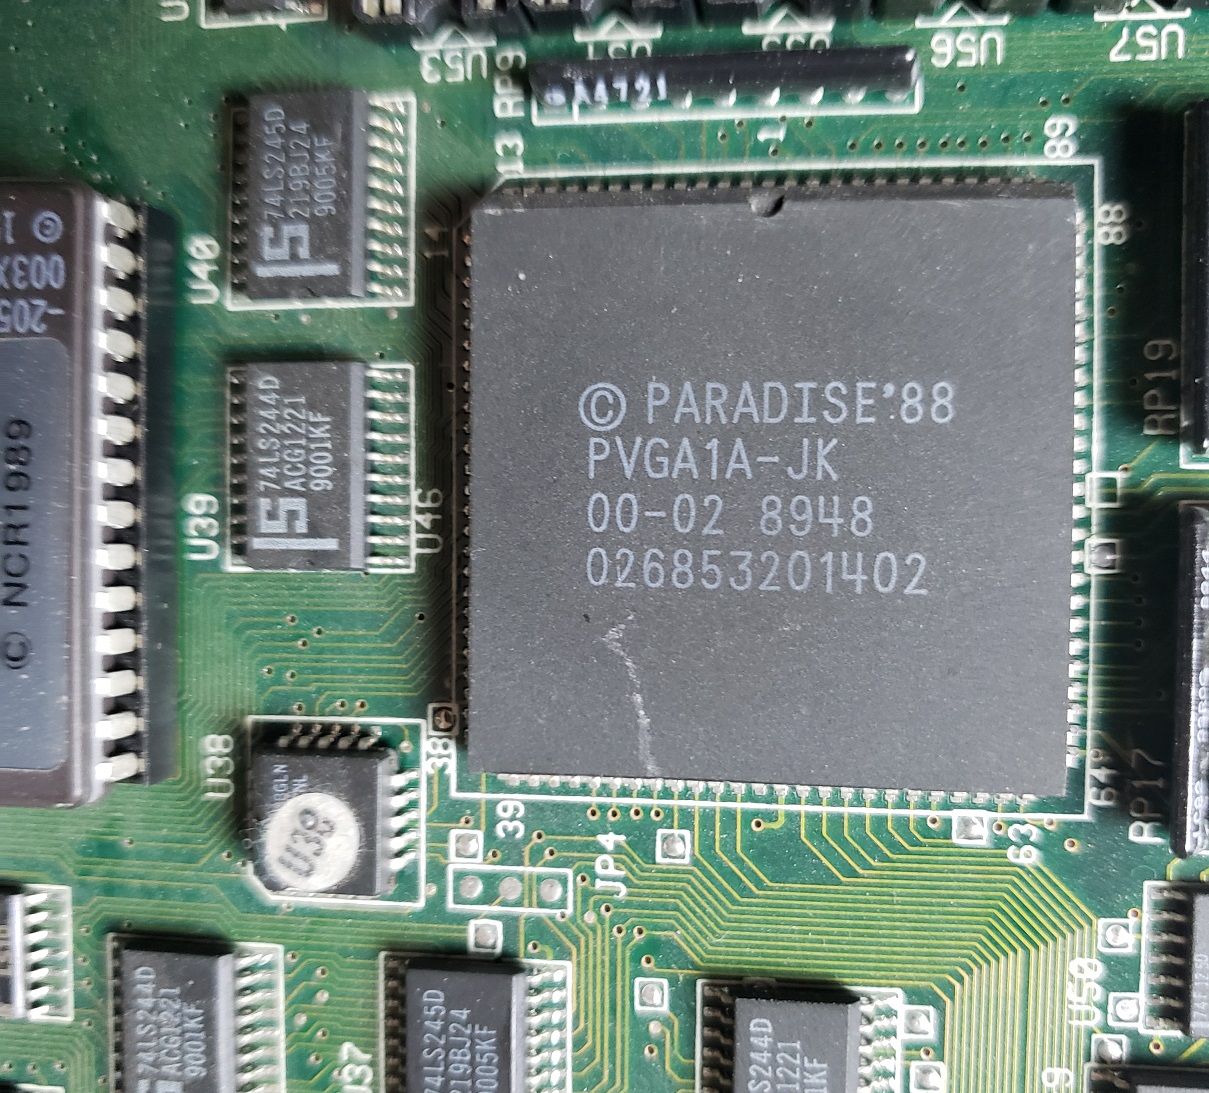
5) VGA video – The board features a Paradise PVGA1A -JK chip as well as 256K of video memory. This was the first SVGA chip from WDC and was considered quite fast for its time. The video memory can be expanded to a full 512K via the sockets next to the soldered-on memory. This chip could be considered a highlight of this machine providing very fast and competent VGA and SVGA output.
6) Switch for enabling and disabling various ports and video modes.
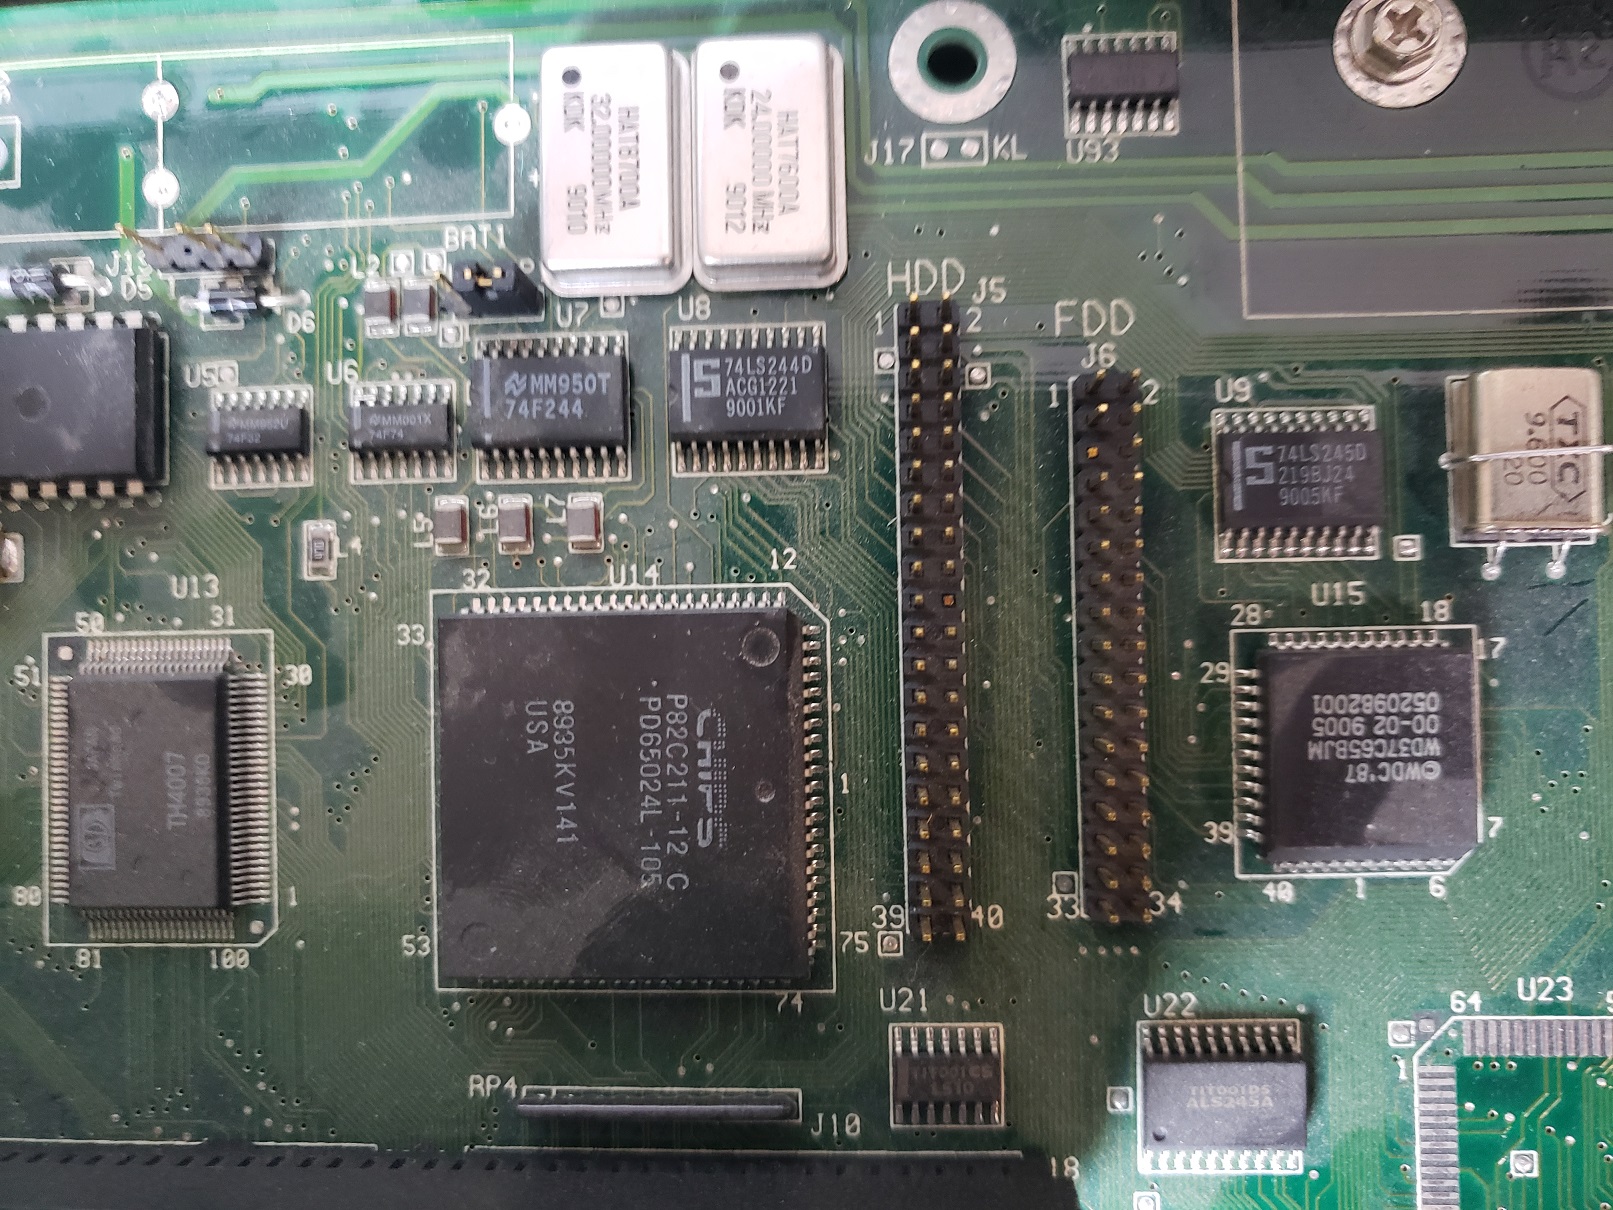
7) Built-in FDD and HDD connectors. The floppy drive controller does support high-density 1.44MB floppy drives. The hard drive controller is IDE but as said before does not support user input in the BIOS for custom drives.
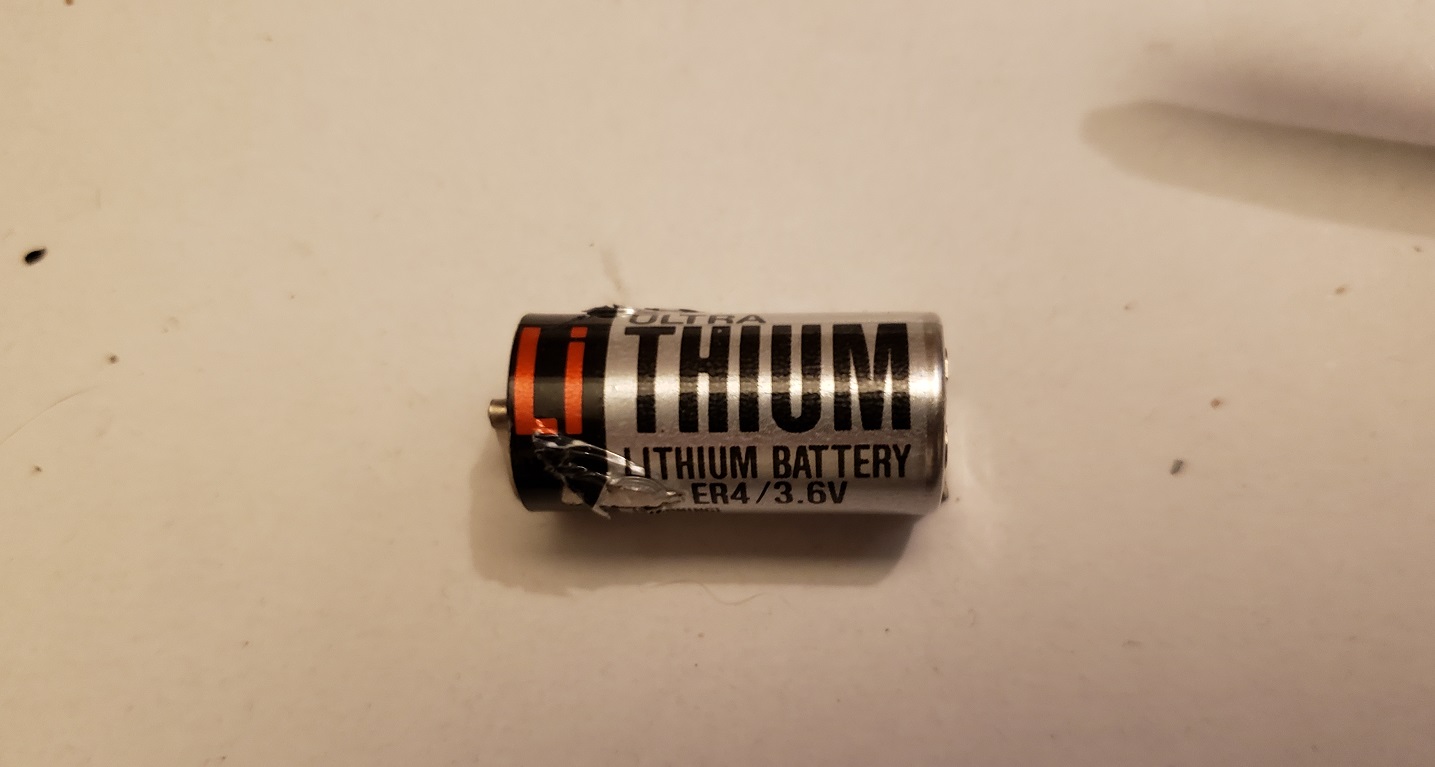
8) Battery – The board uses a barrel-style Lithium battery for the CMOS. Mine was long dead so I removed it. Luckily my board does have pins for using an external battery
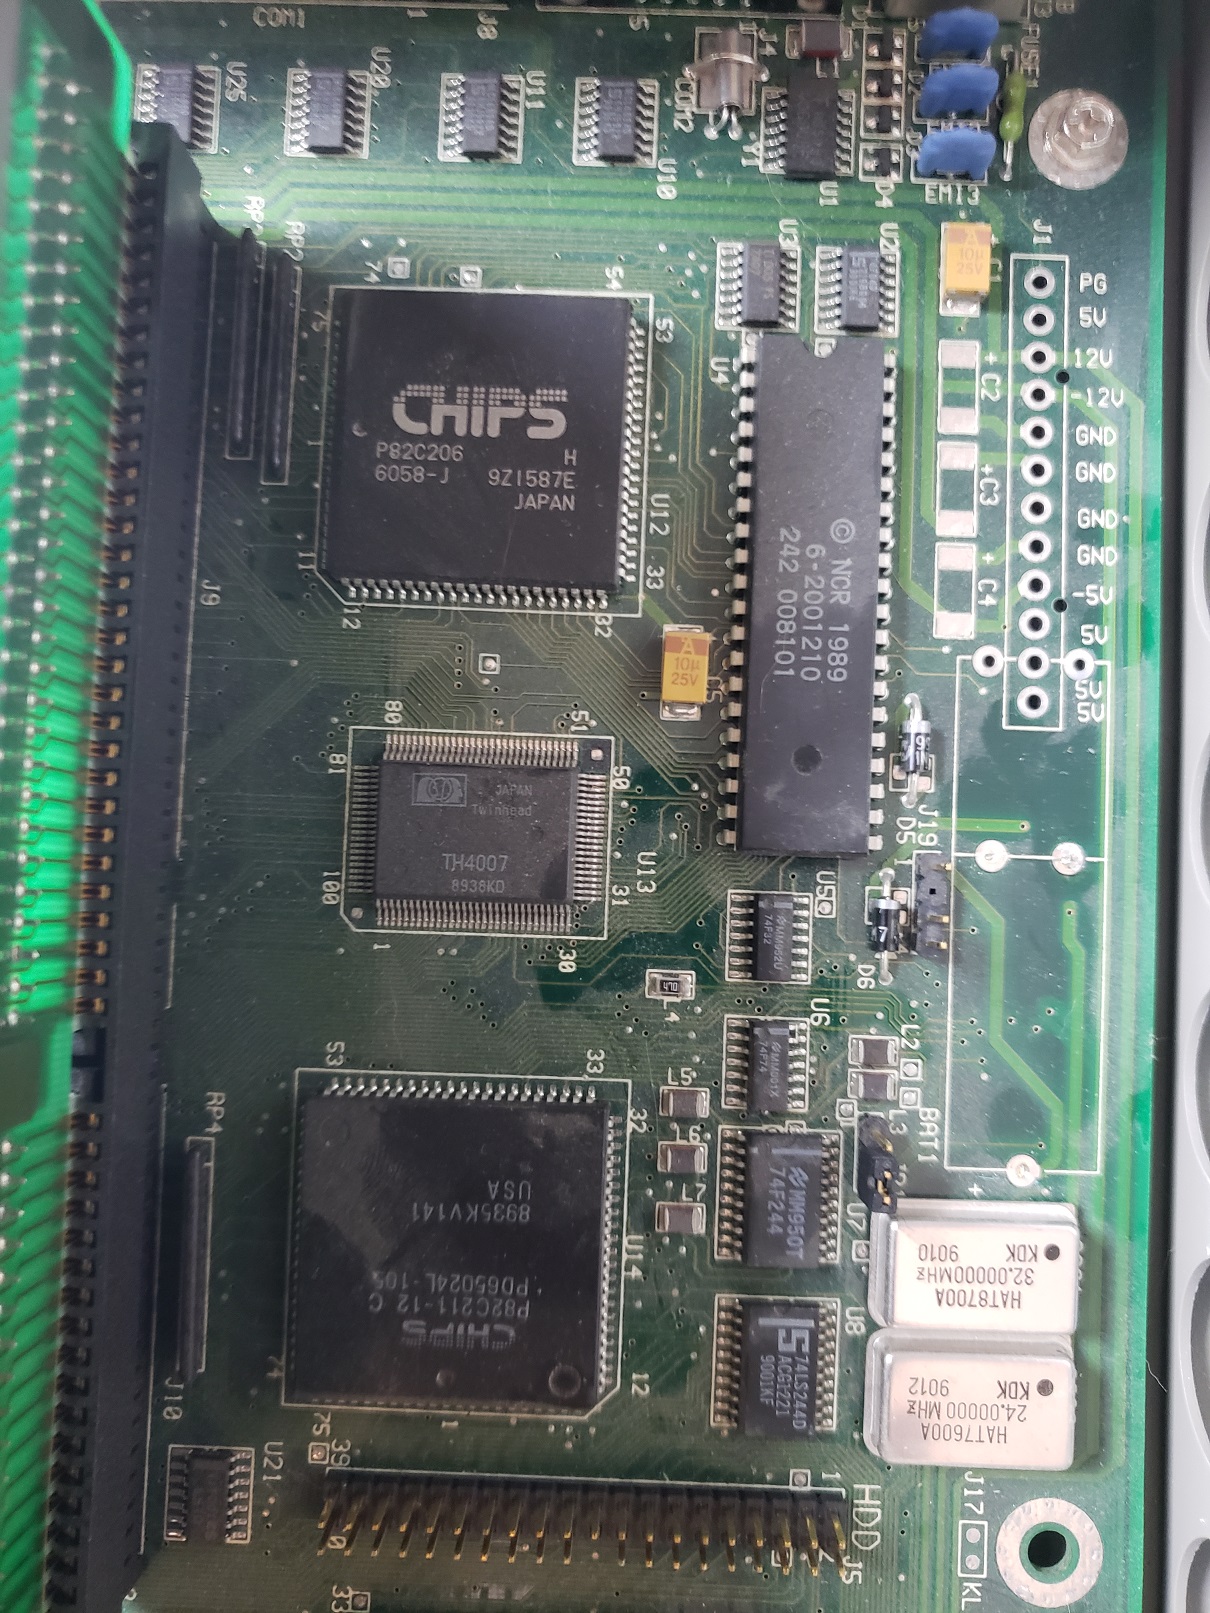
9) Power Connector
10) Piezo Speaker – The board does feature a piezo speaker for sound as opposed to a full speaker cone though it does feature a volume control next to the speaker which is nice. You do need to remove the top of the case to change the volume but it’s nice that the option is there at all as this feature is missing on many motherboards.
Overall this is a nice 286-class PC with the Paradise video chip being a particular stand-out feature. The CPU is also quite adequate for a large selection of older games from the 90s and early 90s. Although a full-cone speaker would have been nice it’s good to be able to adjust the volume on it. The case is small and compact and the lack of drive bays could be an issue but the two 16-bit ISA slots and ability to support 1.44mb Floppy drives do make it much more convenient than a PC of slightly smaller size like the Tandy 1000RL (though you do miss out on Tandy video and sound). Throw in a nice Sound Blaster card or Adlib and you have yourself a competent retro PC for EGA and early 90s VGA titles that also won’t take up too much desktop space or break your back to move.
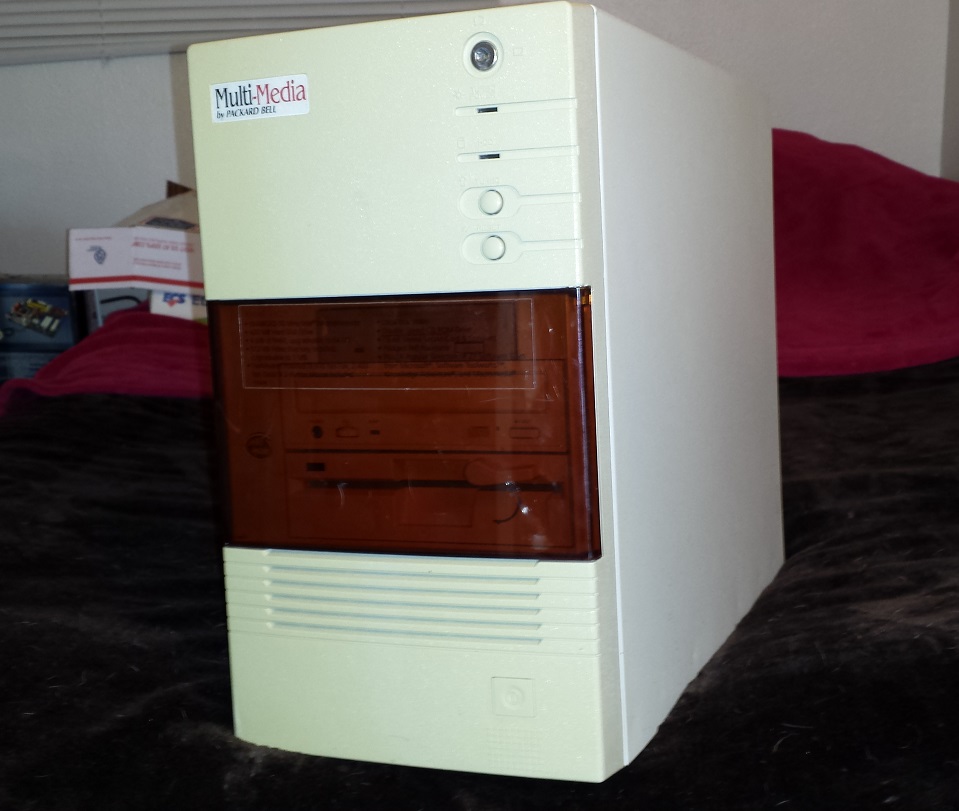
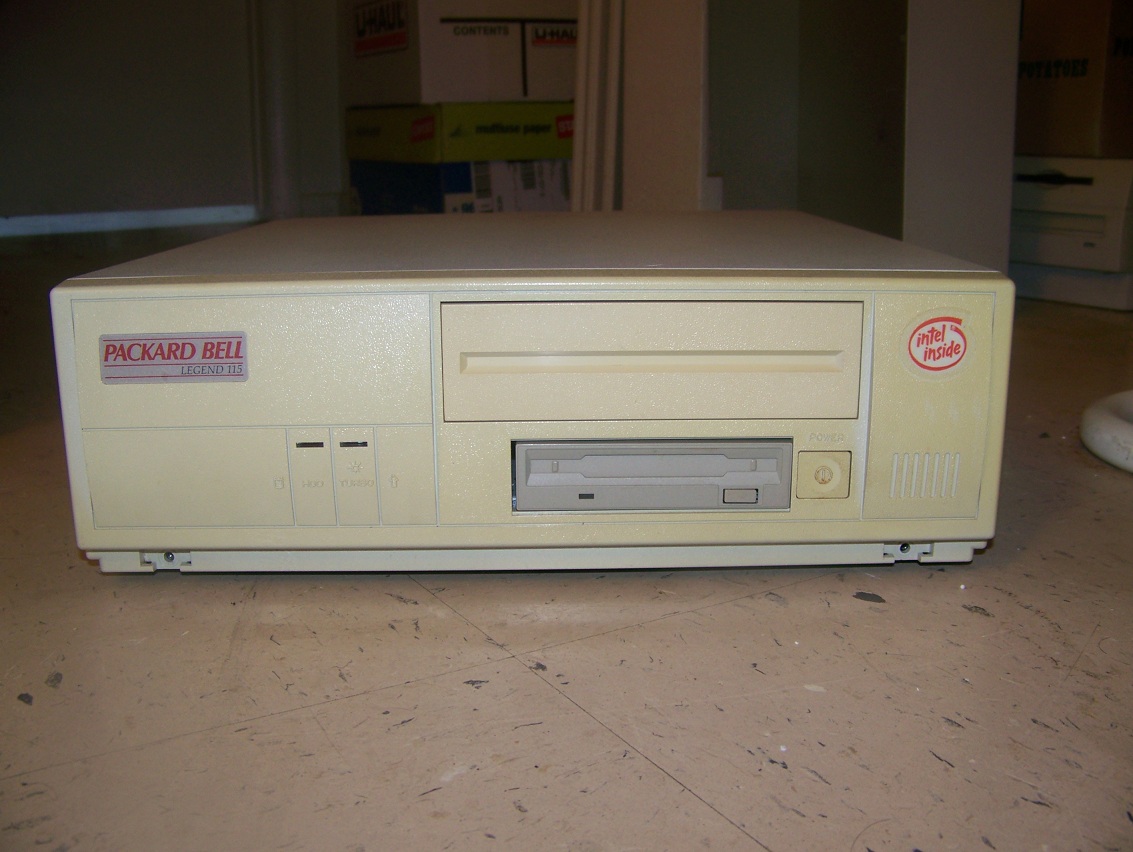
Say what you want about the quality of Packard Bell but you have to admit they did use some pretty interesting and unique cases for their computers. The example I have today is the Packard Bell Axcel 39CDT. From what information Ive gathered this is a rather uncommon model and I’ve been told is somewhat sought after by Packard Bell enthusiasts so I’m guessing it didn’t sell very well.

This machine is a 486 PC as you may be able to guess by the turbo button on the front that is accompanying the reset button. On the to is a keyboard lockout keyhole. setting this to lockout mode will prevent the machine from registering key presses from the keyboard pretty much making it useless. If you don’t have a key and its set to lock don’t worry. They weren’t built to keep out anybody with anything but the most rudimentary picking skills and I was able to change the position on mine with a Xacto knife. The power button is located on the bottom of this case but what is interesting is the panel that opens up to your drives.

The door is actually kind of slick looking but personally I don’t see much need. There is one 3 1/2 bay as well as two 5 1/4 drive bays. This machine did come with a double speed CD-ROM drive according to advertisements I’ve seen but this drive mine came with is a CDR drive added by the previous owner. There is actually two internal bays under the 1.2MB floppy drive you see here that you could fit a hard drive or two into with a 5 1/4 adapter. Specs and adds claim the 39CDT came with a 420MB IDE hard drive but when I picked mine up the hard drive had been removed but more on that later.

You can tell right off front looking at the rear of this PC that the power supply is located at the bottom of the case, a somewhat uncommon location of the time. There are five expansion slots and along the right side we have our various ports. Two PS2 ports for keyboard and mouse followed by a built in VGA port. below those we have a common parallel port and a serial port.
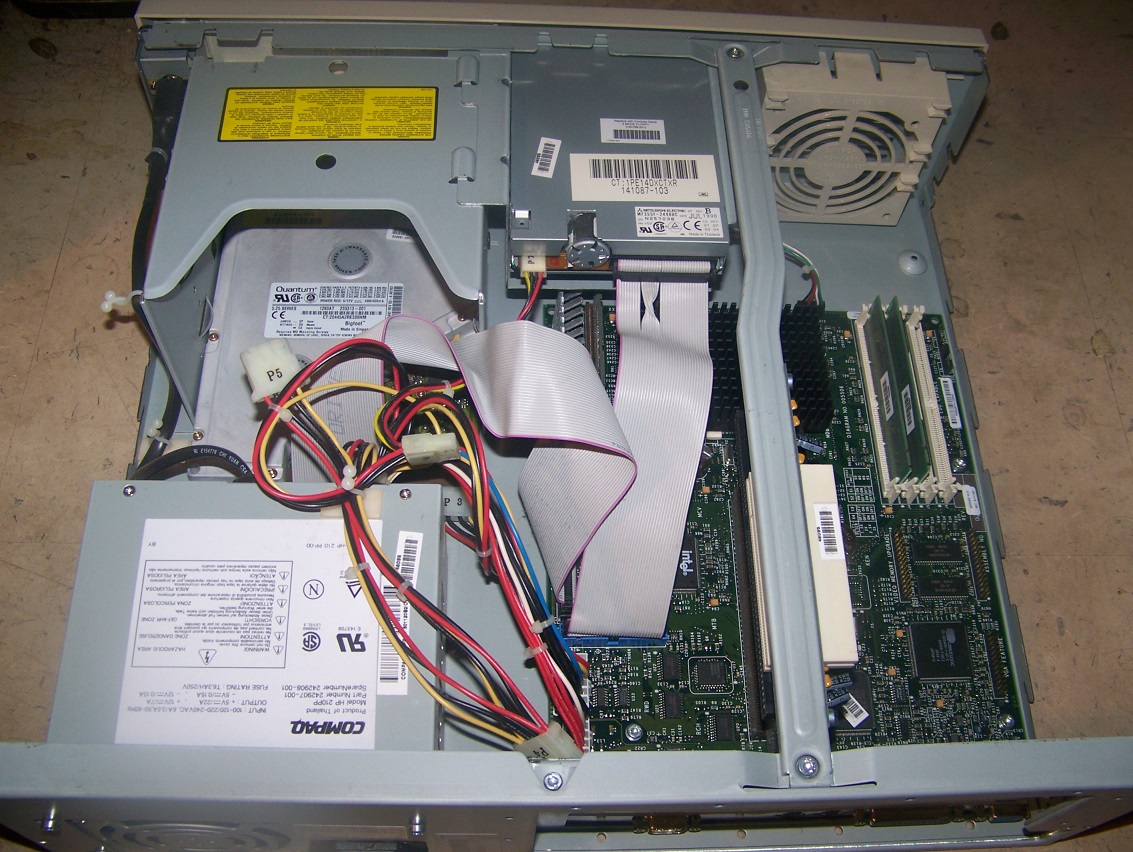
After unscrewing the four rear screws the case on this machine slides forward taking the front face along with it as one piece. It took me a minute to figure this out as I kept trying to remove the case cover in a more traditional manner by pulling to back and toward myself.

There is also a spot as you can see above the power supply for a 3 1/2 hard drive. The power supply is mostly standard except instead of a mounted switch there is an internal button that is pressed in by that long plastic arm that lines up with the power button on the front of the case. This may force some inventive solutions should the power supply fail.
My machine thankfully had the motherboard and jumper configuration chart on the inside of my case. Here it is for any of you that may be missing and need it.


Ok, now lets take a look at the motherboard.

First thing I need to point out is that is NOT the original stock CPU but is what the previous owner upgraded this machine to.
1) CPU – This model originally came stock with an Intel 50mhz SX2 chip. This isn’t to surprising from Packard Bell as this was a cheaper part. The SX designates no built in math coprocessor. Being a DX2 that means the chip ran on a 25mhz front side bus. Overall the 50mhz SX2 running on a 25mhz FSB wasn’t all that much faster then a 33mhz DX chip. I downgraded this machine to a 50mhz DX2 to bring it closer to stock while giving it a math copro and freeing the Intel Overdrive CPU for other projects of mine.


2) RAM – The 39CDT has 4MB of RAM built into the motherboard so if you don’t have any spare 72 pin sticks of RAM lying around it will still run. Mine came with 24MB total RAM but according to advertisements as well as the specs sticker on the bay door RAM is upgradeable to a full 64MB

3) Video – The video is a Cirrus Logic GD-CL-GD5424 running on the VLB or Local Bus. It comes with 512kb of VRAM stock but is able to be upgraded to a full 1MB. Unfortunately from looking at the motherboard it appears that upgrading requires a 512kn VRAM ZIP socket chip. I’m not sure those are to common. As for the CL chip, there isn’t much to say and not much turned up but it appears to be a decent mid range chip and one of CL’s earlier VLB offerings being a VLB version of their ISA GD5422 chip. Overall not bad and likely decent speed/compatibility wise.

4) L2 cache – My SRAM sockets are currently empty but according to the jumper chart the motherboard supports 32, 128 and 512kb of L2 cache via 16 pin and 14 pin chips. This is very similar to my Packard Bell Legend 115. I don’t care that there is no option to use the more common 256kb l2 cache amount though as this seems to be the L2 “sweet spot” for the era.

5) ISA riser card – This is the slot for the ISA riser card that allows for up to five ISA expansion cards.

My machine came with a pretty generic modem and extra parallel port card but it did also come with a Crystal based sound card. Likely a Sound Blaster 16 clone but I do believe it is original to this machine with the PB stickers on the chips.

6) Modem – This appears to be a built in internal fax/modem but for whatever reason the port in the rear is covered up. My guess is the former user added the ISA modem card and covered the rear port to avoid confusion.


7) I/0 connectors – This is the connections for the built in floppy and IDE controller. The floppy controller seems to work just fine but for all my efforts I could not get the built in IDE controller to “see” any hard drive I tried. For that matter I also couldn’t get either of the discrete ISA I/0 controller cards I tried to work either. I tried several hard drives, new and from the era but I could not get this machine to see any of them. My best guess would be it’s an issue caused by not having a CMOS battery present. The original barrel battery was long dead and beginning to leak so I removed it. There is a connector for an external battery but I haven’t tried it yet.
*update* I finally did get the built in IDE controller to work but I was forced to use a old 300mb hard drive. all my efforts to get a ISA controller running failed.
So…the Axcel 39CDT. Again this machine like all but one of the Packard Bells I’ve come across booted and posted just fine. not bad for a twenty some year old machine coming from a very poorly regarded company. The case design is pretty interesting and doesn’t really compromise anything because of it. Three external bays isn’t a lot for a tower but is pretty standard for the era and OEM machines. I don’t like the lack of a 256kb L2 cache option and I would prefer a more conventional sockets for expanding VRAM but still, not a terrible machine.
When I first saw this machine my first thought was that it was a later Tandy 1000 PC but on closer inspection I discovered it was an IBM PC clone machine. It seems every company made IBM clones back in the day and I shouldn’t of been surprised Tandy did either but I had never seen a straight clone from them, besides the later Sensation! machines which I think all used the Pentium and had some kind of backwards compatibility with Tandy sound. The price was right so I present the Tandy 425 SX.

The closest PC I have that I can directly compare the 425 SX to would be my Packard Bell Legend 115. I say that because they roughly use the same small desktop form factor and feature somewhat similar motherboards and the same base Intel 486 SX CPU. The 425 SX is a little wider but the expandability you get is worth the extra size. The machine I have here is bare stock and as far as I could tell was not upgraded in any way from the factory configuration. It almost seemed like NOS. There’s a power button on the far right and a reset button on the far left along with a key lock for locking the case shut I think which was kind of a thing back in the day. There is two 5 1/4 bays and two 3 1/2 bays one being fully internal and meant for a hard drive. Mine came with a 170MB IDE hard drive installed as well as the stock 1.44mb floppy in mine that had “1.44” printed on the eject button which I think is kinda cool. I like the two 5 1/4 bays because this gives you the option of a CD-ROM drive and something like a 5 1/4 floppy drive or a HDD caddy unlike my PB Legend 115 which only has one 5 1/4 bay which goes to the CD drive.

Here we have the back of the unit. The PSU that came with this machine has the monitor pass through which is always convenient. As you can tell right away from the expansion slot placement this machine uses a riser card but It has ISA slots on both sides of the card allowing for five cards which is really nice though the two on the left have to be short in length and you need to pull the power supply to get them in but at least you have the option. As far as ports from left to right we have Keyboard and mouse PS/2 ports, two serial ports a printer port and the VGA port for the built in video.
One thing to note about the VGA port is that it uses an older pin configuration and so one of the pin holes is blocked. This was an issue for me with my flat screen Gateway CRT monitor I use as it had this pin on the connector. One option is buying a VGA extension cable and snapping off the pin on the PC connection side or you can do what I did and drill out the hole so newer monitors will connect. this won’t hurt anything.

Opening this PC is very easy and just involved the two screws on the back and lifting the top away. So here we have a look at the internals. jumper sheet here.

1) CPU – The CPU for the 425 SX is, surprise, an Intel 25mhz 486SX. The SX designates that this CPU has either no math copro built in or has the math copro disabled. The CPU on this PC’s motherboard is soldered onto the board so it can’t be removed but luckily the machine had an extra socket to allow for upgrades. The 25mhz 486 SX is a lower end CPU and although does the job fine for older games it’s really suboptimal for later DOS stuff and an upgrade is highly recommended.

2) CPU upgrade slot – This is the CPU upgrade socket. This is a cheaper LIF socket so insertion and especially removal of the CPU is a little more difficult then a ZIF socket with a handle. This is where you would install either a 487 math coprocessor or the better option, a DX CPU. There are jumper setting to set the FSB to 25mhz and 33mhz so upgrading to a 66mhz DX2 or even an AMD 133mhz 5×86 should work fine. Once a CPU is inserted in the socket and the jumpers set the soldered on 25mhz 486 becomes disabled.
3) RAM – The RAM on this PC is a little strange. There are eight slots for 30 pin RAM as well as one 70 pin RAM slot but this machine seems very picky about what RAM it will accept. I couldn’t make it post with any of the 30 pin RAM I had and only one 8mb 70 pin RAM SIMM as well as the 4mb SIMM that it came with would allow it to post without error. All the other 70 pin RAM I installed allowed the machine to POST and was detected but they tripped a parity error. This board will supposedly support up to 40MB of RAM by using all available slots ( 1 x 8mb 70 pin and 8 x 4mb 30 pin ) but I suspect the right kind of 32MB 70 pin SIMM will also work, but as I said the 32MB stick I tried tripped errors on POST.
4) L2 cache – these are the sockets for adding L2 cache ram. This model did not come with any L2 cache installed which isn’t surprising as it was pretty pricy back when this machine came out. The 425 SX supports 64, 128 or 256kb of L2 cache. even though this isn’t as much as the Legend 115 which supports 512kb of L2 (but NOT 256kb) the chips needed for 512kb on that machine are very hard to come by and after 256kb you start getting diminishing results anyways. The downside is the number of chips and the size of the tag RAM chip needed is not the same as the rest. All cache configurations need either a 8k x 8 or for 256kb a 32k x 8 11 pin TAG RAM module which seem to be a little uncommon. All configurations also require an extra ninth 64k x 1 14 pin module. I don’t know why this ninth module is required, possibly for parity checking. It’s a little bit of a hassle considering that in many other boards all the cache modules you need are the same physical size or like the PB 115 where you just installed five modules of the same size for 128kb.
5) Video – On board Video uses a Western Digital WD90c31A-LR chip with 512MB of video RAM. This is a decent chip and unlike the Headland chip in the PB 115 does not suffer any timing errors. I believe this chip is running on the ISA bus rather then a local bus. The chip can be expanded to a full 1MB of video ram by means of sockets next to the chip. The RAM should be easy to find especially if you harvest it from an old generic or Trident VGA ISA cards.

6) Riser card supporting five ISA expansion cards (three full length).
7) One on board floppy connector and one on board IDE connector.
8) AT power connector.
9) external CMOS battery.
10) PC piezo beeper speaker for PC speaker sounds.
I like the Tandy 425 SX. Its a small machine but not to small so you have room for expandability. The only downside is the picky RAM on this motherboard as well as the need for extra L2 cache chips. I originally had plans for the PB Legend 115 for a special project setup but due to the ability to cache 256kb as well as the added expandability I think I may use this PC instead.
Apparently I haven’t learned my lesson because I came across another Pentium 1 machine that I couldn’t pass up. The Compaq Deskpro 5120 which actually is pretty much the Compaq version of last months article on the Gateway 2000 P5-120. So much so I’m going to directly compare them at the end of this article. Despite them being very similar machines built around the same CPU from the same time frame the Compaq machine has some interesting and uncommon features that make it stand out and in my opinion is superior to the very well built Gateway machine.

And here we see the front of the machine in question. Now compared to the Gateway it a lot plainer looking. Its also a bit smaller and only sports two 5 1/4 expansion bays. My machine seemed pretty stock and did not come with a CD drive. There’s three things I don’t care for on this system from that start.
1) I don’t like when the floppy drive uses that molded into the faceplate thing. So you have to find drives that are missing the faceplate and have to usually attach a button extender thing. it just annoys me.
2) both the power and hard drive activity LED’s on this model are green. usually the HDD activity light is red or orange but no, all the LED’s are the same green including the floppy drive light. Its a super minor thing and I guess one can change this themselves but still, annoys me.
3) no reset button. If its there its REALLY well camouflaged cause I couldn’t find one. sure you can just use the keyboard command but really? no reset button?
When removing the face plates though to add anything like a CD drive they do have a nice little latch.
It seems a little fancier then the standard prongs that hold them in place.

The back is pretty simple. You can tell right off from the expansion brackets this machine uses a riser card. You have a serial port, two color coded PS/2 ports for keyboard/mouse a parallel port and a built in VGA port. A nice touch is the two tool-less screws on the left and right used to remove the case top.
Here’s the machine after removing the case cover. Looks to be mostly stock and original from what I can tell. Of special interest is if you look over on the left in the 5 1/4 bays we see the uncommon “Bigfoot” style hard drive. These were large cheap and fairly slow hard drives that were semi popular with companies like Compaq. This drive is screwed to the base and is not actually taking up one of the two 5 1/4 bays. At the time these drives weren’t really a good investment because although cheaper then a standard 3 1/2 inch hard drive they were fairly slow in comparison and sometimes they weren’t even that much cheaper. This is the first one I’ve seen in some time.

here’s a public domain image I swiped to save me the effort of removing my own drive for comparison purposes. my Bigfoot drive is a 1.2GB model. I think they produced them up to about 10GB.
Next is the riser card

Image is of both sides of the riser card and as you can see it sports both ISA and PCI ports as standard with several slots being “shared”

Here’s the motherboard with most obstructions out of the way. This motherboard uses the Intel 82430hx Triton II chipset which is a improvement over the old Triton I chipset my Gateway has supporting more features. it also has a nice switch with instructions printed on the board to set your CPU type making upgrading or downgrading the CPU fairly easy. Like the Gateway this is a socket 5 motherboard.
1) The CPU is again the Pentium 120mhz just like the Gateway model I looked at previously. I do like the massively long heatsink for this CPU that extends well over the space of the CPU. Maybe it was intended to act as cooling for adjacent chips as well? The motherboard is socket 5 so the Pentium 120 is the end of the line unless you use a Pentium overdrive or Pentium overdrive MMX for a boost of up to 180mhz maybe 200mhz
2) Slot for the riser card
3) The CMOS battery, uses an older style flimsy battery holder so replacing the battery may require soldering
4) For video this machine uses the Cirrus Logic CL-GD5434 chip with 1MB of RAM soldered onto the board. I don’t know a whole lot about it but it seems to be a very middle of the road chip. CL was found in a lot of systems at this time and its not a not horrible chip with good compatability. There’s a VESA feature connector next to the chip which is for some sort of add-on I’m not sure about. The ram for the video can be increased from 1MB to 2 MB with a probably fairly uncommon expansion card. You can see the two connectors for it as it installs right above the 1mb of soldered chips. Like most PC’s of this time adding a ISA or PCI video card via the expansion slots automatically disabled the on-board video.
5) Ram sockets. This machine takes 72 pin RAM. Like the Gateway machine it accepts FPM or EDO RAM. My machine already had 8MB of EDO RAM installed so I added 8 more for a total of 16MB of EDO RAM. This board is capable of supporting 192MB of RAM
6) A neat feature of this board and also this Compaqs big advantage over the Gateway is the COASt (Cache On A Stick) slot. The Gateway PC I had has no L2 cache on the motherboard or a way to add it besides a major soldering job and even then I’m not sure it was supported in BIOS. COASt slots let you install L2 cache sticks much like you would with traditional RAM. This was very common in 90’s Macintosh machines but an uncommon feature on early Pentiums. This stick is a 256kb stick which is the max for this model.
7) two standard IDE connectors for your IDE devices. Interestingly the primary connector has a plastic guide around it and the secondary does not.
8) Floppy drive connector
On booting this machine up it did not boot to Windows 95 as I had expected but instead into DOS and then a Compaq version of Windows 3.1

Its really just an OEM version of win 3.1. Exactly the same but with some extra Compaq utilities like a diagnostic tool and what not. Kinda handy.
Comparison with my 120mhz Gateway p5-120

Since their so similar and I’m writing about them back to back I decided to make a quick comparison with a few speed utilities. Keep in mind I only did this once, so its a quick maybe not 100% comparison. Optimally you want to run the test several times after restarts and take an average but I think it gives an overall idea of the two. I used speedsys which is a well know DOS utility for checking specs and also PCPBench which looks more at video FPS (frames per second). I used the same video card for both machines, my 2mb Matrox Mystique.

Here’s the Compaq with my Matrox card and the sound blaster32 transferred over. Also there is a RAM difference. the Gateway is running 64MB of slower FPM RAM while my Compaq is running 16MB of faster EDO RAM.
Speedsys results
Gateway 2000 P5-120

Compaq Deskpro 5120

On CPU the Compaq scores slightly lower, 89.33 as opposed to 89.40. the difference is negligible and could be due to many things. you can see the memory speed is a little better on the Compaq due to the EDO RAM. In the hard drive performance though you can really see how that slow Bigfoot drive in the Compaq is really dragging down overall system performance. of course this is easily fixable by replacing the drive with a faster 3 1/4 hard drive.
lastly lets see how the L2 cache helps the Compaq score in a battery of tests.
I recently became aware of a neat little collection of benchmarking tools for DOS conveniently put together by Mau1wurf1977, a member over at the Vogons forum, so I wanted to do another comparison of these two machines. Before I was able to do so though half of my EDO RAM on the Compaq stopped being detected no matter how many times I reseated it. In the end I just decided to add a total of 32MB of FPM ram. Slower then the EDO that was in it but twice as much. Still half as much as the 64MB in the Gateway. So here is the results. I also used an older program Land Mark 2.0 because its weird and uses an outdated “AT rating” but it was interesting and later it may help in comparisons to really old 286 and 8088 machines.
Gateway 2000 P5-120
3DBENCH – 104.2FPS
PCPBENCH – 24.9 FPS
DOOM – 51.55 FPS
Quake – 22.9 FPS
Land Mark 2.0 – equivalent to a 691mhz AT system and a 202mhz 287 coprocessor
Compaq Deskpro 5120
3DBENCH – 110.5 FPS
PCPBENCH – 32.8 FPS
DOOM – 57.41 FPS
Quake – 27.6 FPS
Land Mark 2.0 – equivalent to a 691mhz AT system and a 202mhz 287 coprocessor
So, as expected, despite the same CPU and video card the Compaq scores a little higher on every test due to the L2 cache and possibly the slightly newer chipset.
Overall I like the Compaq model. Its a little generic looking and maybe not as easily expandable but its a bit more compact (no pun intended) and inside I think its a slightly superior machine due to the addition of L2 cache and slightly newer chipset. A P5-120 with l2 cache may be a different story although that cache would be soldered on the board so if it failed replacing it may be difficult.

In this article we will be looking at what I consider the ideal setup for a 386 based PC. The 386 is the predecessor of the 486 CPU that we looked at in my Anatomy of a 486 DOS PC article. The CPU was produced from 1985 to 2007 but I think the heyday of this CPU and PC’s based around it is roughly from the late 80’s to early 90’s. The 386 is really the first CPU that was powerful enough to take full advantage of things like VGA and acceptably run games like Wolfenstein 3d. The golden age of DOS gaming lies with the 486 but it really started with the 386.
So why would you want to build a 386 based machine? Well that answer depends on you. Some people just consider it a cut down 486 and a somewhat uninteresting CPU. To a degree This is somewhat accurate and I myself would usually suggest a 486 or Pentium 1 over a 386 machine if you could only have one. So other then building an era correct machine for fun is there any practical reasons?
I would say yes though in all honestly like the Windows 3.1 based machine I covered earlier Putting a 386 together is more of a hobbiest pursuit then a mandatory build for classic PC gaming but I can provide two reasons.
1) sound options. This really only applies if you already have a 486. If you do you probably already have a sound blaster 16, maybe a midi card as well? multiple sound cards can be a pain to configure in DOS and some older sound blasters have been reported to have some mild speed issues with fast 486 machines and Pentiums. with a slower 386 you can experiment with different lesser known sound cards or if you went with the old stand by sound blaster 16 in your 486 you can mix it up and throw a older sound blaster or sound blaster pro in a 386 machine. Many games sound better on a SB or SB pro and the later SB pro cards tend to be less “noisy” cards then the later SB 16’s.
2) earlier games with speed issues. Probably the best reason to build a 386 machine. There is a limited era where games were coming out for 386 based PC’s and some of these games are rather CPU speed sensitive. The best known example of this is Wing Commander, a rather well known and beloved game that is terribly speed sensitive. Even a faster 386 or a slow 486 feels “off” with this game and a slower 386 around the 25mhz mark seems to be the sweet spot. Bubble Ghost and Test Drive III (as demonstrated via the 386 and 486 videos by LGR) are other games that come to mind that are very speed sensitive to faster 486 systems. With a faster 386 and a decent video card you can run games like Wolf3d extremely well and late EGA games just “feel right” on this machine.
Then again if your reading this page your probably a classic PC enthusiast and don’t really need much reasoning to put a classic build together. I know for a lot of people the 386 was their first real gaming PC so nostalgia can play an important roll in PC building. With that out of the way I’m going to commence detailing what I think is the ideal 386 machine and what I put together myself.
Here’s my 386 PC in a tower case. I try to use a case that captures the look of whatever era I’m going after and I think this tower suits the time. The 386 era seems to be when tower cases really started to come in vogue as opposed to desktop cases. I’m personally partial to desktops and that’s the form I used with my 486 build but I rather like the styling of the 386 era cases. There IS a style difference in my opinion though it may be subtle. In my opinion towers of the earlier era seemed to have more “flair” if that makes sense. With this case you can see it at the bottom with the large reset and turbo buttons (turbo button slows down the CPU BTW for compatibility with older games) and the extra big power button and then the grooved base. I think later cases starting around the 486 felt more utilitarian, boxy and plain with small buttons. It was still pretty common to find big power switches on the cases as opposed to press buttons as well.
So if we look at the case starting from the top we have my SCSI CD ROM drive. I believe mine is 12x speed. The CD drive is a bit of an extravagance for the era but definitely not unheard of. Having a CD drive installed makes things much more convenient especially for playing CD rereleases of games that came out at the time of the 386. Below that is a standard 5 1/4 inch 1.2 MB floppy drive. Essential if you want to get the right look of the time for the 386. Also many games and applications were still being released on this format in the late 80’s early 90’s. in the smaller bays we have a standard 1.44MB floppy drive that gets a lot of use in this machine and below that is my SCSI Zip drive. I like to try to include a Zip drive in all my classic machines for convenience and definitely recommend adding one. Mine like in my 486 is the rarer SCSI variety since I went SCSI for this setup, which I’ll get into later. If your wondering why it looks so odd its because the only drive I had was a horribly ugly purple. Why Iomega decided to put out drives with purple face plates is beyond me and unfortunately I couldn’t just swap it with a white plate from a common IDE type drive thus I was forced to paint the face white. Trust me it still looks better then the original purple.
Other then being very shiny the back is not to interesting. Were stuck with the AT keyboard and serial mouse again like on the 486 but that’s not a big deal. we have the standard parallel and serial ports along with the AT keyboard port and the multitude of expansion slots to the bottom.
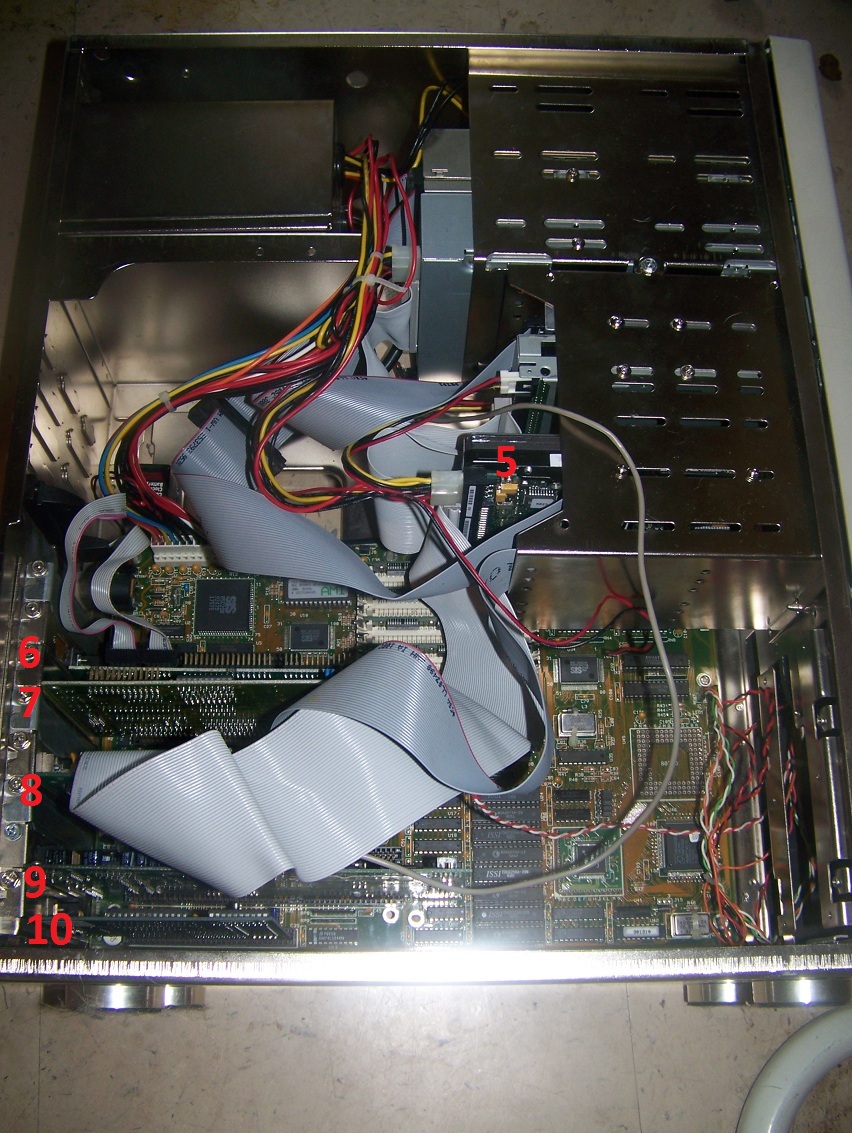
Note in some of the images below the board is in an earlier case. I found the case above early on and transferred over to it but some images were already taken in the older case.
Operating System – For this machine I wanted to be a little different and more period correct so I have DOS 5.0 installed. I would suggest DOS 6.22 since its just a better OS but if you want to be more “correct” 5.0 is the one. There’s not to much difference except 6.22 is just a lot more user friendly but all games that run on 5 should run on 6 and vise versa. Besides it “installs in minutes” and of course “no PC should be without it!”

Now to get into the guts of the machine, I’ll start with the motherboard and its components before we get into the expansion cards I recommend.
Motherboard – For the motherboard I went with a late era 386 board in order to get the best options for expandability. The board I used is a Chaintech 340SCD which uses the SIS “Rabbit” chipset which from my research and the prior owner of this board is one of the faster 386 chipsets.

Its a later board so it offers some feature not common on earlier 386 boards that I highly recommend having such as L2 cache and higher Ram limits which I’ll touch on in a moment. When dealing with 386 and earlier were limited to ISA expansion slots. My board has quite a few slots with two 8 bit and five 16 bit ISA slots. Luckily 16 bit slots were common place with the 386 so our expansion possibilities are wide and fairly cheap. Actually putting together a good 386 can be substantially cheaper then a 486 when you consider top of the line sound/video cards. Though keep in mind ISA is slower then VLB found on some 486 machines and of course later PCI slots. My board also has a pin for an external battery which is always desired to leaking barrel batteries.

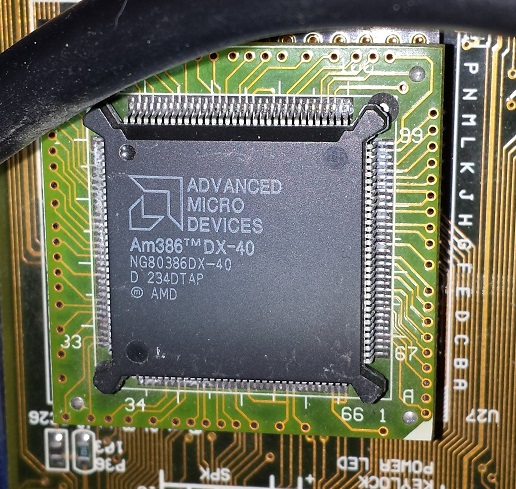
1) CPU – When talking about picking a CPU for a 386 board there is really only one CPU you should look at, the AMD DX-40, the greatest 386 and considered by many to be one of the greatest processors of all time. The DX-40 is a rock solid CPU that is both powerful and reliable. The DX-40 is very common so its not very expensive to acquire and it easily outperforms early 486 CPU’s. After all that praise I guess its odd to say that it is NOT the CPU I originally wanted for my 386. The answer to that is very simple though. Its simply to fast for what I was going for and If your running a DX-40 you may as well just run a 66mhz 486 which I already had. Fortunately at least on my board the CPU is speed adjustable via swapping the DIP-14 oscillator next to the CPU socket. By this method the CPU speed can be set to its rated 40mhz, 33mhz or my choice 25mhz. (speed of the CPU is half that of the oscillator so mine is 50mhz, originally 80mhz). Now if you don’t have a 486 and dont care so much about earlier DOS games then I would defiantly say keep the speed at 40mhz to allow you to play a multitude of games that stretch into the 486 era but if your like me and already have a 486 (or several in my case) then I think a slower 386 at 25mhz opens up a new earlier period of games and makes those earlier speed sensitive games playable with no fuss. After the fact I’ll say I do prefer the reliability and option to kick my speed back up to 33mhz or 40mhz with the DX-40 that I wouldn’t get with a standard 25mhz chip. I should also point out that CPU’s being soldered directly onto the motherboard was pretty common in this era as mine is. look for a socketed CPU motherboard if possible.

Also of interest if you look slightly to the right of my CPU on the motherboard you will notice an empty socket. This for a Cyrix 486DLC chip. Basically it was a “upgrade” option as a 386 with 486 instructions and a very small amount of L1 cache on the chip. Its advantage over the on board DX-40 is debatable and its said to create stability issues on occasion. Best avoided and for my build purposes useless.
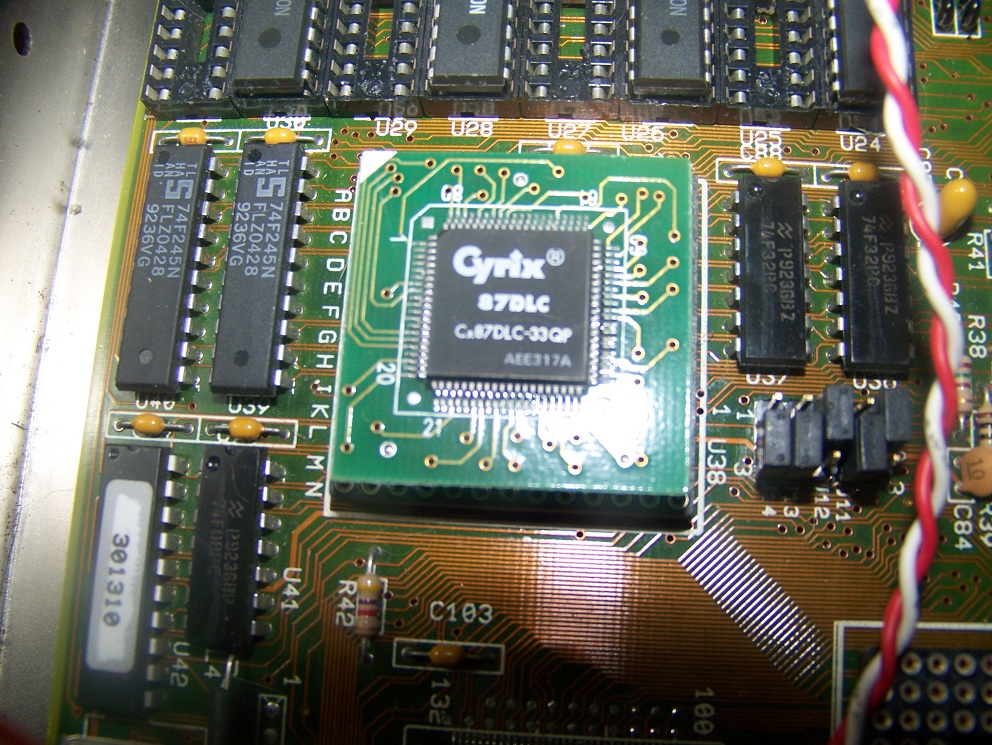
2) FPU math coprocessor – Unlike my 486 DX2-66mhz the AMD DX-40 (and as far as i recall) all 386 CPU’s have no built in math coprocessors to help with complex math calculations. This board though has a socket for the optional 387 math coprocessor. Mine came with a Cyrix x87DLC coprocessor installed. In reality though only a very small amount of applications and games take advantage of the 387. SimCity and Falcon come to mind, probably CAD programs if for some reason you feel the need to to do computer aided drafting on a 386.
3) L2 cache – These are the sockets for the optional L2 cache or very fast memory the CPU can access for common tasks. Adding L2 cache like on a 486 board can dramatically help speed up your system. This is a feature to look out for even if your going for slower 25mhz or 33mhz machines. Many 386 boards seem to lack on board L2 cache. My board supports 256kb of cache which seems to be the max found on 386 boards. Since this image was taken I have fully upgraded my machine to 256kb of cache.
4) RAM – Again, since my board is a later model board it can support up to 32MB of RAM on 30-pin SIMMs which is massively overkill. I currently have my RAM at 16 MB which is still more then enough RAM and is more in line with the period. I do not know if there are any stability issues or game incompatibilities that may come up with large unexpected amounts of RAM such as 32MB on a 386. I would say its probably very unlikely and instances are few and far between but for stability and period correctness sake 16MB is enough. It lets me feel like I have a lot of wiggle room RAM wise while not being to ridiculous overkill. One could easily get by with 4MB for the intended games of the time. If though your going for a maxed out build or don’t have a 486 machine by all means 32MBs.
5) Hard Drive – This is a 50 pin SCSI hard drive 2GB. I went with SCSI completely for this machine with the CD drive, Hard drive and Zip drive all being SCSI. using SCSI for my hard drive let me set up larger partitions easier and I think is a little faster then if I went IDE. The downside being 50 pin SCSI hard drives are nowhere near as common as the IDE variety.
6) Since most 386 boards, even my late model have very little built in your most likely going to require a 16 bit ISA I/O card for various things like serial and parallel ports. I’m just using a pretty generic controller here. It also had pins for IDE devices but since I went SCSI they are currently disabled. No drivers needed or anything. Its all set up by the jumpers. just plug it in and it should work.

7) Video card – Like the 486 the Tseng Labs based cards are regarded as the DOS king in the 386 era as well. Unlike the 486 with its VLB slots we are limited again to 16 bit ISA. The card I’m using is the Tseng ET4000AX with 1MB of RAM. Widely regarded as one of the better if not best ISA DOS VGA card. Mine is a Cardex card but the manufacturer doesn’t make much difference. The ET4000AX offers vibrant colors and is fast as far as 16 bit ISA goes. Best of all they are relatively cheap and common, at least compared to their later VLB versions.

8) SCSI card – This is my SCSI controller card I use to well, control my SCSI devices like my CD-ROM drive, Hard drive and Zip drive. I went with SCSI because I had the parts already and its a generally recommended option over IDE for a classic system. It supports more devices over IDE and is considered a little faster and more reliable with the downside being more expensive. I’m using an Adaptec AHA-1522A which is a little bit of an older card but unlike some SCSI cards it gave me no trouble to set up and also sports a floppy controller which I’m using to run my 5 1/4 and 3 1/3 floppy drives.

9) Sound card – For sound card my recommendation once again goes to old sound stand by Creative. In this case in particular the Sound Blaster Pro 2.0 and its FM OPL3 chip. It will basically work with all games from the era that use FM synth and earlier and is of course adlib compatible. The card is noticeably better sounding then many of the early Sound Baster 16’s is more period correct and many games of the 386 vintage sound better on it. No drivers are needed, simply add
SET BLASTER=A220 I7 D1 T4
to your Autoexec.bat via the EDIT command

10) Midi card – I would say if you care about sound at all you want to add either a Roland or a 100% Roland compatible midi card. The 486 may of been a golden age for general midi but it got its start in the 386 era and many, many games can take advantage of the Roland MT-32 sound module for vastly better music. You could replace the above Sound Blaster Pro with a SB 16 for a crippled midi interface and noisier FM or you can use something like software emulation which I believe will allow you to use the SB pro’s game port as a midi interface at a cost of system performance but the absolute best route is to just get your hands on a midi card. I’m using a Music Quest MPU-401 Roland compatible card I grabbed off Ebay for a decent price. This is a known 100% compatible card but make sure you get one with firmware version 10 as earlier firmware versions are definitely known to have compatibility issues, especially with games from Origin such as Wing Commander. Also try to get one with a midi interface attached with it. Mine did not come with one so I’m using a hand made interface graciously made for me by a member at the Vogons forum whom I will leave unnamed since I’m unsure if he would want random people messaging him for cables in the future.

In the end my 386 build was really fun to put together. It lacks the WOW factor of my 486 as far as cramming it with every possibly option but its a machine for a slightly simpler, yet not to archaic PC gaming era with less options but still a lot of power as well as character. You’ll notice like in just about all my builds I left out a network card of any sort. There is certainly a wide range of 16 bit ISA network cards you can find if you so choose but for me they just take space as I would never have a use for them. So is a 386 worth building? Its was certainly cheaper at least when compared to my monster high end 66mhz 486 with all the perks and trimmings. If you already have a reliable 486 I may say pass on a 386. On the other hard if your into retro PC building or want to experience games like Wing Commander on actual hardware I say put one together. A high or low end 386 shouldn’t break the bank.
*UPDATE*
I recently came across a old PC at a thrift store that has the exact “look” of the era I mentioned at the beginning of this article. Sure enough it sported a 386 inside but unfortunately the board was damaged beyond repair due to a battery leak. I did manage to eventually secure a smaller and possibly superior board that I replaced my old one with
I did replace the mother board with another smaller late era 386 board, the MS-3124 or Contaq-386.

This board has all the same abilities and features of the previous board that I want in a 386 plus is smaller and has a socketable 386 in case the CPU dies I can now actually replace it.

 Here is the original board that came in the case that was damaged beyond repair due to battery acid though its a little hard to tell from the Image. The board I replaced it with is identical in every way to this board with the exception of the chipset. My new one is SIS as opposed to the UMC chipset present on this board.
Benchmarks (AMD DX40 @ 25 mhz 386, 256 L2 Cache, 16MB FPM RAM, Tseng labs ET4000AX)
3DBENCH – 10.0
PCPBENCH – 2.5
DOOM -4.43
Quake – N/A
Speedsys – 4.19
A Packard Bell 486 PC. probably with an almost identical layout to other PB machines of the same era but with a different name. This particular machine was picked up by a friend of mine for $8. You may also be seeing it in a later review significantly reconfigured for a particular purpose but as of now were going to be looking at its (mostly) stock configuration.
Stock this PC is actually rather light and small making it a decent 486 for a non power user that just may want a compact 486 for dos gaming and doesn’t care about having a massive dos monster machine. The downside is the lack of expansion bays. As for external bays we just have one 3 1/2 inch and one 5 1/4 inch bays. Mine came with a standard 1.44mb floppy drive but the upper bay can be used for a CD-Rom drive or a 5 1/4 floppy drive. I like how the cover for the upper bay kind of looks like a disk drive. Besides the power button on the right of the floppy drive we have two lights labeled HDD for hard drive activity and a turbo light but no turbo button. Like the earlier PB 500 I reviewed the Legend 115 actives the turbo by the keyboard and pressing [Ctrl]-[Alt]-[ – ] to slow the PC down and [Ctrl]-[Alt]-[ + ] to restore normal speed. The light should change color to indicate if turbo is activated or not but if it is you should defiantly notice. Like many 486 machines of the time “turbo” buttons now slow the PC down as opposed to speed it up. This is to help with compatibility with older games that require slower CPU speeds. With my turbo activated my machine acted more like a 286 class PC.
As opposed to having screws in the rear to secure the case cover There are two hidden latches in the front that cover the screw placement. I kind of like this. its convenient and looks nice.

Turning the PC around we see.

Slots for three expansion cards, again a bit limiting but not horrible. From the right we have a I/O serial port and then a printer port. This followed by a game port for a controller or joystick which is kind of nice to have built into an old system. Next to that is a VGA port and then two PS/2 ports for your mouse and keyboard, again nice to not have to deal with an AT keyboard keyboard and serial mouse.

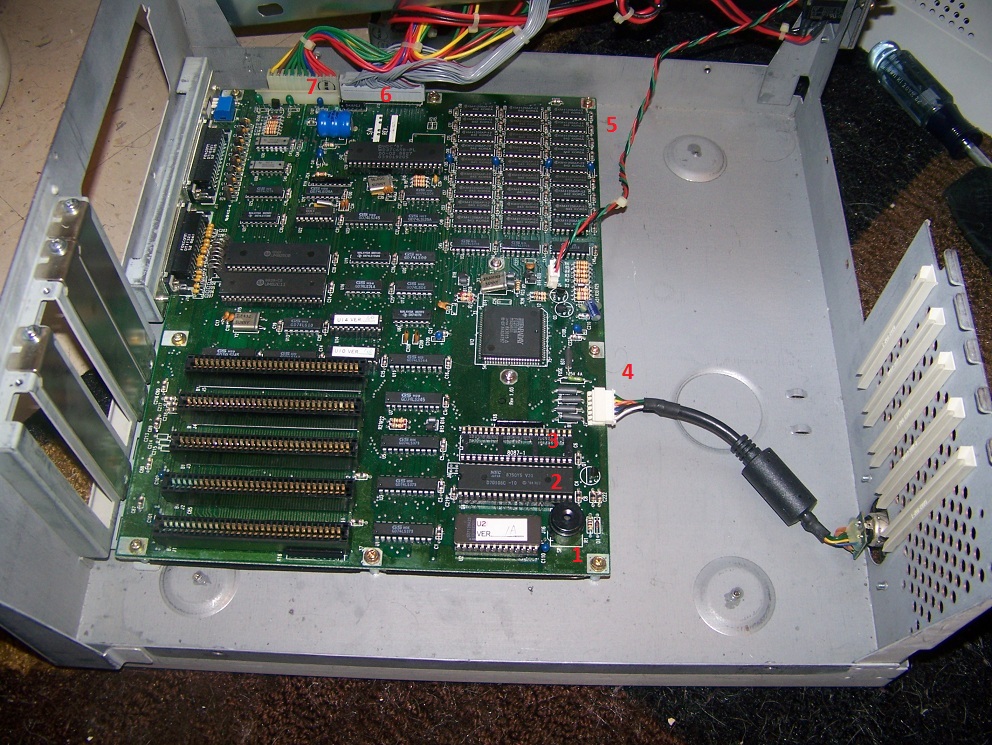
Opening up the system is a simple as taking out the two front screws and sliding the top case off. You can see the hard drive in the upper part of the image. It mounts on a slide in a side position. For a better view of the board you have to remove the middle cross bar. Its easy just two screws and then remove the ISA riser. This model is limited to three 16 bit ISA cards which is going to limit what you can add especially if you wanted to go for a fast VLB video card. It gets even more cramped if you want to add modem or network cards though I believe there are models very similar to this with built in modems. The covered port and connectors are on this model on the other side of the riser.

This machine uses the 410/42/420t m motherboard. Specs can be found here
1) These are the connectors for the single IDE channel and behind it in the picture is the connector for the floppy drive cable. There just pins with no plastic guide guard around them so you need to be a little careful. I also should say the BIOS for the IDE is VERY picky about what hard drives will boot and work. Mine came with a completely dead 140mb Conner IDE drive. Unfortunately the BIOS has no auto IDE detect and even if you know your drives parameters I could not get it to work correctly with any newer IDE drives I owned. The only drive I got to work was on old 420mb Conner IDE drive that had the drive parameters printed out on the side of it.
2) The CPU that came with this machine that you see here is an Intel 486 25mhz SX. Its a slightly unusual part. The SX designated that there is NO math co-processor on board. Luckily this motherboard supports a wide array of CPU’s selectable via jumpers on the board. there should be a label on the underside of the removed case cover with a jumper guide. The 486-25SX is pretty slow as far as 486 CPU’s go but its reliable and does not require any kind of heat sink or fan. Apparently a lot of these chips were actually 33mhz parts down clocked with the math co disabled. You have to love Intel. This being said there usually pretty overclockable but in these days its just easier to actually buy a higher clocked chip.

If the blue socket didn’t tip you off you can take the chip out of the socket and can see this is actually a Intel overdrive socket and so compatible with a Pentium overdrive CPU which would in theory bring this machine up to early Pentium CPU speeds of 63 to 83mhz.
3) Here we have the soldered on 4mb of RAM and a 72 pin RAM socket. This machine did not come with the RAM slot populated, I had added the RAM stick. As I said the machine does come with 4mb of RAM on the motherboard which is nice. The motherboard can take a 32MB stick for a total of 36MB of RAM.
4) The onboard Video is run by a Headland Technology video chip with 512kb of video RAM. I cant seem to find much information on this company or the quality of there video chips but from the information, or rather lack of information I don’t imagine they were a major player or well known for high quality. The chip is apparently running on an integrated VLB bus though and benched slightly higher then a et4000ax and diamond speedster pro I had installed via the ISA slot in tests. upgrading to 1MB of video RAM looks possible via a proprietary looking socket.
*I was recently informed that the Headland chip in the Packard Bell does have a timing error that causes graphical errors such as dot trails and graphics corruption in some games, Sim City 2000 being one of them and Ultima VII being another as yet I have not confirmed this in Sim City but Ultima VII definitely has graphical issues with the on board video.
5) These are the sockets for the L2 cache. Cache is basically very fast RAM that the CPU accesses first before going to the comparatively slower system RAM. The L1 cache ram is generally located on the CPU itself in small amounts but in the 486 era the L2 cache RAM was added and placed on the motherboard usually close to the CPU socket. L2 cache is slower then l1 cache but much faster then the standard RAM, also it was pretty damn expensive. sometimes less reputable PC motherboards either came with completely fake L2 chips, empty and none functioning sockets or lucky in this case simply empty sockets. Even though this PC comes with no L2 cache if you can find the chips 32, 128 or 512k of L2 cache RAM can be added for a nice performance boost. 512k is kind of a lot so I’m a tad impressed with that.

On the left is a cache chip of the size if you want 64 or 128kb of L2 cache. The chip on the right is the larger size that you will need if you want 512kb of cache. these larger chips seem harder to find and even when I did find a number of them when I tried them they failed to work.
For a lowly Packard Bell this PC isn’t to bad. I do have some issues with the video, the small number of drive bays and lack of anything other then 3 ISA slots is limiting and the BIOS is very picky about hard drives. That said the CPU upgradability is decent the 72 pin RAM is pretty expandable and the option to add a good amount of L2 cache is a boon. All in all I think it makes a decent 486 for the casual user that’s not concerned with having the most powerful 486 and has little space to spare. I myself am planning a future article using this machine in a configuration for a special purpose.
Benchmarks (Intel SX 25mhz 486, 128kb L2 Cache, 20MB FPM RAM, Built in Headland 512kb video)
3DBENCH – 19.9
PCPBENCH – 3.9
DOOM -10.71
Quake – N/A
SPEEDSYS – 9.20
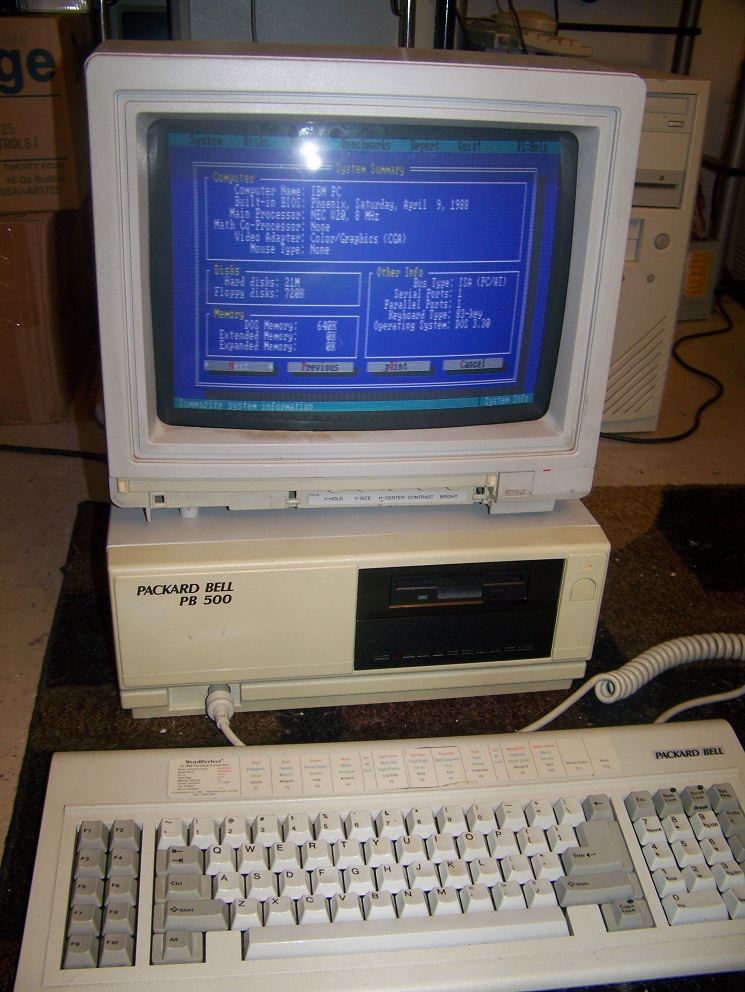
The PB 500 is as far as I can discover the Packard Bell companies first attempt at a IBM compatible machine and I believe was released around 1988 but possibly earlier. The PB 500 has a fairly standard design unlike there later Pentium era cases and seems to run fairly reliably as opposed to the massive reliability issues the company would face later with its products. The PB 500 is basically an IBM XT class clone running on the 8088 CPU but being capable of far greater speed and expandability compared the earlier original PC specs of the IBM 5150.

Here we have the front view of the machine. It is a little lighter and more compact then an IBM XT computer. Nothing to fancy on the front. On the lower left is the keyboard port for an XT keyboard. As you can see on the right I have a 20MB hard drive installed in the lower bay and in the upper bay is a 720k floppy drive. This machine originally came stock with a 5.25 inch 360k floppy drive but is capable of being upgraded to the 3 1/2 inch 720k floppy as they previous owner has done here. Generally this is an advised upgrade and I find the 720K drive much more convenient. Since 720k drives are a little scarce if you install a standard and plentiful 1.44mb drive it will function flawlessly in these machines as a 720k drive. I’m running DOS 3.3 on this machine which I believe is the operating system that this machine came standard with.

here we have the rear of the machine. there are 5 slots available for expansion cards as well as two built in ports. The port on the right is a parallel port and to the left of it is a serial port. To the left of these ports we have a small dip switch that can be used for setting the ports.
Here we have the motherboard in the case with all the drives and expansion cards removed. You can see the five 8 bit ISA expansion slots for add on cards.
1) This is the onboard beeper. This generates all your PC speaker sounds.

2) Here we have the CPU of the PB 500. This machine comes stock with a 4.77mhz Intel 8088 which was standard for the IBM PC. The PB 500 though is a “turbo” XT board so by pressing [Ctrl]-[Alt]-[ + ] on the keyboard the CPU kicks into 10mhz or more precisely 9.54mhz mode. Pressing [Ctrl]-[Alt]-[ – ] returns the CPU to standard 4.77mhz. The change in CPU speed is accompanied by a change in the power LED light from orange to green which is a nice touch. When I received this machine as you may be able to tell from the motherboard image it had a NEC V20 installed which is pin compatible with the 8088. The V20 is very compatible with 8088 software but due to improved efficiency boosts the speed of this particular machine to the equivalent of 8mhz when running in 4.77mhz mode and 15mhz when in 10mhz mode. Although the NEC upgrade is generally an advised upgrade for these machines I decided to use this PC as a sort of base line machine and for complete 8088 compatibility I replaced the V20 with an AMD 8088 CPU. Also to note a very minor side effect of the V20 upgrade is that the LED will not color change when turbo mode is selected.
3) This is the slot for the optional math coprocessor the 8087-1. As you can see this machine is without one.
4) The connection for the XT keyboard port.
5) The chips to the left of the # 5 are the RAM chips. This machine is expanded to its max of 640k of ram. To the right of the #5 is the wire that connects the LED to the motherboard.
6) This is the onboard interface for the floppy controller. The PB 500 supports 360k and 720k floppy drives. Unfortunately this cannot be deactivated so you can’t upgrade to a high density disk controller via an expansion slot.
7) This is the standard AT power connector for the board. Below that you can also make out the blue barrel nickel cadmium battery. These need replaced every few years else they can leak and corrode your motherboard.

Here is a shot of the internals with all the drives and expansion cards in place. As I said before the hard drive that came installed with this machine is a MFM half height 20MB hard drive that you can barely see below the floppy drive and cables. Since this machine was found at a thrift neither I nor the buyer I received this from knows if the video card and HDD controller came stock with this machine.
1) The PB 500 lacks any onboard video so in order to have the machine display a video card is required. In a way this is nice since you get the option to choose your video card and not have to worry about disabling any onboard video chip. The PB 500 can accept any 8 bit video card. I decided to go with CGA over VGA or EGA since most VGA games run far to slow on this machine and I have much better machines for EGA. The card that came with this PC was the ATI small wonder CGA card which is a very nice CGA card in my opinion. The ATI small wonder can do CGA as well as Hercules/MDA, Plantronics, and ATI’s own 16-color 320×200 and 640×200 graphics modes. It also has a header for a composite jack. This card has a home made composite connection routed through the gap where the cards dip switch is. It looks a bit crude but I like it since it means I do not need to take up another expansion slot for the composite jack bracket.

I really like this card and it seems to work really well.

Here’s a shot of Leisure Suit Larry in the Hercules mono mode and next to it is F-15 Eagle in CGA mode. This is taken on my Tandy CM-4 CGA monitor.
2) This is the 8 bit MFM hard drive controller. Since the motherboard doesn’t have a built in controller an expansion card controller is required. This particular card is from Western Digital and supports 10 or 20 MB MFM drives.

Overall the PB 500 is a pretty nice compact XT class machine for playing older CGA games that require that slower 4.77mhz CPU. Couple that with the turbo mode and the option to replace the 8088 with a NEC V20 if you desire and you have a pretty capable early to mid 80’s machine. You also have the option to add an 8 bit VGA card or EGA card if you wanted to play some later games though in my opinion even in turbo with the V20 most VGA games are just going to be to taxing. One of my issues first off is the fact you cant disable the onboard floppy controller and cant add a controller for high density 1.2MB and 1.44MB drives. Also from what I’ve read this machine is very picky about what 360k drives it will work with. Finally by this time many XT class machines like the IBM 5160 came with eight 8 bit ISA expansion slots so the mere 5 found on the PB 500 is a very minor disadvantage overall. Despite that it’s still a nice 8088 machine and doesn’t take up a lot of desk space.
Update 7/19/16
I recently picked up another PB 500 that appears to me more or less stock so I just wanted to post a few images of what it looks like and the expansion cards I found inside.\


The CPU I found installed was a Siemens produced chip.

The Tandy 1000 line of computers was a pretty important and well known computer line of the 80’s. Based off of IBM’s failed PCjr It had superior sound (Tandy 3 channel) and video (Tandy graphics which was a improved version of CGA looking very similar to EGA) when compared to other IBM PC’s of the time that used a PC speaker and CGA or Monochrome graphics. If you want to learn more about the details or Tandy graphics there are tons of informative pages on the net and I would suggest starting at Wikipedia or here. I recently acquired a Tandy 1000A for about $10 with an accompanying Tandy CM-4 RGB color monitor (just an older version of the CM-5 but basically identical). So what is the Tandy 1000A and how is it different from the original? Cosmetically and functionally they are pretty much identical except that according to Wikipedia the 1000A “fixed bugs, scanned expansion cards for bootable ROMs, and added a socket for a math coprocessor”. Since there is already so much information on this particular computer and not a whole lot for me to add I’m just going to briefly go over it here and point out the differences between the original Tandy 1000 and the slightly later 1000A revision so you know which one you have.

unfortunately the Tandy 1000A I bought did not come with a keyboard and I suspect both 360K 5 1/4 floppy drives no longer function. To speak for the Tandy’s build quality I purchased 2 other computers at the same time both mid 90’s Pentium 1 rigs. They both failed to boot (most likely a power supply issue) while the Tandy booted right up. The front is identical to a stock Tandy 1000 even down to the name plate. you have the two disk drives, big red self destruct button…errr reset button. a keyboard port proprietary to the Tandy so you cant use a standard IBM keyboard and finally two joystick ports. The power switch is on the right hand side at the rear.

The back is also identical for the most part to a standard 1000. from left to right we have the parallel printer port, light pen port (not a serial port and pretty much useless) and RGB monitor port (for CGA monitors), composite a/v out in case you don’t have a monitor you can use a TV set and finally a mono audio a/v out.
also on the back we have the first and easiest way to see if you have a 1000A.

Take a look at the model number written above the boxed serial number. If it says 25-1000A then you have a 1000A….most likely. It is possible that someone at some point damaged the case and swapped motherboards putting a 1000 MB into a 1000A case. If you want to be completely sure we need to open it up and look inside. Fortunately this is incredibly easy and requires removing 5 screws, 2 in the front and 3 in the back.

(click to enlarge)
Here we have the motherboard, usually the entire right side is obscured by the power supply, floppy drives and aluminum casing which I have temporarily removed.
1) This is the empty slot for an optional 8087 math co-processor. This slot will not be present on a standard Tandy 1000 and was the biggest obvious addition to the 1000A. The addition of a math coprocessor would speed up the computer when running some programs and math intensive applications.
2) This is the 8088 CPU of the 1000A, the same CPU as in the 1000. The CPU runs at 4.77MHZ (or 4.6 by some independent benchmark tests) and can be upgraded to a NEC V-20 chip to improve performance (only works in about 70% of Tandy 1000, 1000A’s). I plan to go into more details at a later time, perhaps if a do an “Anatomy of” feature on the Tandy but as of now I’m just going to quickly go over the basics.
3) connection for the power supply. it looks like AT but i believe it is proprietary.
4) this is the floppy connector for the two 5 1/4 floppy drives.
The Tandy 1000A like the 1000 comes with 3 8-bit ISA slots.

This a single slot 8 bit ISA memory card for the Tandy. It has 512k of RAM on board bringing the total system RAM to its max of 640k. This card also has a DMA chip or (Direct Memory Access) on board increasing IBM compatibility. Later versions of the 1000 like the SX had the DMA chip as well as the potential 640k of RAM on the motherboard itself.
The Tandy 1000A is a slight upgrade from the stock 1000 and is not difficult to differentiate once you know what to look for. In the end though it pales in comparison to the later SX, TX and even the compact EX/HX Tandy 1000’s which offer much more expandability and features while maintaining the same compatibility for the early Tandy era games and applications.

The Wang Alliance 750CD is the unfortunate victim of a somewhat silly name and at least to the immature of us it easily evokes a snicker or a grin. Beneath the somewhat silly name implication the 750CD is a very capable 386 era PC. Wang Laboratories was actually a fairly successful American company that existed from the 70’s up until they were bought in 1999 and besides manufacturing a few IBM compatible PC’s, among other things also developed the PC RAM SIMM which basically is putting RAM on sticks rather than having a bunch of RAM memory chips socketed to a motherboard.

I’m seriously a sucker for the desktop case design. Towers are nice and all and really the better overall design but the desktop case just gives me a nice retro feel and the Alliance 750CD is a very nice and low profile case. Nothing overly complicated about it or non standard. The only odd feature is the placement of the reset button far off to the upper center area of the case but its only a cosmetic oddity. One limiting factor of this PC is the limited drive bays with only one 3.5 and one 5.25 inch bays. The 750CD came standard with a 1.44MB floppy drive and a CR-ROM drive. Its a tough call sometimes with a 386 based CPU computer on whether to go with a 5 1/4 inch floppy drive or a CD drive. I would say have both but really if only given the choice between one or the other it gets a little harder. the 1.2MB 5 1/4 floppy drive was standard for the 386 era and a lot of games came in that format also a lot of CD based games were a little too much for a 386 CPU but at the same time a CD drive is very convenient and easy to replace. also a lot of old games were re-released in CD format and a CD drive makes it a lot easier to transfer files if you want to play with CD burning. For the 750CD being a late era 386 I think having a CD drive as opposed to a 1.2 MB floppy was the right decision since at the time the CD was clearly becoming the future of games as well as the fact the 25mhz CPU in the 750CD was not a bottom of the barrel 386.

This would be a rear view of the PC and as you can see its actually a fairly forward thinking design. The only expansion cards I have installed (I’ll get to them in slightly more detail in a minute) are a sound blaster for sound, an ethernet card and those RCA stereo jacks you see are for a CD-ROM IDE interface card so any sound from those jacks would be from a CD playing in the drive. besides the expansion cards the ports are pretty standard which is very nice for a 386 PC. we have built in VGA as well as ps/2 ports for both mouse and keyboard in a time when a lot of PC’s were still offering serial mouse and AT keyboard ports as standard and ps/2 as optional. also a pair of DB9 ports and a printer port.

Here is a shot of the inside (minus the CD-ROM IDE expansion card). As you can see the Motherboard is actually quite small and the 5 16 bit ISA expansion slots are supplied via a riser card in the middle of the board. The setup actually works pretty well except it can be hard to install cards sometimes as the metal tabs press each other if you have cards installed on both sides. It also uses an AT style power connector coming off the side of the board. The motherboard only has 1 IDE connector onboard as well as 1 floppy connector. this would still allow a cd-drive/hard drive combo on one IDE cable plus your 1.44MB floppy drive OR you could pull the CD drive and put the hard drive on the IDE and a 1.44 and 1.2 MB floppy drives on the floppy connector. I have my CD drive and 200MB hard drive (I think, it may be 500MB) on separate IDE ports because mine came with a IDE card pre-installed by the previous owner.

This is the ISA IDE expansion card I have installed, an IDE-16003 V2. this card appears to be primarily focused for giving a PC user an extra IDE connection for a separate CD-Rom drive/drives improving performance rather than have both the CD drive and hard drive on the same cable. This card as well as the other 2 expansion cards I have on the 750CD were added later and did not come factory.

This is the CPU and a co-processor. The CPU in the 750CD is an AMD 25mhz 386SX, in the above photo you can see it at the top partially obscured by the floppy drive power cable. This CPU is soldered to the motherboard and is non upgradable unless possibly by a rare and most likely expensive upgrade kit that uses the expansion slots. The 25mhz 386 is a somewhat speedy CPU but I would place it kind of middle of the road, no match for any 486 and outclassed by faster 386 CPU’s like the famous AMD 40mhz 386. It will though in most cases get the job done for games and applications of the era or at least faster than a 16mhz 386 or a 286 CPU. SX in the CPU title means that it has a 16-bit external data bus and a 24-bit external address bus. As no 386’s had built in math co processors a co processor expansion socket was added. Later on 486 class CPU’s DX was used to designate that the coprocessor was built into the CPU and no co processor was needed as opposed to referring to data bus width.. we currently take this for granted though since starting with the Pentium era these abilities were always built into the CPU. This particular 750CD has a Cyrix fastmath 387 co processor installed in its expansion slot. This was an upgrade and not factory installed or standard with this PC.

Here we have the opposite side of the inner case with the expansion cards removed. The Alliance 750CD uses 4 32 pin RAM slots and came factory with 2MB installed, mine is upgraded to the full 16MB the PC is capable of handling. For the era this is more than enough RAM as I’ve said before even many 486 era games will run on 8MB RAM with no issues. The on board video of the 750CD uses the Western Digital Paradise WD90C11 chip which was considered a very capable video chip for its time. A faster 16 bit ISA video card could always be added but for the type and era of games this PC plays I think the Paradise chipset is just fine.

For sound this PC only came equipped with the standard PC internal speaker but the previous owner had a sound card installed which I decided to leave. This is a sound Blaster Pro 2.0 which is an 8 bit sound blaster (and thus fully adlib compatible) card. It’s not really my favorite SB card. It uses the Yamaha OPL3 chip like the SB16 but If your going to use an 8 bit sound blaster better to go with a Sound Blaster 1.0, 1.5 or 2.0 which use the OPL2 chip that is more old game compatible and can offer some Creative Music system sound (with optional expansion chips) you could also go with the Sound Blaster pro 1.0 which has duel OPL2 FM chips for stereo sound. There are a few games that only support this or that sound odd when played on a later OPL3 FM chip. It is less “noisy” and offers better sound clarity then most of the SB16 cards that precede it though, except for maybe the Vibra models. Sound Blaster 16 cards are also not 100% backwards sound blaster compatible so it does have use there for older Sound Blaster games. Don’t get me wrong, it’s not a bad card and is fine for the era but not my first choice. Since this is an as is review and not looking at what I would consider an “optimal” setup like in my “anatomy of” series will let it slide.
Overall I like the Wang Alliance 750CD despite its mildly offsetting moniker. It offers good expansion and a sleek low profile case. The CPU although a little underpowered performs adequately and you have the option of a nice amount of RAM and a co processor. The built in VGA, dual ps/2 ports for the mouse/keyboard as well as the factory CD drive make this a very forward thinking PC for its class.
A place for the pc collector
Probabilmente il miglior blog bilingue al mondo*
Game-related ramblings.
My Gaming Timeline
Lynn talks about video games, records and books ...
Sharing My Retro Video Game Collection.
Random electronics and gaming crap
Chronogaming project featuring reviews, screenshots, and videos of the entire Super Nintendo library in release order.
Random mutterings on retro computing, music, plus radio controlled scale modelling.
Work(s) in Progress!
1001 video games and beyond
retro computers and stuff
Stay Jispy!
