
Subscribe to continue reading
Subscribe to get access to the rest of this post and other subscriber-only content.
Subscribe to get access to the rest of this post and other subscriber-only content.
well I’m only going to go over this quickly as a fast reference. if anyone wants to look any of this up in more detail there are plenty of sites and always Wikipedia.
there are many computer graphics standards but first I’ll go over the most basic ones that will be dealt with in a classic computer setup starting with the first color graphics standard. Originally I took some crappy “point camera at screen and click” pictures but then I decided to hell with it and I just used DOSBOX and screenshots. I’m not a fan of emulation but here it serves its purpose.
Remember that computers began with very limited resources and those limited resources as well as cost kept initial color graphics on the computer limited. Remember that more colors and higher resolution requires more RAM and RAM could be expensive. In 1981 RAM cost $8,800 per Mbyte compared to the end of the DOS era of 1996 at $29.90 per Mbyte of RAM (according to here). I’ve used the game Eye Of The Beholder as a guide to illustrate the differences between the standards.
Hercules Graphics – This popular monochrome standard actually came out after CGA in 1982. It does seem like a set back in the fact it can only display 1 color but CGA cards could not do text very well and the Hercules card was backwards compatible with MDA (the monochrome display adapter) so it was very popular for business. It also had CGA emulation meaning it could take a CGA game and render it in monochrome. It had a theoretical top resolution of 720×350 and also had the ability to display to dual monitors. I could not get Eye of the Beholder to display in Hercules mode so here are screens of Outrun in Herc mode. If your monitor was a green or amber screen then the image would be displayed in that color.
Black and White monochrome

Green phosphor screen monochrome

CGA – Color Graphics Adapter was introduced in 1981. It could display up to 640×200×2 resolution as well as 4 colors at any time from a palette of 16. Two common color schemes were available, Magenta, cyan, white and background color and Red, green, brown/yellow and background color both were pretty hideous.

Also of note is that some CGA graphics cards as well as some computers of the era offered composite ports for hooking up to a TV. Interestingly programmers were able to make some games look better using the composite connection by utilizing the quirks of composite. composite isn’t very sharp and programmers were able to use the fact that it blurs and blends colors thus creating more colors then the standard CGA when hooked up via the composite port. Ultima and burger time are two games that quickly come to mind that had more color when using a composite hook up. The downside of using composite instead of CGA is the picture can sometimes look less sharp and text can look very blurry.
TGA – Tandy Graphics Adapter, actually this graphics mode was originally released with the failed IBM PCjr in 1984 as “CGA Plus” but after the system flopped it became known as the Tandy standard since the Tandy 1000 line of computers were originally PCjr clones. Many games ended up supporting this mode on Tandy 1000 machines and it is very similar to the later EGA standard many times looking identical. It is capable of 640×200×4 resolution and can display 16 colors at once from the available 16 color palette of CGA.

EGA – Enhanced Graphics adapter was also released in 1984 and was capable of higher resolutions and more colors in total. EGA can display up to 640×350 resolutions and even up to 720×540 via later expanded graphics modes. It can display 16 colors at the same time from a palette of 64. the EGA and TGA modes of Eye of the Beholder look identical. EGA is also backwards compatible with CGA

it should be noted that despite the identical nature of the visuals here EGA and TGA can have vastly different looks depending on the game. One well know example is Thaxder.
TGA

EGA

TGA looks to have better color depth and overall color while EGA has a higher resolution and numbers and letters are sharper.
VGA – Video Graphics Array, This is what most of use are used to. VGA was introduced in 1987. It could display a resolution of 640×480×16 or 256 colors in 320x200x256 from a palette of 262,144 colors. VGA is also backwards compatible with CGA and EGA.

MCGA – Multi-Color Graphics Array also released in 1987 was a stripped down VGA standard only used in some low end IBM PS/2 models and some Epson clone machines. Its mostly CGA compatible but NOT EGA compatible. It could do 320×200 in 256 colors like VGA but not some of the higher resolution VGA modes. There were never any add on MCGA cards since VGA was vastly superior for only a little more cost.
SVGA – Super Video Graphics Array came out the same year as VGA. it is essentially an extension of VGA capable of 800×600 resolution and was continuously updated by the VESA or Video Electronics Standard Association. more info can be found on Wikipedia under SVGA. this was really the main video standard from the late 1980’s and up. I currently do not have a comparison screenshot but most times its identical to VGA except for higher resolutions.
keep in mind this is just skimming over the most commonly used graphic displays and is certainly not comprehensive especially in regards to odd or extended resolutions available. I would highly suggest googling or Wikipedia for more information.
Packard Bell computers or “Packard Hell” as some refer to them may not have attained a very high reputation for value during their heyday in the USA during the 90’s. perhaps its a well deserved bad reputation. I never owned one as a child so I can’t personally attest to them. (though I did have a horrible AST PC). despite this they were a significant PC manufacturer for the time and turned out quite a few models in the early Pentium era and prior. This is more of a short review or overlook since I’ve noticed there isn’t alot of specific information on a lot of these models online. I picked up this Packard Bell S605 Multimedia PC at a thrift shop for under $20. On hooking it up the machine fired right up and besides perhaps a dying original CD-ROM drive and some issues with the original sound card the machine has worked fine after all these years.

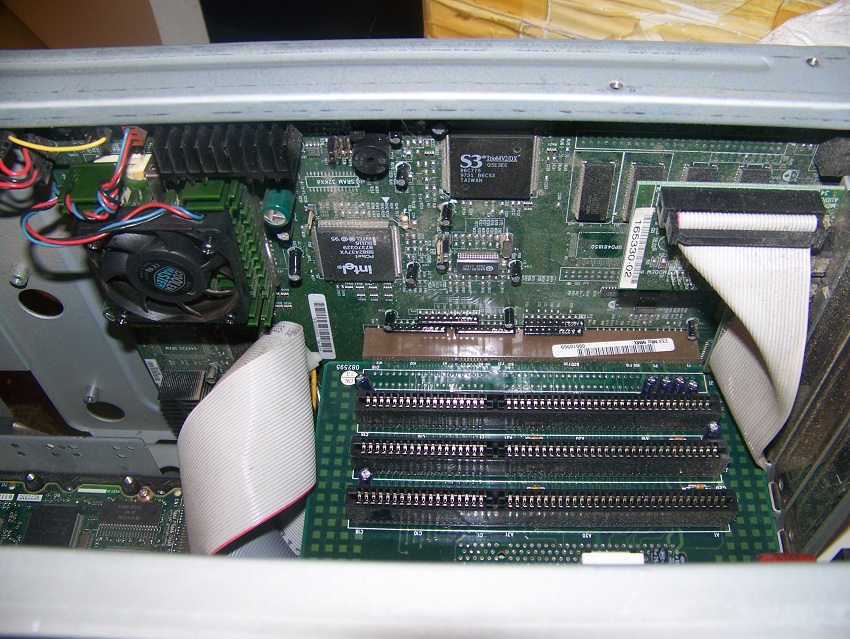
It uses the typical weird case design that Packard Bell was fond of in the 90’s with the weird grey bordering at the base. I suppose this did help it stand out a little from an aesthetic point of view and defiantly gives the machine some personality. This particular model still has all the retail stickers attached proclaiming its vast technological features for the time. This is a 233mhz Pentium 1 model on a socket 7 MB. the Intel 233mhz MMX is the last of the Pentium 1 line of CPU’s and its actually a great CPU I use in most of my Windows 95 PC’s which is also the operating system this machine had preloaded. nothing else very special, it originally came with 24MB of RAM, mine was upgraded to 64MB but the max that can be installed is 128. I suspect you need to use 2 PC66 64MB RAM DIMMS to achieve the 128 though since when I tried installing a single 128MB stick the PC booted up but gave me odd memory errors and upon booting Win95 was extremely slow and only registered 32MB RAM in the system properties. The built in video is the S3 Trio64V2 chipset which is really the standard for DOS gaming and is a great video device for compatibility. It is a little lacking for Windows95 though so I tossed in a spare S3 Virge PCI video card I had to at least give the machine some 3D ability while keeping the excellent 2D since the Virge uses basically the same 2d core as the Trio64V2. It also came loaded with a little 3.2GB hard drive that booted right up

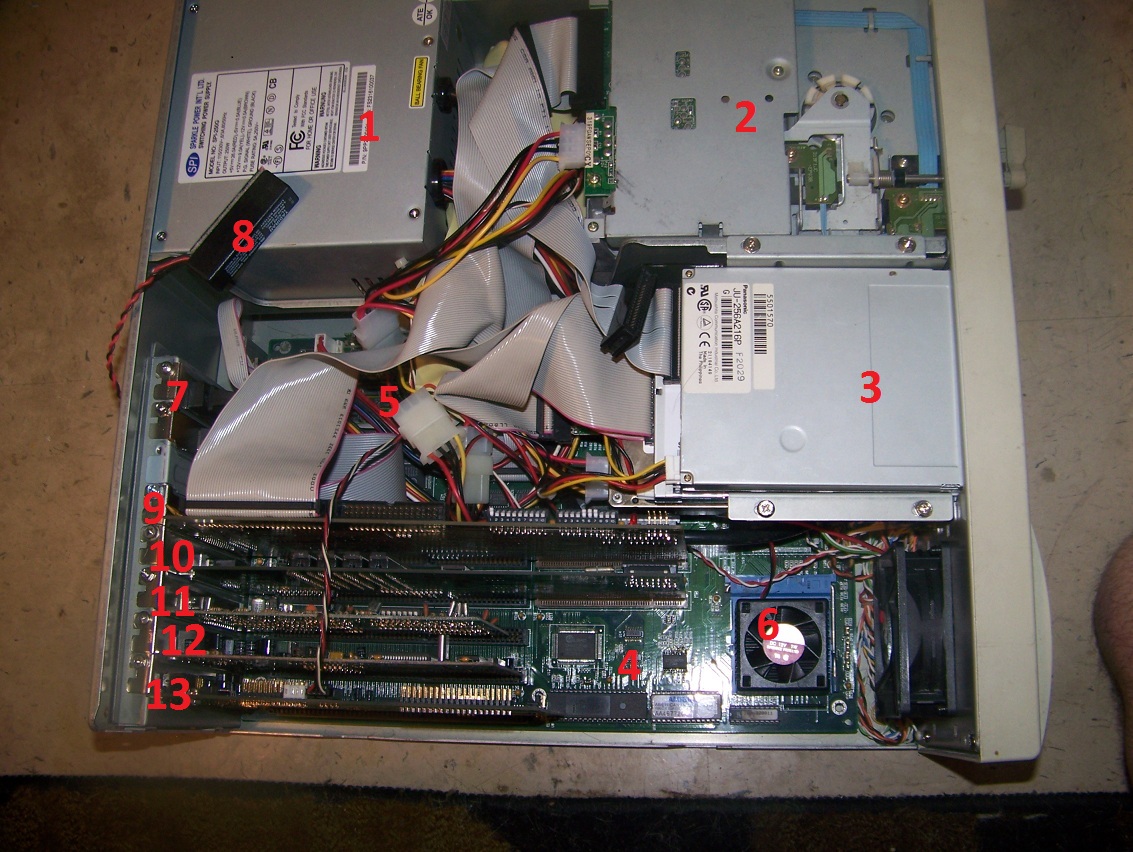
Here’s the case opened. Again its an odd case as usual for PB. instead of the top and sides coming off as one piece or a simple side panel coming off the side and bottom come off, though the reasons for this become quickly apparent.

This is the case on its side laying down. notice it? Well it doesn’t really effect anything but the slots for any expansion cards ( 3 16 bit ISA and 2 PCI ) are on a riser card inserted into the motherboard so to insert a new expansion card you have to flip the PC upside down and stall them. so as you can see they are installed upside down comparatively to the PC tower. this effects nothing but I just find it weird like a lot of these old computers. The pre installed sound card does not take up a slot, its just kind of screwed into a bracket but has no connection to any expansion slot. it is connected to the motherboard by what appears to be a IDE cable. It appears to be a standard SB compatible crystal semiconductor sound card common on Windows 95 systems but no matter how many times I reinstall the drivers I just cant get sound. the card is being detected by windows but has a conflict so its possibly defective. I do plan to install some older spare sound card when I come across one since I just cant seem to get this onboard sound to work. also the fan on the CPU is loud, very very loud.
Conclusion: its not a bad computer despite being a infamous Packard Bell. with RAM maxed and a decent sound/video card for the era it would make a pretty good Windows 95 machine. The CPU is excellent and what I use in my Win95 setups and you get both mouse and keyboard PS/2 ports plus a USB port built in. I seriously considered making this machine my main Win95 PC but it has its drawbacks. Win95 can support up to 480MB of RAM and even though for almost all programs 128MB is more then enough I like the option of being able to throw in a little more if needed. Also being limited to only 2 PCI slots can be an issue especially if you want to add a Voodoo 1 or 2 3d card or a PCI audio card like the DOS compatible Ensoniq PCIaudio.
Most of us have toyed with the concept of using a PC as a media center device, or in plain speak. hooking a pc up to a television in order to have a huge screen and stream media, as in movies, TV and music. with the video availability of online content through services like Hulu and Netflix its very easy now days. also turning your DVD’s into digital files and storing them on a hard drive is also a reality. many of us also have that old AMD or Pentium 4 PC of 6 to 8 years ago collecting dust in the closet or maybe your using it as a secondary PC but are seriously considering just tossing it. well you can probably turn that PC into an awesome media center PC for next to nothing.

here’s my older PC from around 2006. it served me very well for 6 years as my main computer but after skipping windows Vista I decided it was time to upgrade to something a little newer. the original specs of this computer are:
AMD 3500+ CPU
1 GB DDR2 RAM
onboard video/sound
250MB SATA hard drive
It was a decent PC for its day and ran Windows XP media center very well. The built in S-video connection would have been acceptable for video output but I wanted to be able to output HD quality video since it was being hooked up to a HDTV.
over the years I had added 2.5 GB of RAM making the total 3.5 GB as well as a Creative Audiology sound card. since these were prior purchases I did not consider them an expense for creating the media center PC. This particular PC uses socket 939 and i discovered that a AMD Athlon XP 4000+ CPU were selling for cheap on eBay so I snagged one for $20 giving my PC a significant CPU power increase. I also by good fortune came across a Nvidia 9800GT video card at goodwill for $9.99. this is a very good card for the time and offers good video quality as well as having a HDMI out connector allowing me to stream HD content to the TV. I would strongly suggest using a Video card with a HDMI connector for your media center PC though I did get lucky in my find, as such cards can go for about $50 on Ebay.
here’s the internals

In the end I spent roughly $30 on upgrades to create a good quality media center PC out of my existing hardware. you could always spend a little more if you wanted a more recent video card but the idea is to make one on the cheap with what you have. Internet connectivity is also a must since this will allow you stream Youtube, Netflix as well as Hulu and other online video content. I was content to use my PC’s built-in wired ethernet port but a cheap wireless adaptor should work just as well. currently I am also using existing wired optical mouse and standard keyboard but an upgrade I plan in the future is to replace these with a pair of wireless mouse/keyboards. another thing to consider is a PC remote, or a remote control designed to control your PC. I do not have one of these either at current but its a cheap and easy component I plan to add in the future as well as perhaps a larger SATA hard drive if I ever come across one. Also if you want to spend a little more and do some more work you can always find a little media center PC case and put everything in that but I personally didn’t feel like doing the work, putting up with the hassle or unnecessarily spending more money when I felt my standard silver case looked pretty spiffy.
so, in review to turn your old AMD or Pentium 4 into a fine home media center PC i would strongly suggest maxing out the RAM and finding a decent video card with a HDMI connector. the cpu upgrade isn’t very necessary but nice and older cpu’s are mostly cheap now. I mostly stream my content so I didn’t need a huge hard drive but if you are planning to save and use digital media you can find an extra 300 – 500 GB SATA drive for not too much if you don’t already have one. any version of XP will work fine. I think windows 98 or even ME is a little to old, slow and buggy for this kind of thing and windows Vista and 7 eat up to much memory and resources for this.
lastly there are plenty of software packages out their for free that may make the process of picking your movies easy as well as give it a better look. I sometimes use XBMC media center.
One issue I did have was sound. because of how my TV and surround sound is I had to use separate PC speakers instead of using the TV speakers. it sounds ok but it’s slightly cumbersome and takes up an extra power socket. This is because the HDMI port on my cheaper TV does not have a separate means to input audio and so far I havent tinkered with my video card to set it to output sound through the HDMI port. I’m fairly sure it can be done but I just really havent bothered. In the end my home media center stats ended up being
AMD 4000+ CPU
3.5 GB DDR RAM
Sound Blaster Audiology
Nvidia 9800GT video card
250GB SATA hard drive
a shot of the current setup

You can even use much older PC’s if you don’t have anything this new on hand but you will take a quality hit. Prior to this my home media center PC was thrown together from a PC purchased in 2000. it was a pentium 3 1ghz with 512MB RAM and a PCI video card with S-video out. I believe the card was a 5000 series Nvidia Geforce. it was sluggish, only outputted SD quality video and wasnt great at streaming from the internet but it played DVD’s and movies/files off USB flash drives quite well.
I’ve never been a huge fan of emulation, or using another system (most commonly a PC) to emulate or “think” its something else such as a SNES or Genesis or even a different type of PC. I know it has its uses but I’ve always found the real hardware to run smoother with less issues. a lot of games use certain nuances or quirks in its native system that are either very hard or sometimes virtually impossible to emulate, games sometimes run at incorrect speeds, sounds wrong or even looks wrong and that’s not taking into account the pure feel of playing on actual hardware. To be honest though physical media tends to wear out and die. This is where flash carts and copiers come in. Basically a flash cart or copier takes a ROM or the data that is on your SNES or NES cart and by some means, either a flash storage device or a floppy makes it playable on actual hardware. a ROM is the actual game you play, the chips it is written on inside a cartridge or on a CD/DVD is the physical means we use to store and access that game data. At times flash carts have created some controversy over copyright and piracy issues and it would be naive to say that this does not happen but there is also a HUGE amount of legitimate use that can be had from these devices. being able to access your entire legitimately owned games via a single cart and a PC without having to get out and cause wear and tear on your originals is a huge advantage let alone not having to store every game you own within hands reach. another great advantage is the ability to play games that were never officially translated and released to the USA. Several individuals and groups over the years have created excellent English fan translated ROMS of games that never got to be released stateside and if you import the actual game a flash cart lets you play those unseen classics on actual hardware in English. I should also take the time to point out that even these flash cart/copier devices are not perfect. some games use special chips built into the actual game carts that are not physically present in the flash carts or encoded in the ROM data. An example of this would be the famous Super FX chip in some SNES games that allowed polygons and 3D on the SNES. The NES is also infamous for its use of a variety of special chips inside carts and “mappers”.
THE EARLY YEARS

Above is a Chinese manufactured Game Doctor 7, a rather well known SNES copier from the early 90’s. this was my first experience with a copier which I had purchased around 2005 and i hated it. What you did was find your particular game ROM on the internet and then copy that ROM to a 1.44MB floppy disk. Usually the game was far larger than 1.44MB in size and required several floppies. The interface was a little awkward but manageable. From what I’ve gathered these devices were very popular but I just felt it was way to cumbersome and archaic not to mention it looked kinda unflattering humping my SNES all day. I should add the unit also took up a wall socket with a big AC adaptor box and I never did figure out how to save a games save file to disk, only the built in RAM which ment if I ever lost power to the system or accidentally unplugged it my save was gone.
A COMFORTABLE MIDDLE GROUND
I knew there had to be a better method out there. From a little research I had found an answer, the flash cart. How the flash cart differs from the earlier copiers is it does away with the hardware and unreliable floppies and using flash storage like the type found in your flash drive condenses the process down to a flashable cartridge (requiring no external power, simply insert in your system) and a small interface device and software program for your PC. Another bonus was that these devices were relatively cheap and were created for many old school systems such as the Genesis, SNES, TG-16, Master System and so on. there were still some problems though. I once read as a comment on a forum I can not recall that the people who make flash devices love antiquated hardware and would “make us use 5 1/4 floppies if they could”. Amusing but not to far from the truth, the earlier flash carts were still somewhat archaic and require some rather unintuitive methods. A non computer savoy individual may indeed end up having a hard time setting up these early flash carts. Also they tend to only be able to hold 1-4 games in memory at a time with only 1 able to use the save function. A reliable webpage based in Hong Kong that still sells these devices is Tototek. I’ve bough several affordable flash devices off them over the years and I can personally vouch for their reliable products and good customer service.
First off make sure you have a running PC that has one of these
 A parallel Printer port. I don’t think they are standard anymore but PC’s were still commonly sporting them in the mid 2000’s so put that old Pentium 4 or AMD 3500+ to use. Also be SURE to go into the computers BIOS and set the printer port to EPP mode or it won’t work. You can usually access the BIOS on startup before Windows or whatever your running boots, press the del key or F8 key after powering on. Also I’m fairly sure the cable used must be bi-directional else the cable won’t transfer the information correctly.


So, you have your flash cart itself (I put mine inside an old extra cart of Super Mario World) and your small green board you connect to the PC. the board connects via a USB cable (for power) and a parallel printer cable. your also going to need a program such as Super Flasher that can be downloaded free from the above Tototek website, keep in mind the flashing software is different for different flash carts. The Genesis flash cart uses different software also available from the site.

It’s all rather self explanatory at this point. Insert the cart to the board, turn on the board via the power switch and use the software to load your ROM file. The Tototek carts are nice because you don’t have to do any goofy things with your game saves. it saves in game via a battery on the flash cart but keep in mind you can only save with one game at a time if you load multiple games onto the cart. Wait a few minutes for your game to load to the cart, pop it in your SNES (or whatever system you have a flash cart for) and

look at you, your playing an English translated Japan only strategy RPG on your actual SNES, yay!
THE PRESENT
As convenient as these style flash devices are over the older copiers technology moves on and flash carts of the present (2012) have evolved beyond the need for either clunky interfaces or limited space. enter the modern flash cart.

This is a modern example of a flash cart. This specific one is for the NES system but they are also made for a variety of cart based systems. This cart as well as its SNES version can be purchased here at Retrozone. The modern flash cart consists of the cart itself and usually either a Compact Flash card or in some devices an SD flash card. Everything you need is in 2 devices. For the NES you just buy a compact flash card, mine is 512MB in size. Insert it into the CF slot on your PC which most have them now and if not you can get USB adaptors for only a few dollars on eBay. drag and drop your ROM files into the folders you easily set up on the flash card and that’s it.Insert the card with your ROMS into the cart, insert cart into system and there you go, access to hundreds of games if you so choose. I need to point out again though that not all games work as I stated earlier many games on the NES use special hardware in the form of chips on the games. Good news is updates are always being worked on and as time passes more games are becoming playable via software updates to the carts available freely via the website. The one real downside I find, at least with the Retrozone version, is that the method of saving in game is somewhat clunky. You create a separate .sav file for whatever particular game you wish to save in. In order to save in game you have to get up and hold the RESET button down 5 seconds and let go and hopefully you get a little screen asking if you would like to save. its awkward but manageable. Another drawback is price, these style carts tend to go for well over $100 where the older Tototek style carts can be had for under $80. And that’s it for flash carts. A very useful way to have all your collection on hand and still use the acual hardware.
Before the days of dual core and quad core and even hexa core’s on one CPU you had to actually have two (or more) physical CPU’s on a motherboard. These have been around for some time and the most common ones are from about the 2000’s using two physical Pentium III cpu’s but much older boards from the mid 90’s using two Pentium pro cpu’s arent to uncommon either. This setup in the days before dual cores was to enhance processing power and multi-tasking. Not common on home use computers these were mostly found on business machines, graphic design/video editing machines and servers. The idea of two cpu’s is also slightly deceiving. One would assume that two 1 ghtz processors would equal 2 ghtz but you would be wrong as the process of having two completely separate processor sharing the load and exchanging information is more like 1.5 ghtz. though under multi tasking you can tell a definate performance boost. also only certain operating systems even support a multi cpu setup and even then an application has to be written that takes specific advantage of the second processor. The bulk of these applications were business oriented and few if any games took advantage of this.


this is my current dual processor machine. Its running two Intel Pentium III 1 ghtz cpu’s on windows XP professional. 1.5 gigs of RAM and as for the expansion cards nothing to special, for sound I’m just running a generic paradise beach sound blaster compatible card in a PCI slot and for video I have a Geforce2 MX400 in the AGP slot. the MX400 is not a bad card at all for the early 2000’s era and gives acceptable performance. obviously a much better video and or sound card can be added to this PC to make it an excellent early 2000’s XP machine.

obviously with a second physical CPU on-board your going to be generating more heat so it’s always a good idea to have good ventilation and if you can, a secondary fan nearby to blow that hot air out of the case. Also remember only certain operating systems or OS’s can “see” the second CPU and take advantage of it. The most common OS’s that can be used with a dual CPU system are Windows NT, Windows 2000, Windows XP professional edition, Windows Vista and Windows 7 professional and up. Linux, later versions of OS/2 and several other OS’s also support the dual CPU setup. A computer with two processors running on an unsupported OS such as Windows 98 or 95 will still function but only one CPU will be detected and the PC will run as a single CPU system.
Reasons to have a dual CPU computer?
well, to be honest there’s very little reason to seek out a computer with two physical cpu’s and its mostly a novelty but there are a few reasons.
1) you’re using older business software for some reason designed for an older OS and cannot get it to operate under a newer OS. its unlikely but in this case it will probably run smoother on a dual cpu setup.
2) these boards were generally manufactured for power users and professionals so the boards tend to be of better quality then your run of the mill MB’s and also tend to support higher RAM amounts then other MB’s manufactured around the same time. they make excellent boards to have in an older backup PC running Win 2000, XP professional or even Vista or Win 7 if all you’re doing is web surfing or spreadsheets.
3) If you have a Pentium III based dual CPU PC you can make it into a dual boot system running Windows XP as well as Windows 98 giving you the ability to play more modern games in XP and a large amount of older Windows 95/98 and DOS games under Win98. in XP you get the speed benefit of the extra CPU and under Win98 the CPU is not to fast for many Windows and even some DOS games.
The list of reasons is short but if you can come across one for free or cheap and have the extra space and money they make good nerd conversation pieces and a system properly upgraded with a good sound/video card as well as maxed ram would make a good and reliable windows XP gaming machine.
*UPDATE OCT 22 2012
I recently put together another much better dual CPU PC that I’m adding here

This is a dual CPU PC based off a Tyan S2507T motherboard with 1GB of RAM. the MB has 2 1.4GB Pentium III-S Tualatin CPU’s installed, the last and fastest of the Pentium III family. the 1.4 PIII CPU is more efficient and runs faster then the early Pentium 4 CPU’s that followed it making it a very capable Windows XP Machine, which is the current operating system I have installed. The CPU and other components is also not to insanely fast or exotic that Windows 98 should have any issues so its makes a really nice Windows XP/98 dual boot system.

Nothing very special as far as sound card goes, just a Creative Sound Blaster Audigy which provides overall good and compatible sound.

The Video card I have installed is a card I always wanted to try out. It is an AGP Millinium Matrox G400 MAX. This MAX is the top of the line Matrox card in 1999 and preforms great in windows 98 as well as early XP era. Doing a search on Ebay the cheapest G400 MAX I could find was $43.99, I bought this card on Ebay for $11.00 shipped. If you’re looking for a MAX at that price just search for the common and relatively cheap G400 stock model, some sellers aren’t sure what they have and every once in a while a MAX will get tossed up and sold as a regular G400, the key is to look for cards with the fan on the heatsink as only the MAX were sold with a fan attached. It’s always a possibility that someone slapped a fan on a normal G400 but its doubtful and as in my case worth the risk of purchase for a substantially cheaper MAX card. The MAX runs faster (and hotter) then the stock card and this one comes with 32MB or video RAM. The Matrox cards are known for their excellent 2d performance and image quality and some people even use them under DOS (at the expense of overall game compatibility) because of this reason. The G400 is usually considered the best of the Maxtrox Millinium line and has a few neat features. It can display on two CRT monitors at once via its 2 VGA ports as well as utilize the ability to do environmental mapped bump mapping which is a fancy graphical ability that several games of the time supported.
Continuing with the “Anatomy of” series we will be looking at perhaps the quintessential computer and CPU of the early to mid 90’s and a DOS mainstay. The 486 CPU was introduced in 1989 and continued to be refined and made faster. It stuck around well into the Pentium era of the mid 90’s. The PC were looking at today is based around the 486 and designed to run virtually any DOS game and program from the late 80’s up until the mid 90’s. it’s a little to fast and overkill for mid and early 80’s games and although certainly playable, just a tad to slow for later DOS games such as Duke 3D or Doom. I find this setup to really be the perfect type for most DOS gaming in both compatibility and time specific feel (if that makes sense). It’s a little harder to find the parts for and maybe slightly more expensive than building a Pentium based DOS PC but the effort is worth it. I’ll be attempting to explain the parts necessary to put together a 486 PC but as always the suggestions are my opinions and there are many, many choices available. For quick reference I also have a page explaining various PC ports and slot types here.

I chose a desktop style case, I feel it better conveys the era and I personally like the form factor but you can just as easily chose a tower type configuration. This case is slightly larger than most I have seen on the market and has 3 5.25″ drive bays where most I have seen have 2. make sure you get an AT style case as your motherboard is going to be an AT form factor with most likely an AT power connector. Most of these cases can be found for less than $20 and many times come with a AT power supply. A lot of these cases have little slots for keys, don’t worry about them, you don’t need the key. this was so owners or businesses could lock the case to protect the insides from unwanted modifications or pilfering I assume. they usually come with 3 buttons, your standard power and reset as well as a “turbo” button. contrary to what you may think the “turbo” button actually slows the CPU down. This is to help with compatibility with older games that require a slower CPU. It’s a mostly useless feature but I suppose its nice to have to somewhat increase compatibility.


One thing you’ll notice about the back is that there are no PS/2 ports for keyboards or mice. The PS/2 standard had not taken hold yet and a majority of 486 based motherboards did not have or support the connection, you will even find these AT style keyboard connections on early Pentium based boards.
1) AT keyboard connection. Finding an AT keyboard shouldn’t be hard. I spot them a lot at Goodwill in the piles of boards they usually have in one corner. the bulk will be USB or PS/2 but look for older off white colored boards and check the end connectors for the larger AT plug. The good news is that the AT connector is compatible with the PS/2 standard by way of an adapter plug. these can be found online for a few dollars and let you use a PS/2 type keyboard with the AT plug.
2) serial ports, The mouse is slightly more tricky. Serial mice are almost always the older style “ball mice”. They aren’t to rare and almost never more than $5. Unfortunately the connection is not electronically compatible with PS/2 so even with an adapter your PS/2 mouse may still not work. You need to look for serial/PS/2 compatible mice. sometimes this feature is stated on the mouse, usually it is not. You’re most likely better off just using a serial mouse. The other port is a 25 pin serial.
3) Parallel port, generally this is where you would plug in a printer to interface or a external Zip drive.
4) External SCSI port
5) Video port
6) Midi port
7) Gravis Ultrasound ACE
8) Sound Blaster 16 and joystick port
now to get into the meat of the setup.

1) the PSU or power unit. almost all 486 motherboards are going to have an older style AT power connector so you’re going to need a AT power supply. You don’t need one that’s very powerful 200 watts should suffice. Unfortunately these power units are getting a little hard to come by but on the plus side there is ATX to AT converter cables available for a few dollars. You’re also probably going to have to wire the PSU to the power button on the case unless you bought a case with the PSU already hooked up. this isn’t difficult and it’s just plugging 2 connectors. Mine is 250 Watts which should be enough for a machine of this time.
2) these are the larger 5.25′ drive bays. your almost defiantly going to want a CD-ROM drive installed. A lot of games in the era did have a CD release with enhanced sound and graphics. I’m using a CD-RW drive simply because I didn’t have a regular drive available at the time. these drives work fine for playing CD’s in DOS. there is no need to have a DVD drive since this format did not exist at the time. A DVD drive will also work and should operate just like a CD-ROM drive when installed.
The second drive I have installed is a 1.2MB 5 1/4 inch floppy drive. Almost all games of this era came on 1.44MB 3 1/2 floppies or CD so this drive really isn’t completely necessary but it you have an extra there’s no harm adding it on. It adds compatibility for some older games and also greatly enhances that classic PC look. I’ve also learned recently that there may be a few games that actually had content CUT to fit on a 1.44MB 3 1/2 floppy version. Tongue of the Fat Man is one such game with more content on the 5 1/4 floppy version.
Lastly I have my 500MB IDE hard drive installed in a removable Hard Drive caddy. Usually these caddy’s have a small fan for extra cooling and can be easily pulled out if you need to swap hard drives or your drive fails. I have my boot drive installed here and my games installed on my secondary hard drive. This way if my main drive fails I can easily swap in a new one.
3) The 2 3 1/2″ bays I have installed a IDE 500MB hard drive and a 1.44 MB 3 1/2″ floppy drive. a larger hard drive will work fine but as stated in earlier “Anatomy of” articles DOS only sees about 500MB without using partitions or tricks. the 1.44MB floppy drive is a must since many games were released on this format.
Under the 1.44mb drive I have my 100MB SCSI Zip drive. The SCSI variant is defiantly a little rarer and harder to find then the IDE based drives but i have noticed its a little faster, uses a smaller floppy type power connector and does not take up a space on my IDE chain since IDE only supports 2 devices per cable and SCSI can support over seven. It did take me a little time to hunt one down.
Finally under the Zip drive I have my secondary 1.4GB SCSI hard drive for my games.
4) The motherboard or MB. You’re really going to want a socket 3 motherboard to support the later 486 CPU’s. There all going to come with several 16 bit ISA slots but I highly recommend you find one that also has 1 or 2 VLB slots. you can look up this slot type on Wikipedia for more detail but they are longer connector slots usually a light brown in color. they were prevalent in the late 486 era and are faster at transferring information then the older ISA slots, roughly equivalent in speed to the later PCI type slot. PCI was still having the bugs worked out of it at this point so I don’t recommend a 486 board with PCI slots. My board has 2 VLB slots which is about the standard number. also make sure to note the MB type and do some research. MB’s of this era usually required jumper switches to change settings for things like CPU types and speed. fortunately though most 486 era MB’s do have the IDE and floppy connectors built in. I’m using a UM 486V AIO motherboard. It’s okay and serves the purpose though there are others out there that support more RAM and have more slots. mine has 256k cache as well as 2 VLB slots and 4 16 bit ISA slots.
Take note of the cache slots when buying a motherboard of this era as well. cache is very fast memory that the CPU makes use of. it is much faster then your standard system RAM and at the time was much more expensive so there were issues at the time with motherboards coming with empty cache sockets or even worse fake cache. L1 cache is located on the CPU itself but in the 486 days the L2 cache was on the motherboard. your board will operate with no L2 cache but it will take a stability as well as performance hit. My board can handle up to 256k of L2 cache which is plenty for the time period. You really want between 128k and 256k L2 cache. Some boards offer 512k or on high end boards 1mb but after 256k you really start to notice diminishing results so its not really necessary.

5) RAM. Most if not all of these era motherboards are going to use old 30 pin ram simms. there a little hard to find but not terribly expensive online. the MB I am using has 32MB which is also the most allowed, high end 486 MB’s could allow up to 64MB using 16MB simms. 32MB and defiantly 64MB is complete overkill for the era of gaming we are making this PC for. The majority of games from the time will happily run smoothly on as little as 8MB RAM. also make sure you research the RAM your MB needs, all 30 pin RAM is not the same and some boards are very picky on only accepting high or low density ram or things like EDO. for instance. most old PC’s use parity 9 chip ram in 30 pin simms. If the ram simm has 8 chips its non-parity and for a MAC. some MB’s you can adjust a setting in BIOS to allow the use of 8 chip RAM but many do not so make sure your using the correct type of RAM.
6) CPU. The CPU I suggest and perhaps the all time classic 486 is the Intel 486DX2 66mhz CPU. I know there are several 486 CPU’s that were faster but the 66mhtz is without a doubt one of the most widespread and reliable of the time. The 66mhtz was very widely used by DOS games and also gets along well with the VLB ports. make sure to couple the CPU with a heatsink/fan combo to extend the life of your system.
 (image taken from Wikipedia as public domain)
7) serial port bracket and parallel port bracket. A lot of these older boards only have the keyboard connector built in so your going to need a diagram of your board (commonly available on-line if you know your MB type) and a bracket with the serial ports/parallel port and cable. If your lucky these will come with the 486 MB. You’re going to need the 9-pin male serial port for your mouse.
8) battery. The CMOS battery saves your BIOS settings. without it your going to be constantly configuring your drives and HDD on startup. 486 boards use a variety of battery’s from battery chips to barrel nickle-cadnium battery’s to lithium batteries on the higher end MB’s. My MB was very weird in the fact that the only battery connection available was a 4 pin external battery. these look like little bricks with a wire coming off and a connector on the end. they can go average for about $14. they usually have a side with adhesive so you can stick it to the side or inside case. I simply allow mine to dangle out the back.

9) SCSI card. I’m using a BusLogic BT-445S VLB SCSI card to handle any SCSI devices I use on this machine. SCSI or Small Computer System Interface is the alternative to IDE. In general its considered a little faster and more reliable then IDE but can be a headache to set up at times and the devices can be harder to find and costlier then IDE equivalents that’s why I like to use it in addition to my IDE. On my setup I have my secondary hard drive running on the SCSI bus. It is a newer 7200 RPM IBM SCSI hard drive detected as 1.4GB capacity. I primarily use this drive for my games. Another benefit of SCSI is that its not as size limited due to BIOS issues as drives connected to the IDE bus. You can also connect tape drives and CD-Rom drives to the SCSI bus and there is also an external connection. I believe I can connect up to 7 devices on this particular card. I originally had an Adaptec VLB card but it had a faulty BIOS chip so I switched over to this SiiG card which has worked well but was a sort of “bare bones” controller. I finally settled on the BusLogic card since it was a fair price and feature rich. Try to get a card that has features such as asynchronous transfer, large drive capability, DMA and bus mastering as these features will speed up your HDD access. Take note though if your using as later 486 motherboard and have your ram set to “write-back” you’re almost assuredly going to have bus conflict issues when adding a vlb SCSI device. As far as I know there’s no way around it. Its either write back RAM or the VLB SCSI but using a ISA SCSI card should work fine though it will be slower. Adding a SCSI card is completely optional but I think it improves your device options and ups the “coolness” factor.

10) graphics card. There are many options available for graphics cards in this era. since 3D accelerations is really not a consideration for this era we need an excellent 2D card. since our board should have at least 1 VLB slot we should focus on a VLB card. as I said before PCI was still having the bugs worked out of it at this point so I don’t recommend a 486 board with PCI cards. Previously I was running a Diamond Speedster Pro VLB card with 1MB of onboard RAM. 1MB for the most part is all the video RAM you need. there are some reported issues with sound interference or crackling when using a Speedster Pro VLB with a Sound Blaster 16 but the number of games is limited and I have never personally come across this issue. If you must have the top of the line though and the current card I am using hunt down a Tseng Labs ET4000 VLB card. It’s widely regarded as the fastest VLB card. Mine came with 1MB of RAM but I added more to make a 2MB card. Buying the RAM individually can be a little pricey so look for an old cheap Trident card and harvest its RAM, just be careful which way you inset it. These cards can be a little pricy but they are very compatible and very fast.

11) Midi card. The midi card I currently have installed is a Roland mpu-401-T. I use this card to run all my external Midi devices such as the MT-32. Prior to this card I used my Sound Blaster 16 to control my midi devices but That setup was prone to games not working because they required a true midi interface card or they fell victim to the dreaded “hanging midi note” bug that effects midi modules connected via sound blaster midi ports. These are 8 bit ISA cards but work just fine in a 486 16 bit slot. keep in mind there are several versions of the card and mine is the 401-T version. You will also require a “midi breakout box” to interface with your external modules. make sure your box is the same as the ISA card your using or it will not work. They are wired differently and I found that out the hard way.


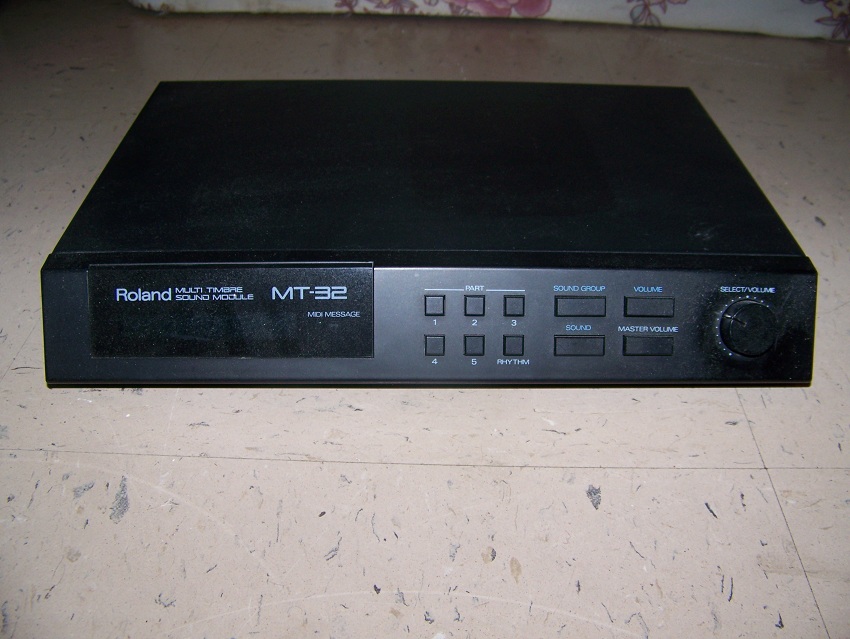
Connected to my breakout box and Midi interface card is my Roland MT-32 module. The MT-32 sound module really deserves an article of its own on its features and how to set one up so I’m just going to briefly go over it here. There is a revision of this module that’s almost identical except for a rear headphone jack and internal updates. There are a small number of games that work incorrectly with the old version but correctly on the new version and a small number that work incorrectly with the new revision but correctly on the old one so the ultimate setup would include both modules. there is also an internal version the LAPC-I that I believe is based on the old module. Basically this was the Cadillac of sound devises and was capable of sound quality far ahead of the cards available at the time. A lot of games support the MT-32 standard and most sound brilliant for music. I urge you to go on YouTube and look up “MT-32” comparison videos and hear for yourself the difference. For maximum compatibility I have my MT-32 paired with the SB16. To avoid conflict my SB16’s midi port is set to port 300 and my midi card is set to port 330 which is the default port that most games look for. The MT-32 handles music when the option is available and the SB16 the digital sound effects. Many games will allow for the SB16 to be used for sound effects while the MT-32 handles the in-game music.
Another indispensable midi module would be a Roland Sound Canvas SC-55 or SC-55 MKII. These modules support general midi and Roland midi which many later DOS games support. These games may support general midi but NOT MT-32. Th SC-55 can also emulate the MT-32 but may not sound perfect compared to a actual MT-32. The earlier SC-55 is said to be slightly more compatible with older DOS games while the SC-55 MKII may perform better with a few late DOS titles.

12) Gravis Ultrasound ACE. The Gravis Ultrasound was a competitor to the sound Blaster. Although it wasn’t as widely supported as the SB it was still supported in a variety of games and offered much higher quality sound and at times even improved game performance. The card I’m using is the ACE which is a stripped down version of the regular card. I’m using this card because Sound Blaster emulation on a Gravis was not very good and the ACE was designed to work in a machine alongside a Sound Blaster. Unlike regular cards you can disable the adlib emulation on an ACE and with the Ultrasound initialization program v. 2.26a available here, you can also disable the game port option so you have no conflicts with the Sound Blaster.

13) Sound card. I’m using a later model Sound Blaster 16 Vibra ISA card for FM sound and digital effects. The Sound Blaster 16 or SB16 is really a no brainier for this era in PC gaming. It is backwards compatible with the Adlib standard and almost every game of the period supported Sound Blaster sound. They are fairly cheap and easy to find giving the best compatibility and performance for the early to mid 90’s era. There are more capable cards like the AWE series or the Gravis Ultrasound but I feel you sacrifice compatibility and these cards are better suited for faster Pentium based PC’s.
Also a strong argument can be made to use a earlier 8-bit Sound Blaster Pro or sound blaster. The Sound Blaster 16 is NOT fully compatible with the sound blaster and older software often sound better on it. with the exception of perhaps the Vibra model SB16 cards the Sound Blaster pro has a lower sound to nose ratio. keep in mind that the sound blasters before the SB16 do not have midi ports compatible with the MPU-401 standard meaning you cannot use them to hook up external midi modules. I have recently debated replacing my sound blaster 16 with a older sound blaster but since I have some older PC’s that I can use for that purpose I’ll stick with the good all around Sound Blaster16 card.

The SB16 model I am using is the CT2900. it uses the VIBRA chip but also has the Yamaha OPL FM chip. try to use a SB with the OPL FM chip as many later models lack this chip. and without it some sounds that use FM end up sounding off. If your observant you’ll notice in the full picture of the open 486 above the sound card is different, shortly after taking that picture I found the better model CT2900. the model I was using prior lacked the Yamaha OPL chip.
14) MPEG decoder card. (not pictured above) This is the newest edition to my 486 and thus not in the motherboard images above. It is a 16 bit ISA RealMagic MPEG decoder card. This card allows a 386 or 486 CPU machine to decode MPEG video which otherwise would be to taxing to the CPU. I plan to use this card for playing RealMagic enhanced games. admittedly the games that support these cards are few and rare and have to be a special version supporting the card. I believe there are RealMagic enhanced versions of Dragons Lair, Space Ace, Return to ZORK and The Horde as well as possibly a few others. Using the card allows for smoother and better looking full motion video scenes as well as possibly other effects.


There are cards that connect via a external passthrough such as this card and others that connect directly to your video card via a VESA connector cable internally. The VESA connector cards tend to produce a better image quality but are less compatible then the passthrough cable cards.

For a joystick I’m using the Microsoft Sidewinder 3d pro. this joystick is a duel digital/analog joystick that works in DOS as well as Windows 95 and has a little switch underneath the base to choose modes. I previously was using a Seitek joystick which although was very compatible was very stiff and not so much fun to use. So far the sidewinder has been a great joystick and tends to do the job quite well in whatever flight/flight shooter I throw at it in DOS. Not the best when compared to some Thrustmaster flight controllers but I think it makes an excellent all around stick.

For games where I would rather use a more conventional gamepad rather then a joystick I go with the Gravis Gamepad. Its comfortable and compatible. The joystick bar can be unscrewed if desired and they can be found cheap at thrift stores, commonly under $5.
I run DOS 6.22 on my 486 PC and use no navigators or Windows 3.1. A navigator shouldn’t cause any issues but I’m aware of a small number of games that Windows 3.1 may cause compatibility issues with. All in all the 486 based DOS PC is going to be a little more expensive and require a little more effort to put together than a Pentium based one, perhaps $50 to $100 unless you can find one cheap on Craigslist or a yard sale. In my opinion its worth it as it gives you access to a vast collection of excellent early 90’s games without having to worry about CPU speed issues as well as the satisfaction of gaming on an all time classic PC setup.
Things I still need to add to this setup
*add more external sound modules (Roland cm-32,)
Here’s some older images of this machine playing some games.


article updated 10/30/2015
A lot of people are intimidated by DOS. I was one of those people, I grew up with a commodore 64 and a Amiga in the household so by the time I had a PC it was well into the Windows 95 era. Hopefully this article will help dispel a few myths about the difficulty of setting up a DOS based PC. I am also aware of DOSBOX which is a DOS emulator for use on windows machines and although sometimes emulation is a great way to play games that otherwise may be unavailable it’s still my opinion that it’s no replacement for the feel and nuances of the real deal, even with the latest versions of most emulators I still sometimes find errors in speed and sound. but to each his own I suppose. I’ve created a quick reference page for various PC slot and port types if needed
The easiest, cheapest and all around most compatible DOS PC to put together in my opinion is an early Pentium based system. The one I have assembled uses slightly more expensive parts in an attempt to create an “ultimate” Pentium based DOS machine and perfect for more late era DOS games from the mid 90’s. Usually you can find these older PC’s for cheap at flea markets or yard sales. I found mine for $5. usually they come with windows 95 but that can easily be formatted and replaced with DOS.

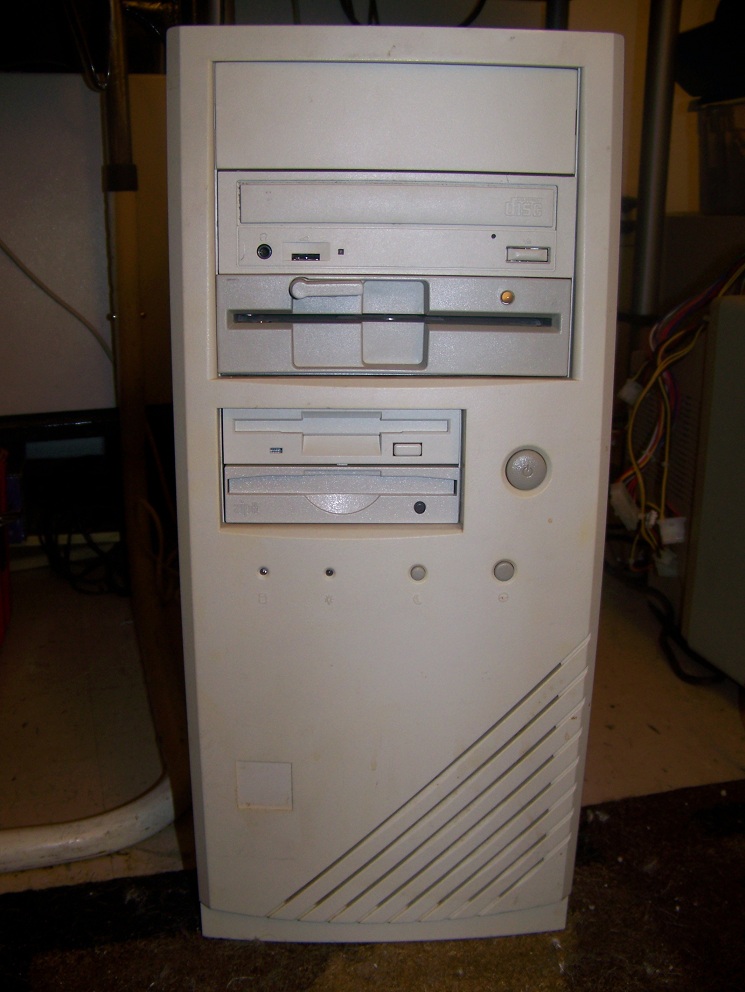
this is a typical mid to late 90’s PC case. they loved off white and beige back then. Has your standard power button, reset button and sleep mode button.

Here’s a rundown of the parts inside. You’ll most likely have these (of some sort) if you picked your PC up at a sale.
1) motherboard, this determines the connectors, CPU’s allowed, max ram and all that good stuff. Mine is a socket 7 board which supports a range of Pentium 1 and AMD CPU’s. You also want to have at least 1 ISA slot (you can easily look up slot types on Google or Wikipedia) since DOS loves ISA slots for sound. My board here has 1 AGP slot 4 PCI slots and 2 ISA slots so its great for my needs. The one I’m using here is a PA-2013 which from what I’ve read is one of the faster socket 7 motherboard produced. It also comes with a massive 2mb of onboard L2 cache memory.

2) power unit, my motherboard has a ATX power connector which are very common but some of these early boards may have an AT power connector which are a bit rarer. you can also snag a ATX to AT power adapter off of eBay for a few bucks.
3) standard CD-ROM drive, you can use a DVD drive but there’s not many if any games from the DOS era that use DVD’s
4) 5 1/4 floppy drive. not really needed since this computer is going to be to fast for a lot of really old games and most DOS games from this era came on 3 1/2 floppy disks or CD anyways.
5) 3 1/2 1.44MB floppy drive.
*Not in the image above I recently installed a 100MB Iomega Zip drive in the bay below the 3 1/2 floppy drive. The zip drive runs off the IDE bus just like the CD-ROM drive. My late socket 7 Motherboard can recognize the drive in BIOS but for operation in DOS it requires drivers and is seen as drive F:. The ZIP drive is convenient because I’ve found there are a lot of files that are just to big to fit on a 1.44MB disk but are not worth burning onto a CD so the ZIP drive is a great and convenient middle ground.
6) Hard drive. I believe DOS 6.22 has a limit of 504MB without using partitions or any other tricks though FAT 16 format can read up to 2GB hard drives on one partition. certain BIOSes can support 2GB partitions though in DOS such as the BIOS on this motherboard. That’s still a lot of space since a lot of games and applications from this era are pretty small. larger drives will work no problem but the OS will only see 504MB or 2GB depending on your BIOS. The first drive I have installed is a 10,000 RPM SCSI drive. SCSI drives tend to be faster and more reliable then IDE hard drives but usually harder to find and more expensive. I believe I have a 8.5gig HDD installed though my OS only can “see” 2GB which is more then enough.
7) This is my secondary hard drive or drive D:\ which is connected to the IDE bus. It is slower then my primary SCSI drive and was formally my primary hard drive. I kept it in my machine after upgrading to SCSI as just a backup and extra space.
8) CPU, I have a 200mhz MMX Intel CPU installed. In my opinion it’s a little to fast and I would recommend something more along the lines of 100 or 133mhz CPU. as you go back and play older games your going to hit speed issues with any Pentium class CPU but anything faster than 200-233mhz and you could start seeing more timing and speed issues showing up in even some early 90’s games.
9) RAM, i have a 128MB stick installed. its a bit of an overkill. most games of the era would be more than happy with 64MB or even 32MB and less
10) cheap extra 99 cent slot fan i grabbed in bulk of eBay. not needed but it helps cool and we wont be using the AGP slot (although DOS should still run fine under an AGP card you may not have as much compatibility since newer cards don’t always support older video standards and resolutions)
11) SCSI controller card. You can also go with SCSI if you add a SCSI controller card. Using quality SCSI controller cards and high end SCSI hard drive/CD-rom drives can increase PC performance since SCSI is less taxing on the CPU. It also makes it easy and convenient to add multiple drives in the future via the external SCSI port available via the SCSI card. Using SCSI hard drives can also overcome the HDD size limit sometimes. On later machines like this one the performance boost is less pronounced then it would be on a 486 or lower but the option to add more external drives still makes it worth wild. I installed a PCI Adaptec AHA-2940w/uw card in the machine as well as a 2GB SCSI hard drive to compliment my IDE hard drive. This card is well supported and has both external and internal 68 pin connectors as well as an internal 50 pin connector. I added a 8.5GB SCSI (seen as 2GB) IBM hard drive in this system to compliment the IDE Maxtor 9.5GB just to add more space and to test out the drive. using the speedsys utility my speed rating for the IDE drive is 424.81 while the SCSI drive is rated at 819.85 which is almost twice as fast as the IDE drive. I eventually may just go all SCSI with this setup.

12) graphics card, I’m using a S3 Trio64V2/DX PCI card. These cards are not very expensive, fairly powerful and were widely supported in the late DOS era. There is a very wide variety of graphics cards you can use for this era but in my opinion the Trio64v2/DX is the card for the job. There is supposedly a version of the Trio64V2 that uses faster SDRAM labled as a /GX but I have never run across one. You can also use a ISA graphics card but they are generally slower and not as capable. Some motherboards will come with on-board or built-in graphics chip. Generally these aren’t as powerful as buying an add on card. sometimes just installing a add on card will override the on-board video but sometimes you may need to disable the on-board in BIOS.

*After some debate I decided to upgrade my PCI video card to a S3 Virge/GX like this one in my “Building the best all around DOS computer” article.

It has the same 2d core as this Trio/V2 but also more Ram and the ability to run “accelerated” S3D DOS games like Terminal Velocity. Its a really minor thing and any DOS machine will be fine with a trio but I had an extra Virge on hand and decided what the heck.
Also when using either the Trio or any Virge I discovered a utility called S3VBE20. Do a Google search and it should be findable. Its a TSR DOS program that will update your S3 cards VESA from 1.2 to 2.0. This will help when running some games in SVGA. For example it will allow you to chose from many more resolution options in a game like Quake (though if you can actually run the higher resolution modes at a decent frame rate is another matter).
13) 3DFX Voodoo 1. You can also add a Voodoo 1 3d card to this setup. it is a PCI 3d graphics card that you can install in a slot next to your main 2d card (like the Trio64v2). you will need a short VGA cable to externally connect the Voodoo to whatever 2d graphics card you have installed. there are actually a few DOS games that support the Voodoo 3d accelerator card (Carmaggedon, Extreme Assault, Tomb Raider, Ect…). I use a righteous orchard voodoo 1 card with 4MB of RAM. This card uses a mechanical switch so there is an audible “click” when the voodoo activates for a game which has no practical effect but I like it. I recently added this card to my setup so its not in the numbered internal pic located above.
It should be noted that all but one Voodoo 1 cards have 4MB of RAM. Canopus sold a version of the Voodoo called the Canopus Pure 3d and its the only Voodoo 1 card to use 6MB of RAM as well as a TV out. Good luck finding one though as there pretty rare.

14) sound card. For my sound card setup I went through several options before settling. There really are many ways you can go. For this setup I am currently using a sound blaster/daughterboard combo. The current combo I have installed is a Sound Blaster AWE32 paired with a NEC XR385 For the general midi. The AWE32 is backwards compatible with the Sound Blaster 16. The daughterboard is a NEC XR385 which is a NEC relabeled Yamaha DB50XG. These cards are relatively cheap and when attached to a sound cards wavetable header give General Midi support. The general midi standard of the time was set by Roland but I actually prefer the Yamaha general midi sound for certain games and some even specifically support it (Extreme Assault). The sound is mostly the same as the Roland general midi but In certain games like DOOM I think the Yamaha GM sounds better. My particular model lacks a Yamaha FM chip for accurately playing FM tunes in older games but for the era this PC was created for most games will be using general MIDI or CD audio anyways. There are models of the AWE32 that do have genuine FM chips though if you lack a separate PC for older DOS games where you may want an accurate sounding FM capability. I have 6MB of RAM added to this AWE32 but with the superior GM daughterboard you’ll really never use the cards own midi.
AWE32

AWE32 with NEC XR385 daughterboard attached

Formally I used a Sound Blaster 16 model 2900 paired with NEC XR385 giving me good FM synth and SB16 compatibility. The big issue with this card is the “hanging note” bug that effects almost all SB cards. The degree of the bug varies from card to card but basically it created hanging or stuck notes when used in conjunction with a midi device (either external via the midi port or internal via the waveblaster header). my particular card works pretty well with some games but I get the error with others. Heres a clip taken from DOOM, you can here the hanging note bug as a high pitched “twinkle” sound that should not be there. Listen closely and you can hear it at 0:02, 0:07, 0:13, 0:34, 0:35 and 0:53 in the video here. This card was particularly bad with the “hanging notes” and made games like Daggerfall almost unplayable. After switching to the AWE32 I got the bug far less. In DOOM I’ve only heard it once so far and it hasn’t reared its ugly head in Daggerfall at all yet.
A simple alternative would be to use a Sound Blaster clone card or using two sound cards, one for MIDI and one for digital sound effects. Rather then dealing with installing two cards though I decided I can handle the occasional issue with the AWE32. I did attempt to use a clone card pictured below. It is a Audio Excel card. Unfortunately It failed to install on this computer for unknown reasons. I did manage to install the combo on a separate Pentium DOS PC where it performed fine with no “hanging MIDI” bug. Note though that this card lacks the Yamaha FM synth chip so FM sounds off. There are also reports of some games that just are not compatible or that sound “not right” when running as a Sound Blaster.

Now that all the parts are together there’s a lot to do. You should reformat the hard drive, install DOS (i strongly suggest DOS 6.22) and then install the mouse driver as well as the sound card driver. Most of the motherboards from this mid to late 90’s era should auto detect the hard drive, CD drive and floppy drives. You don’t have to but you may want to replace the CMOS battery. This is a little battery that remembers your settings and the date/time. It’s the same kind of battery they have in a lot of watches but a little bigger. Its cheap and easy to swap out. DOS should be available over the internet if you look hard enough or you can buy a copy online. Sound card drivers should be out there as well. Generally drivers are not required by DOS for graphics cards.

I also use dos navigator 1.51 which can be found for free. it’s a dos navigation program that makes looking around for files in DOS more “windows like” but it should not interfere with DOS compatibility at all. Be aware if its running it does eat some conventional memory.
on to memory. a lot of people have bad memories of running DOS because of frequent memory issues. some games, especially from the late DOS era that our computer is aiming for require large amounts of conventional memory. even when I was a relative newbie to DOS I have to say I ran into very few issues with making conventional memory free. some people say not to run it but if your running DOS 6.22 run the memmaker program and it will optimize your memory. usually that alone gives me almost 600k of free memory. there are a lot of tricks I won’t cover here but just look up how to optimize conventional memory in DOS. load as much as you can into high memory. lean how to manipulate the CONFIG.SYS and AUTOEXEC.BAT files with the EDIT command. one trick to free 1-3kb or more is to change the lastdrive parameters in the CONFIG.SYS file. usually its set to Z but your most likely never going to have that many drives so set it to something more reasonable like H. here is a pretty good but somewhat technical site for optimizing RAM in DOS http://www.mdgx.com/mem6.htm

I achieved 617k conventional memory with very little effort. that’s enough to run just about any game including Elder Scrolls: Arena, a huge mem hog.
I would say with a little looking around a setup close to this would cost less than $50 even less than $20 or free if your lucky and ask around. it’s most likely a little to fast for really old DOS games but offers good overall compatibility and the ability to play demanding late era DOS games at top speeds and visual settings.
Here’s a video I did on this machine.
Here is the sound setup I used prior which was an AWE32 you can listen to compare

*Updated image with the ZIP drive installed and the upper drives slightly rearranged.
Benchmarks
Pentium 200mhz MMX, 128 SDRAM, 1MB L2 cache, 4MB Virge/GX PCI
3dBench – 152.2 FPS
PCPBench – 60.2 FPS
DOOM – 81.54 FPS
Quake – 48.3 FPS
Landmark 2.0 – cpu – 1312 fpu – 3486 video – 24576
the compaq presario 2200 with max 80mb ram and optional subwoofer installed. i replaced the origional faulty CD drive with a black DVD drive. its running windows 95. supposedly only about 300 of these were sold in the US (according to wikipedia). i do like the built in speakers and form factor but its no wonder these things didn’t sell well since there are virtually no upgrade paths to take with it. even updating from windows 95 to 98 causes the system to go crazy and display gibberish.


Pretty standard ports on the rear. modem jack(s), headphone and microphone jack. joystick/midi port, VGA port. two PS/2 ports for mouse and keyboard. printer and serial port. The spot between the VGA port and the PS/2 ports was supposedly going to be for a USB port but that never materialized.

1) speaker/subwoofer
2) 56k modem
3) cryix 6×86 180mhz media cpu (not upgradeable)
4) dvd drive and under it is the HDD
5) 3.5 floppy disk drive
6) power supply
7) 80MB ram (80mb max)
basicly the only thing upgradable on this PC is the modem which can be upgraded to a 56K modem. no ethernet though and no ability to add any sound or video cards.
to replace the cd drive or hard drive you need to unscrew a screw to the left and right of the where the hard drive is located and disconnect the speakers, floppy and the hdd and cd drive then the entire computer splits apart into 2 pieces

here’s an example of what happens if you simply attempt to upgrade the OS to windows 98, oh did i mention it beeps like crazy the entire time. the most common way around this issue is to open the PC and remove the hard drive. install the hard drive into another NON presario 2200 pc and then install windows 98. remove the hard drive and then reinstall it into the 2200 and voila! but really, should that kind of thing be necessary. Now I believe you can upgrade to other later OS’s such as XP or ME but I suppose if you had this computer at the time that didn’t help. I’m guessing those later OS’s would also run painfully slow on this computer.
also apparently some clever (or lucky) people discovered that if you press some strange random keys as the gibberish is displayed you can get to a menu. choose the second from the bottom option and installation should start…i suppose that makes it somewhat better. if you manage to get windows 98se on this computer congratulations!
bottom line: should you have this computer, NO. unless you collect computers and you can snag it for free or a very low price your money can be spent on better more useful things. despite its rarity it’s not a prized piece to have. On a practical level it’s even worse and doesn’t even make a half decent windows 9x machine. For early windows OS’s you MUCH better off with almost any other machine. Even though the built in speakers are kinda nice just don’t bother.
I picked up the Tandy 1000EX system in great condition with the boxes. I still like my Tandy 1000 SX better but at least this model has a volume control for the internal speaker. It also came with the 640k RAM expansion and a modem, I never use modems in these old computers though. The main attraction to the Tandy series of computers is their almost perfect IBM compatibility but also with the improvements introduced with IBM’s PCjr such as Tandy Graphics and improved sound.

A place for the pc collector
Probabilmente il miglior blog bilingue al mondo*
Game-related ramblings.
My Gaming Timeline
Lynn talks about video games, records and books ...
Sharing My Retro Video Game Collection.
Random electronics and gaming crap
Chronogaming project featuring reviews, screenshots, and videos of the entire Super Nintendo library in release order.
Random mutterings on retro computing, music, plus radio controlled scale modelling.
Work(s) in Progress!
1001 video games and beyond
retro computers and stuff
Stay Jispy!
