Skip navigation

Tag Archives: macintosh

In today’s article, we will look at the quintessential Macintosh II, the Mac IIci. The Macintosh IIci went on sale in 1989, well after the original Mac II was introduced in 1987. There were also several models introduced after the IIci, some faster, though overall the IIci may be the best all-around model of the line.

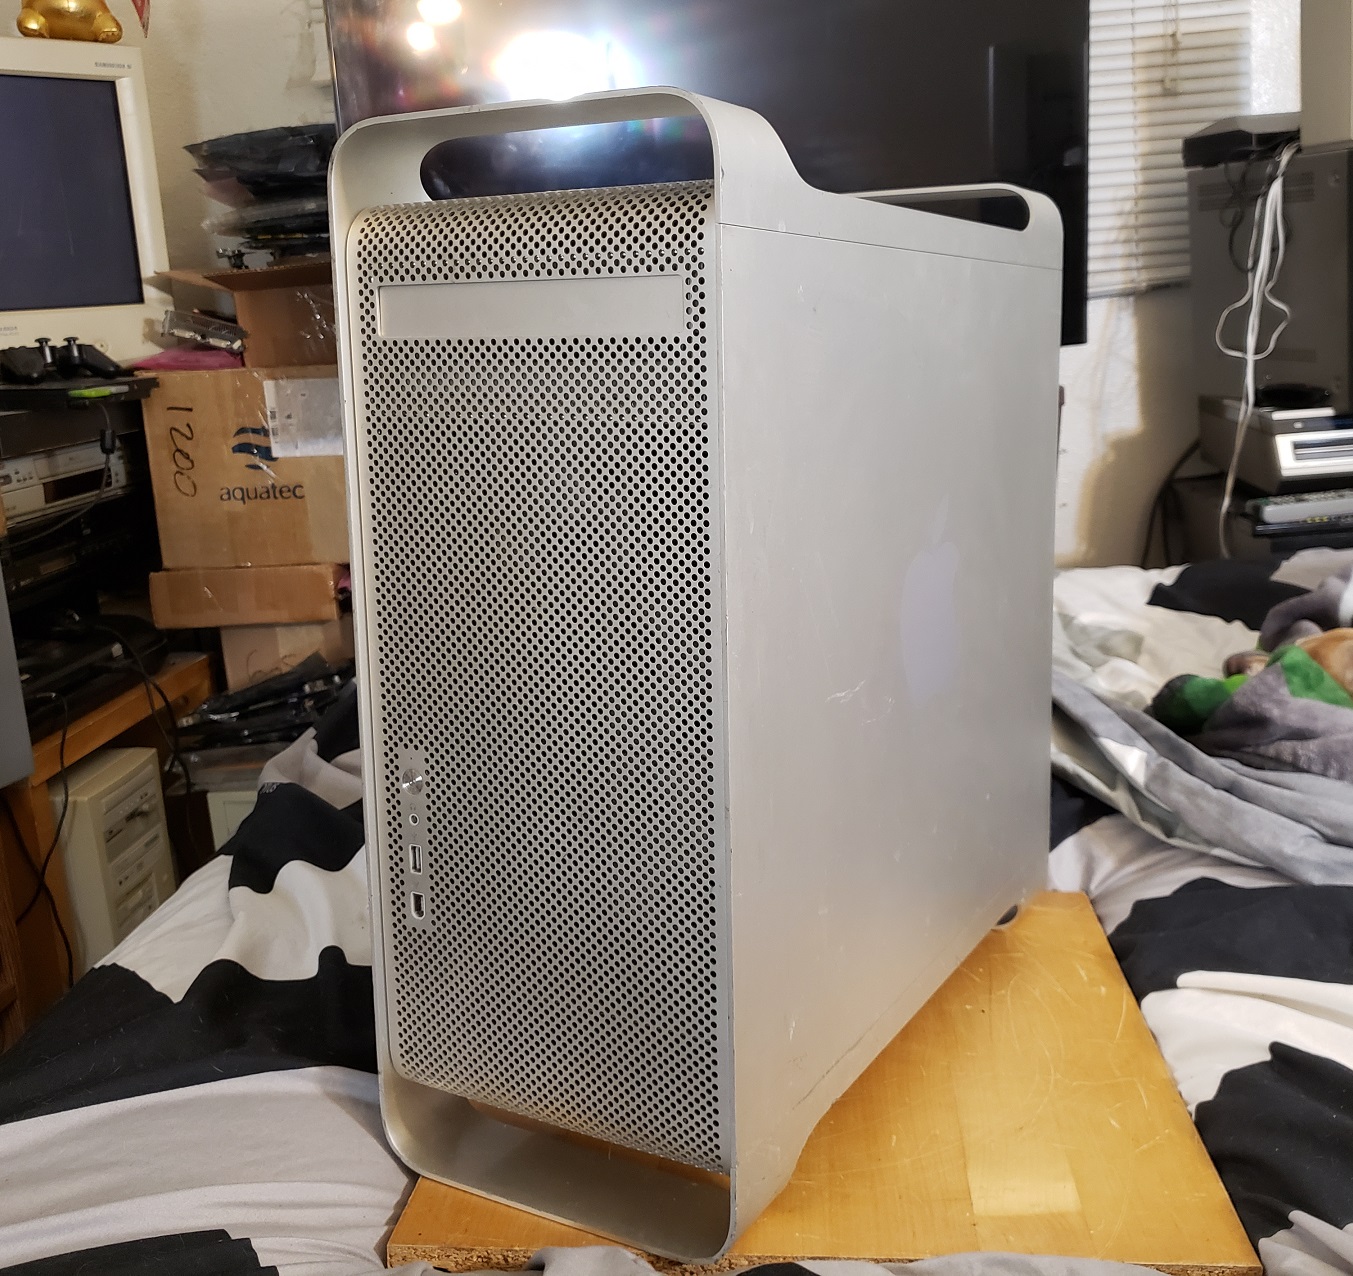
The IIci as seen above came in a compact yet expandable desktop form factor which could also be turned on its side and used as a tower if needed. The four small rubber “feet” can also be relocated to the side if the user wants to orient the IIci vertically.

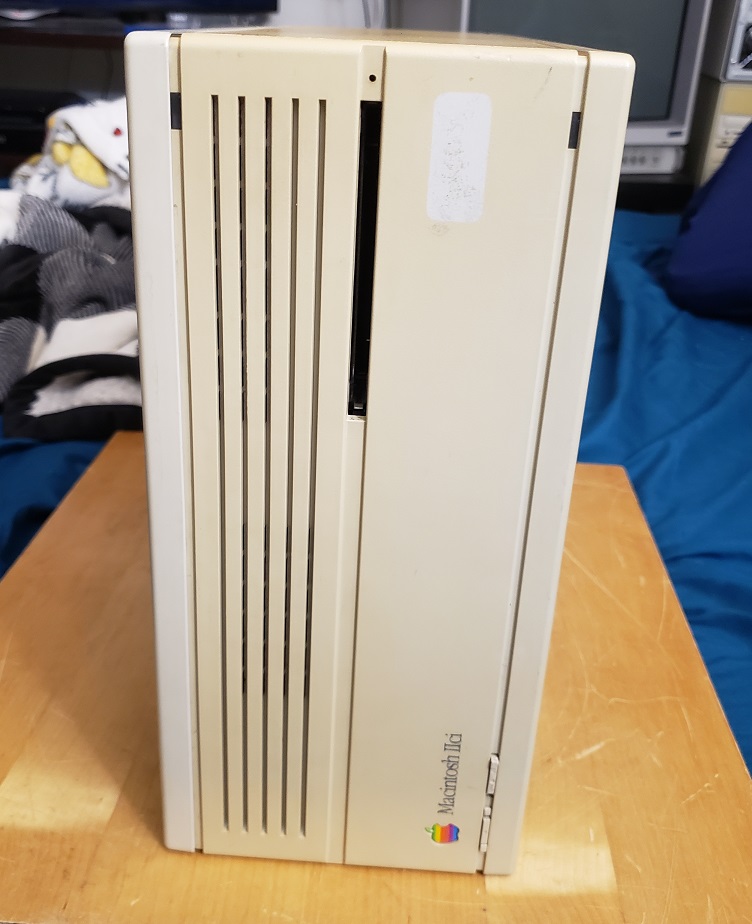
The case for the IIci used Apple’s “snow white” case design. As you can see, mine, unfortunately, is quite yellowed, except for one rectangle on the front where previously a sticker was placed. This case uses a “toolless” design as well so with few exceptions this case can be opened and disassembled without a screwdriver due to the use of plastic tabs. Thankfully unlike some models, these cases have held up fairly well though caution is still advised when opening.

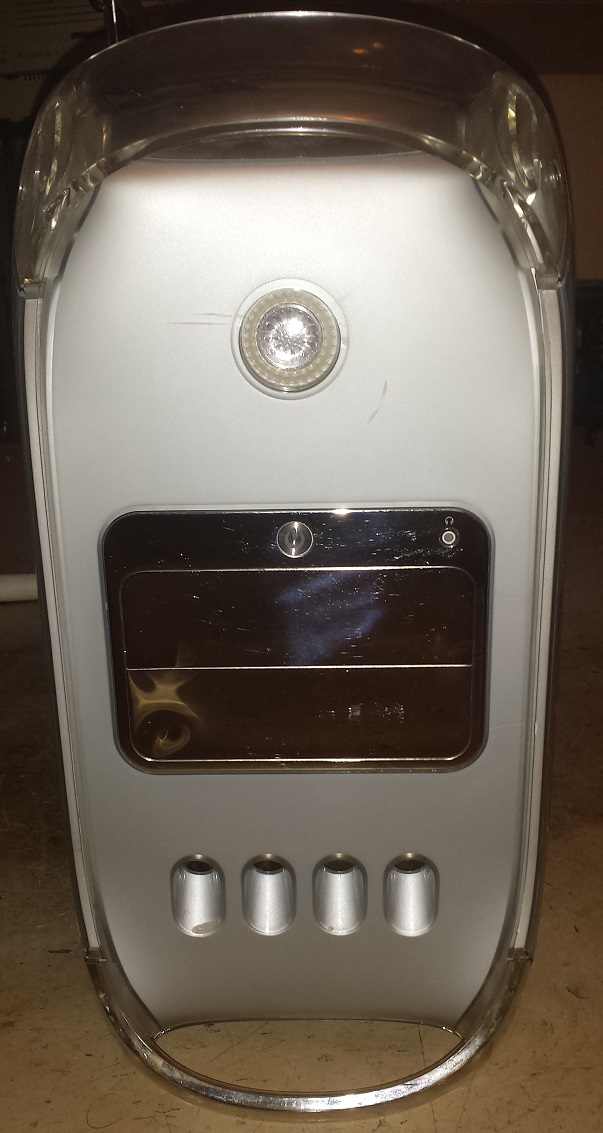
The two buttons in the lower left-hand corner are reset and the interrupt switches. On the right side of the case, we have a single 1.44MB floppy drive and two LED indicator lights. The top right is for HDD activity and the bottom right LED is the power indicator light.

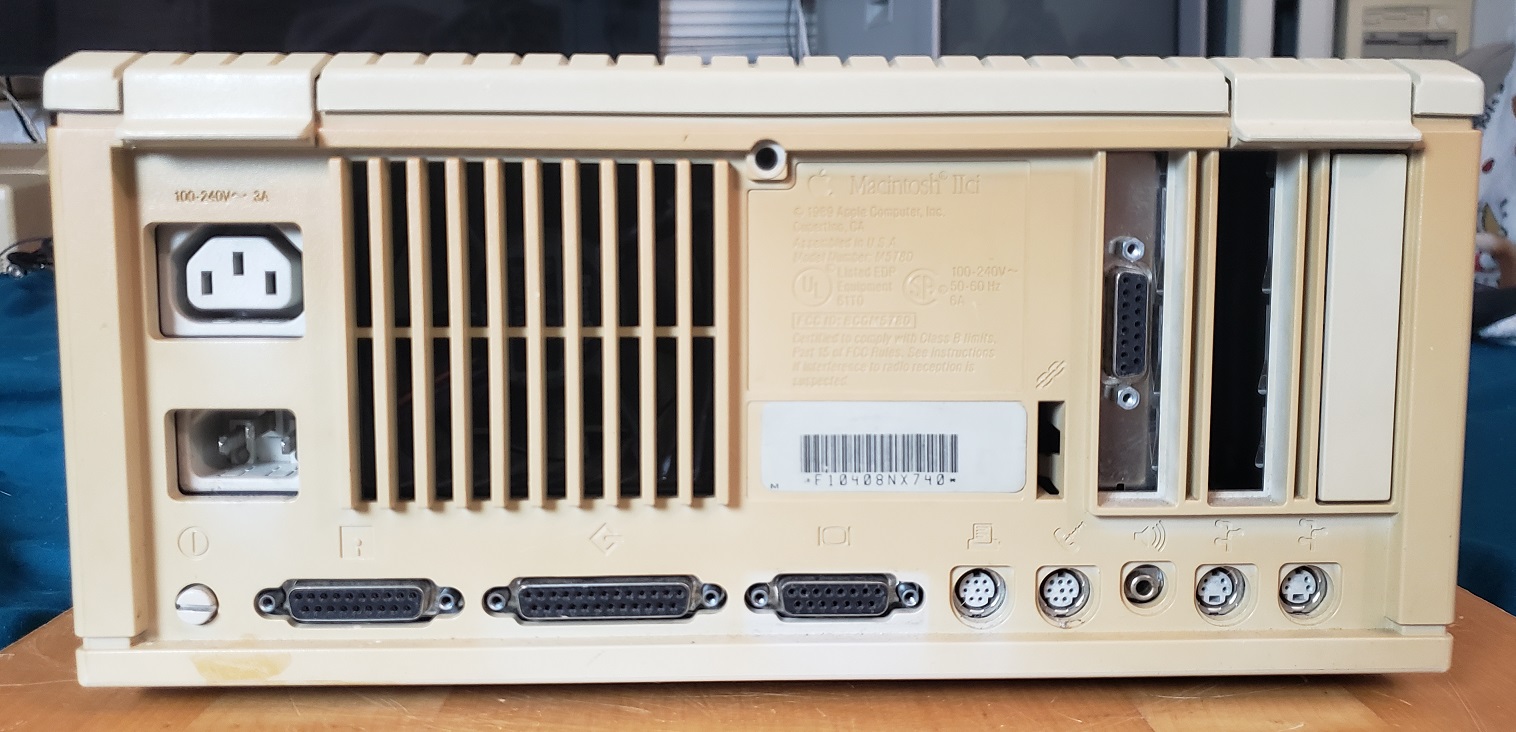
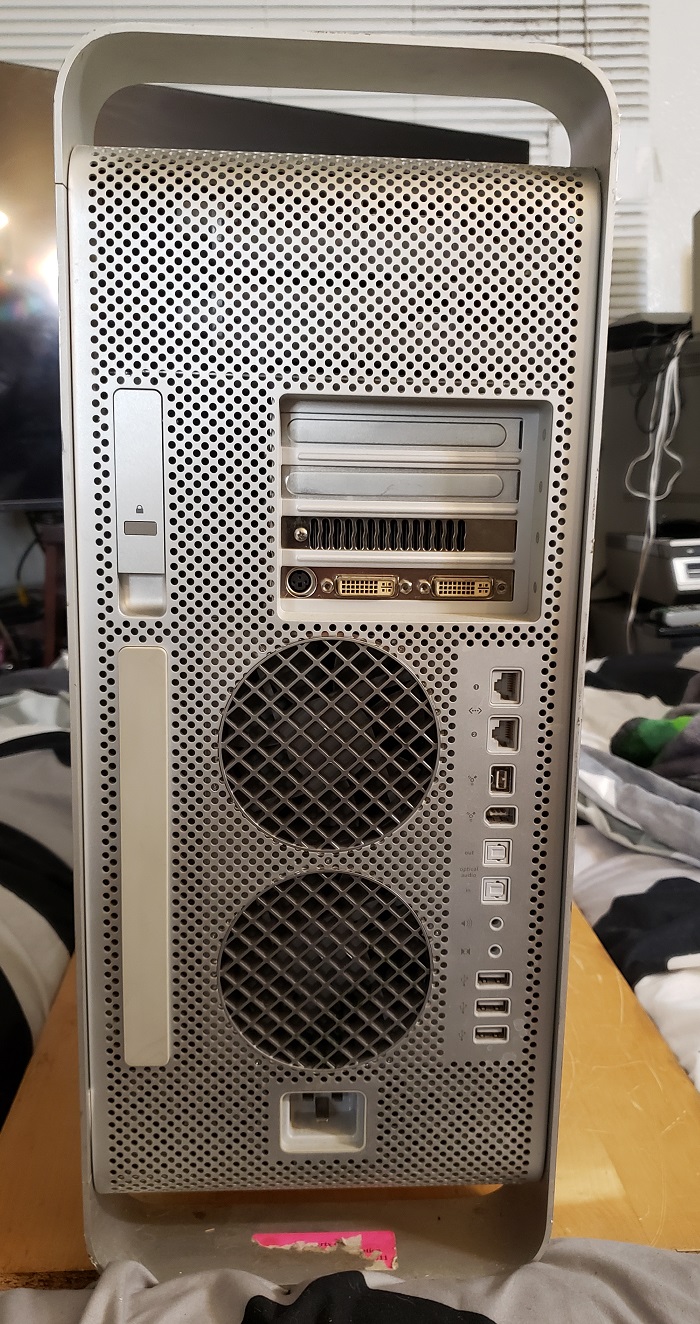
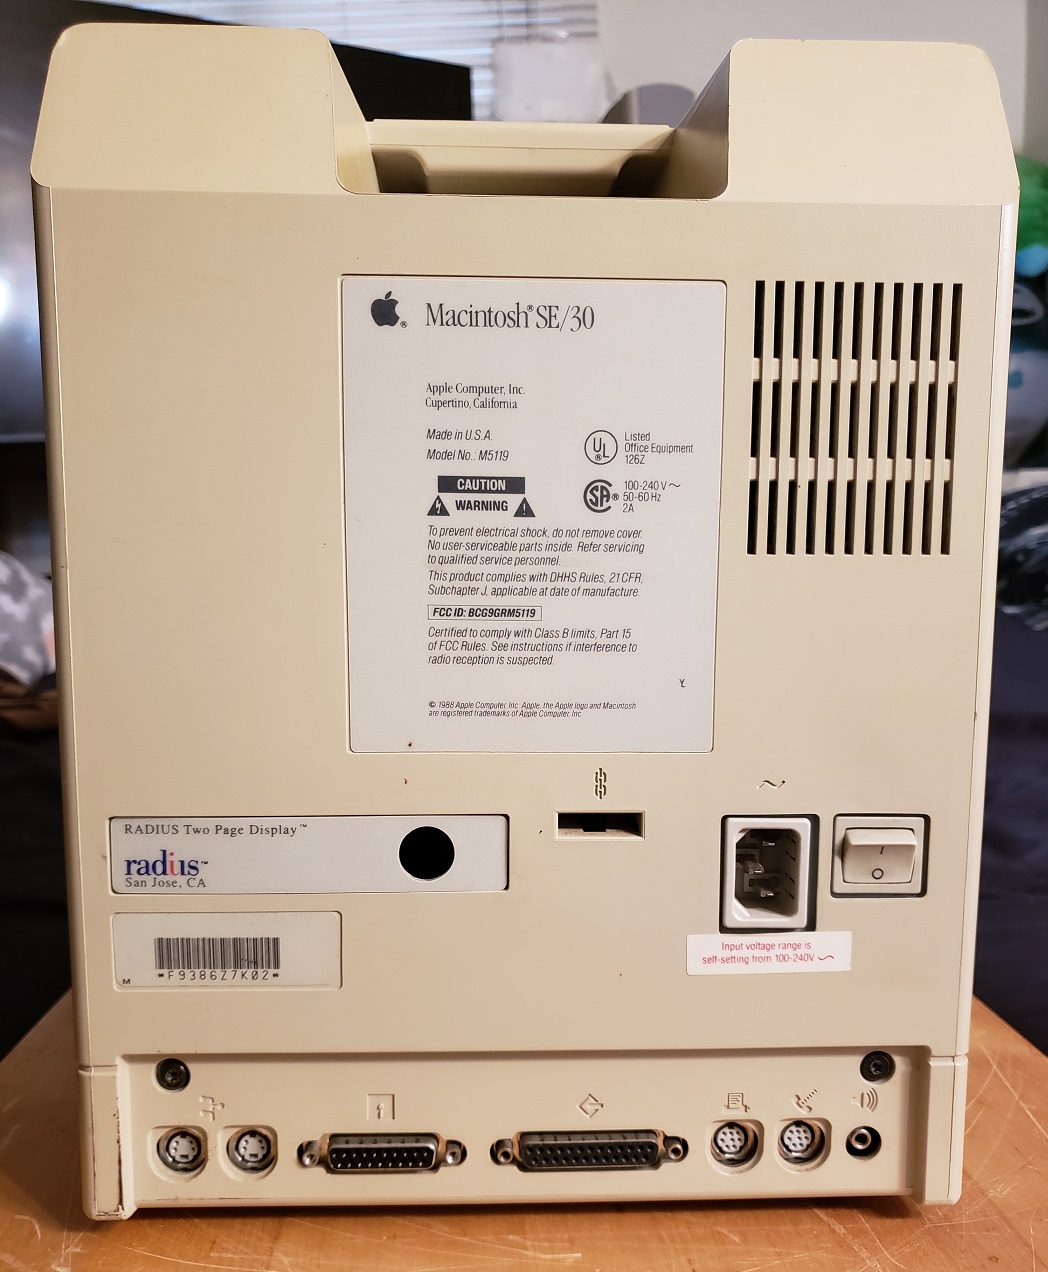
On the rear of the case if you look at the top you can see the two plastic tabs that latch the cover of the case on. On the far left we have a standard three-prong power connector as well as a power inlet above this for connecting a monitor.

Starting from the lower left side we have a power button though the IIci can also be soft powered on via a keyboard power-on key. The power button can also be depressed and turned with a screwdriver to lock it in the power-on position. to the right of this, we have an external floppy drive connector, a SCSI connector for connecting external devices such as hard drives or CD-ROM drives, etc. Next is the video port for the built-in video. The on-board video for the IIci uses a shared framebuffer meaning that the video does use a small amount (about 320k) of system memory from the first RAM bank, which can affect performance negatively under certain situations. Next are the printer and modem ports followed by a 1/8 audio jack for connecting external speakers and last we have two ADB ports for connecting things like a keyboard and mouse.

Next, let’s take the lid off and take a look inside.

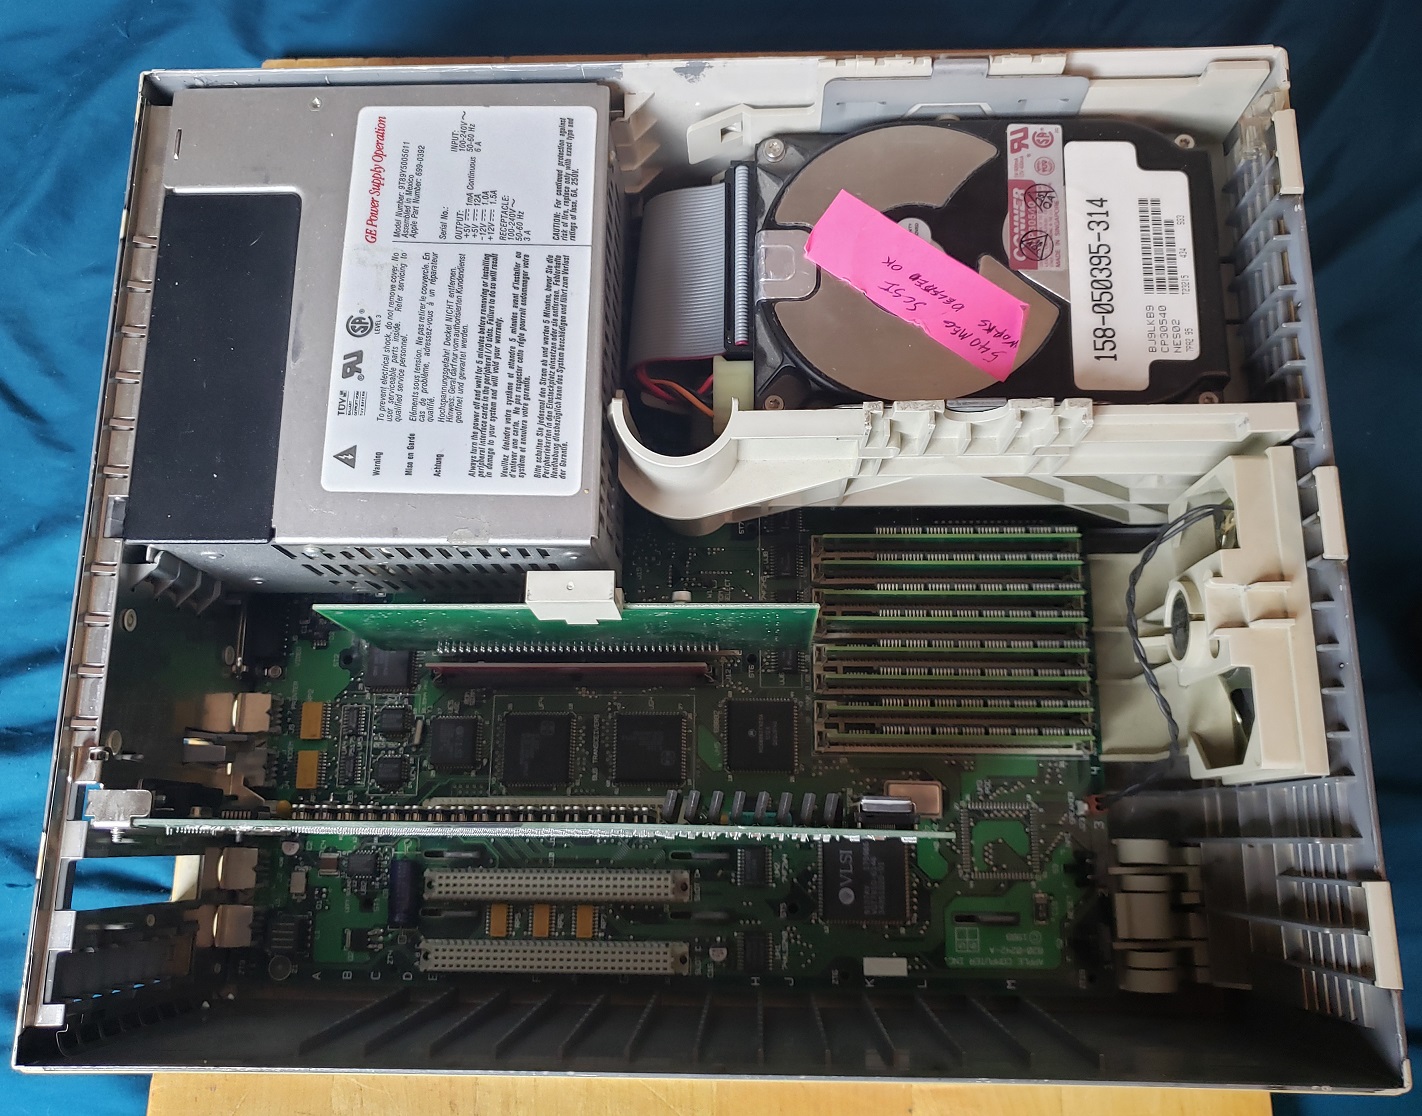
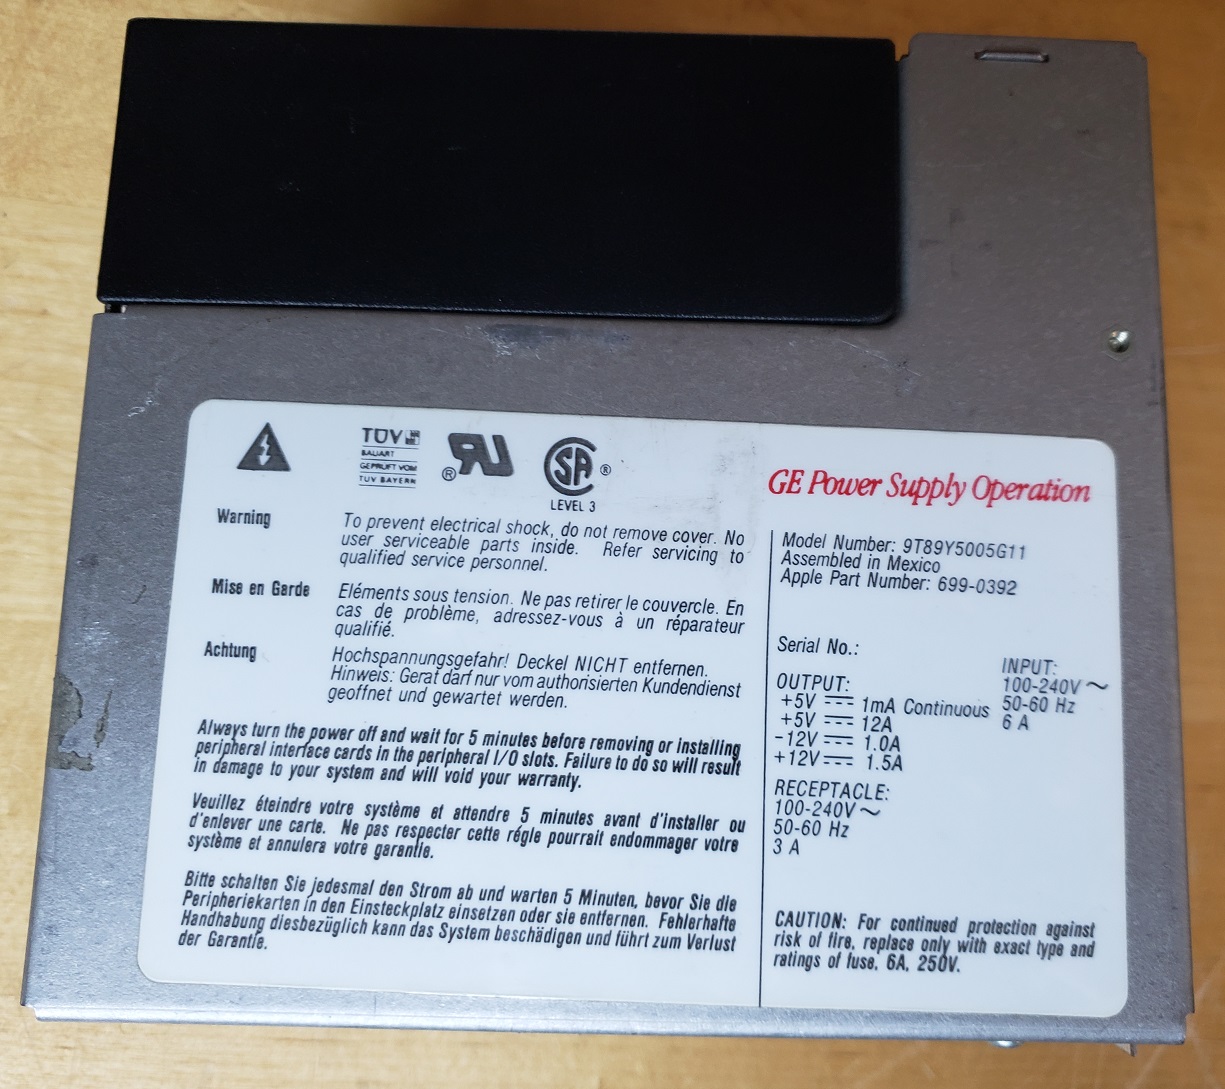
we can start in the upper right-hand corner with the power supply.

Depending on the maker of the PSU the reliability can vary. Most Macintoshs I’ve come across from this era are either dead from leaked capacitors or dead power supplies. The GE power supply in this Macintosh IIci is still functional.

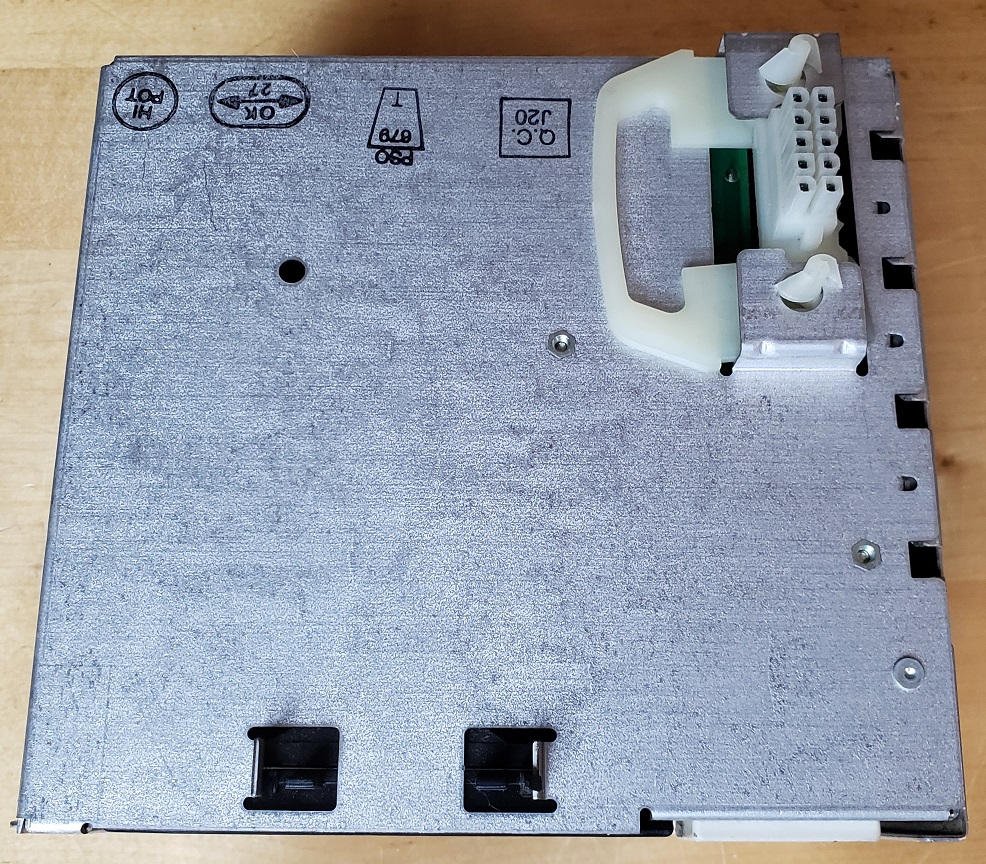
These power supplies connect directly to the motherboard underneath and basically sit on the connector.

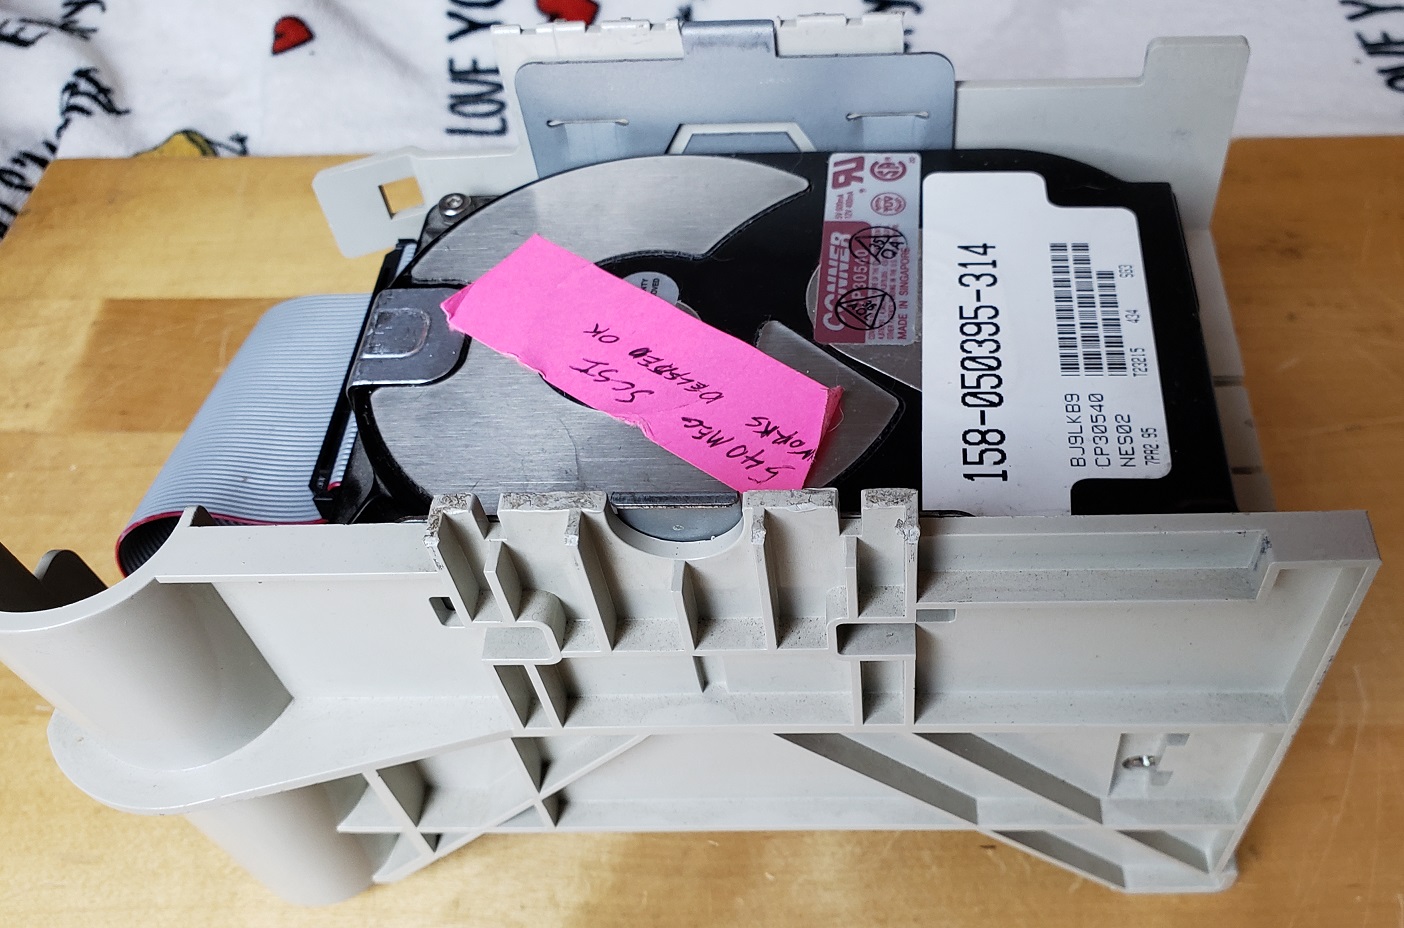
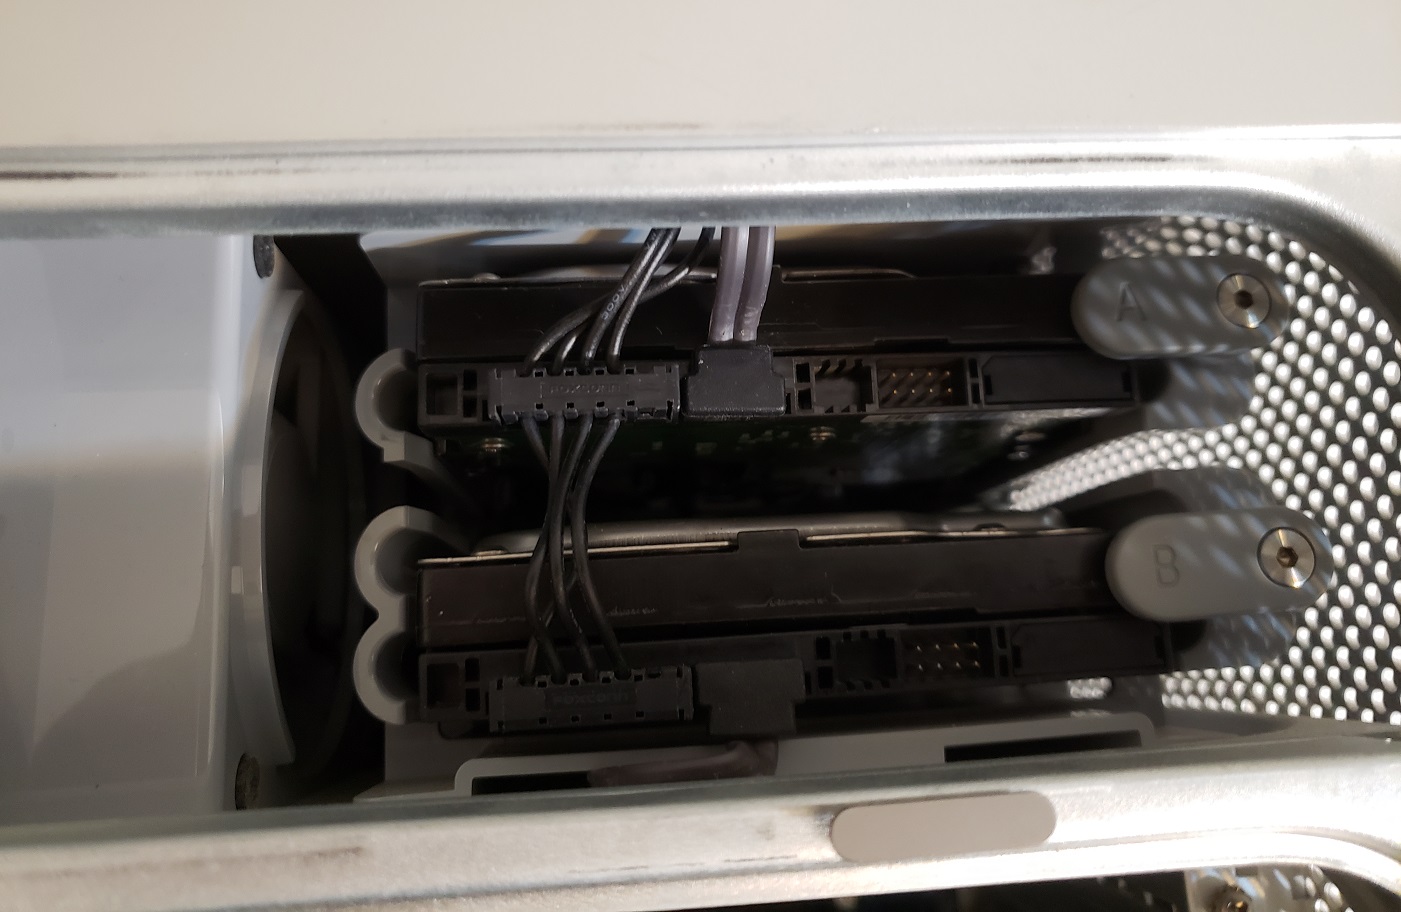
At first, I installed this rather chunky 540MB SCSI hard drive which although mechanical like the stock drives you would have found on this Mac, was much larger than their 40MB and 80MB size.

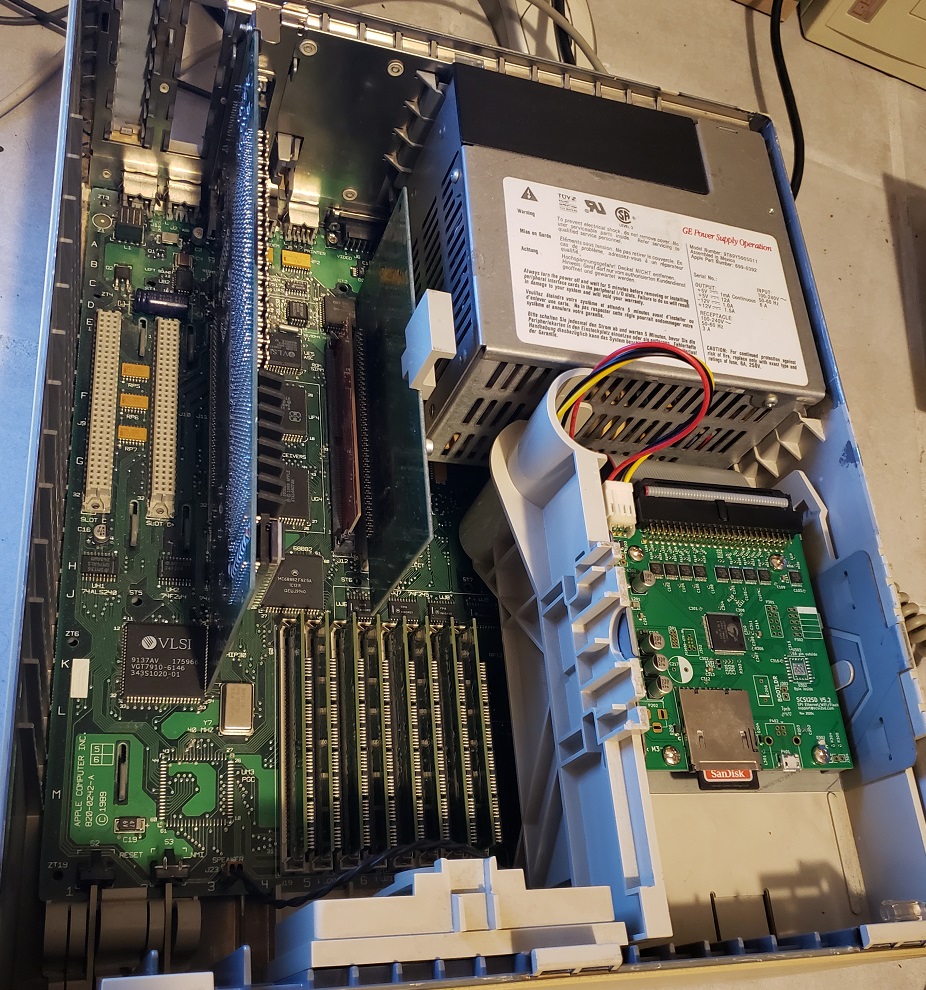
I eventually did decide to remove the older 540MB drive for a whopping 2GB SD2SCSI solution as you can see above.

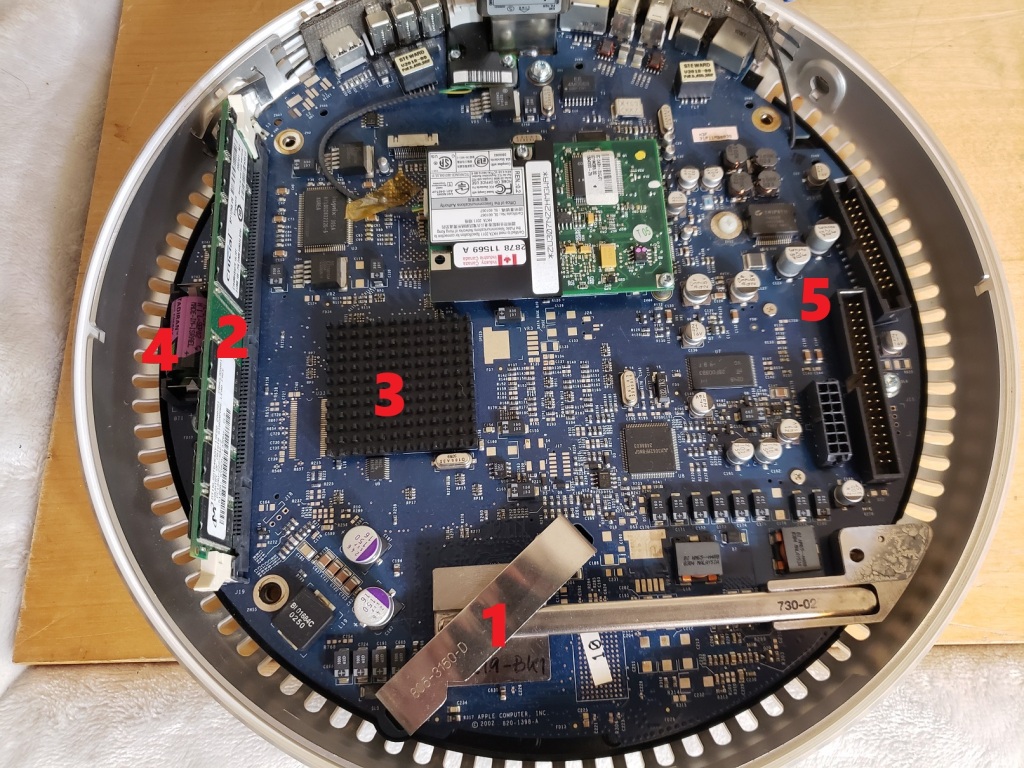
Let’s take a look at the motherboard before we check out the lone expansion card I have installed.

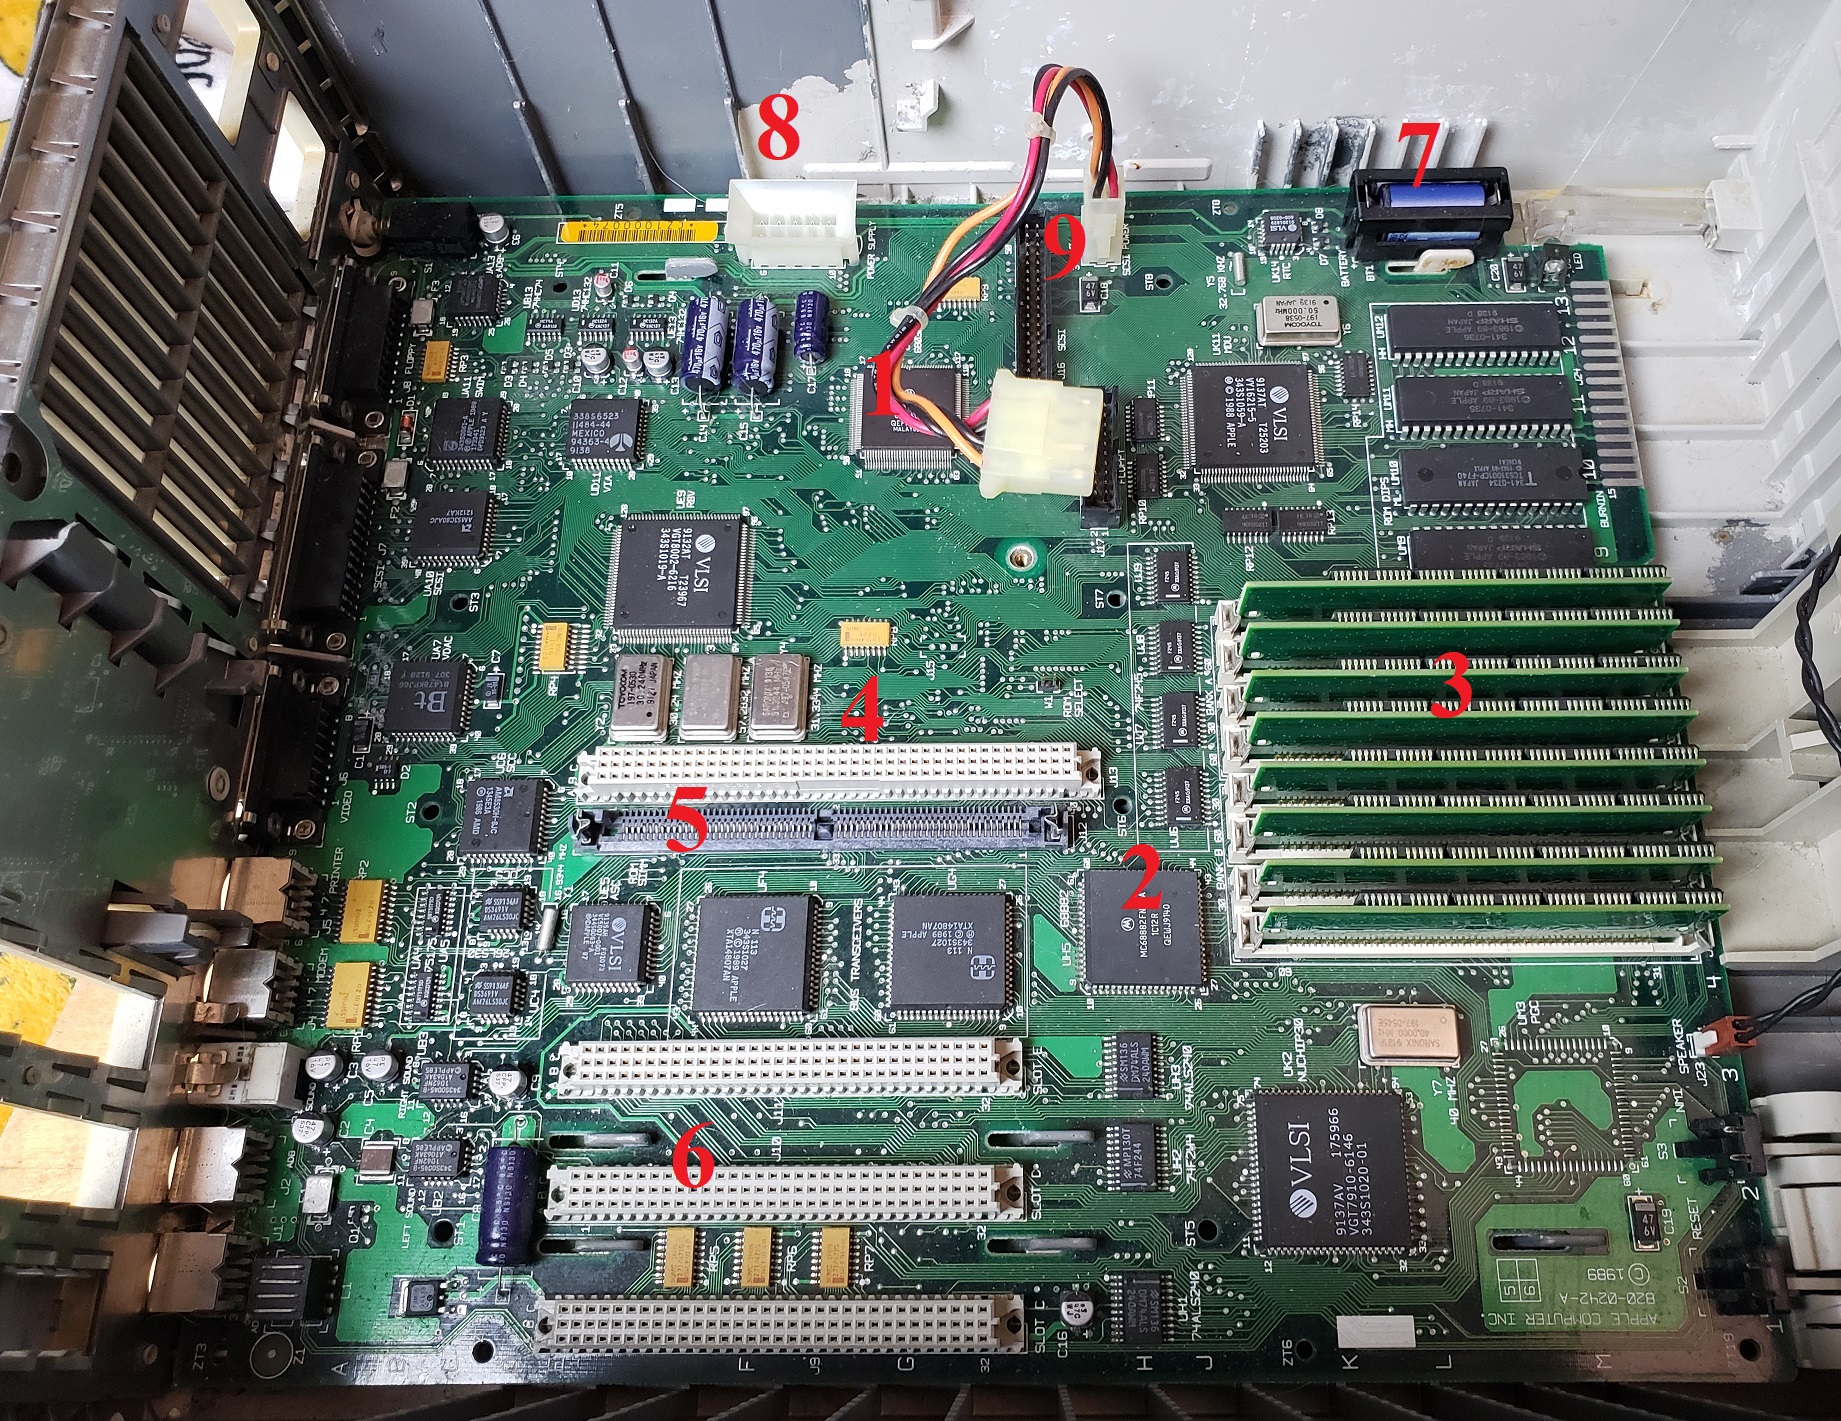
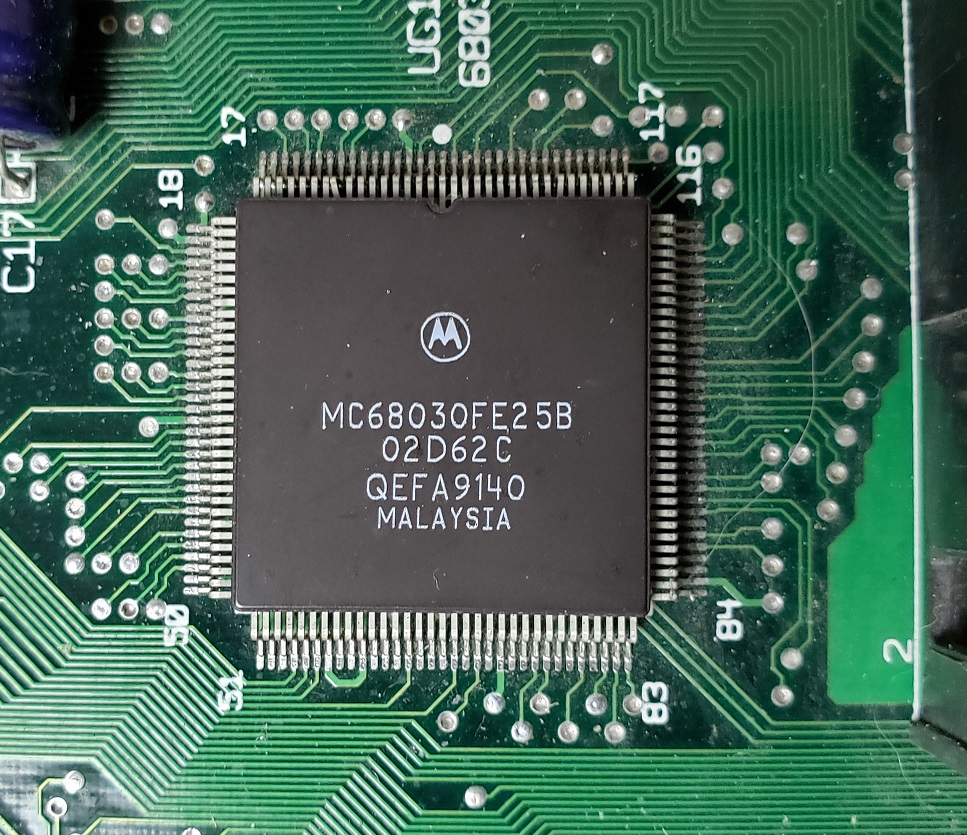
1 ) CPU – The CPU is the Motorola 68030 running at 25MHz as well as running on a 32-bit bus motherboard meaning that, unlike some Macintoshes that featured a 32-bit CPU and a 16-bit bus, nothing was holding the CPU back in the IIci. Despite this, some games can still struggle even at 320×200 resolution such as Wolfenstein3D though I have been told there is a patch to improve performance on a 68030.

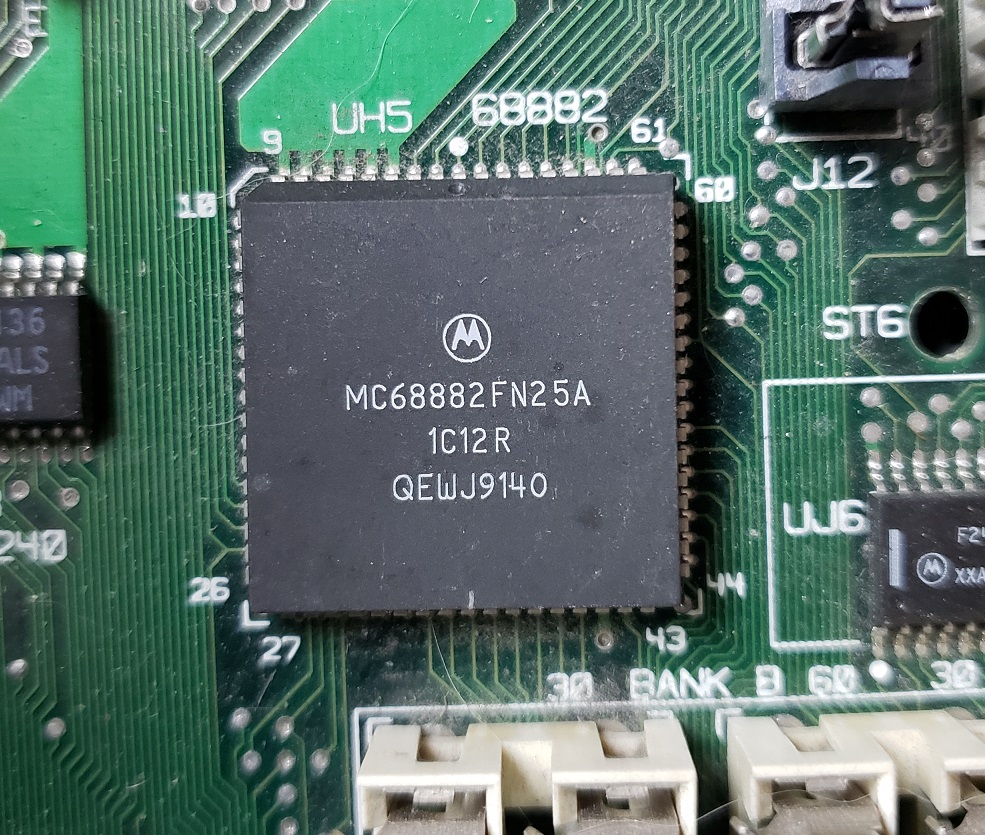
2 ) FPU – The IIci also has a math co-processor on the board in the form of the Motorola 68882. I’m not completely sure if like on the PC, this is underutilized or if more games on the Mac support it.

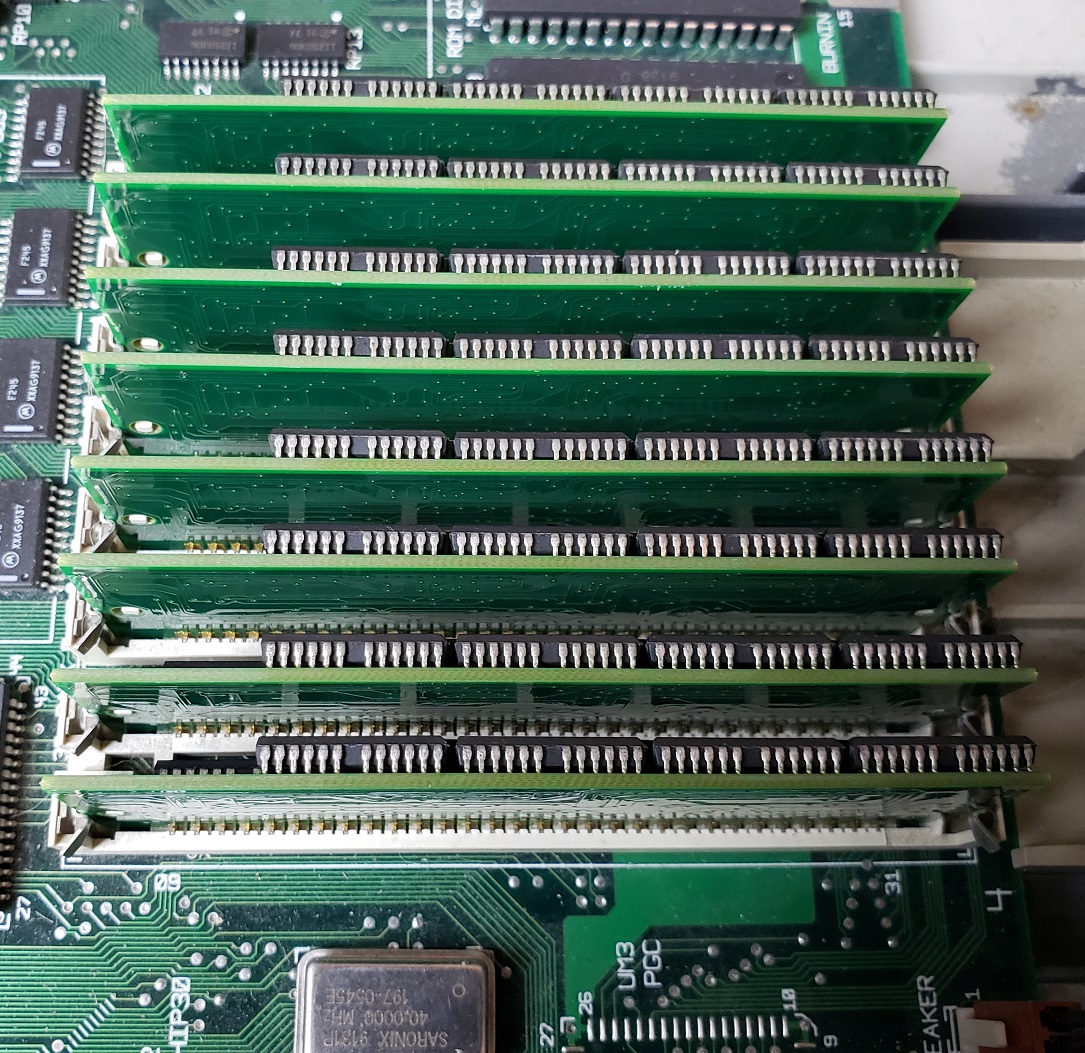
3 ) RAM – Like many classic Macs the IIci can take much more RAM than was practical for the time. Typically a IIci of the time would have had 1-4MB of memory installed but due to its 32-bit clean ROM and 8 memory slots the IIci can accept a total of 128MB of memory via 30-pin SIMMs. I maxed my memory out though this is far more than any program would need.

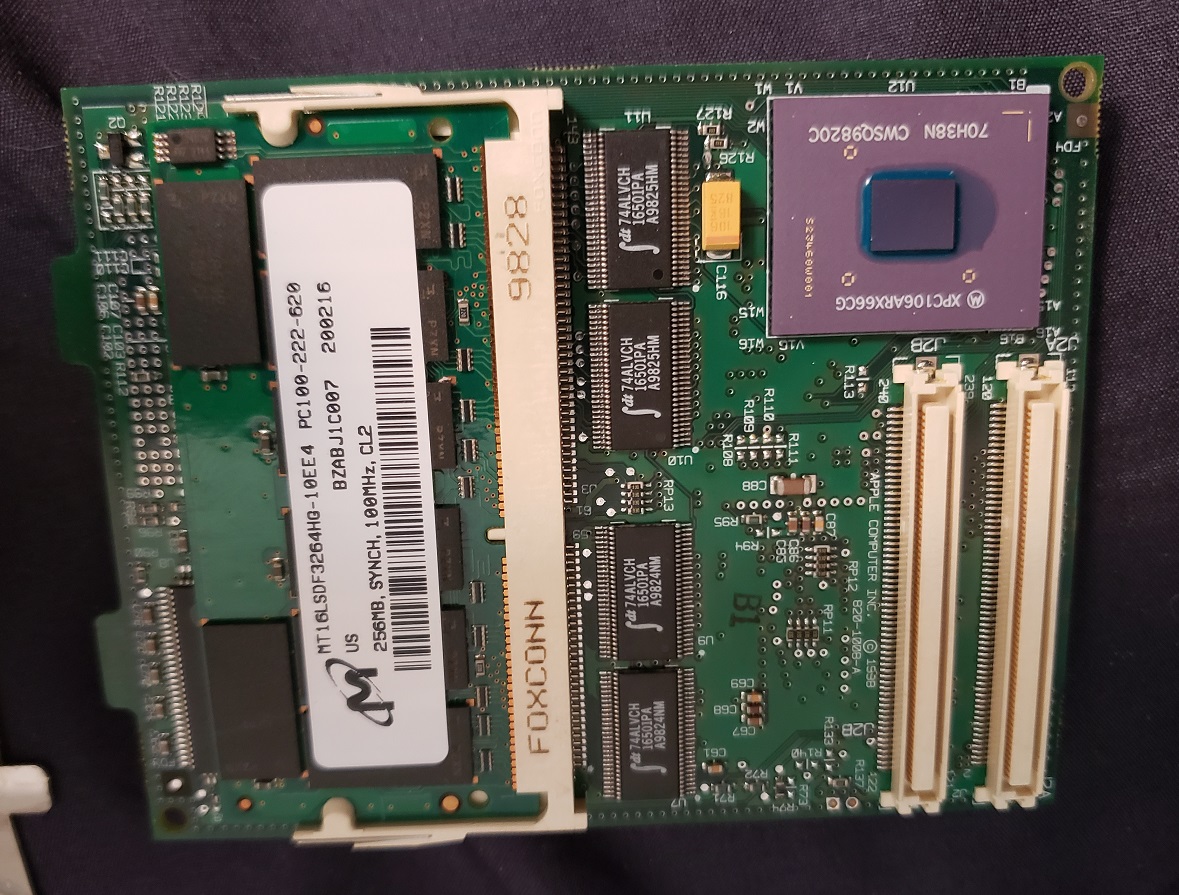
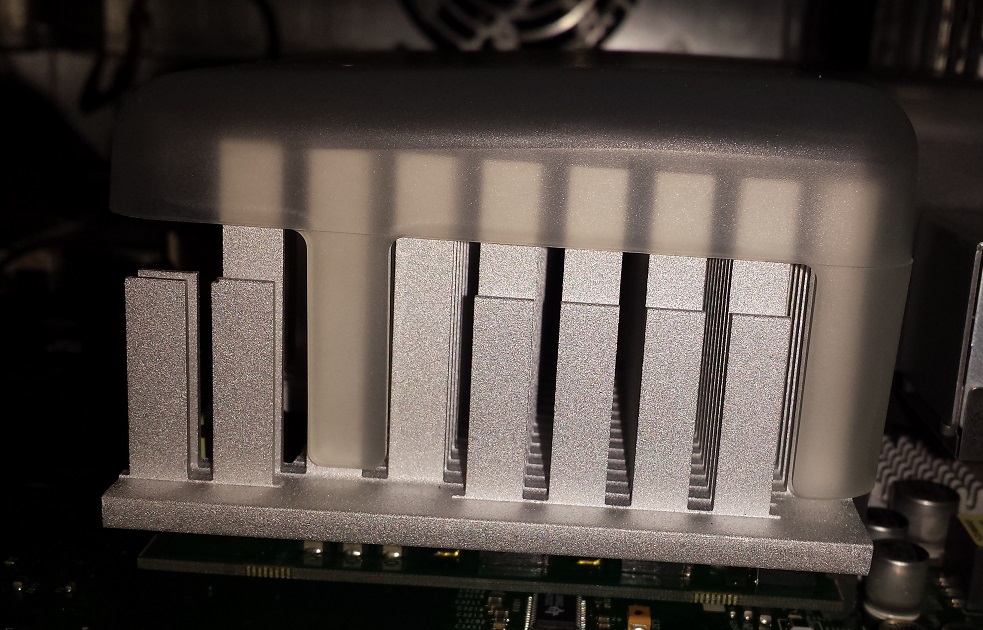
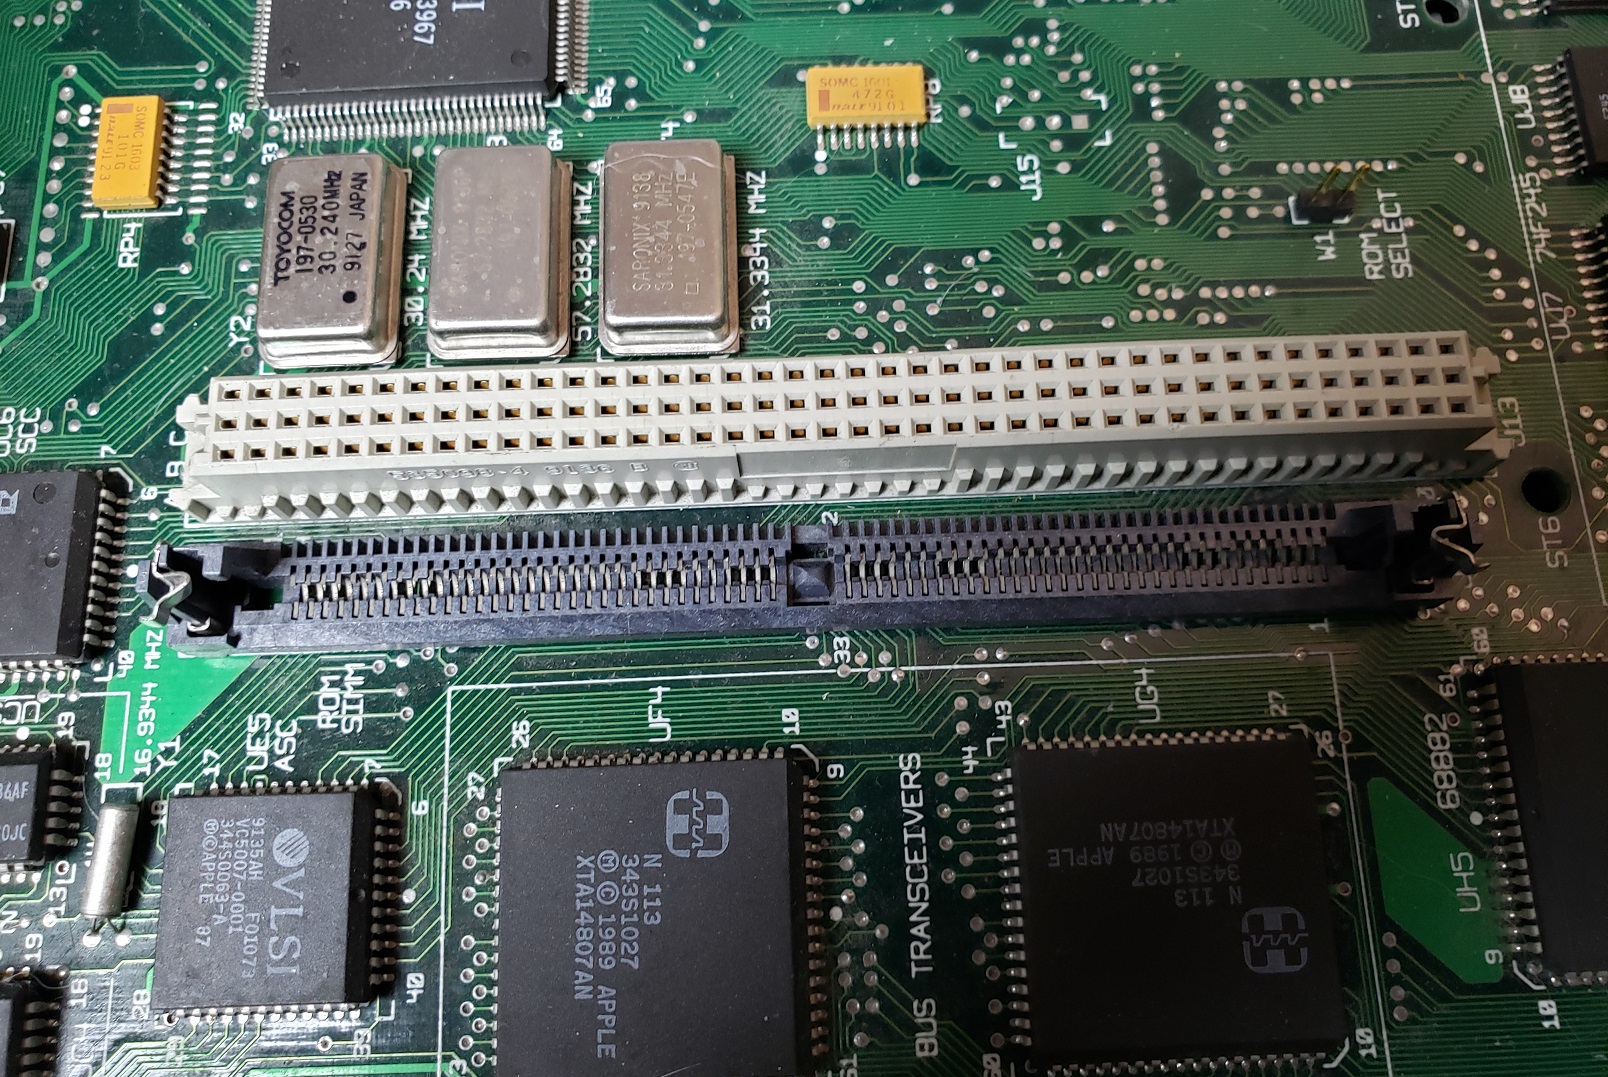
4 ) Cache PDS slot – The PDS slot located near the center of the motherboard is most commonly used for L2 cache upgrades, having a function similar to COASt module slots on early Pentium motherboards. It can be hit or miss whether you find one of these cards in any IIci one may pick up as they seemed to be optional at first before Apple began including them in the systems.

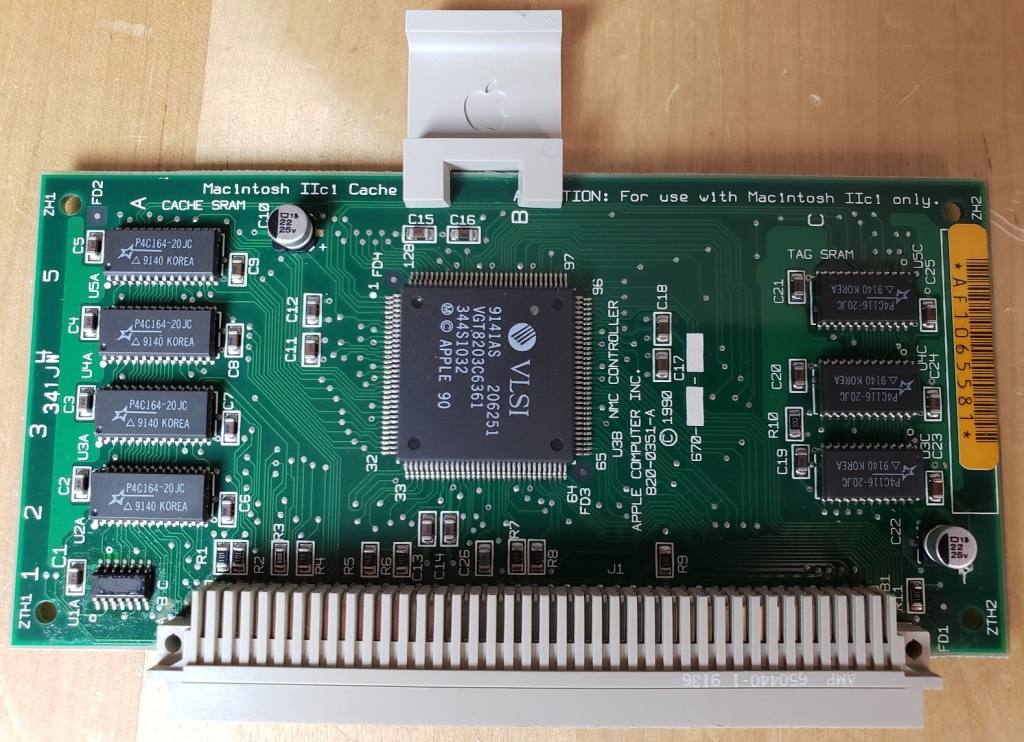
Official L2 cache card

The cache card is a highly recommended upgrade for the IIci as it is claimed to increase performance from 20% to, if you believe some sources, 130% though the vast majority of data indicated a general performance gain of 25% overall. The standard card from Apple contains 32k of L2 cache although third parties did make cards with larger amounts. Expect greatly diminished returns in performance after 128k.

Several third parties also took advantage of this slot to release CPU/cache accelerator cards allowing faster 68000 CPUs and even PowerPC processors to be installed.

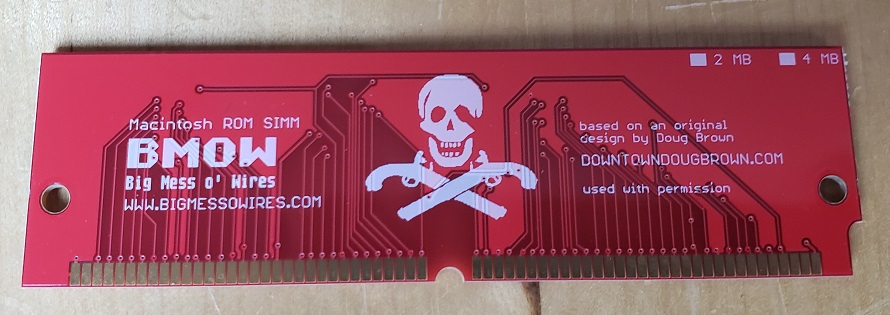
5 ) ROM slot – Right next to the cache PDS is a slot to install an optional ROM. The IIci was the first Macintosh to use a fully 32-bit “clean” ROM allowing much higher amounts of memory without modification or extra software. I decided to install a Macintosh “ROMinator” ROM SIMM from BMOW since it gives me several nice features like the ability to boot into System 7 from ROM in the event I have any issues with my HDD.

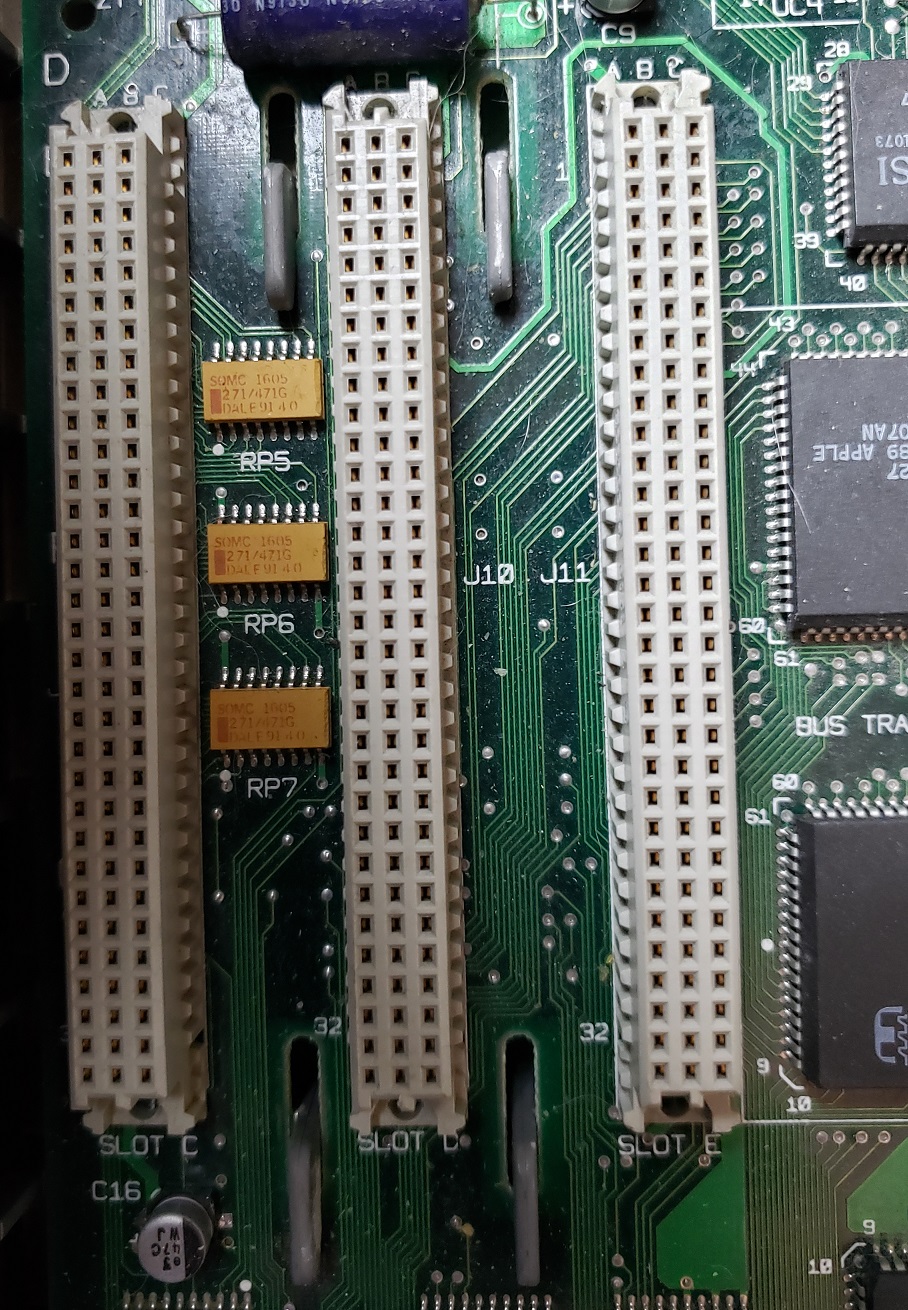
6 ) Nubus slots – The IIci features three Nubus slots for decent expandability although most users may not find a real need to add any cards. The general recommendation would be to add a more powerful video card as this can be beneficial for gaming purposes and allow more colors and higher resolutions. Another reason to add a discrete video card would also be to free up the memory used by the integrated video.

7 ) PRAM battery used for holding system settings

8 ) power connector for the system power supply

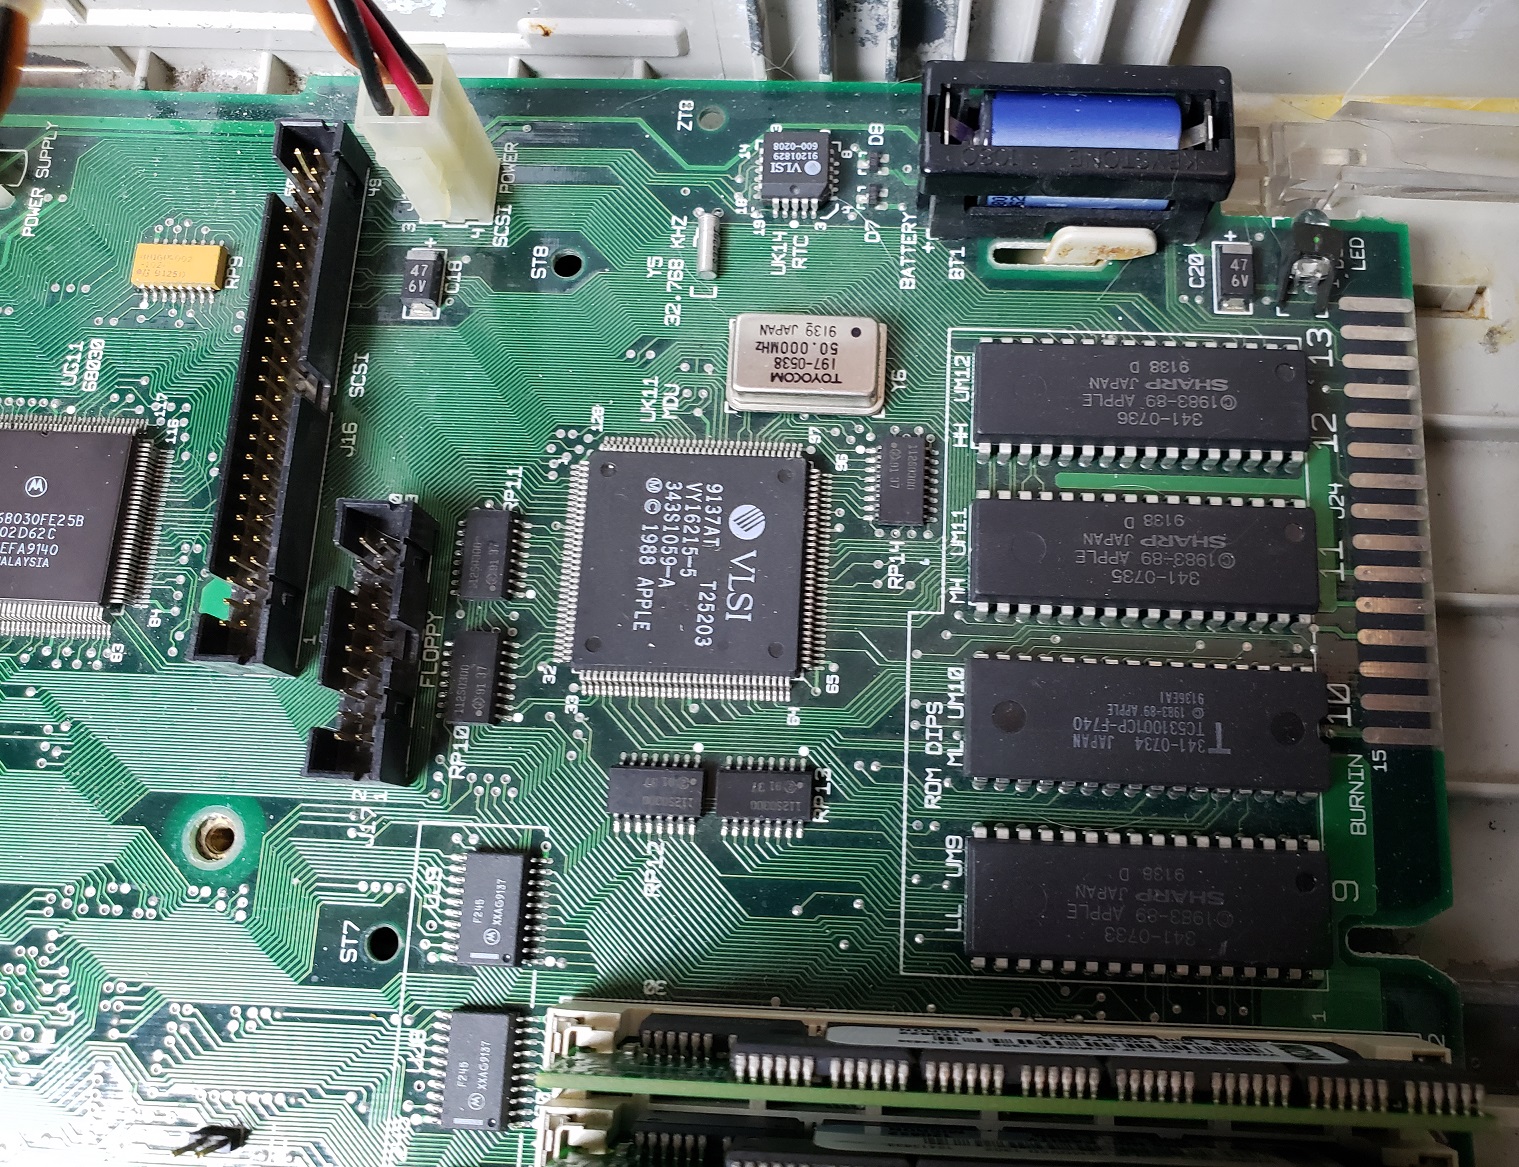
9) Interestingly the IIci does not pull power straight off the PSU but has a separate connector on the motherboard ending in a Molex connector for powering the hard drive. The floppy drive is powered via the floppy drive cable.

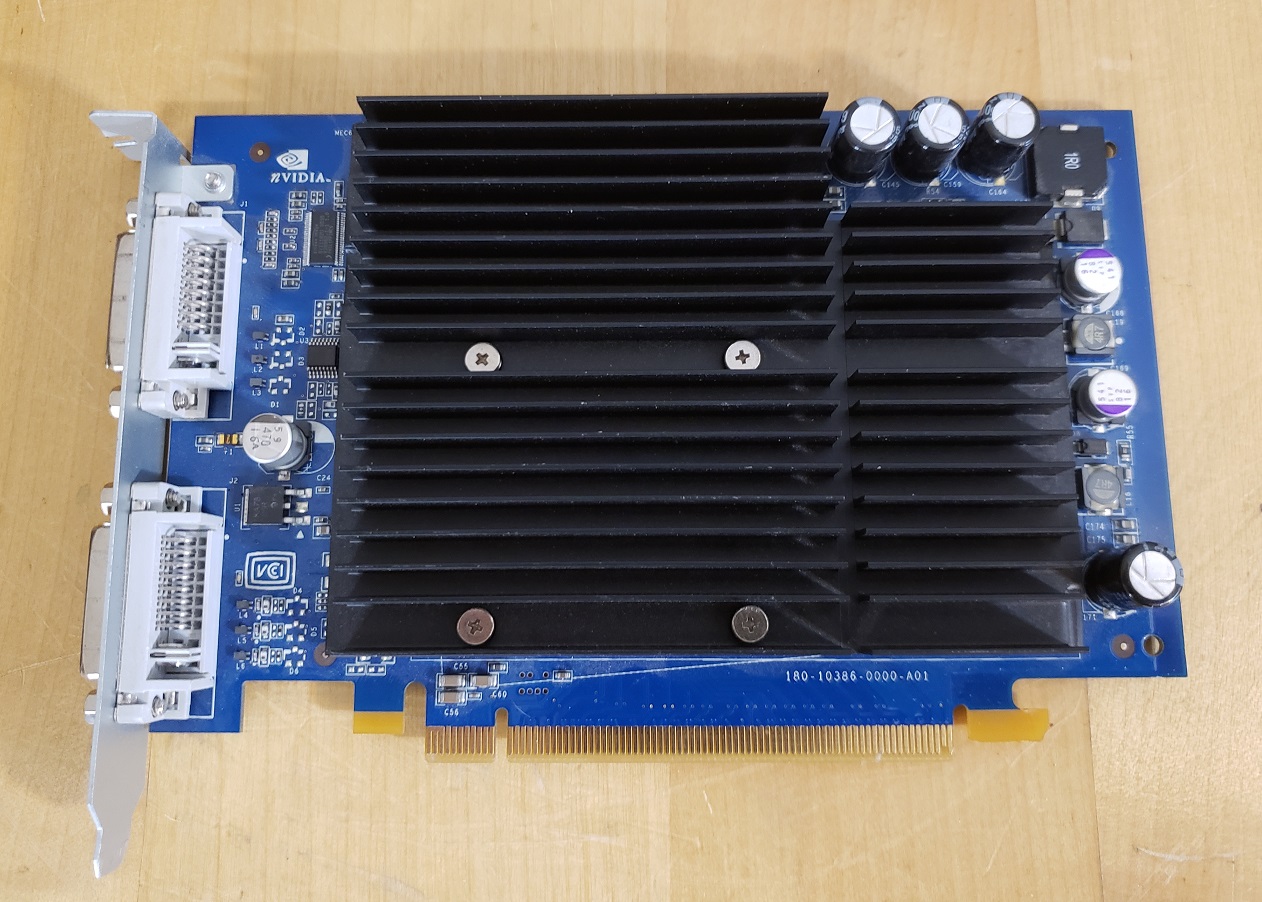
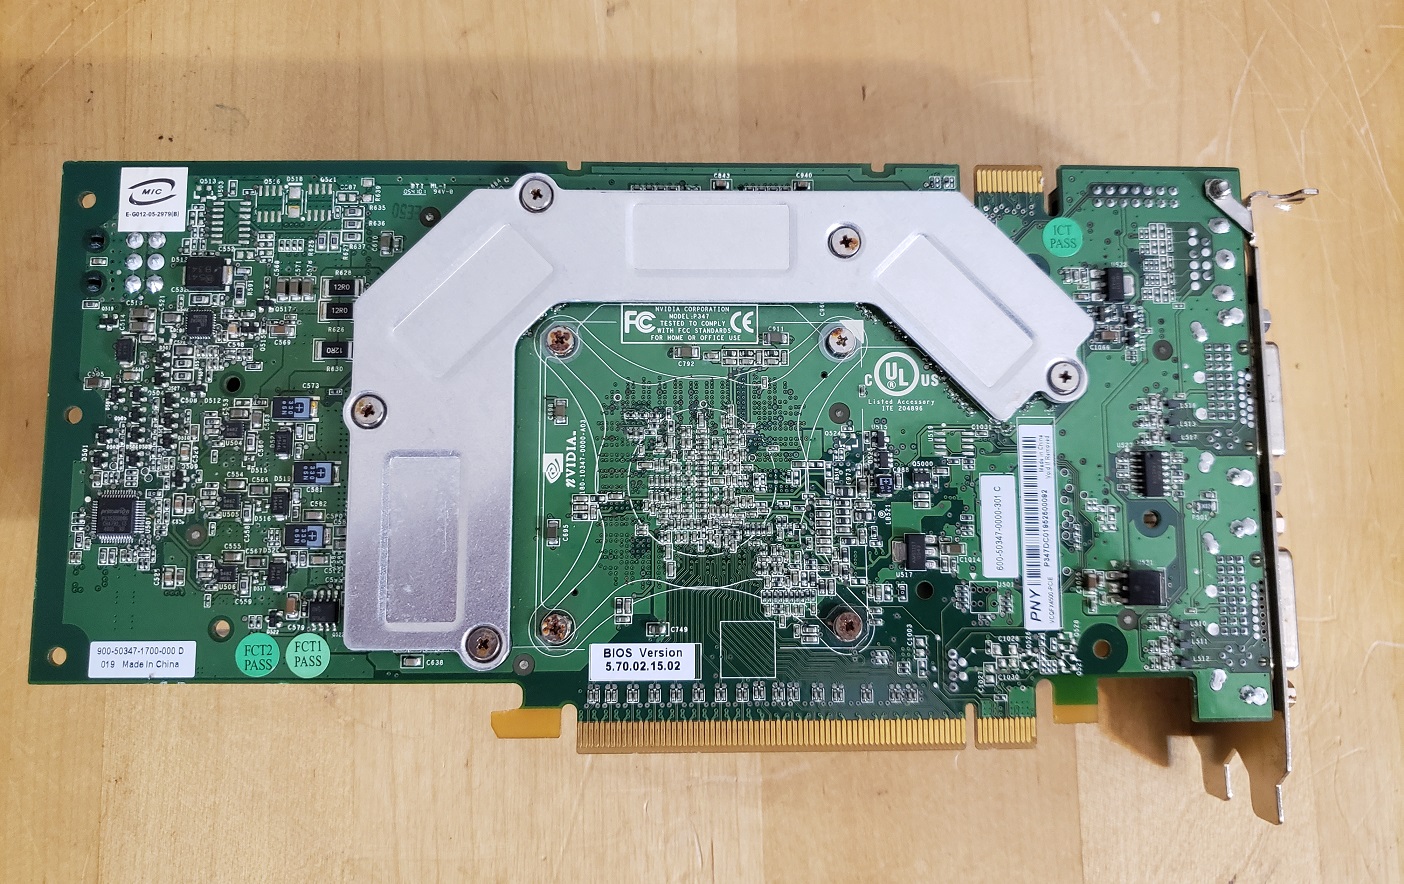
The sole expansion card I have added is a video card, the Radius PrecisionColor 8-24X

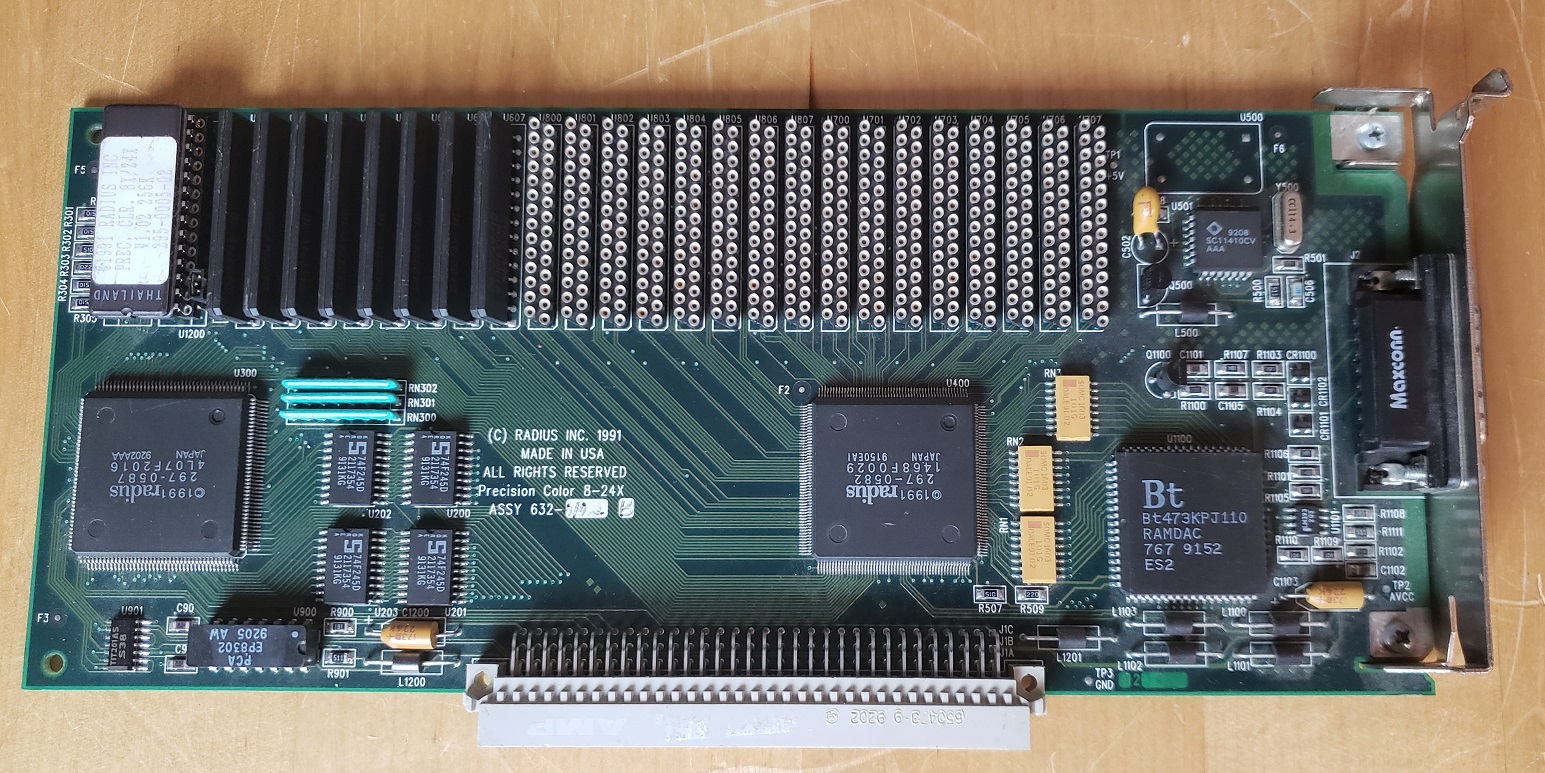
I wouldn’t say it’s the best video card option to upgrade to as although it supposedly has QuickDraw acceleration I haven’t noticed any performance improvement in games but at the very least it is an improvement over the built-in video as it allows more colors and has its own video memory.

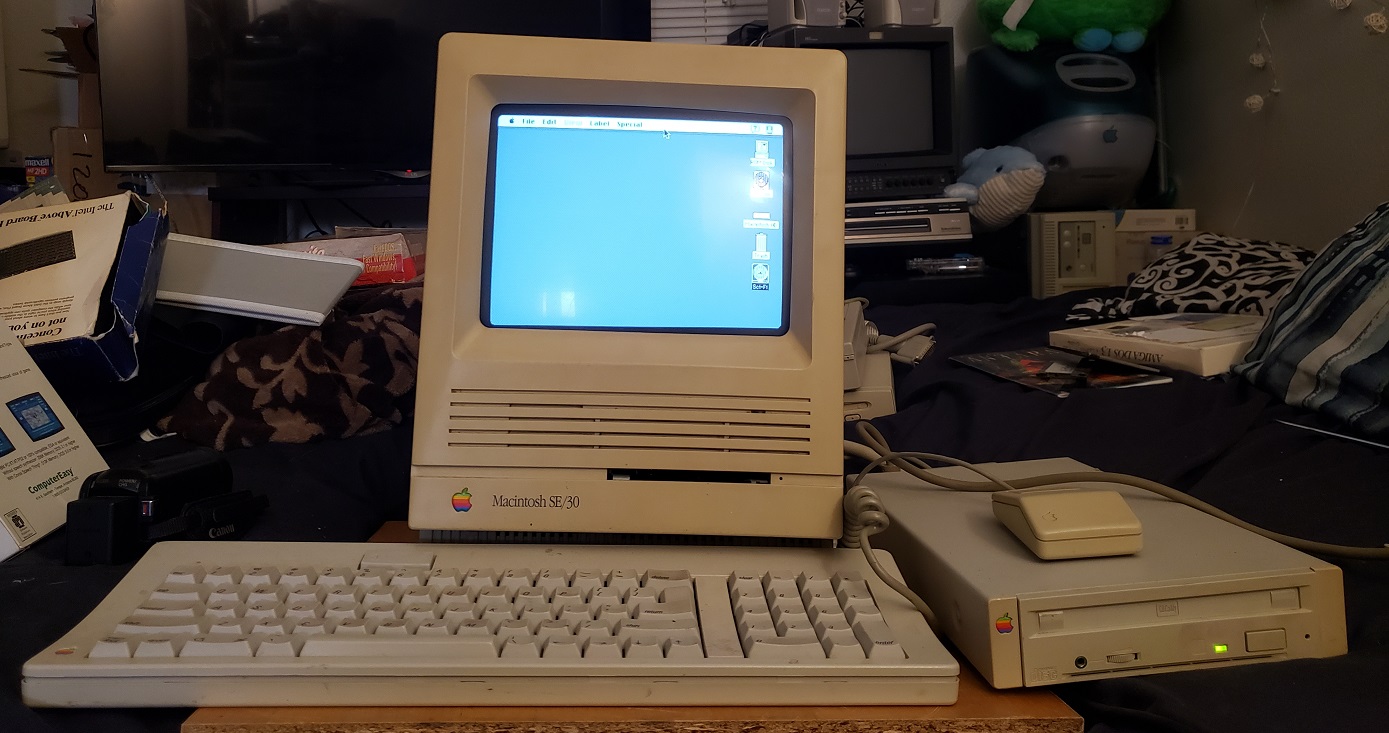
I am currently running System 7.5 on my Mac as that is what feels most appropriate and it seems to run quite well overall.

In my opinion, the Macintosh IIci is Apple doing the Macintosh II right. The system offers good performance, especially with an added cache and video card as well as offer decent (for a Mac) expandability in a small case. I’d certainly recommend one for anyone wanting to set up a classic 68k Mac for gaming and as I said a full setup will not take up much space on a corner desk. Another bonus is that the IIci was sold in fairly large numbers over several years so despite rising prices on retro goods as of 2023 the IIci isn’t as pricy or hard to find as some other models, just be aware of the possibility of bad caps and PSUs to contend with as these plague most classic Macintosh models

The Power Macintosh G5 series was the end of an era for Apple and the Macintosh. It was one of the last Macs to use the venerable Power PC CPU before moving onto Intel CPU’s which in my opinion made Macs little more then PCs with a custom Apple OS and took away much of their uniqueness for better or worse. The quad core G5 Macintosh was one of the last of the G5 Macs and one of the most powerful. Before we get into the specs keep in mind that older G5 Machines will have differing configurations and this is only a look at one of the last PCs in this line and not a general overview of the entire G5 line..

I’ve frequently seen these cases referred to as “cheese grater” cases due to the front. The case is all aluminum and despite the lighter weight of the metal the thing is very heavy. Being aluminum though it’s likely the case will survive long after all of us are dead, that is unless they all get melted down to make aircraft during WW III. The front of the case is very simple with a single 5 1/4 drive bay near the top for a CD/DVD optical drive and only a few inputs further down on the left.

First is the power button which does light up when pressed and powered on. Next we have a audio headphone jack and finally one USB 2.0 port and below that a Firewire 400 port. The case also has aluminum “feet” on both the bottom and top which are handy for both assisting in carrying the heavy beast of a case as well as keeping it off the ground a little. Be aware that these “feet” are very prone to being crushed if shipped improperly.

Opening the case on the G5 macs is a cinch. on the upper right hand side of the rear of the case is a simple lever. Simply pull it up and the side panel pops off. To the right of the handle are four expansion slots. Most of the rear is taken up by two massive fans and below those is the connector for your power cord.

The connector is, in classic Apple fashion, not quite your usual 3 prong connector as the shape is completely square and the three prongs are fairly flat as opposed to round so you will need a special power connector. Now the power cable used here is not proprietary but it is commonly found on high end sever equipment with high wattage power supplies. I couldn’t really say what advantage this connector type has over the more standard one and I seriously doubt it is needed for the G5 Macintosh so all it really seems to do is be extremely annoying if you happen to lack a compatible power cable and the 50 standard ones you have laying around the house won’t fit.

Starting at the top and going down the G5 has a neat row of various inputs and outputs. First are dual Ethernet ports followed by a Firewire 800 and 400 port. Next are optical audio in and out ports followed by dual 1/8 audio jacks and finally three USB 2.0 ports.

Upon removing the side panel most of the lower section of the case is further covered by a hard clear plastic cover. This is easily removed via a small handle near the top. There is also a badge on the bottom portion of the case that if you are unsure of the exact factory specifications of your model you should be able to find them there.

On the top left is the sole 5 1/4 drive bay which at least factory standard should be occupied with a 16x DVD drive. To the right of this bay are dual 3 1/2 drives for installing hard drives. A 250GB SATA drive was the stock drive but I have added a second drive in the lower “B” bay.

I have seen people install SDD drives in these bays but it may require an adaptor to fit securely or just be installed loose in the bay.

Below these bays are the four expansion slots.

Four slots for expansions cards is pretty anemic for a computer but in all honestly they are all PCI-e and being a Macintosh your not likely going to find you need to install much more then a video card anyways. The four PCI-e slots is actually a nice upgrade from previous models in the G5 line which lacked any PCI-e expansion slots and instead used AGP, PCI and PCI-x. Only the bottom slot is PCI-e x16 so I would suggest installing your video card in the bottom most slot. As far as I can tell there is no option to run either a crossfire or SLI configuration in the G5 Mac.

the G5 Power Mac came stock with the Macintosh version of the Geforce 6600 with 256MB or memory. This card is quite adequate though it is not the mot powerful card the G5 quad can accept and if you want to take some better advantage of what this system has to offer the video card should be one of your first upgrades if possible.

The G5 is somewhat limited on video cards it can accept due to the requirement that cards use a special Apple Mac BIOS and OS drivers. The fastest video card I could find for the G5 Mac quad was the Quadro FX 4500 with 512MB of memory. This card is basically the workstation version of the 7800 GTX and is more or less the same. Upgrading to a FX 4500 gives a noticeable boost to gaming on the G5 though finding a specific Macintosh version of the card can be difficult and/or expensive. Another route you can take is tracking down the much more common PC version of the card and flashing its BIOS to the Mac version.

You will need a specific revision of the PC card with a specific BIOS in order to flash it though. Usually the card with the L bracket on the back are flashable models but always check the BIOS revision to be sure.

Guides on the process such as the one Here can be found with a simple Google search.

Also take note the FX 4500 will require an additional power cable that connects to the motherboard and then to the card as seen below. also seen below is the connector for the IDE cable that goes to the optical drive.

The area of the motherboard below the expansion slots is dominated by the CPU and in this model, water cooling system, which is located behind the “G5” shield. To the left of this is the RAM which we can get a better look at by removing the large gray fan which simply lifts straight out.

The G5 “quad core” came factory with 512MB of DDR2 memory but I have expanded mine to a whopping 16GB of RAM. 16MB of DDR2 is a lot of memory for 2006 when the G5 line was discontinued and when many PC’s were still maxed out at 4GB with Windows XP. I do remember reading that the the jump from DDR memory in all other models of the G5 to DDR2 in the late 2005 models such as the quad core made very little to no performance improvement but I can’t seem to locate the source so I can’t confirm this though I felt it worth mentioning.

Finally we have the CPU or in the case of the Power Mac G5 Quad Core, two CPU’s.

The CPU’s and cooler are under a stylish aluminum shield with a large G5 emblazoned on it so you know what’s under it. The G5 Quad Core sports two separate dual core 2.5GHz G5 Power PC CPU’s under a factory stock water cooled system.

My machine is equipped with a liquid cooling system by Delphi. The Delphi coolers were known to have leakage issues which could corrode and destroy the system. according to Wikipedia Apple started later using a liquid cooling system from Panasonic which was much more reliable. I have found at least one comment in my research that indicated that it was actually the Panasonic cooler used in the 2.7GHz G5 Macs that was unreliable and thus resulted in the apparent scarcity of that model. This also makes sense since the 2.7GHz G5 with the Panasonic cooler seems to of been released in early 2005 where the models with the Delphi coolers were released in late 2005.

There are faster 2.7GHz G5 macs though these machines use two separate single core G5 CPU’s so they may be faster in single threaded applications and games that do not take advantage of multiple cores though the quad core is seen as the fastest overall G5 PC. Its very hard to compare speed wise with Pentium or other X86 processors but I have seen rough equivalency with faster AMD FX processors.

The Power Mac G5 quad core is the king of the G5 line and possibly of the power PC computers in general. It was the end of an era for Apple who after these machines switched over to Intel CPU’s and in my opinion lost some uniqueness. The case for the G5s is durable but be prepared because it is heavy and moving it around is a real pain. The G5s did get a reputation in its day for being fairly good machines for things like video editing but also as a space heater as it tends to give off a lot of heat while in operation. I will say my machine does get a little warm and is loud though I expect the models with fan cooling as opposed to water cooling would be even louder. It should be the king of OS X gaming though unfortunately there aren’t many games that are exclusive to power PC based OS X though .

Previously we have looked at several black and white compact Macintosh computers including the Classic, Classic II and Macintosh SE. Today we are going to take a look at the pinnacle of the B/W compact Mac family, the Macintosh SE/30.

The Macintosh SE/30 was released in 1989 and was a compact mac to rule them all. It offered the power of its larger Macintosh II brothers in a small compact package as well as some future upgradability.

The front of the SE/30 is obviously dominated by its 9-inch 512×346 pixel black and white screen. The quality of this screen is excellent and games designed for the b/w mac look great on this machine. Other then the screen we have a small HDD activity LED hidden within the horizontal lines below the screen. The floppy drive is a 1.44MB drive which on the SE/30 for the first time came standard on a compact mac.

The only dial or button on the face of the SE/30 is a brightness dial for the monitor hidden away below the Apple badge and model name.

First off on the lower left side of the rear is the expansion card plate for certain expansion cards. This SE/30 previously seems to have had a Radius display card but unfortunately the card was removed by the previous owner but the bracket was left behind. To the right of this we have a standard 3-prong power connector and the power switch.

Taking a look at the various ports starting from the lower left we have dual ADB ports for keyboard and mouse. Next to this we have an external floppy drive connector for attaching well, an external floppy drive. Next is an external SCSI port for connecting external SCSI devices such as hard drives and CD-ROM drives. Next is an apple printer and then modem jack and lastly we have a 1/8 stereo audio out jack for connecting headphones or external speakers. Since we are talking about the sound the SE/30 uses an Apple Sound Chip (ASC) including four-voice, wavetable synthesis and stereo sampling generator. The sound coming from the built in internal speaker will be mono but anything through the rear audio jack, wether speakers or headphones will be stereo.

Removing the case reveals the drives and internals.

It is fairly cramped inside but the motherboard is fairly easy to remove as it just slides up and then away. Remember to detach the cables before removing the motherboard though.

The fan header, floppy and SCSI cable and power cable need to be unplugged from the motherboard. Only the power cable may present an issue since it can be a little stubborn and hard to reach. Below the CRT tube is a tray for an optional SCSI hard drive. Generally the SE/30 was sold with either a 40MB or 80MB hard drive installed but the system will take as large as a drive as you can find. I currently have a 300MB hard drive installed. Below the hard drive is a 1.44MB floppy drive.

Above is the motherboard for the SE/30 after being separated from the case. A common point of failure on these boards as with most of the older Macs are the silver surface mounted capacitors. These tend to leak over time but can be replaced with modern equivalents.

1 ) CPU – The CPU is the Motorola 68030 running at 16MHz. This is the same CPU and speed as some of the SE/30’s big brother full sized Macs such as the Macintosh IIx and IIcx. Due to the SE/30’s 32-bit bus it is the fastest of the black and white compact macs being even faster than the Mac classic II which features the same CPU and speed but only ran on a 16-bit bus.

2 ) FPU – One other feature of the SE/30 is the inclusion of an FPU co-processor standard on the motherboard as opposed to being optional. The Motorola 68882 FPU unit helped when performing more complex math functions though like the on the PC I’m not sure it was utilized very often in games. You could argue that an optional FPU socket is a better option since if the FPU fails you can replace it much easier.

3 ) RAM – The SE/30 features eight slots for 30-pin RAM SIMMS. 1MB or seems to of been stock but it’s not unusual to find SE/30’s with 8 to 16MB of memory.

Unofficially the SE/30 can support up to 128MB of RAM using 8 16MB SIMMs. This is a staggering amount of memory for 1989 when this model was released let alone in such a compact machine. I was able to upgrade My SE/30 to 128MB, just be sure to remember afterward to navigate to the memory option in your OS and enable 32-bit memory mode.

4) ROM – The original ROM that came stock with the SE/30 was a 32-bit “dirty” ROM meaning that it still had some 24-bit code. This meant the SE/30 was limited to 8MB of RAM though there was a software solution called Mode32 which allowed 32-bit mode. Both SE/30s I have come across had Mode32 installed and if yours does not the software is freely available with an internet search.

Thankfully the ROM on the SE/30 is not soldered to the motherboard and can be swapped out as easily as if it was a stick of RAM. One way to make your SE/30 32-bit “clean” was to swap the stock ROM out with the ROM from a Macintiosh IIsi or IIfx. For a while I had swapped my ROM with one from a Mac IIsi and it seemed to work fine.

Possibly the best option currently for making your SE/30 32-bit “clean” would be ordering the reasonably priced ROM-inator-II from Bigmessowires. The ROM-inator II is a modern replacement for your SE/30 which makes it 32-bit “clean” but also adds HD20 hard disk support, various utilities and lets your Mac boot to System 7.1 from the ROM.

5 ) PDS slot – The PDS or Processor Direct Slot allowed the SE/30 to accept a number of expansion cards. Something not seen in most of the compact Macs. Various cards such as accelerators and display cards can be added via this slot.

6 ) PRAM battery

7 ) SCSI connector

8 ) floppy connector

9 ) Power connector

10 ) Interrupt and reset buttons

The SE/30 is one of the all time classic Macintosh computers and along with the color classic I and II one of the absolute best compact Macs. The SE/30 has all of the power of a full sized Macintosh II in a much smaller package. With a ROM replacement, a sizable SCSI hard drive and the full 128MB of RAM the SE/30 becomes a monstrous classic Macintosh. The smaller black and white monitor can be a handicap when it comes to games but games designed for the B/W mac look stunning on the monitor and the lack of color even lends itself to the atmosphere of certain games such as the Infocom Macventure series.

re-capped Mac SE/30 motherboard upgraded with ROM-inator II and 128MB of memory

I would highly recommend tracking an SE/30 down if you want a classic compact Mac. You’ll probably never need the 128MB of RAM but I would certainly recommend adding a nice sizable SCSI hard drive or even a SCSI2SD adaptor for storage. I would also highly recommend the very affordable ROM-inator II if only to make your machine 32-bit “clean” and to get that very nice ability to boot from ROM.

SE/30 with external SCSI CD-ROM drive

This slideshow requires JavaScript.

In 2002 Apple released the successor to their all-in-one computer, the iMac G3. Originally named the “New iMac” the PC would eventually be known as the iMac G4. The iMac G4 was extremely futuristic looking for it’s time with the entire motherboard and other components being housed inside a dome case. Coming out of the top of this dome was an adjustable metal arm and a TFT active matrix LCD screen with a native resolution of 1024 x 768. This was still a era of large heavy CRT monitors and seeing an LCD still felt pretty futuristic. In today’s article we will be looking at the 800MHz model which is the second of the four revisions Apple made of the iMac G4.

Even if your not an Apple fan you have to appreciate the industrial design and ability to fit everything into a small 10.6″ dome case. Even in 2019 as I write this article the iMac G4 wouldn’t look out of place on a sci-fi TV series taking place in the future home or on a starship.

Of course there is a price for this compactness and design and I’m not talking the dollar amount Apple wanted for one. I’m talking about expandability which is obviously severely lacking with the G4.

The front of the dome has no visible buttons or LEDs, just a shiny Apple logo and a slot for the optical drive. The optical drive in my model is a CD-R / DVD combo drive but the drive did vary by model.

Side shot

Full rear shot

On the back of the dome we have an array of different connections for connecting your G4 to the internet as well as other peripherals.

All the way, barely visible, on the left side we have a Kensington security lock for securing your iMac to some object so whomever doesn’t walk away with it. Next to this we have a standard 3.5mm headphone jack. The next jack looks to be another standard 3.5mm audio jack but it is not. This is actually a special audio jack for a set of Apple Pro speakers. The jack is a little smaller then a standard 3.5mm jack and it also delivers power to the speakers. I unfortunately do not have a pair of these speakers but many consider them some of the best speakers ever made for any Mac computer. Following this we have two firewire 400 ports and an Ethernet jack. In the center we have a three pin power connector followed by a modem, three USB 1.1 ports and finally a mini VGA output port. The port supposedly only mirrors the main display but still handy if your having issues with the built in monitor.

To access the internals of the iMac there are four small screws on the underside of the base.

Removing the metal base plate gives access to the airport wireless card, or if you don’t have one, the port to install it. To the right is a 144-pin SO-DIMM RAM slot. This RAM is the smaller style SDRAM more commonly found in things like laptops. This slot will accept up to a 512MB stick of PC133 memory which is what I have currently installed. The iMac G4 can accept up to 1GB or RAM total but the second RAM slot is not as easily accessible. Later versions used DDR memory and had a maximum limit of 2GB..

After removing several more screws on the base of the G4 you need to carefully pry the two pieces apart. Even with the screws removed it may take some effort as there should be thermal paste still bonding the two haves of the case together.

Here are the two halves separated. The upper half houses a fan and speaker as well as both the CD/DVD drive and hard drive above that. My 800MHz G4 came with the stock 5400RPM 60GB hard drive and OS X 10.4.11 installed. This hard drive can be upgraded to a larger size and can even be replaced with an SSD (via an adapter) if so desired.

Now lets take a look at the interesting part, the motherboard attached to the base of the g4.

1) CPU – My model features an 800MHz Power PC G4 but earlier models featured a 700MHz CPU. Later models went all the way up to 1.25GHz. There is no fan on the CPU but the heat sink is interesting on these models as it attaches to the side and makes contact with the upper half via thermal paste to use the entire case as a heat sink. This heat sink is more significant on the faster models. A metal clip holds the sink firm against the CPU but can easily be removed with the help of something like a flat head screwdriver and a bit of force though be careful not to gouge the motherboard or slip.

I do tend to like the Power PC chips and the 800MHz is sufficiently powered for the time though of course you’ll get more gaming mileage from a 1 or 1.25GHz model.

2) RAM – The second RAM slot is located on the upper half of the motherboard and uses a standard 168 pin DIMM slot. The slot on mine is also populated with a 512MB PC133 stick bringing my G4s memory up to the 1GB limit. I do understand Apple was working with space limitations and had to be creative to fit everything but it is an annoyance that one can only easily access half of the RAM sockets for upgrading without taking the computer apart. The difference in form factor could also potentially confuse less tech savoy consumers looking to upgrade their iMac G4s memory.

3) Video – I did not remove the small passive black heat sink to confirm but I’m almost 100 percent certain that lying underneath is the iMac’s Geforce 2 MX video chip. This model as well as the earlier iMac G4 also used this chip along with 32MB of non-upgradable video memory. Later models used the Geforce 4 MX chip as well as FX 5200 Ultra chips along with more memory. The Geforce 2 MX in the 800MHz here was not a high end or enthusiast oriented card but was a sort of cut down Geforce GTS with performance numbers a little higher in general then the older Geforce256. It did run cool and featured some advanced features for the time such as T&L (Transform and Lighting) capabilities making it a good choice for a non gaming oriented all in one machines like the iMac G4.

Next to the GPU chip we also have a small daughterboard like card. I believe this card has chips controlling the wireless and networking functions of the iMac.

4) Battery – This is the typical PRAM battery found ubiquitously in older Macintosh PCs. It’s always a good idea to change this battery when picking up an old Mac.

5) Various connectors

Above where the heat sink arm meets the upper case we have three connectors for interfacing with the upper half of the iMac. The smallest connector on the lower right is a power connector while the one above it is a standard ATA-66 IDE connector for interfacing with the CD/DVD and hard drive. The last connector strongly resembles a floppy drive connector but it is not. I believe this is just the interface between the monitor and the motherboard video and connects with a female connector on the upper half of the case.

The iMac G4 is a very futuristic design that even in 2019 I feel would fit in on the set of Star Trek or some other sci-fi production. As an everyday PC in its time it probably made a half decent space saving and fashionable family computer for tasks such as surfing the web and doing things like homework. As a gaming computer for a retro gamer though I find it very limited. The CPU is adequate but the Geforce MX is more suited for older 90’s games rather then early 2000’s mac titles. The RAM is a bit annoying to upgrade requiring you to open the case and upgrading in general is very limited. Unless your very short on space, only looking to play older 90’s Macintosh games or just love the stylish futuristic look of the iMac G4 your much better off with any of the Macintosh G4 towers such as the Digital Audio G4 or the Mirror Drive Door G4 towers, at least as far as expandability and gaming go. If you must have that iMac G4 look though there are always the more capable 1 and 1.25GHz models that should offer more in the way of early 2000’sOS X gaming capabilities.

Way back in Jan of 2016 I wrote an article on the slot loading iMac G3. This time we’re going to take a look at the original Bondi blue “tray loading” iMac G3 and see how this iconic computer that is often times referred to as “the Mac that saved Apple” compares to its later “slot loading” revision. In this article we will be looking at a more or less bone stock very first revision or revision A model originally released in August of 1998.

As I stated in my original post on the slot loading variant of the iMac I was not the greatest fan of the Mac and was firmly in the Wintel PC camp during that time. My disdain for the iMac though was at the height of my displeasure with all things Apple and I honestly did not know why anyone would want one of those computers. Time and experience though has softened my stance and I now can appreciate these computers for what they are and the use they were intended for. The all in one iMac G3 was not a new idea but it was an idea that Apple as a company had moved away from during the latter half of the ’90s to make more generic “PC” type machines and hence lost a lot of what made Apple unique and stand out in the market. The iMac G3 was an all-in-one machine and was extremely simple to set up and played with Apple’s strength of focusing on industrial design with a colorful and inviting Bondi blue colored shell as opposed to the standardized beige of almost all other PC cases. The iMac was intended to be extremely user-friendly and be simple to set up like a microwave or a toaster. This computer was aimed at the average user just wanting to “surf the net” or write school assignments rather than power users or gamers (even though the iMac certainly could be gamed on).

The original model seen here only came in Bondi blue as opposed to later models that were offered in a variety of colored shells. A handle was provided at the top to help move the Mac around but to be honest it always feels a little awkward to use and I always feel like it’s going to snap off despite the handle being very sturdy.

The bulk of the iMac is taken up by the built-in 15-inch shadow mask CRT monitor capable of resolutions up to 1024 x 768. The iMac G3’s kept this same spec monitor throughout all models though later slot loading iMac’s supplied an external VGA port to connect to an external monitor. These early tray loaders did not which makes it quite unfortunate if your monitor dies. The rear of the Mac hides only a small handle, which is used when removing the motherboard, and a standard 3-prong power connector.

They also came with a matching Bondi blue iMac keyboard and mouse. The keyboard is a simple Apple USB keyboard and is not so dissimilar from others besides the color but the mouse, a USB ball type mouse, is the infamous “puck mouse” so called because of its hockey puck like shape.

Unfortunately the rumors of the poor ergonomics of the of the puck mouse are completely true and the mouse can be very awkward and uncomfortable to use over any extended period of time. This isn’t a major problem since the mouse can be swapped out with any Apple USB mouse including later Apple Pro mice which use a standard shape and sports a laser as opposed to the older ball for tracking. The puck mouse also uses the traditional one-button Apple style mouse so no scroll wheel. The mouse has held up well though I’m not sure if this is from rugged construction or lack of use.

The iMac was famously the first Mac to drop the floppy drive although one was easily added via a USB port. In its place a 24x CD-ROM drive was standard and is located below the monitor. The early runs of the iMac used a tray loading CD drive, hence the “tray loader” title where as the later models used a self-loading slot mechanism. Next to the CD drive we have a power button that emits a soft green light when on and on the right and left sides we have two built-in stereo speakers. These speakers do have a habit of rotting a bit but it is a repairable issue and fortunately this particular iMac does not suffer from the foam around the speakers deteriorating.

The speaker on the left has a wireless 4Mbits/s IrDA inferred sensor which was removed starting with the revision C tray loaders. The right speaker has dual 1/8 stereo jacks for hooking up headphones that two users can use at once which is quite nice. Underneath the Mac is a fold-out stand of the same Bondi blue as the case.

On the left side of the iMac we have a small compartment housing some various ports. The is a plastic cover which can either be removed entirely or replaced after your various peripherals are plugged in and the wires snaked out through the several openings provided.

Once the plastic cover is removed we are greeted by a variety of ports.

On the left we have two more audio jacks, one for a microphone and a second for optional external speakers, handy if the built-in speakers fail or are not powerful enough for your liking. Next to that is a scant two USB 1.1 ports. The iMac is also known for going all in on USB and ditching the traditional Apple ADB ports in favor of USB though I wish more USB ports were made available. The mouse is generally expected to plug into the USB port on the keyboard (this why the cord is generally so short) and this does help free things up. A USB hub can also be used without issue in case you have multiple USB devices you want to use. Next we have a 10/100 Ethernet jack and lastly a 56k Modem jack.

Under these ports we have a mysterious little covered cutout held in by two screws. Behind this cover is what is commonly called a “mezzanine slot”. This is a sort of expansion slot that originally was only supposed to be for Apple’s internal use but you can use it for other things and third parties did make expansion devices that took advantage of the presence of this slot though from my research they seem to be extremely rare. I even know of at least one third party adaptor that uses the slot to add a 3DFX Voodoo II upgrade and according to Wikipedia SCSI and TV tuner cards were also available though I’ve never seen any of these cards in person. This port was removed along with the previously mentioned inferred sensor with the tray loading revision C model.

Opening the iMac is much easier then it is on later revisions and there is no “mesh” layer present that requires removal. You just need to remove a few screws on the underside and then use the handle to pull off the plastic case section. Once the outer case is removed as well as a few more screws and cables the motherboard assembly will slide out though be careful as with most older Macintosh computers the plastic casing can be delicate and things tend to snap off.

Here is the underside of the case with the motherboard assembly removed. The early tray loaders sport a fan for cooling as seen here while the later slot loaders used a fanless convection process to cool internals.

Here we have the tray that holds the motherboard and most of the iMac’s components completely removed from the case. The hard drive is located under the CD-ROM drive as seen in the image below. Mine came with the original 4GB 5400 RPM drive.

imactlx1

Originally the iMac came preloaded with Mac OS 8.1 or 8.5 with the ability to officially upgrade to OS X 10.3.9 though mine has been upgraded to OS 9.2.2.

1 ) CPU/RAM – The CPU and RAM on the tray loaders were both located on daughterboards that connected directly to the main motherboard. The metal cage enclosing the daughterboard easily wiggles off with some light force. Revision A as seen in this article and revision B iMacs only shipped with a 233MHz PowerPC 750 G3 processor w/ 512kb of L2 cache but later revision C and D tray loader iMacs had 266MHz and 333MHz CPUs installed.

tlmac12

imactlx3

imactlx4

CPU module top

imactlx5

CPU module bottom

Standard RAM amount was 32MB of PC100 SDRAM in a smaller laptop style form factor. The revision A iMac was expandable officially to 128MB and unofficially to 384MB. Revision B, C and D were officially expandable to 256MB and unofficially to 512MB. My machine came with the oddly numbered 288MB of RAM installed. It seems the previous owner did make the sole upgrade of adding a 256MB stick of memory in addition to the 32MB of RAM already installed.

I had no problem up upgrading my RAM to a full 512MB by installing two 256MB RAM modules despite being a Rev. A motherboard and sources online indicating 384MB being the limit.

2) Video – Original revision A iMacs shipped with a built-in Rage IIc chip and 2MB of SGRAM as seen on my iMac but this was quickly changed in revision B and up tray loaders to the much more powerful Rage Pro chipset with 6MB of SGRAM standard. The original revision A boards can be upgraded to a full 6MB of SGRAM.

The ATI chip isn’t a surprise as Apple has a history of using ATI chips for graphics in this era. As far as I can tell the revision A iMac G3 is the sole computer to use this specific version of the Rage chip built in. Overall the Rage IIc is an adequate chip, though by 1998 it was getting quite outdated and was seen as a entry level 3D video chip. 2D applications should run just fine as well as less intensive 3D titles as long as resolutions and features are kept in check.

imactlx2

with 4MB extra video RAM module

3) Sound – Sound has always seemed like a bit of an afterthought in Apple machines and finding specifics has always been a bit of a chore as sound chips aren’t commonly noted on spec sheets. The iMac would appear to use Crystal CS4211-KM chip which supports simulated surround sound via the two built-in speakers.

4) Battery – Lastly we have the PRAM battery which acts just like the CMOS battery in a standard motherboard. Be sure to replace this on any newly acquired Macintosh computer.

Accessories

Compucable iDock II

The iDock is an interesting accessory that was designed for the iMac to extend its capabilities. My version is the iDock II which features a built-in 1.44MB floppy drive. As far as I can tell the floppy drive is the only difference between the iDock I and II. The iDock connects to the iMac by way of a standard USB cable and requires its own power supply.

20220712_185418

The top of the iDock swivels allowing you some measure of turning your iMac which sits on top of the iDock.

20220712_185413

The rear of the iDock features several ports to expand your iMac such as four USB ports, two Geo ports and one ADB port. The ADB port has been reported to not work or only partially work on these units. On mine I was able to get an ADB mouse to work but it was very iffy and the response was poor. The iDock does require special drivers to function.

20220712_185433

The iMac does what it set out to achieve and I can see now what I couldn’t see as my high school self, why the iMac succeeded. It wasn’t meant for people like me. It was meant less for hardcore PC gamers and those that liked to expand and tinker with their computers and more for the everyday user, the soccer mom, the person that just wanted to do homework and surf the internet and it made a pretty easy to setup and usable computer to sit in the corner of the family room and have for general family usage.

As a collectors piece the Bondi blue iMac is certainly worth adding to the collection and holds a significant place in computer history and especially Apple’s history. They are still relatively inexpensive as of 2019 though an original revision A may take some work track down and identify. If your purely looking for a Macintosh for late 90’s gaming though there are much better options. Personally, I think your better off acquiring a Power Macintosh G3 tower or desktop simply for the vastly greater options you get in upgrading (such as PCI slots) and higher ease of repair. Failing finding one of these a later slot loading iMac or even a G4 could make a good choice as they seem to be easier to source and are more powerful out of the box.

This slideshow requires JavaScript.

On this blog we have already taken a look at two models of the Apple G4 Macintosh line. In this article we are going to take a brief look at another of this line. The Macintosh G4 “Sawtooth” also referred to as the AGP G4 due to its addition of an AGP slot for video.

The Sawtooth as we will refer to it uses the same style case and color scheme as the Digital Audio G4 that I covered earlier as well as the entire early G4 line. Released in 1999 the Sawtooth was a modest improvement over the earlier “Yikes” G4 with an AGP slot for video as well as faster ATA controller for IDE devices and the option of some faster video cards as well as faster CPU speeds.

The front is identical to the earlier models with the center speaker and power button as well as the smaller reset and debug buttons on the lower section. There are two bays, one 5 1/4  and the lower bay being 3 1/2. Mine has a DVD drive installed as well as an optional ZIP drive.

Turning the Macintosh around we see the PSU connector as well as four expansion slots on the lower portion of the case.

On the upper half we have our various connectivity jacks and ports.Closest to the top we have two Firewire 400 ports with a 10/100 Ethernet jack below that and then below that we have two USB 1.1 ports and finally two audio jacks for speaker and / or microphone. We also have a jack for a modem to the right.

Like the other G4 Macs the case opens very easily by pulling on a handle on the side. Here I have all the expansion cards removed as to give a better view. Up top we see the power supply as well as the two drive bays. The bays are actually one single piece that slides out by removing the front panel and undoing two screws. The lower bay appears to be 5 1/4 at a glance but it’s really a 3 1/2 bay. Mine originally had a hard drive installed in it for some reason.

The G4 Macintosh actually has ample room for hard drives and mine came with six hard drives installed. Possibly the previous owner was running a RAID array. I took out most of them but left in two. One is a 400GB and the other is 250GB. I left the OS that was installed though which was OS X 10.2 though I believe the original OS shipped was 8.6.

Now lets take a better look at the motherboard.

Compared to a PC motherboards I always found Macintosh motherboards from this time to look rather sparse and boring though this may be attributed to having components on the underside of the board. This motherboard like the Yikes model before it and the Gigabit Ethernet model after run on a 100mhz front side bus.

1) CPU – All of the original model G4 Macs run on the Power PC G4 (7400) CPU.  The CPU in this machine is a 450mhz version with 1mb of L2 cache but they also came in speeds of 350mhz to 500mhz. The 450mhz would be the middle range option and is probably comparable to an earlier Pentium III in performance.

2) RAM – There are four slots present designed to handle up to 2GB of PC100 SDRAM. stock though the most the machine usually came with was 256mb. Also earlier OS’s which originally came loaded onto the Sawtooth can only detect up to 1.5gb

3) Internal Firewire. The Sawtooth G4 has an interesting internal connector not present on the earlier Yikes models nor the later Gigabit Ethernet version. This is a Firewire 400 jack on the lower right corner of the motherboard presumably to power an internal Firewire hard drive.

4) Wireless airport card connector for attaching a wireless card. This was a feature not present on the earlier model.

5) ATA connectors – Two ATA66 connectors for attaching up to four IDE devices such as CD drives and hard drives.

6) CMOS battery – Is the standard 3.6 V lithium battery to save settings. Like all Macs the death of these batteries tend to cause more issues then what I see happen in PC’s. If your having odd instabilities replace these things first.

7) ATX power connector

Finally lets take a look at the expansion slots and cards I have installed.

The Sawtooth comes with three 66mhz PCI slots which will accept your standard PCI cards as well as special cards meant for the faster 66mhz PCI slot. Also new to this model over the Yikes Macintosh is the x2 AGP slot for a dedicated video card.

Video – The video card I have installed is an AGP ATI Rage 128 Pro card. This would of been the stock video card to come with this G4 though some models also came with non Pro versions. These cards came with 16mb of video memory onboard. I think the Rage 128 Pro is a decent card for the time and these were found in virtually all Apple Macintosh machines at the time. They have decent performance compared to something like the TNT2 as well as good compatibility with older titles. The video out options on this particular card are also nice offering standard VGA as well as DVI and S-video. This card does seem to run out of steam fairly quickly when you start running games post 2001 or so. Id recommend it for late 90’s Mac games but if you looking to upgrade this card maybe should be close to top on the your list for replacement.

SCSI was also an option on these Macs and many long time Macintosh users were still quite accustomed to the SCSI hard and CD drives. My machine came with a PCI Adaptec SCSI controller which I suspect was installed stock. I was able to use this card to replace the hard drive in the ZIP drive bay with an actual purple face plate SCSI ZIP drive although stock these machines used IDE ZIP drives with a face plates matching the translucent blue plastic.

CPU UPGRADE

I did also happen to acquire a Sonnet Encore ST/G4 upgrade CPU that I wanted to test out on this machine. Mine is a whopping 1.7ghz upgrade but they also made a 1.8Ghz upgrade chip and possibly faster. Installation was fairly easy and saw a massive speed boost over the 450mhz G4

I did notice that OS 10.2 did identify the CPU as a G3 though this didn’t seem to really affect anything.

sawtoothug3

Another upgrade I tried out as adding a PCI ATA133 card to match with the installed Maxtor ATA133 hard drive. This created noticeable faster booting times.

All an all another solid G4 machine from Apple. The Sawtooth does a modest job of improving on the Yikes G4 (a machine I hope to one day cover) but doesn’t offer anything to dramatic. Again, this is machine would certainly make a nice 90’s Mac gaming rig with a CPU that falls into the area of being capable but not to fast. The case is also rather nice being built quite solidly compared to earlier “brittletosh” cases and is also super easy to access and work on. I’ve never had any issues with the G4 processor and its always a treat to work with. These machines can also be found very cheaply so don’t hesitate to pick one up.


Some time ago I wrote an article on the Power Macintosh G3 minitower. In This article we are going to take a look at the desktop version of the same G3 and also look at a few minor upgrades I have performed.

Here is my rather yellowed but otherwise in good shape G3 desktop also known as an “Outrigger” case.  The G3 desktop was apples last traditional desktop Macintosh and more or less uses the exact same case as the 7500 and 7600 series I’ve covered in the past. Same speaker on the left and same available drive bays. Mine came with a 1.44mb floppy drive in the obvious floppy drive spot as well as a 24x speed CD-ROM drive below that and a 100mb ZIP drive which were not to uncommon on these machines. The floppy drives on these machines though are powered via a propietary floppy cable and do not have a molex connector on them. I’m unsure if you can use a regular floppy drive.

Here we see the back of the case which is similar but a little different then the 7500 or 7600 due to a different motherboard. There are three slots for expansion cards located on the far right.

We have a power connector and a pass through for a monitor top center and starting at the bottom left we have a SCSI connector followed by a lone ADB port followed by a Ethernet jack and then modem and printer jacks. Lastly we have a display jack for the built in graphics. To the right of the display jack we have another modem jack that my model came with as well as jacks for the audio, a audio out and mic input. This section may vary since it can be swapped out with various “personality cards” which I’ll talk about when we get to the motherboard portion.

Taking the top of the case off reveals pretty much the exact same thing we saw with the 7500/7600 machines.

Opening up the plastic folds and lifting the drive bay compartments reveals the motherboard as well as a space for a hard drive which is mounted on a sled much like in the drive bays. Mine came with the original 4GB hard drive and OS 8.6. The motherboard is much smaller then the motherboard of the 7500 or 7600 in the same case.

Here we have the drive and its sled removed.

The motherboard in the desktop model uses the exact same board as was found in the minitower.

Here is a closer shot of the area on the board were going to look at first with the CPU, RAM and ROM.

1 ) CPU – The G3 macs including the desktop models all used the PowerPC G3 750 CPU. The Desktop model came most commonly with a 233 or 266mhz CPU with 512k6 of L2 backside cache. They also came with a 300mhz CPU with 1mb of L2 cache option. My model was originally a 266mhz version but I upgraded mine to a 300mhz CPU with the 1mb of L2 cache.

The CPU modules have the L2 cache on them and install pretty much like you would on a PC  with a ZIF socket. You simply remove the heatsink, lift the lever and remove and replace your CPU. Keep in mind to change the CPU speed you will need to set jumpers on these motherboards which I will detail further down the page. When I replaced my 266mhz CPU with a 300mhz version it was still running at 266mhz until I set the jumpers although it was detecting the full 1mb of L2 cache as opposed to the 512kb on the original CPU.

2 ) RAM – the G3 has 3 RAM slots for PC66 SDRAM. Generally the machine sold with 32 to 64mb of RAM but is expandable up to 768MB. I have mine with the full 768mb of RAM. You can use faster PC100 or 133 RAM but it will operate as PC66.

Also keep in mind your going to want lower profile RAM since if the RAM is even a little taller then the stock CPU heatsink its going to cause issues with the top fitting. you can make it work but its awkward and pressed down on the motherboard.

Also of note for games. If you are experiencing audio stutter in games as in the example below TURN OFF virtual memory in the OS.


3 ) ROM – Like a lot of earlier Macs the G3 has its ROM on a module. early A revisions of this ROM did not allow slave devices on the IDE bus thus limiting you to one device per IDE controller. This was fixed with revision B and C. I have a later B revision of the ROM, the $77D.45F1 but if you do have an early revision A it is advisable to track down a B or C revision and swap them out. You can find this information under the Apple system Profiler in the OS.

3b ) Video – The onboard video as well as the SGRAM is located under the modem on my machine and next to the PERCH card slot. Early models had the ATI Rage II+ chip on board and later motherboards like mine have the Rage Pro or Rage Pro Turbo chips. This came with 2mb of SGRAM on the board expandable to 6mb.

4 ) “Personality” card or PERCH card – This card basically is the audio card for the Mac providing a simple audio out and mic input. These cards were known as “personality” cards or PERCH cards and are upgradable. My G3 has the simple audio card known as “Whisper” but can be upgraded to the “Wings” card which includes A/V input for video capture. There is also a very rare “Bordeaux” card which features DVD decoding capabilities.

My machine also has the optional 56k model seen just below the PERCH card.

5) Pram Battery which is you CMOS battery for retaining data.

6) CPU and FSB jumpers – This is the jumper block for setting your front side bus, CPU multiplier and PCI clock speed. The G3 comes from the factory with a preinstalled jumper block set to whatever your machines factory configuration is. as seen below.

This is usually under a warranty void type sticker. If your planning to upgrade your CPU or overclock your going to need to set these jumpers. Keep in mind the G3 motherboard uses the smaller 2.00mm sized jumpers but these can usually be found very cheaply on Ebay.

A guide to setting the jumpers can be found here and here.

Here is the jumpers after the factory set block is removed.

7 ) PCI – the G3 has three PCI slots available for expansion with the appropriate MAC version PCI cards.

I have cards installed in two of my three PCI slots. I will detail these upgrades at the end of the article.

8 ) 50 pin SCSI connector for connecting relevant SCSI devices such as hard drives and CD drives.

9) Two ATA-2 IDE connectors for connecting IDE hard drives and CD-Rom drives. If you have an early ROM board then you can only have one device per connection as opposed to two in a slave/master configuration. You are also limited to drives of up to 137gb with the onboard controllers.

10) PSU connector

11) Floppy connector.

My Expansion cards

I have installed two PCI cards in my G3 Macintosh as upgrades

1 ) Sonnet ATA-133 controller card

This is actually the same card I had installed in my G4 MDD Macintosh. I decided to pair this card up with both a 52x speed CDRW drive as well as a 40gb Maxtor ATA-133 hard drive for added speed. This allowed me double my CD speeds and dramatically increase the speed of accessing my hard drive. Using a PCI IDE controller also allows you to overcome the 137gb size barrier of the onboard controller.

2 ) ATI Rage 128 PCI video card w/ DVD decoder.

Not really a huge upgrade over the onboard video but an upgrade that offers a little more power and DVD decoding abilities. The Rage 128 chip is a decent chip that offers good compatibility with games in general and should work fine with late 90’s Mac games. I believe the card pictured above is the 16mb version though there are 32mb cards available. These cards are also fairly cheap and available online. Just be sure to buy the Macintosh versions.

So in the end what do I think of the G3 desktop? I like it. Even though it is basically the same machine as the minitower model I have a soft spot for desktop designs and the desktop just fits into my setup better. The desktop model also seems lighter then the tower model though since it uses the same 7500/7600 series case it comes with the same issues of being made of very brittle plastic. Expect hinges and tabs to bust off when working with this machine. Overall I feel the G3 makes a good rig for playing late 90’s Macintosh games and offers a good range of expansion options. With OS 8 or 9 loaded on your hard drive your good to go.

The Color Classic was a much beloved but underpowered classic compact Macintosh released in February of 1993. Along with the Color Classic II released that same year it was the only “classic” compact Mac to feature a color screen. Unfortunately the Color Classic was very underpowered and was comparable to Apples low cost LC machines. It has a very low RAM limit of 10MB and its 16mhz 68030 CPU was strangled performance wise by its 16-bit data bus. Compare this to its big brother the Color Classic II which featured 36MB of maximum RAM and a 33mhz 68030 on a full 32-bit data bus. Unfortunately the Color Classic II or Colour Classic II as it is also known was never sold in the US and only in Asia, Europe and Canada. Even in places it was officially sold it was not overly common and importing one can command a high price. If you do live in the US though there is a practical solution to turning your Color Classic into the machine it should of been in the first place and that is to replace the motherboard with that of a Macintosh LC 550, essentially transforming it into a Color Classic II. In this article we will be looking at one such machine. Except for the case label on the front and a slightly different motherboard this machine is for all practical purposes a Color Classic II.

The Color Classic and Classic II use the same case and only differ externally by the name plate at the bottom. The case itself is a departure from the earlier styling of the compact Macs and has a much rounder case design. The main attraction to the Color Classics are the built in 10 inch (9 inch viewable) Sony color Trinitron monitor. Former models in the compact Mac lines all used black & white monitors and later macs immediately following the color classics used lesser quality shadow mask monitors.  The monitor in these models is known to give a very crisp image capable of 512 x 384 pixel resolution. The down side of this monitor and its lower resolution is that many games from the time required a 640 X 480 resolution. One popular modification does allow you to increase the Color Classics resolution up to the required 640 x 480 increasing game compatibility also adds stress to components and may result in a shorter overall life span of your Macintosh.

Above the monitor we have a built in Microphone, a new feature for Macintosh computers at the time. Below the monitor we have a standard 1.44mb floppy drive as well as a power LED and controls for volume level and brightness.

One thing to note about the Color Classic is the the power switch on the back does not actually power up the system. To initiate boot you need to use an Apple keyboard with a soft power on button on the keyboard. The switch on the rear is simply to activate the power supply. To the right of the PSU we have two pots for monitor adjustments and in the center above our ports is a security lock.

From the bottom left to right we have two ADB ports for keyboard and mice followed by a printer port, modem port. external SCSI port, microphone jack, audio out jack and finally a space for an expansion card. My Color Classic came with a Ethernet card installed.

Getting access to the motherboard in a Color Classic is exceptionally easy and all you need to do is gently press down on the two plastic tabs and pull away from the case. The plastic cover should come right off. To remove the motherboard itself just grasp it firmly and pull away from the case.

If you look inside the bay where the motherboard came out you can see the edge connector on the far side where the board interfaces with the rest of the computer.

The floppy drive and hard drive are accessible by removing the outer case via four t15 screws much like the older compact macs. My machine came with a 120mb SCSI 50 pin hard drive. The hard drive can be removed without removing the analog board with a little effort but the floppy drive usually requires its removal to access it. Also of note the speaker is also housed in a plastic shell below the PSU and behind the floppy drive. The speaker also needs to be removed to access the floppy drive.

Before I start talking about the motherboard I need to restate as the title says that this is NOT a stock Color Classic. Stock I feel this machine is pretty underpowered so thankfully when I picked this unit up it had been upgraded by replacing the motherboard with the motherboard from a Macintosh LC 550. The Macintosh LC 550 motherboard is essentially the same motherboard in the fairly uncommon Color Classic II thus by swapping boards with a 550 board you turn your Classic I into a full fledged Classic II with two minor differences. The first difference is the name badge on the front of the case which I suspect can be swapped out if by some random chance you come across a Classic II’s badge. Second, depending on what you read the Color Classic II either has the exact same motherboard as the LC 550 or the LC 550 has slightly more video ram maximums ( 512k maximum in a Color Classic II as opposed to 768kb maximum in an LC 550). The LC 550 having a higher VRAM max makes sense as it was meant to drive a higher res monitor but still many sources on the internet claim they use the same board.

There are other upgrades you can perform on a Color Classic I or II such as the “Mystic” mod which allows a 68040 CPU or even Power PC CPU mods but these require software and/or hardware modifications where as the LC 550 mod is simply a matter of swapping motherboards and that is all. LC 550 boards have gotten harder to find in the US but price wise it’s still a cheaper and easier option then paying a hefty premium to import a Color Classic II.

The board itself is extremely compact. Take note of the metal legs on the underside when removing or reinserting the board back into the case as they can break off and short components as they rattle around inside a powered on machine.

1)  Edge Connector – This is the connector that the board uses to interface with the rest of the computer when inserted into the case.

2) PDS or Processor Direct Slot – A rather limited form of expandability slot. Usually cards using the PDS slot were specific to the CPU used thus a PDS card meant for a 68040 would not work on a 38030 with a PDS slot. My particular Color Classic has an Ethernet card occupying this slot but another popular card was the Apple IIe emulator card which let one play Apple IIe games on the Color Classic I and II.

3) CPU – The LC550/Color Classic II are equipped with a Motorola 68030 running at 33mhz on a 33mhz front side bus utilizing a full 32-bit data bus as seen on this board. This was a pretty speedy CPU at the time and is worlds better then the 16mhz 38030 in the original Color Classic which was strangled performance wise by a 16-bit data bus motherboard.

4) Coprocessor – Here is a socket for an optional 68882 math coprocessor to assist in floating point math. This was an option on both Color Classics and the LC 550. My motherboard thankfully came with one installed. Not terribly useful for games but nice to have none the less.

5) PRAM – standard PRAM battery for holding saved data and date/time.

6) VRAM – Here is the systems video ram for the built in video controller. On the original Color Classic you had 256kb with the slot allowing for expandability up to 512kb of VRAM. On the LC 550 we have 512kb standard with the added RAM via the neighboring slot for a total of 768kb. As I stated earlier there is some mixed information on the internet on if a true Color Classic II board allows up to 768k or is maxed out at 512kb like the original Color Classic.

7) RAM – The original Color Classic was restricted to managable but still low amount of 10mb of RAM but the Color Classic II and LC 550 board we see here comes with 4mb solder onto the board with the ability to expand up to 32 additional megabytes via a 72 pin RAM slot for a full 36mb of RAM as I have on my machine.

In conclusion the Color Classic is a neat little machine. It takes up barley any space which is also part of the reason it has such a cult following in places like Japan where space is at a premium. It also has a very nice and crisp color display unlike previous compact macs which were limited to monochrome displays. While the power and expandability of the original Color Classic is pretty poor the Color Classic II is everything the original should have been and if you happen to come across one pick it up if you like Macs. If your in the US however finding a Classic II may be daunting so if you do have an original model keep an eye out for the LC 550 motherboard, perhaps from an LC with a dead monitor. The motherboard swap is literally just a drop in replacement and you instantly have yourself a Color Classic II with maybe a little extra VRAM.

mdd2

In my previous article I talked about the Macintosh G4 and specifically the “Digital Audio” model. This time I’m going to talk about another G4 Mac sometimes referred to as a DRR G4 but more commonly known as the MDD or Mirror Drive Door model. Looking at the images above and below it becomes fairly obvious how these machines got their nicknames.

mdd1

The case overall is basically the same as the Digital Audio versions case and in fact all the G4 tower PC’s are similar with exception of the face and back. The case color scheme is more silver this time around as well as the cases area of the two drive bays has a mirror like plating, hence the name. This is actually quite reflective and I guess is useful to see if your being snuck up on while browsing on OS X or as a impromptu weapon against Medusa attacks. Also on this mirror finish section we have the power button at the top which glows a nice white when powered on as well as a welcomed frontal audio jack for headphones. The speaker is now placed at the very top with four decorative vent looking recesses at the bottom. Missing are the reset button and programmers button found on the Digital Audio and earlier G4 tower cases.

mdd3

The rear of the MDD is the opposite layout of the earlier Digital Audio case. This time the expansion bays are at the top while the various ports and jacks are near the bottom.

mdd4

The available ports are exactly the same but in a different orientation. Two USB 1.1 and two Firewire 400 jacks followed by Ethernet and modem jacks and finally an audio output jack and a jack for those Apple high definition speakers. The only addition is an audio input jack next to the audio out.

mdd5

Opening the case is the same as before and super easy with a side handle that pulls up and away.

mdd6

Inside it’s basically a reverse layout of what we saw in the Digital Audio machine.

mdd9

On the section of the case that does not fold out we have two full 5 1/4 drive bays for optical drives as well as a fan and three spots for hard drive mounting. Two 3 1/2 inch HDD bays under the 5 1/4 inch bays and one vertical oriented 3 1/2 inch HDD bay to the left under the power supply. I have two hard drives currently installed. One 80GB drive that holds Mac OS X 10.5.8 and a second 180GB drive for data.

mdd7

Like other G4 motherboards the MDD motherboard has quite a few chips soldered on underneath making the board look slightly bare from the top.

1) CPU – The MDD model G4s came with many CPU options up to dual 1.42ghz G4 PowerPC 7455 chips. Mine was the lowest powered model and came with dual 867mhz chips with a 133mhz front side bus. Note that many models in the MDD line came with dual CPUs on a sort of CPU module. As I said previously in articles its hard to compare the power PC to the far more common Intel X86 CPU’s in speed but this would roughly be equivalent to a Pentium 4 or maybe a 1.4ghz Tualatin PIII but this is only a rough guess.

mdd8

mdd16

2) RAM – four slots supporting up to 2GB of DDR RAM which is also why this model is also sometimes referred as the DDR G4. Unfortunately the Power PC 7455 can only use at most 50% of the DRR RAM bandwidth meaning there is no improvement over the previous models and their PC133 SDRAM as far as memory speed is concerned.

3) Four 64 bit PCI slots (which work fine with regular PCI cards) as well as one x4 AGP slot for video. Keep in mind that if your using a x8 AGP card whether a MAC card or a PC card that has been flashed with a mac BIOS you need to disable pins 3 & 11 to get video. This applies to all G4 Mac’s with the exception of the AGP 2x Sawtooth models. This issue is due to apple using the at the time unassigned pins 3 & 11 for the “ADC” apple monitors connection. When AGP x8 came out those pins were suddenly used for something else so basically they wouldn’t run on a G4 Macintosh. The way around this is to disable the pins completely either by taping over them or cutting the traces making the card AGP x4.

mdd10

The card I’m using in this machine is a Geforce4 MX. Not a particularly interesting card but it more or less does the job. The MX was a budget card and less advanced then even the preceding Geforce3. For me it’s enough since I really only use this machine for one game and messing with OS X but the MDD G4 can support up to a Geforce 7800 GS with the earlier mentioned Pin modification.

4) Wireless airport adaptor for wireless internet

5) IDE connectors – There are actually three IDE connectors but one is obscured behind the huge CPU heatsink. The one located behind the heatsink is an ATA-100 connection intended for your primary hard drive.

macmddex2

The two connectors located at “5” are an ATA-66 connector for two secondary hard drives and a ATA-33 that is intended for the optical drives.

macmddex1

Regardless I have a separate Sonnet ATA-133 PCI controller card installed in my machine for the optical drive and main hard drive while my secondary hard drive is attached to the ATA-66 labeled connector.

mdd11

6) CMOS battery used for saving settings.

Upgrading the CPU

I decided to upgrade the CPU in my MDD Mac since the CPU it came with was barely what I needed to do what I wanted to do with this machine. Third party CPU upgrade kits seemed to be overpriced so in the end I decided to go with a cheap $25 upgrade to a single 1.25ghz CPU. Now the value of this upgrade is somewhat debatable since I was going from a dual CPU configuration to a single CPU and OS X can take advantage of dual CPUs but my main purpose of this rig was to play a few select games which didn’t really take advantage of dual CPU anyways so I figured the 383mhz bump was worth it.

When considering a CPU upgrade for any G4 Macintosh keep in mind the CPU modules are not compatible across models so make sure the CPU your looking at is specifically for your model, for instance for a MDD model or Sawtooth G4.

I also wanted to (and needed to with this CPU upgrade) bump the front side bus speed up from 133mhz to 167mhz which required a small modification to the motherboard.

First disconnect any cables from the motherboard and then remove the currently installed CPU which can be done by unscrewing the various screws holding the heatsink on and then gently disconnecting the CPU module from the motherboard. It will look like this with the module removed.

mdd12

next unscrew any screws fastening the motherboard to the case and remove. The modification we need to do to enable 167mhz FSB is the desoldering and removal of a resistor on the underside of the motherboard.

mdd13

The piece we need to desolder is labeled as R676 and is located near one of the corners of the large black heatsink.

mdd14

Desolder this component and that’s it. You can now install a faster CPU and have a slightly higher FSB.

mdd15

The final step is to reassemble and install the new CPU. Here is my 1.25ghz G4 CPU module before installation and reapplying the heatsink.

mdd17

And lastly booting the machine and checking the system information to confirm everything.

mdd18

I like the MDD G4 Macintosh. It’s super easy to work on and plays the few early 2000 OS X exclusive games I need it to play just fine. It does have its issues though. It’s a shame there was no real improvement with the DDR RAM being used over the older PC133 SDRAM. Also upgrading the CPU if you have an early model like mine can be a small chore requiring a modification not to mention the modification needed to use a more powerful AGP video card. Another problem is the fan. This machine can be pretty loud and I noticed it is significantly louder then my Digital Audio model G4. For me the fan isn’t to loud and doesn’t come anywhere near the noisiness of my dual Tualatin rig but I can see how it can annoy some people and the noise level did seem to be a common complaint when I was doing research on the model. I would still recommend a MDD model though if you just wanted to casually mess around with those few early 2000’s OS X games and you can pick up a rig cheaply.

g4d14

The G4 Macintosh was produced between 1999 and 2004 in three main distinctive variations known sometimes as the “original G4’s” or “Sawtooth” models, the “Quicksilver” G4’s and the “Mirror Drive Door” or MDD G4’s. Even among these there were motherboard variations. For instance early models of the “original” line lacked an AGP slot. The G4 I’m going to talk about today is a sub model known as the “Digital Audio” G4 and falls somewhere between the original line and the Quicksilver models. Basically It has the motherboard of an early Quicksilver model in the case of the original line.

To be honest I’ve grown kind of fond of the G4 towers over time. They tend to strike a sort of balance between the good things about apple such as design and the Power PC CPU and a IBM compatible such as expandability and more standard ports and drives.

g4d1

The case design for all the G4’s is more or less the same basic design with most of the variations concerning the color and style of the frontal bays. The digital audio G4 uses the same case as the Sawtooth line and is a pleasant white/bluish color. There are also these handle looking things that are on every corner which in all honestly are nice for assisting lifting and moving the relatively heavy tower. On the front we have two 5 1/4 bays.

g4d9

Internal shot of the two bays.

one usually sports a DVD/CD drive as mine does and the other sometimes a 100mb ZIP drive depending on your model. Mine obviously lacks the ZIP drive but one can be added easily enough.

Also on the front we have a grill for the built in speaker as well as a power button that glows a nice white when powered on as well as a programmers button and a reset button beneath that. The programmers button can be used to bring up a console window for debugging and can also be used to update firmware.

g4d2

Under the fan slot we have a standard power jack and to the left we have our built in ports. At the top we have a modem jack and two audio ports. The top jack is a standard headphone jack and below that is an apple speaker mini-jack for high fidelity apple speakers. Further down we have a Ethernet port followed by two Firewire 400 ports and a pair of USB 1.1 ports. Below that we have five slots for internal expansion cards. The top one is taken up by my video card since the G4 machintosh’s do not have built in video. further down I added a Firewire/USB card for more connectivity.

g4d5

Unlike many of the earlier Mac’s I’ve reviewed here the G4 uses a seemingly higher quality plastic and a lot more metal so the case feels much more sturdy and less prone to “brittletosh” issues. Opening the case is getting inside is ridiculously easy and may be the easiest time I’ve ever had getting into any PC or Mac. All you do is lift the handle on the side of the case and….

g4d6

Once open you have almost full and unimpeded access to the board. At first I thought the motherboard seemed very barren and unpopulated but many of the chips and capacitors are actually mounted on the underside of the board. There are also three spots on the bottom of the case for mounting hard drives. Currently I only have one lowly 40GB IDE drive mounted.

g4d8

On to the motherboard.

g4dmb

1) CPU – The Digital Audio G4’s came with a variety of CPU speed options starting at 466mhz. Mine is the highest end model sporting a 733mhz PowerPC 7450 processor sometimes refered to as a G4e (enhanced) as it is a redesigned and improved version of the G4 CPU. Its very hard to find CPU comparisons between PPC and Intel x86 CPU’s on the web but I would wager its perhaps equivalent to a faster Pentium III. This motherboard is running on a 133mhz front side bus.

g4d10

2) CMOS battery – Is the standard 3.6 V lithium battery to save settings. Like all Macs the death of these batteries tend to cause more issues then what I see happen in PC’s. If your having odd instabilities replace these things first.

3) RAM – Three slots for SDRAM supporting up to 1.5gb of PC133 RAM

4) Expansion slots – four 64 bit 33mhz PCI slots and one AGP x4 slot for a video card.

Video – The Digital Audio G4’s came with one of several video cards. Mine came with an AGP ATI Rage 128 Pro with 16 MB VRAM. Keep in mind that if your using a x8 AGP card whether a MAC card or a PC card that has been flashed with a mac BIOS you need to disable pins 3 & 11 to get video. This applies to all G4 Mac’s with the exception of the AGP 2x Sawtooth models. This issue is due to apple using the at the time unassigned pins for “ADC” apple monitors connection. When AGP x8 came out those pins were suddenly used for something else so basically they wouldn’t run on a G4 Macintosh. The way around this is to disable the pins completely either by taping over them or cutting the traces making the card a AGP x4.

g4d11

This card is a Macintosh version so it comes with both a VGA port and an Apple Display Connector port. Its not really the most exciting card but it does well enough for 90’s games and some early 2000’s games. Your going to want to upgrade though for any series turn of the century gaming though. Officially the Digital Audio models were sold with up to Geforce 2 or 3 cards installed (some conflicting information).

5) Wireless airport card connector for well….connecting to wireless devices.

6) IDE connectors – Two ATA-66 connectors for connecting a total of four IDE devices. In my setup I have my DVD drive connected to the onboard ata66 connector but I’m using an ATA100 PCI card to connect to the hard drive.

g4d13

7) ATX power connector.

I haven’t really done much to this machine since I got it. I’m currently running OS X 10.4.11 which is the highest officially supported version of the OS.

This slideshow requires JavaScript.

For comparison I also have a standard Macintosh Quicksiver G4. For all intents and purposes the Quicksiver is basicly identical to the Digital Audio except for the case and improved specs stock such as faster CPU and graphics cards.

quick1

I rather like the look of the front speaker without the grill.

quick2

On the read we have the same connections though my Quicksilver here lacks the modem. Finally a look at the motherboard which looks a little diffrent as far as some smaller compoents but has the same amount and placement of major compoents such as expansion slots.

quick3

I haven’t used this particular Mac much because I have a more powerful MDD G4 that I will eventually cover here that I use for present general early OS X stuff. That said I do like the Digital Audio G4. most of all I like the color scheme and ability to easily add a ZIP drive, even though I currently haven’t and probably will not.


FDISKformat

A place for the pc collector

I ❤ Old Games!

Probabilmente il miglior blog bilingue al mondo*

Waltorious Writes About Games

Game-related ramblings.

NekoJonez's Gaming Blog

My Gaming Timeline

Evelynn Star

Lynn talks about video games, records and books ...

Retro Megabit

Sharing My Retro Video Game Collection.

133MHz's Junk Box

Random electronics and gaming crap

SNES A Day

Chronogaming project featuring reviews, screenshots, and videos of the entire Super Nintendo library in release order.

Retrocosm's Vintage Computing, Tech & Scale RC Blog

Random mutterings on retro computing, music, plus radio controlled scale modelling.

The PewPew Diaries.

Work(s) in Progress!

1001Up

1001 video games and beyond

retro computing and gaming plus a little more

sparcie

retro computers and stuff

jispylicious

Stay Jispy!