Skip navigation

Tag Archives: compact Mac

Previously we have looked at several black and white compact Macintosh computers including the Classic, Classic II and Macintosh SE. Today we are going to take a look at the pinnacle of the B/W compact Mac family, the Macintosh SE/30.

The Macintosh SE/30 was released in 1989 and was a compact mac to rule them all. It offered the power of its larger Macintosh II brothers in a small compact package as well as some future upgradability.

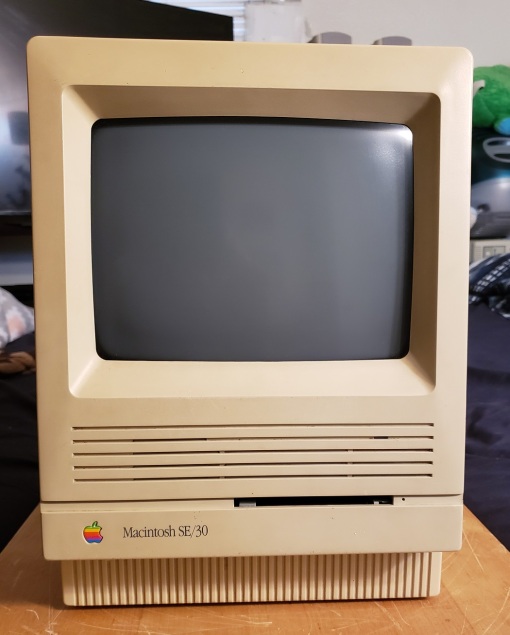
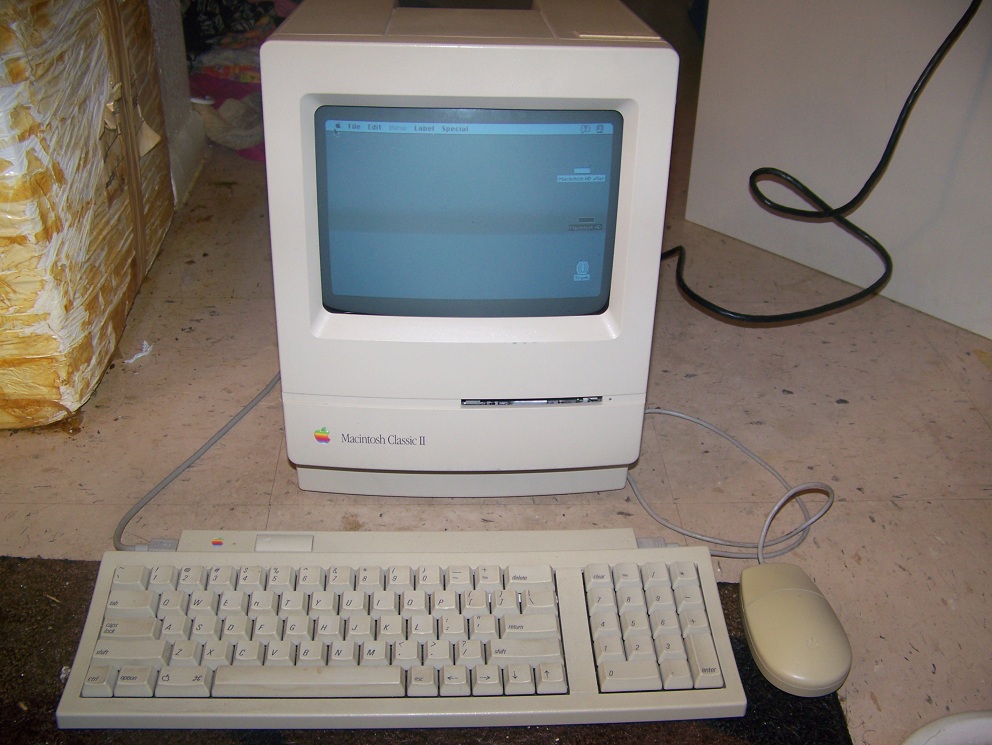
The front of the SE/30 is obviously dominated by its 9-inch 512×346 pixel black and white screen. The quality of this screen is excellent and games designed for the b/w mac look great on this machine. Other then the screen we have a small HDD activity LED hidden within the horizontal lines below the screen. The floppy drive is a 1.44MB drive which on the SE/30 for the first time came standard on a compact mac.

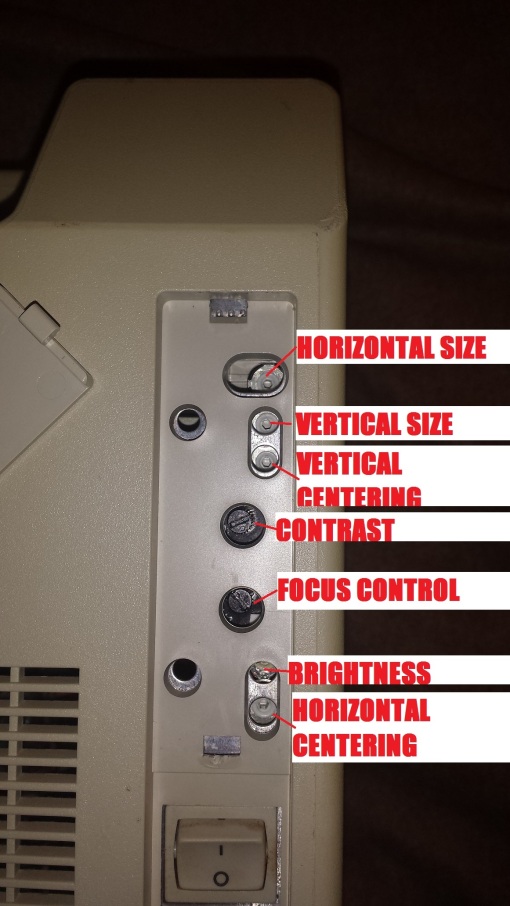
The only dial or button on the face of the SE/30 is a brightness dial for the monitor hidden away below the Apple badge and model name.

First off on the lower left side of the rear is the expansion card plate for certain expansion cards. This SE/30 previously seems to have had a Radius display card but unfortunately the card was removed by the previous owner but the bracket was left behind. To the right of this we have a standard 3-prong power connector and the power switch.

Taking a look at the various ports starting from the lower left we have dual ADB ports for keyboard and mouse. Next to this we have an external floppy drive connector for attaching well, an external floppy drive. Next is an external SCSI port for connecting external SCSI devices such as hard drives and CD-ROM drives. Next is an apple printer and then modem jack and lastly we have a 1/8 stereo audio out jack for connecting headphones or external speakers. Since we are talking about the sound the SE/30 uses an Apple Sound Chip (ASC) including four-voice, wavetable synthesis and stereo sampling generator. The sound coming from the built in internal speaker will be mono but anything through the rear audio jack, wether speakers or headphones will be stereo.

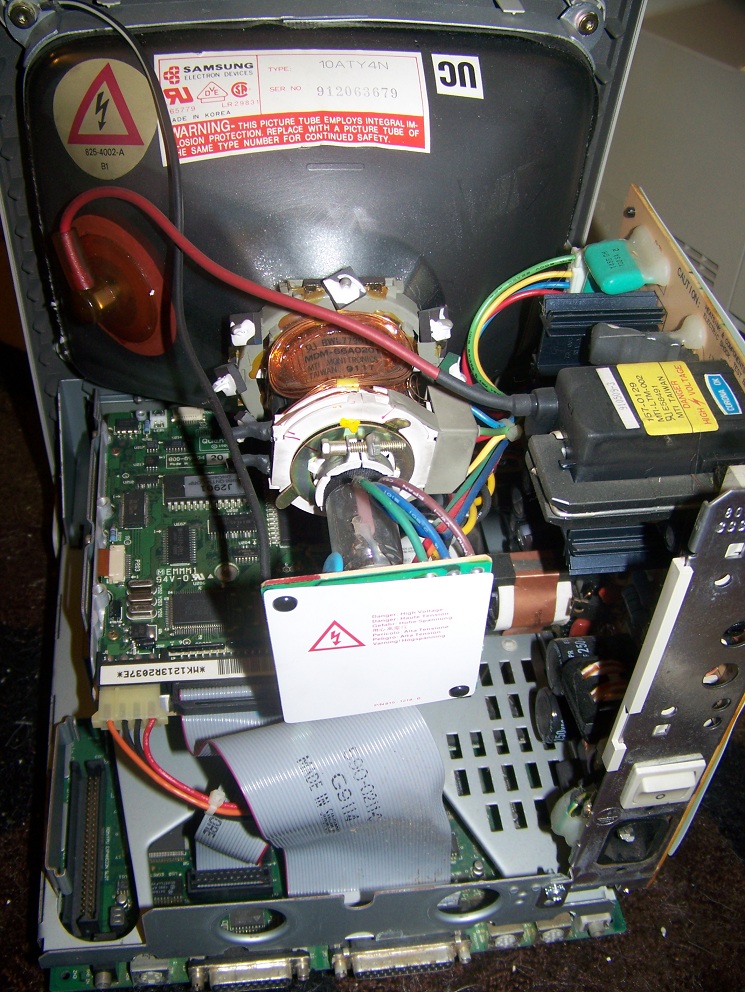
Removing the case reveals the drives and internals.

It is fairly cramped inside but the motherboard is fairly easy to remove as it just slides up and then away. Remember to detach the cables before removing the motherboard though.

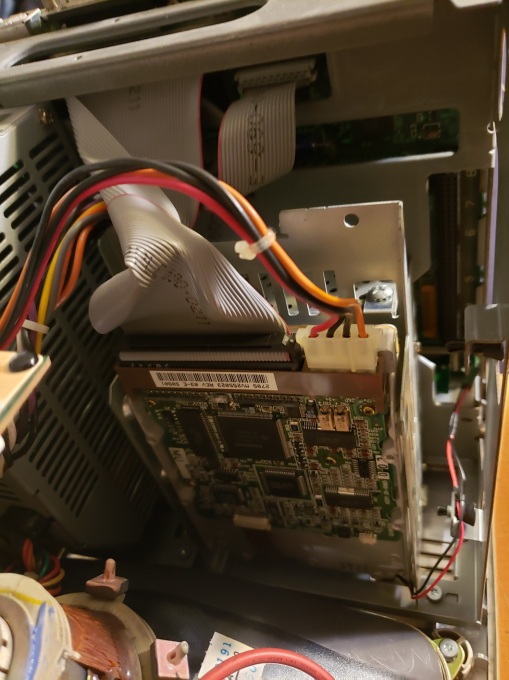
The fan header, floppy and SCSI cable and power cable need to be unplugged from the motherboard. Only the power cable may present an issue since it can be a little stubborn and hard to reach. Below the CRT tube is a tray for an optional SCSI hard drive. Generally the SE/30 was sold with either a 40MB or 80MB hard drive installed but the system will take as large as a drive as you can find. I currently have a 300MB hard drive installed. Below the hard drive is a 1.44MB floppy drive.

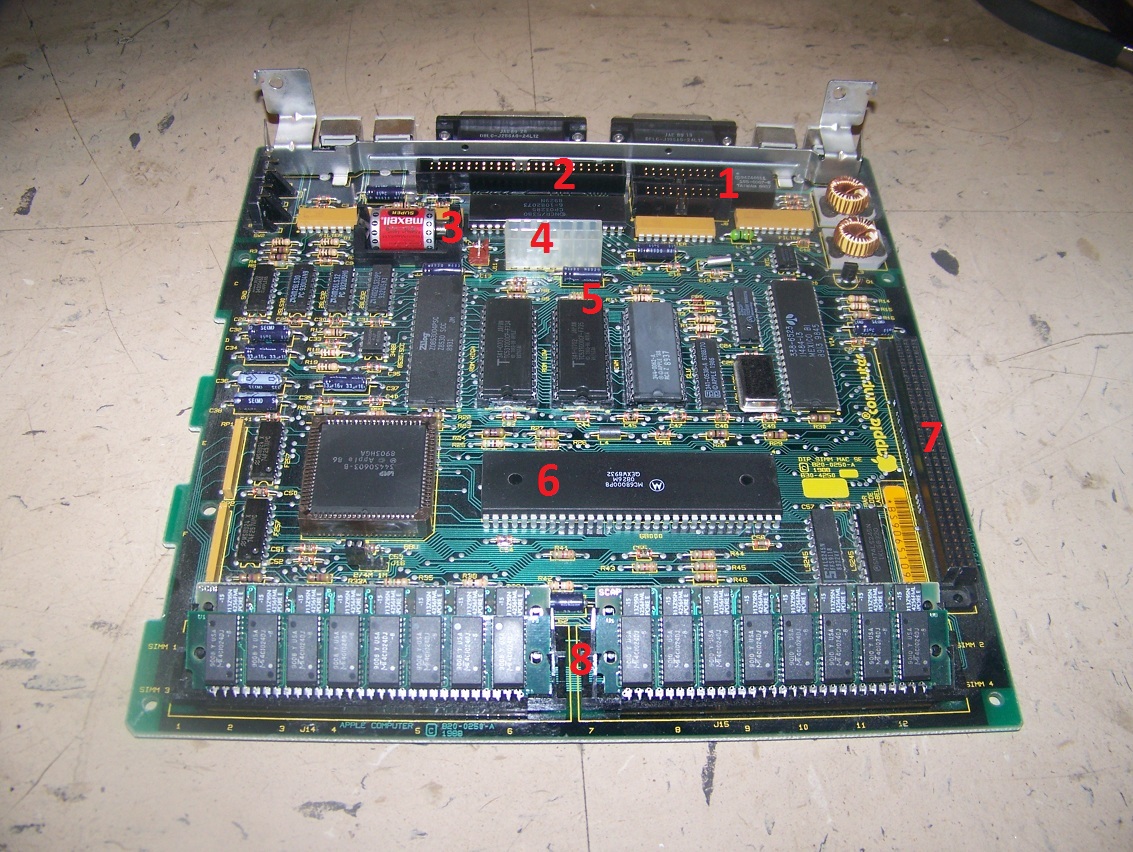
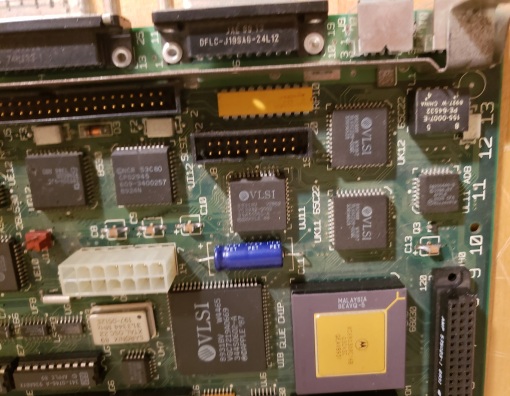
Above is the motherboard for the SE/30 after being separated from the case. A common point of failure on these boards as with most of the older Macs are the silver surface mounted capacitors. These tend to leak over time but can be replaced with modern equivalents.

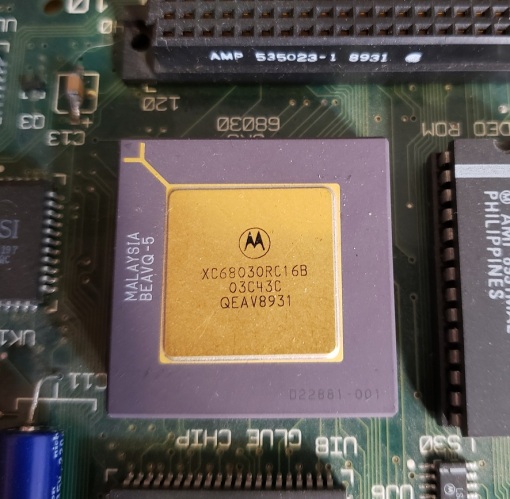
1 ) CPU – The CPU is the Motorola 68030 running at 16MHz. This is the same CPU and speed as some of the SE/30’s big brother full sized Macs such as the Macintosh IIx and IIcx. Due to the SE/30’s 32-bit bus it is the fastest of the black and white compact macs being even faster than the Mac classic II which features the same CPU and speed but only ran on a 16-bit bus.

2 ) FPU – One other feature of the SE/30 is the inclusion of an FPU co-processor standard on the motherboard as opposed to being optional. The Motorola 68882 FPU unit helped when performing more complex math functions though like the on the PC I’m not sure it was utilized very often in games. You could argue that an optional FPU socket is a better option since if the FPU fails you can replace it much easier.

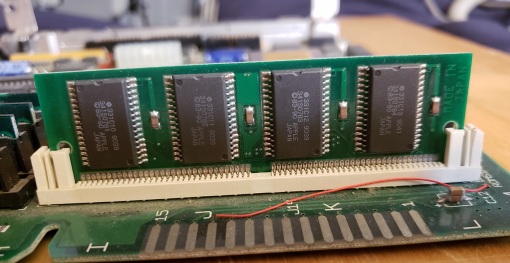
3 ) RAM – The SE/30 features eight slots for 30-pin RAM SIMMS. 1MB or seems to of been stock but it’s not unusual to find SE/30’s with 8 to 16MB of memory.

Unofficially the SE/30 can support up to 128MB of RAM using 8 16MB SIMMs. This is a staggering amount of memory for 1989 when this model was released let alone in such a compact machine. I was able to upgrade My SE/30 to 128MB, just be sure to remember afterward to navigate to the memory option in your OS and enable 32-bit memory mode.

4) ROM – The original ROM that came stock with the SE/30 was a 32-bit “dirty” ROM meaning that it still had some 24-bit code. This meant the SE/30 was limited to 8MB of RAM though there was a software solution called Mode32 which allowed 32-bit mode. Both SE/30s I have come across had Mode32 installed and if yours does not the software is freely available with an internet search.

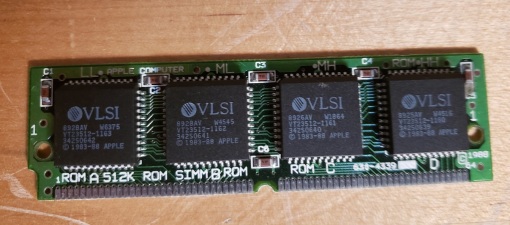
Thankfully the ROM on the SE/30 is not soldered to the motherboard and can be swapped out as easily as if it was a stick of RAM. One way to make your SE/30 32-bit “clean” was to swap the stock ROM out with the ROM from a Macintiosh IIsi or IIfx. For a while I had swapped my ROM with one from a Mac IIsi and it seemed to work fine.

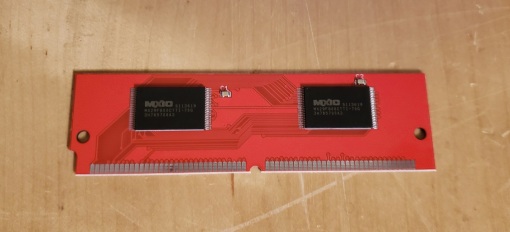
Possibly the best option currently for making your SE/30 32-bit “clean” would be ordering the reasonably priced ROM-inator-II from Bigmessowires. The ROM-inator II is a modern replacement for your SE/30 which makes it 32-bit “clean” but also adds HD20 hard disk support, various utilities and lets your Mac boot to System 7.1 from the ROM.

5 ) PDS slot – The PDS or Processor Direct Slot allowed the SE/30 to accept a number of expansion cards. Something not seen in most of the compact Macs. Various cards such as accelerators and display cards can be added via this slot.

6 ) PRAM battery

7 ) SCSI connector

8 ) floppy connector

9 ) Power connector

10 ) Interrupt and reset buttons

The SE/30 is one of the all time classic Macintosh computers and along with the color classic I and II one of the absolute best compact Macs. The SE/30 has all of the power of a full sized Macintosh II in a much smaller package. With a ROM replacement, a sizable SCSI hard drive and the full 128MB of RAM the SE/30 becomes a monstrous classic Macintosh. The smaller black and white monitor can be a handicap when it comes to games but games designed for the B/W mac look stunning on the monitor and the lack of color even lends itself to the atmosphere of certain games such as the Infocom Macventure series.

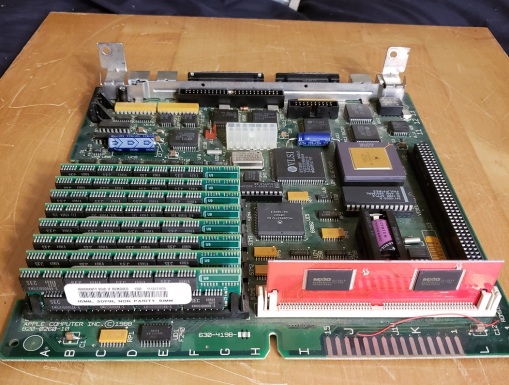
re-capped Mac SE/30 motherboard upgraded with ROM-inator II and 128MB of memory

I would highly recommend tracking an SE/30 down if you want a classic compact Mac. You’ll probably never need the 128MB of RAM but I would certainly recommend adding a nice sizable SCSI hard drive or even a SCSI2SD adaptor for storage. I would also highly recommend the very affordable ROM-inator II if only to make your machine 32-bit “clean” and to get that very nice ability to boot from ROM.

SE/30 with external SCSI CD-ROM drive

This slideshow requires JavaScript.

The Color Classic was a much beloved but underpowered classic compact Macintosh released in February of 1993. Along with the Color Classic II released that same year it was the only “classic” compact Mac to feature a color screen. Unfortunately the Color Classic was very underpowered and was comparable to Apples low cost LC machines. It has a very low RAM limit of 10MB and its 16mhz 68030 CPU was strangled performance wise by its 16-bit data bus. Compare this to its big brother the Color Classic II which featured 36MB of maximum RAM and a 33mhz 68030 on a full 32-bit data bus. Unfortunately the Color Classic II or Colour Classic II as it is also known was never sold in the US and only in Asia, Europe and Canada. Even in places it was officially sold it was not overly common and importing one can command a high price. If you do live in the US though there is a practical solution to turning your Color Classic into the machine it should of been in the first place and that is to replace the motherboard with that of a Macintosh LC 550, essentially transforming it into a Color Classic II. In this article we will be looking at one such machine. Except for the case label on the front and a slightly different motherboard this machine is for all practical purposes a Color Classic II.

The Color Classic and Classic II use the same case and only differ externally by the name plate at the bottom. The case itself is a departure from the earlier styling of the compact Macs and has a much rounder case design. The main attraction to the Color Classics are the built in 10 inch (9 inch viewable) Sony color Trinitron monitor. Former models in the compact Mac lines all used black & white monitors and later macs immediately following the color classics used lesser quality shadow mask monitors.  The monitor in these models is known to give a very crisp image capable of 512 x 384 pixel resolution. The down side of this monitor and its lower resolution is that many games from the time required a 640 X 480 resolution. One popular modification does allow you to increase the Color Classics resolution up to the required 640 x 480 increasing game compatibility also adds stress to components and may result in a shorter overall life span of your Macintosh.

Above the monitor we have a built in Microphone, a new feature for Macintosh computers at the time. Below the monitor we have a standard 1.44mb floppy drive as well as a power LED and controls for volume level and brightness.

One thing to note about the Color Classic is the the power switch on the back does not actually power up the system. To initiate boot you need to use an Apple keyboard with a soft power on button on the keyboard. The switch on the rear is simply to activate the power supply. To the right of the PSU we have two pots for monitor adjustments and in the center above our ports is a security lock.

From the bottom left to right we have two ADB ports for keyboard and mice followed by a printer port, modem port. external SCSI port, microphone jack, audio out jack and finally a space for an expansion card. My Color Classic came with a Ethernet card installed.

Getting access to the motherboard in a Color Classic is exceptionally easy and all you need to do is gently press down on the two plastic tabs and pull away from the case. The plastic cover should come right off. To remove the motherboard itself just grasp it firmly and pull away from the case.

If you look inside the bay where the motherboard came out you can see the edge connector on the far side where the board interfaces with the rest of the computer.

The floppy drive and hard drive are accessible by removing the outer case via four t15 screws much like the older compact macs. My machine came with a 120mb SCSI 50 pin hard drive. The hard drive can be removed without removing the analog board with a little effort but the floppy drive usually requires its removal to access it. Also of note the speaker is also housed in a plastic shell below the PSU and behind the floppy drive. The speaker also needs to be removed to access the floppy drive.

Before I start talking about the motherboard I need to restate as the title says that this is NOT a stock Color Classic. Stock I feel this machine is pretty underpowered so thankfully when I picked this unit up it had been upgraded by replacing the motherboard with the motherboard from a Macintosh LC 550. The Macintosh LC 550 motherboard is essentially the same motherboard in the fairly uncommon Color Classic II thus by swapping boards with a 550 board you turn your Classic I into a full fledged Classic II with two minor differences. The first difference is the name badge on the front of the case which I suspect can be swapped out if by some random chance you come across a Classic II’s badge. Second, depending on what you read the Color Classic II either has the exact same motherboard as the LC 550 or the LC 550 has slightly more video ram maximums ( 512k maximum in a Color Classic II as opposed to 768kb maximum in an LC 550). The LC 550 having a higher VRAM max makes sense as it was meant to drive a higher res monitor but still many sources on the internet claim they use the same board.

There are other upgrades you can perform on a Color Classic I or II such as the “Mystic” mod which allows a 68040 CPU or even Power PC CPU mods but these require software and/or hardware modifications where as the LC 550 mod is simply a matter of swapping motherboards and that is all. LC 550 boards have gotten harder to find in the US but price wise it’s still a cheaper and easier option then paying a hefty premium to import a Color Classic II.

The board itself is extremely compact. Take note of the metal legs on the underside when removing or reinserting the board back into the case as they can break off and short components as they rattle around inside a powered on machine.

1)  Edge Connector – This is the connector that the board uses to interface with the rest of the computer when inserted into the case.

2) PDS or Processor Direct Slot – A rather limited form of expandability slot. Usually cards using the PDS slot were specific to the CPU used thus a PDS card meant for a 68040 would not work on a 38030 with a PDS slot. My particular Color Classic has an Ethernet card occupying this slot but another popular card was the Apple IIe emulator card which let one play Apple IIe games on the Color Classic I and II.

3) CPU – The LC550/Color Classic II are equipped with a Motorola 68030 running at 33mhz on a 33mhz front side bus utilizing a full 32-bit data bus as seen on this board. This was a pretty speedy CPU at the time and is worlds better then the 16mhz 38030 in the original Color Classic which was strangled performance wise by a 16-bit data bus motherboard.

4) Coprocessor – Here is a socket for an optional 68882 math coprocessor to assist in floating point math. This was an option on both Color Classics and the LC 550. My motherboard thankfully came with one installed. Not terribly useful for games but nice to have none the less.

5) PRAM – standard PRAM battery for holding saved data and date/time.

6) VRAM – Here is the systems video ram for the built in video controller. On the original Color Classic you had 256kb with the slot allowing for expandability up to 512kb of VRAM. On the LC 550 we have 512kb standard with the added RAM via the neighboring slot for a total of 768kb. As I stated earlier there is some mixed information on the internet on if a true Color Classic II board allows up to 768k or is maxed out at 512kb like the original Color Classic.

7) RAM – The original Color Classic was restricted to managable but still low amount of 10mb of RAM but the Color Classic II and LC 550 board we see here comes with 4mb solder onto the board with the ability to expand up to 32 additional megabytes via a 72 pin RAM slot for a full 36mb of RAM as I have on my machine.

In conclusion the Color Classic is a neat little machine. It takes up barley any space which is also part of the reason it has such a cult following in places like Japan where space is at a premium. It also has a very nice and crisp color display unlike previous compact macs which were limited to monochrome displays. While the power and expandability of the original Color Classic is pretty poor the Color Classic II is everything the original should have been and if you happen to come across one pick it up if you like Macs. If your in the US however finding a Classic II may be daunting so if you do have an original model keep an eye out for the LC 550 motherboard, perhaps from an LC with a dead monitor. The motherboard swap is literally just a drop in replacement and you instantly have yourself a Color Classic II with maybe a little extra VRAM.

I know, for a guy that’s “not a Mac guy” and doesn’t really care that much for them I sure have a lot of them to talk about. Well that’s just been my luck lately and what I’ve come across in my thrift store/Craigslist scouring. Today were going to look at the classic black and white Macintosh SE or more specifically the FDHD version which is basically the exact same machine with support for high density 1.44mb floppy disk drives.

macse1

Here we have the front view of the machine as its running some early version of system 7. No, I do not know who “Peg Johnson” is or how to change the hard drive name from what I’m guessing is the previous owner’s name. This machine is sporting the hard drive in the upper section and a 1.44mb floppy drive or “superdrive” as Apple liked to call them in the lower section.

macse2

Usually you can tell if an SE is upgraded for high density floppy use by the badge on the front though there’s nothing stopping anyone from simply doing the upgrade to a SE and not worrying about swapping the front of the case. Originally the Macintosh SE that came out in 1987 were only capable of reading and writing 400kb and 800kb floppies but in 1989 the FDHD version was released that allowed the use of high density 1.44mb disks making things way more convenient.

macse3

Here we have the rear of the machine. Pretty standard as we have two ADB ports for a mouse and keyboard. This is a little different from most later Macs like the Macintosh Classic which only had one ADB port in the rear. My guess is that later keyboards have ADB ports on them so you would plug your keyboard into the Mac then your mouse into the keyboard and at the time of the SE that wasn’t an option on the keyboard. I currently don’t have an old Mac keyboard so I don’t know. Next is a floppy port for an external floppy drive, a db-25 SCSI port, printer port, modem port and finally a audio out jack for headphones or speakers outputting four voice sound with 8-bit analog conversion using 22khz sampling rate. Which from what I can tell is pretty much the same as later compact black and white Macs.

I’ve outlined how to get into one of these in my Mac classic article that I linked to above so I won’t go into that again but once inside it looks pretty much as you would expect, cramped.

macse4

Here we see the cramped innards of a compact Mac once again. The 1.44mb drive is in the lower bay and in the upper is from what I can tell by the label as well as what was standard issue on these things a 20mb Apple SCSI hard drive yet mine comes up as 10mb in the OS. Also the fan is mounted in the upper section to the back. You can see the grating for it in the rear picture and in the one above in the upper right. This is different from the later versions that have a downward bottom mounted fan.

macse5

Here is the motherboard. If you compare it to the Macintosh Classic and Macintosh Classic II you will notice its about twice as big.

1) These are the two floppy drive connectors. I’m only utilizing one but you can always have a duel floppy configuration and no hard drive if desired.

2) SCSI connection for the hard drive

3) 3.6V PRAM battery for keeping time/settings

4) power connector to the PSU

5) ROM chips and Floppy controller – these three chips are your ROM  and floppy controller chips. the original chips should be labeled

342-0352-A  HI ROM
342-0353-A  LO ROM 
344-0043-A  IWM

these are the original chips for the 800kb SE units. mine have the newer chips labeled

342-0701 HI ROM 
342-0702 LO ROM 
344-0062-01 SWM

If you have the newer chips your good to use 1.44mb floppy drives and disks. older SE’s can be converted just by replacing these chips and then adding a drive. *there may be slight number variations to the chips*

6) the Motorola 68000k CPU running at 8mhz. This CPU is in a long rectangle form factor of the time where the later 68000k CPU’s on the Classic I, II are smaller square CPU’s.

7) SE PDS expansion slot for things like CPU accelerators and such.

8) RAM – the SE can take up to 4MB of 30 pin RAM. mine originally came with 1MB but I have upgraded it here with a full 4MB.

I rather like the boxer case style of the SE as opposed to the later more curved Classic compact Macs. The SE is surly an improvement over earlier models like the Plus and 512k Mac but its still a very limited machine. the FDHD version with support for the 1.44mb floppy is a great boon but I stick with my earlier assessment. The only compact B/W Mac really worth using seriously is the SE/30.

macse6


The Macintosh Classic II is in many way similar to its less powerful sibling the Macintosh Classic. It was the last of the iconic black and white compact Macs and perhaps the most powerful next to the excellent Macintosh SE/30. The case looks very similar besides the label on the front and back indicating if the machine is a Classic I or II. Keep in mind there were two cases for the Classic II both looking alike except that the later cases have holes on the side for the speaker to allow better sound. My case is of the older type. There’s not a lot I can say about it that I didn’t say about the Classic as far as form goes. This machine was found off Craigslist and suffered from the common “stripped display” issue that plagues many of these macs. The issue is commonly caused by leaking caps on the motherboard. after cleaning the board in distilled water and allowing it to dry It operated flawlessly when reinstalled into the Mac. This is a temporary solution though and if your board suffers from this problem it requires the motherboard to be “recapped” or the capacitors replaced. this is neither to difficult or expensive and you can typically find someone on the internet who offers the service for around $40 or so plus parts.

mclas21

The machine came with the same black and white 9 inch display as the Classic, sported the standard 1.44MB floppy dive and had the same Monaural four-voice sound with 8-bit digital/analog conversion using 22-kHz sampling rate for sound as the Classic did.

mclas22

The rear of this unit is also very similar to the Classic except for the inclusion of a port for a microphone on the far left. Next to the microphone port we have the standard ADB port for keyboard/mouse, port for an external floppy, db-25 SCSI port, two ports for a printer and then modem and finally a headphone port.

mclas23

On opening the Classic II up it also looks very similar to the Mac Classic. These machines typically came with a 40 or 80MB hard drive. Mine came with a 40mb drive. Like all the compact macs it is very cramped in there and you have to take a lot of caution not to be electrocuted by the capacitors for the CRT tube. The drive on top is going to be your floppy drive while the hard drive is attached below that.

mclas24

The motherboard though looks very different from the Classic.

1) This slot looks like the RAM expansion slot from the Classic but actually it is a slot to add a FPU or math co-processor or additional ROM. A few third parties did make FPU add ons for this slot but they are not very common.

2) This is the CPU. The Classic II really bumped things up in terms of power from the Classic I. This CPU is a 16mhz 68030. The Classic I used a 8mhz 68000.

3) Floppy drive connector.

4) SCSI connector for the hard drive.

5) 3.6 V lithium PRAM battery to save settings.

6) RAM slots for up to 10MB of RAM. this is a good deal more then the 4MB limit on most other classic compact Macs.

7) Power connector

mclas25

My Classic II is running System 7.1.0 which is a fairly typical OS for this machine. you can run the sleek System 6 if you wanted but lose some features or upgrade to System 7.6.1 which I think this machine can handle pretty easily.

There wasn’t a whole lot to say about the Classic II that I didn’t say already about the Classic I. I do think this is a much more capable machine with a better CPU and the capability or more RAM, 10MB as opposed to 4MB limit of the Classic I. I would also say that this may be the most capable of the black and white compact Macs next to the SE/30. The Classic II shares the same CPU as the SE/30 but unlike it the Classic II uses a 16 bit data bus as opposed to 32 bit meaning that the RAM is limited to 10MB and is overall a slower system despite the same CPU. If you want that iconic compact mac look but still want good functionality, don’t mind the B/W screen and don’t have a ton of money to splurge on the SE/30 I would recommended the Classic II if you can find a working one for under $40.


Some of the all time classic Macintosh computers are the all-in-one compact Macs from the late 80’s and early 90’s. Praised for their beautiful industrial design and portability they are iconic, they are also in my eyes, kind of useless. Keep in mind this is coming from a gamer and someone who has not been enthralled to apple. There’s plenty of good things I can say about the old macs and in particular the Macintosh Classic (not to be confused with classic Macintosh’s in general). They are portable, have a sleek design, are user friendly and helped launch desktop publishing among other things, they have there place but as a game machine or even just everyday computing or web browsing well, not so much. I can just say if I had a compact mac and my friends had a 386 PC with even a crappy sound card and VGA card I would be terribly jealous. The Macintosh classic is a later iteration of the early compact macs which include the Macintosh Plus, Macintosh SE and others. It is in almost all ways a step backwards from the Macintosh SE/30 which preceded it but it still brings some nice improvements over some of the earlier Macs. It should be noted though that this model was intended as a low-end Macintosh and for first time users so efforts were made to keep costs low. Like most classic Macs you’ll see these going for stupid high prices on Craigslist or eBay a lot of the time. Be patient, I picked this one off of Craigslist with mouse and keyboard for $25. the gentleman I bought it off of recovered it from a school years ago and didn’t want to see it go to waste.

classm1

The Mac Classic uses a fairly simple design. As can be seen the monitor came with the unit and was built in. The monitor is a 9 inch monochrome black and white CRT display. The image from these monitors is actually pretty good. The one here is bright and sharp. In one way the monitor being built in makes setup very simple as well as helps portability but being stuck with black and white can be a major drawback. This comes from someone who loves black and white movies and I’m certainly not a graphics centric person but for games its just limiting. It does lend a certain style though to games meant to be played on this system. Under the monitor you can also see the standard Mac SuperDrive a 1.44MB floppy drive able to read mac and ms-dos floppies. Screen brightness is now software controlled so no brightness dials are on the case.

classm2

Here is the back of the unit. I always liked the little handle on the top of the older compact Mac cases, its a nice touch. From left to right we have a ADB port for your apple mouse or keyboard (or both since they were made to be daisy chained), a DB 19 port for an external floppy, a DB 25 SCSI port for SCSI stuff, and two mini din ports for printer and modem. Lastly is a convenient little headphone jack for the Monaural four-voice sound with 8-bit digital/analog conversion using 22-kHz sampling rate. (thank you Vwestlife at the vintage computer forums for that info).

If you remove the cover located above the power switch you reveal knobs to adjust screen properties.

cmt16

Unfortunately Apple decided not to label these knobs but I did that for you in the image above.

classm3

this is the left side of the Mac. these are the interrupt and restart buttons. I know in the older compact macs you had to get a little plastic switch thing that you would install onto the case to access these buttons. It looks like these buttons finally became official on the Mac classic.

Now on to getting inside these. Like all the early all in one Macs these were not meant to be tinkered with by the average Joe and to help ensure that the case was screwed closed by 4 TORX screws, 2 of which at the top are extremely recessed and hard to get to without a special rare “mac cracker” tool or a long handled T15 TORX screwdriver. Originally I could not find a T15 screwdriver that was long enough so I had to make my own. I stripped a hard plastic pen and jammed a T15 screwdriver head into it from one of those interchangeable screwdrivers and that worked pretty well. eventually i did find a long enough T15 screwdriver at an ACE hardware store for a few bucks. here’s a picture of it.

cmt15

Yeah, just looks like a screwdriver but I was seriously happy when I found one. Once the screws are out the case is very easy to open, just pull back the rear of the case and expose the innards.

classm4

Here we have the very crowded inside of the Mac Classic. As an added bonus we have an exposed monitor and capacitors so you get the thrilling opportunity to severely shock and or kill yourself if you touch the wrong part. really just completely stay away from the monitor and the stuff on the right of the case.

1) the monitor, just leave it alone and don’t touch it.

2) This is the RAM card, which is a real improvement from the earlier compact Macs.

classm5

The max RAM that the Mac Classic can detect is 4MB. 1MB of RAM is on the motherboard and 3MB more are accessible via the special RAM daughter board pictured above. The RAM daughter board has 1MB of RAM soldered on and 2 30 pin slots for an additional 2MB of 30 pin RAM. Avoid buying a Mac Classic with only 1MB of RAM since it is missing the proprietary RAM expansion card. This easily accessible board is a great improvement over earlier compact Macs where in order to expand RAM you needed to remove the entire motherboard and on certain models and motherboard revisions actually cut capacitors in order to get the max RAM amount.

3) this is the tray for the hard drive. the Classic uses SCSI drives and mine is a 40MB drive which came shipped with this Mac. Remember to use Apple brand SCSI hard drives for the least amount of trouble. Under the hard drive tray is the floppy drive. the hard drive tray slides off with the removal of a screw.

4) this is the circuitry for the monitor and also the power supply, leave it alone. you can also notice now the exposed pots to adjust the monitor.

classm6

Once the power cord, floppy drive and hard drive cables are disconnected the board should slid out with very little trouble. The motherboard is very small compared to the earlier compact Macs and is roughly half their size.

1) special connector for the Mac Classic RAM expansion card. this is used for nothing but the RAM card. I believe that the line of 8 chips to the right of the connector is the 1MB of on board RAM.

2) floppy drive connector

3) SCSI hard drive connector

4) CPU, this is the Motorola 68000 processor running at 8Mhz

5) 3.6V lithium barrel battery for keeping time and settings saved.

6) These are the interrupt and reset buttons.

7) The Power supply connector.

classm7

Here is an underside shot of the Mac. As you can see the Motherboard leaves lots of space so there is room now for the fan to blow downward under the mac. make sure your Mac has its little legs lifting it above the surface else I can imagine overheating issues may arise.

classm8

The Mac classic came with the Apple keyboard II as standard as well as the one button apple mouse. The power button on the keyboard is not necessary to turn the Mac on as the rear power switch will work fine and will boot the Mac on power up. System 6.0.3 is in ROM and can be accessed by holding command + option + X + O keys during boot. I have system 6.0.7 installed on hard drive. Its very suited for this computer and boots up very quickly. You can put system 7.5.5 on this Mac but it kinda bogs things down a bit as the 68k CPU on this Mac isn’t very fast.

bottom line on this Mac is that I do like the improvements to the design such as the easy RAM expansion compared to earlier models but there really isn’t much room for any other type of expansion and there are no expansion slots on the motherboard. The CPU is a bit underpowered for the time and I really struggle to find any use for this Mac except as a system 6 novelty platform. If you want a classic compact Mac find an SE/30. The cases make good aquarium mods though.

FDISKformat

A place for the pc collector

I ❤ Old Games!

Probabilmente il miglior blog bilingue al mondo*

Waltorious Writes About Games

Game-related ramblings.

NekoJonez's Gaming Blog

My Gaming Timeline

Evelynn Star

Lynn talks about video games, records and books ...

Retro Megabit

Sharing My Retro Video Game Collection.

133MHz's Junk Box

Random electronics and gaming crap

SNES A Day

Chronogaming project featuring reviews, screenshots, and videos of the entire Super Nintendo library in release order.

Retrocosm's Vintage Computing, Tech & Scale RC Blog

Random mutterings on retro computing, music, plus radio controlled scale modelling.

The PewPew Diaries.

Work(s) in Progress!

1001Up

1001 video games and beyond

retro computing and gaming plus a little more

sparcie

retro computers and stuff

jispylicious

Stay Jispy!