Skip navigation

Tag Archives: ibm desktop

Around four years ago I wrote an article on this blog about the very similar IBM 300PL Type 6562. I picked up this machine because I really liked the style of the case but it really wasn’t the model I was looking for. Finally, several years later I finally acquired my IBM 300PL 6862.

The case is more or less identical in style and size to the 6562 except it lacks the audio input/outputs and volume control under the floppy drive. On the left side of the case we have a large power button with three LED indicator lights underneath for power, HDD activity and network activity. Near the center of the case is a slot meant for a 1.44MB floppy drive. To the right side of the case we have 2 5 1/4 drive bays with one being occupied with a CD-ROM drive, though in this case it is not the original drive.

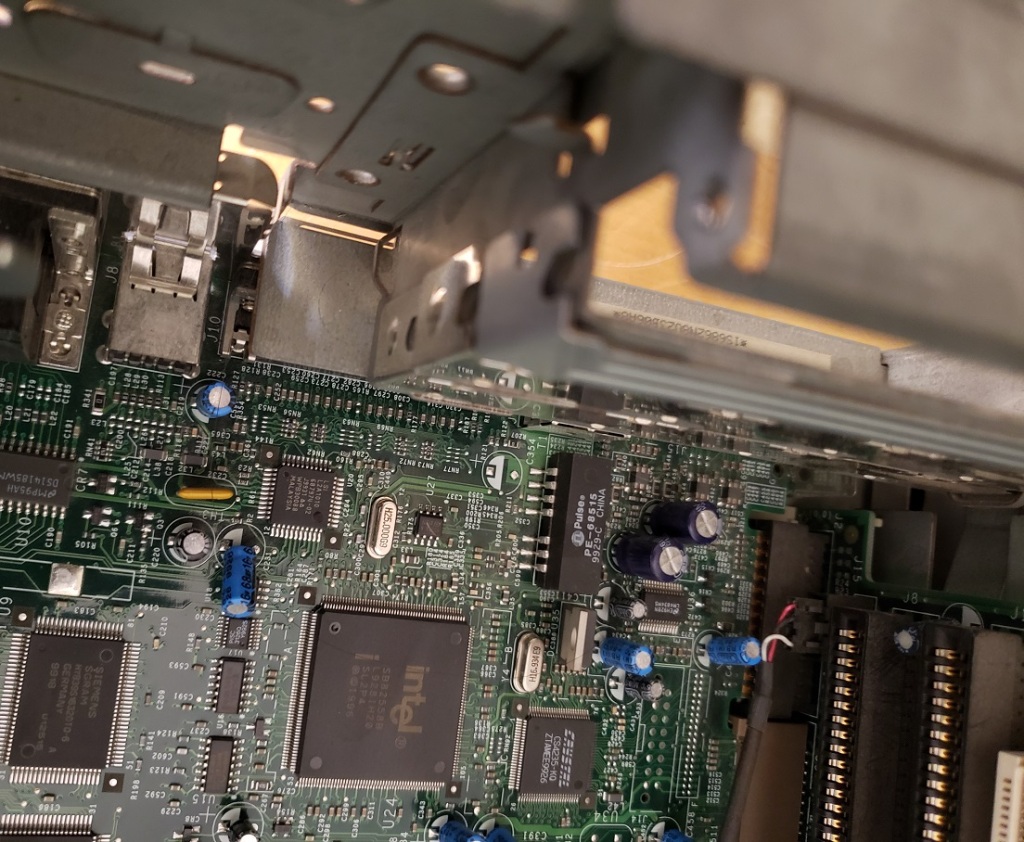
Turning the case around we can tell right away by the orientation of the four expansion slots that this machine uses a riser card. Starting under the expansion slots mid-case and moving right we have our various built in I/0 ports. First we have three audio jacks for the built in audio for a microphone, line in and finally line out. Next we have an Ethernet jack followed by a parallel port, dual USB 1.1 connectors, dual serial ports, two PS2 ports for mouse and keyboard and lastly a VGA connector for the built in video. Above the VGA port is another unusual cutaway. This is for the possible addition of an AGP card which we will take a look at once we are inside the case.

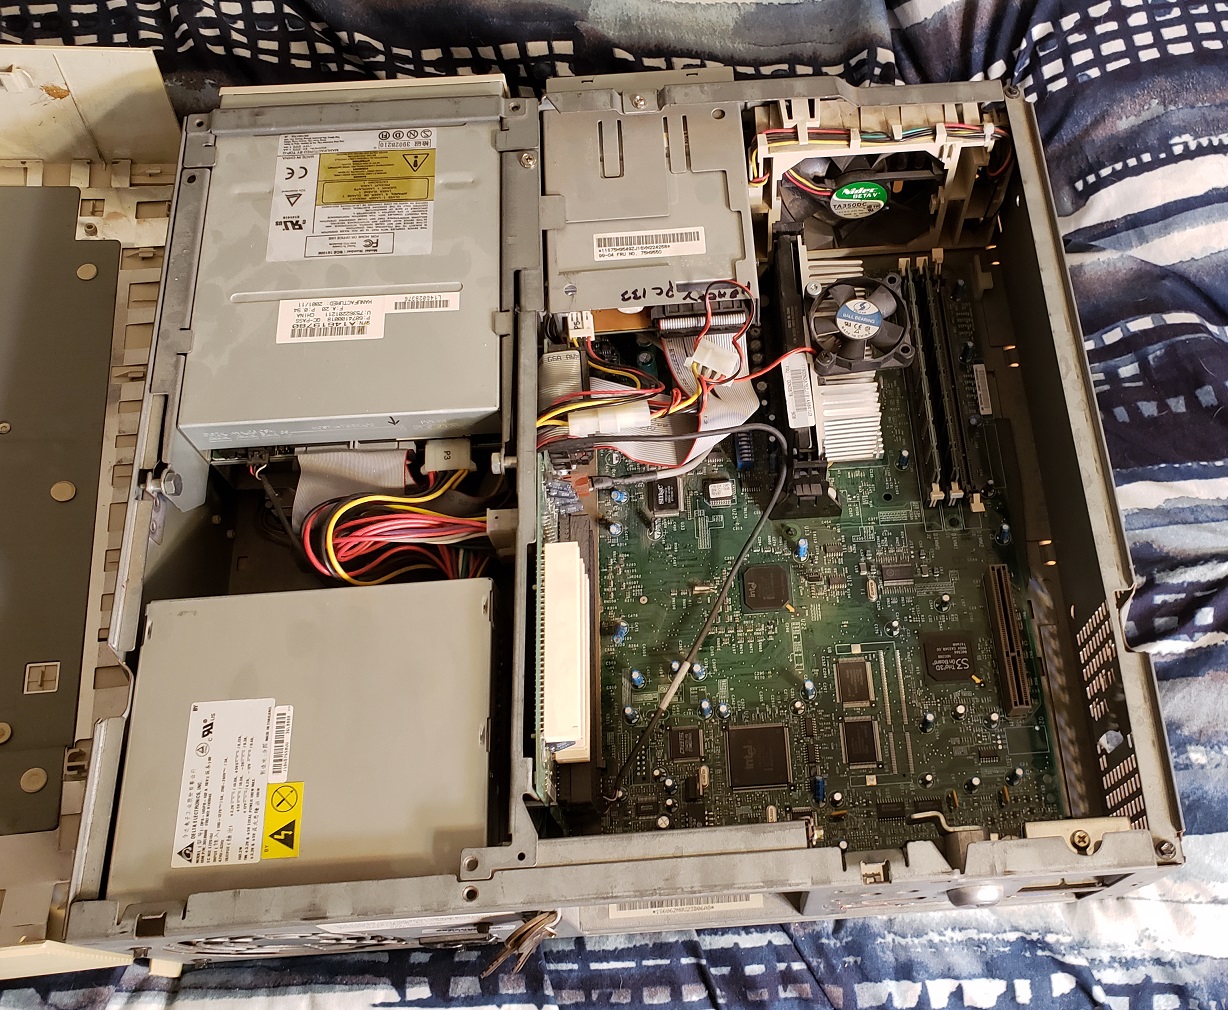
The case lid is pretty easy to remove and just requires lifting two tabs at the back of the case and pushing it forward and up. The IDE hard drive is mounted out of sight below the CD-ROM drive and below the second 5 1/4 bay.

Here is the handy data sticker found on the underside of the case cover though note that I found it wasn’t 100% accurate which we will talk about. This may be due to me updating the BIOS to the latest version.

And next lets take a better look at the motherboard.

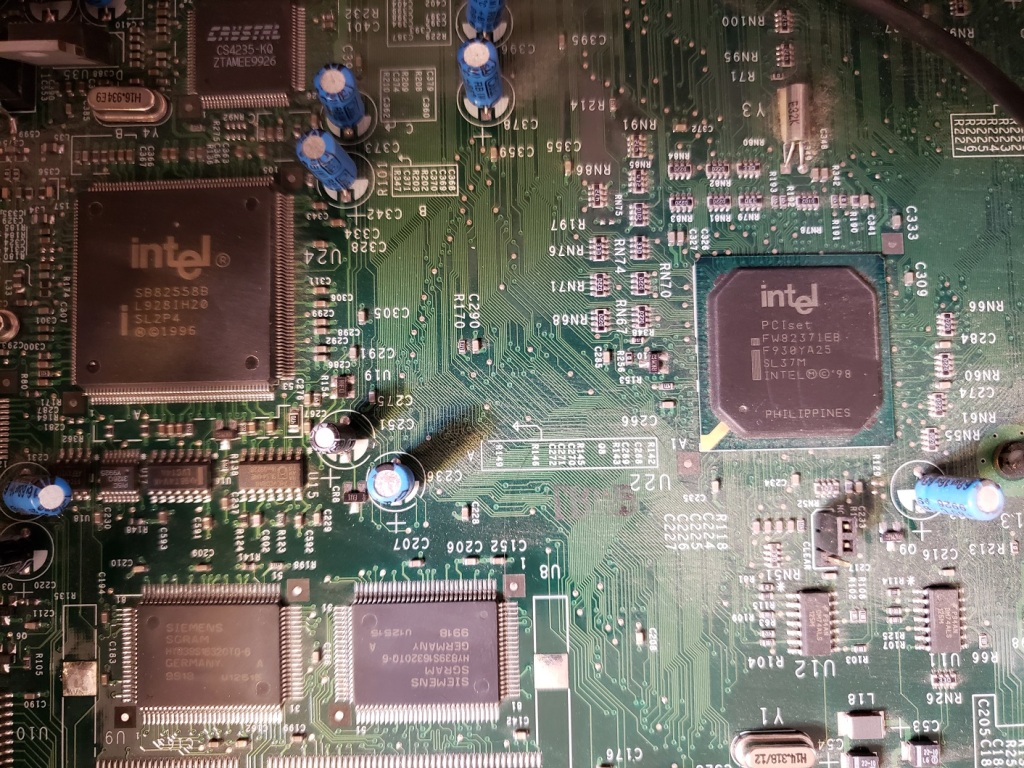
The motherboard is an NLX form factor board which some manufactures like IBM and Intel pushed in the late 90’s. It was meant to be a low profile, low cost motherboard form factor and had some odd quirks like the AGP port placement on this board which is located far from the other PCI and ISA slots and, for the most part, requires NLX form factor video cards. It’s a little hard to see in the images above but the motherboard connects to another brown colored edge connector located where the riser slot is located.

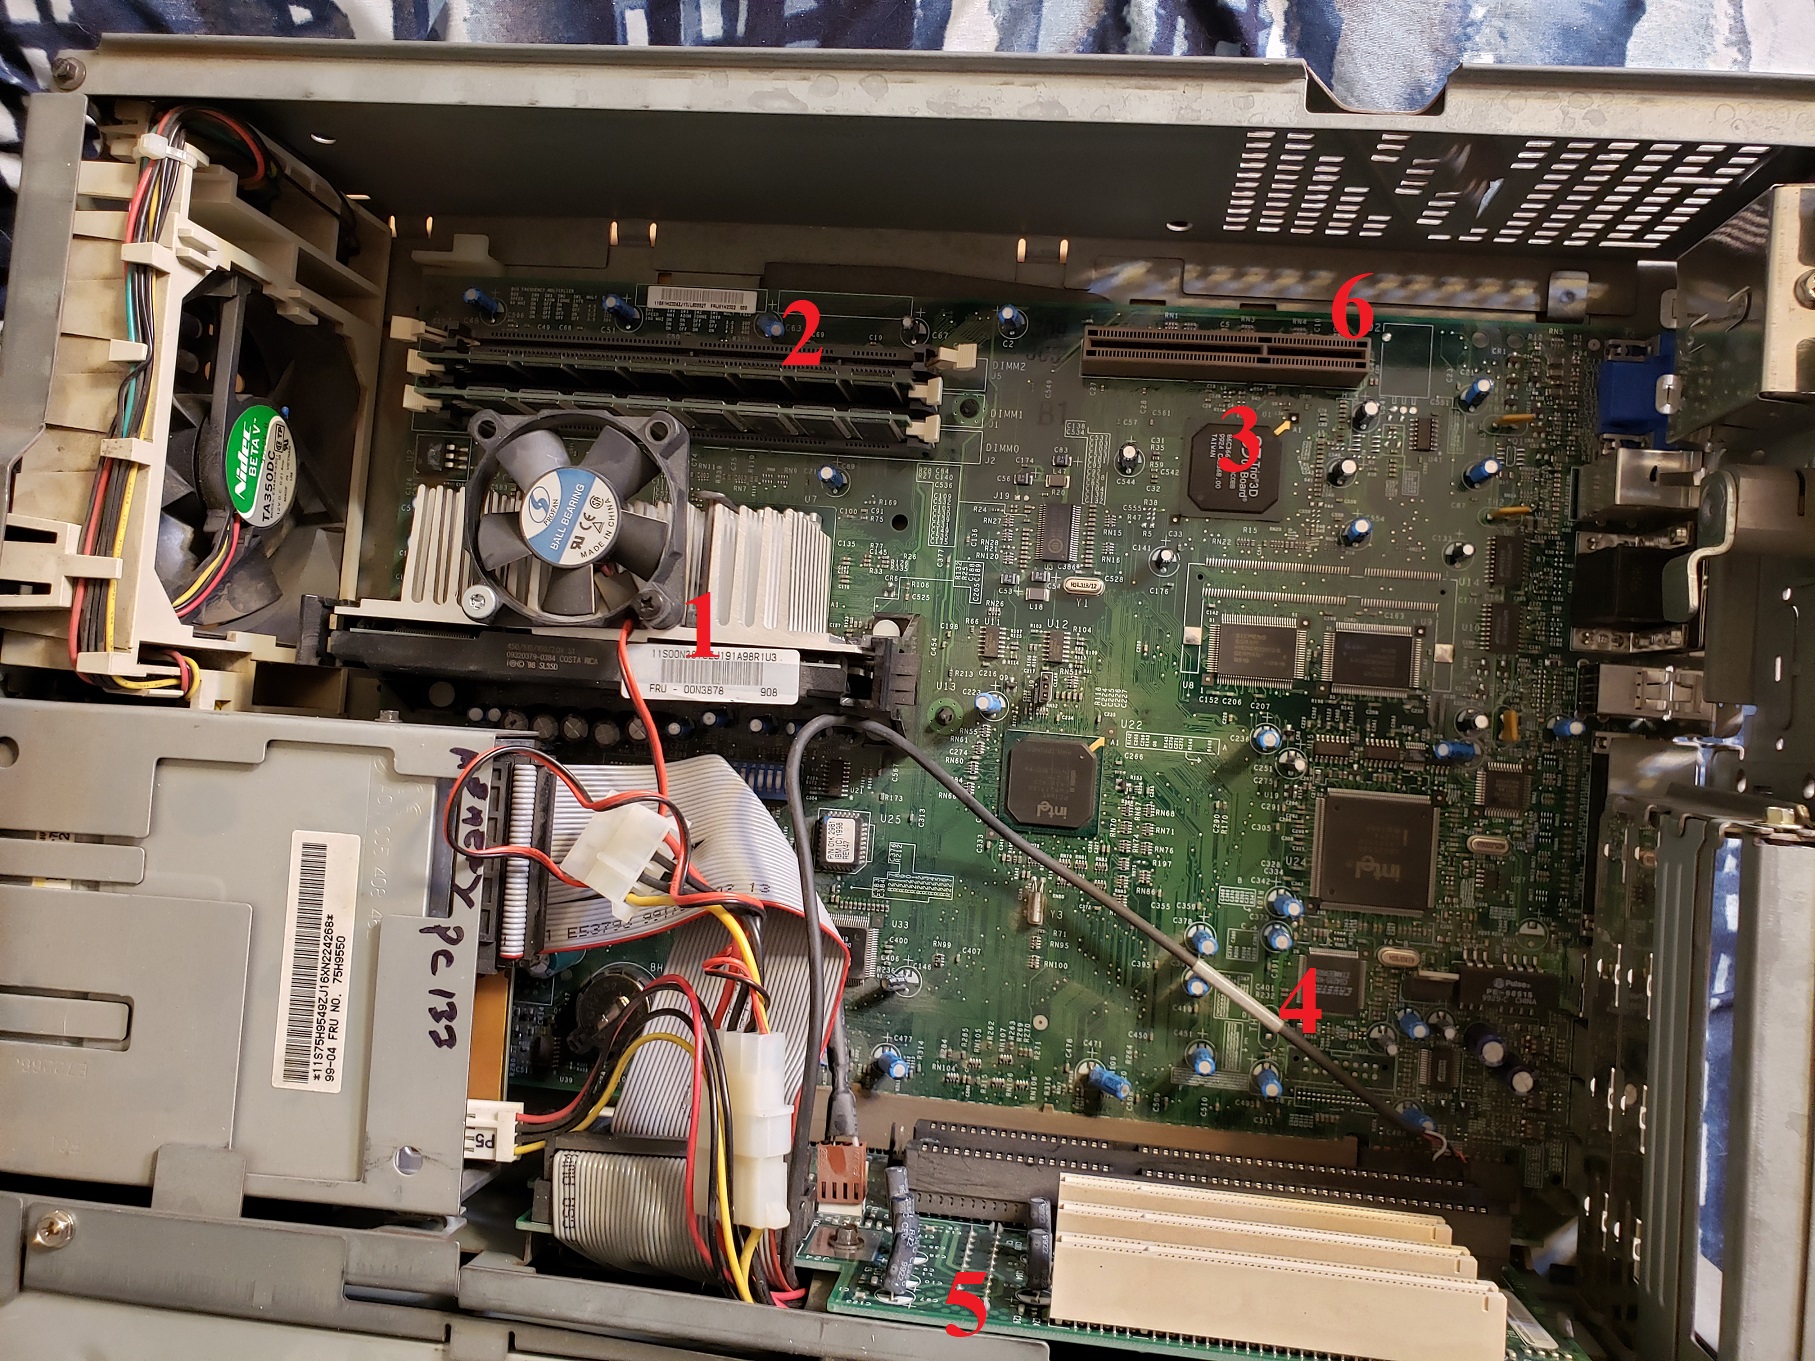
1 ) CPU – The Type 6862 motherboard uses a slot 1 socket and supports both Pentium II and III slot 1 CPU’s. My particular machine came with a 450MHz Pentium III, the lowest clocked Pentium III, and also had what I’m pretty sure a cooling fan added on by the previous owner.

The sticker on the underside of the case lid gives switch positions for installing a Pentium III up to 550MHz but with an update to the latest BIOS I was able to successfully upgrade the CPU to an 800MHz Pentium III and using a Power Leap adapter was even able to install a 1.3GHz Tualatin. A few things to note however is I found the switch settings useless when upgrading the CPU and when I changed them from what was the systems default I even ran into POST errors. I suspect this may be an issue caused by the BIOS update which changes how CPU speed is handled. I did however run into a separate POST error after changing CPU’s that I had to go into the BIOS advanced features menu and disable “CPU BIOS update”.

Also note that there are no power connectors on the main motherboard for the CPU fan but there is one on the riser board which can be used.

2 ) RAM – The Type 6862 officially takes up to 384MB of PC100 SDRAM. My machine was able to recognize 512MB with the BIOS update under Windows 98se. I am currently using two 256MB sticks of PC133 which work at PC100 speeds on this motherboard.

3 ) Video – The built in video chip is a S3 Trio 3D with 2MB of SGRAM. The Trio 3D is more or less the successor to the Virge line of 3D acceleration chips and like them it has great 2D compatibility with older DOS titles but 3D is somewhat lacking. For retro gaming I strongly suggest upgrading with an AGP card unless your strictly going to be playing 2D titles.

4 ) Sound – Sound is provided by a Crystal CS4235-KQ chip. I don’t have much experience with this chip but the datasheet indicates it is Sound Blaster, Soundblaster Pro and Windows sound system compatible though being a budget chip I wouldn’t be surprised if the FM synth was not up to par with a true Yamaha OPL chip. For general use in Windows it should suffice but if you want to use the 6862 for gaming I would advise disabling the built in sound and adding an ISA or PCI sound card depending on your needs.

5 ) As was mentioned earlier the Type 6862 uses a riser board like many Desktops. on this riser board we have various connectors such as the power connector for the CPU fan as well as three PCI and two 16-bit ISA slots. This should be more than enough for adding sound and video cards depending on your needs.

If you look below the riser you can also see the long brown slot the motherboard itself connects to.

When installing expansion cards each card does not get its own screw to hold it in place but the case used a metal bracket that unscrews and then screws back on to secure any added cards.

6 ) AGP slot – Unusually on this board the AGP slot is located far away from the riser card and the other PCI/ISA slots. On a technical level it does not make much if any difference though it can cause issues if you were hoping to run a certain setup such as using a Voodoo 1 or 2 or any card that requires some sort of cable connection to your primary video card.

The other issue this arrangement causes is that due to the special video backplate used you need an NLX compatible video card with its video connector high on the card. Usually, these cards also have a little square cut on on them on the lower half under the video connector.

NLX compatible card on the right along with bracket adapter. None compatible card on left.

Thankfully Diamond Multimedia made a large number of NLX compatible video cards and most late 90’s video chips can be found in this form factor such as the Voodoo3, TNT 1 and 2, Matrox G200, ATI Rage 128 and others. The most powerful card sold in the NLX form factor was the Geforce 256 SDR though they tend to sell for quite a large amount of cash these days.

ATI Rage 128 in NLX form factor and proper bracket adapter attached.

I quite like the IBM 300PL Type 6862 and it’s quite versatile. You can easily install a low clocked Pentium II along with an ISA sound card and have a fast DOS rig. On the other hand, it also makes a great Windows 9x retro PC depending on your era of choice determined by your CPU and video/sound card choice. The ability to support everything from a Pentium II 233MHz all the way up to a 1.3GHz Tualatin via a power leap adapter makes this a very versatile retro PC.

The case is a bit large however and does take up quite a lot of desktop space. Other annoyances such as the odd arrangement of the AGP slot slightly limit your video card options but despite this the 6862 makes a great late 90’s retro PC.

The IBM PC 350 was released in the mid 1990’s as an office / home desktop PC. It came in several sub models that used completely different motherboards and CPU’s from a socket 3 486 class up to socket 7 Pentiums all using the same case. In this article were going to look at the sub model 6587 which is the last sub model in the PC 350 class.

The case for the PC 350 is both sturdy but at the same time not extremely heavy. On the front there are LED lights for HDD activity and a power LED next to the large white power button. There is no reset button.

One pretty cool feature is the sliding front cover that slides to the left revealing your various drive bays. There is room for two 5 1/4 inch drives as well as a 3 1/2 bay and two internal 3 1/2 bays for hard drives. In the upper left corner is a cut out for an optional PCMCIA interface which I’ve never seen on a desktop before. Unfortunately mine did not come with this option installed.

My PC 350 did come with an 850MB hard hard drive installed which sounds about right for the time. A CD-ROM drive was an option but mine did not come with one installed. Installing a 5 1/4 drive can be a little taxing and removing the bay bezels can require a lot of force or completely removing the metal drive holders inside which also is not easy due to the assembly being held in by a hard plastic screw.

On the back we have from left to right, a infrared port for connecting an infrared receiver for wireless inferred communication with compatible devices. Next we have two PS/2 ports for keyboard and mouse followed by a serial port, two USB 1.0 ports and a parallel port. Lastly there is a VGA port for the built in video.

There are no screws holding the upper case on and accessing the motherboard is achieved by depressing the plastic tab in the upper left corner of the case and pulling back and then up on the upper case. Thankfully this tab is made from pretty rugged and thick plastic and feels fairly resistant to breaking off.

On the underside of the case is a simple chart explaining the memory configurations as well as a basic motherboard layout and the various switch settings. I always like when PC’s do this as it helps greatly when making basic changes like CPU upgrades.

Here is a view of the drive bay assembly removed from the case as well as the hard plastic screw that needs to be removed to get the metal assembly out.

Now lets take a look at the motherboard and relevant parts.

The PC 350 motherboard does use a standard lithium battery to store CMOS settings. In the image below is is obscured by the IDE cable.


1) CPU – My model 6587 came with a Pentium 133 but is easily upgradable. The chart found on the case underside gives settings for installing up to a Pentium 166 but online sources indicate a Pentium 200MHz classic or even a 166 or 233MHz MMX chip can be successfully installed though you may need to experiment with motherboard switch settings (Wikipedia suggests the 75MHz setting should work for 233MHz).

The MMX chips take a lower voltage from what it appears the board can provide so use caution if your going to attempt an MMX install. For a Pentium 200 classic the jumper settings were not present on my jumper sheet but through trial and error I found the settings for the Pentium 120 allowed for 200MHz operation with the P200.

The CPU’s on all of these machines are fanless and only come equipped with a passive cooling heatsink, though a rather tall one.

The instructions and all paperwork only refer to 3.3 volt Intel Pentiums CPU’s being compatible with some sources claiming Cyrix and AMD chips to be incompatible though I was able to upgrade my board with an IBM branded Cyrix 6×86 PR 166+ CPU without issue. I just made sure my CPU was labeled as requiring 3.3 volts (most Cyrix 6×86 CPU’s seem to require only 2.9 volts).

ibm350cpuchart

*Correction* The above chart refers to the Cyrix / IBM CPU as a “PR 166+” as it should be labeled as a P166+

2) RAM – The PC 350 has one 168 pin RAM socket as well as four 72 pin RAM sockets for memory expansion. You can expand the memory up to a total of 192MB and the convenient chart found on the underside of the case lid has a graph showing the advised memory configuration for the desired memory amount.

My PC 350 came with 32MB of memory installed via one 16MB 168 pin stick and two 8MB 72 pin sticks. I originally thought I would try using a single 32MB or 64MB stick of 168 pin memory and forgo the 72 pin sticks but none of my 168MB sticks would physically fit the 168 pin slot. I tried several sticks and they all were physically very slightly off and would not install. This is because I later discovered the 168 pin slot is keyed for 5 volt SDRAM which is not compatible with the 3.3V (the common used SDRAM).

3) L2 cache slot – L2 cache on the model 6587 is via a COASt module fount next to the CPU and can accept either 256KB or 512KB of L2 cache. Mine came with a 256KB stick though I needed to remove it and clean the contacts before it was recognized.

4) Video – The PC 350 comes with a S3 Trio64V+ chip on the board along with the ability to expand the memory from 1MB up to 2MB. The Trio chipset is an extremely DOS compatible chip proving excellent 2D support and compatibility for DOS and Windows 9x.

5) Riser card – The PC 350 uses a riser card in order to provide both PCI and 16-bit ISA expansion slots. In total the riser provides three PCI and five ISA slots though three slots are shared PCI/ISA slots and two are dedicated ISA slots. The opposite side of the riser provides for one of the stand alone ISA slots as well as a connection for power.

6) Floppy/IDE -The 350 motherboard provides for standard floppy connection as well as two built in ATA-2 IDE connectors for a total of four IDE compatible devices.

7) Switch – This is the switch used mainly for selecting your processor speed. Thankfully the chart on the underside of the case provides the settings and switch configurations should you decide to change CPU’s. The chart provided does come off as a little confusing though as It does not list actual FSB settings or provide a setting for 200/233mhz CPU’s. The Wikipedia entry on the PC 350 advises setting the switches to the “75 MHz setting” for a 233MHz Pentium.

8) PSU – The 350 motherboard requires three PSU connections to the board. Besides the standard AT connection the 350 also requires an additional AUX connection as seen below.

The IBM PC 350 makes a fair retro computer. It excels at DOS retro gaming and needs very little besides an ISA sound card to have a very compatible machine. As a Windows PC it is quite acceptable and a PCI 3D accelerator card such as a Voodoo would do wonders. The BIOS tends to be fussy though and when I made ANY changes including simply unplugging the mouse the machine demanded I enter the setup feature upon restarting and change/save the new settings. There are other annoyances such as the extra connection needed on the power supply as well as the slightly picky 168 pin RAM slot.

The case itself is quite nice offering a sturdy design, decent bay expansion as well as being easy to get into. I also like the sliding piece on the front so you can cover up your ugly discolored drives when not in use. Adding drives though requires some disassembly and is a hassle.

For a DOS PC the IBM PC 350 will serve you well though for Windows it’s passable but there are much better options. As a side note I could not get Windows 95 or 98 to install on my machine. This was due to some sort of driver conflict at the Windows splash screen I was never able to resolve. The machine IS Windows capable however and this problem boiled down to my particular machine.

There’s just something about an IBM machine. After the PS/1 and PS/2 line IBM continued within the consumer PC market with a line simply known as the IBM PC line. This line of PC’s was sold roughly from 1994 to 2000 and consisted of many models from mid range 486 CPU’s to Pentium III’s. There isn’t anything particularly special about the IBM PC line as they don’t do anything necessarily new outside of a few uncommon design choices though I have to say I’ve always loved the look of the desktop cases within the line. In this article we are going to look at the 300PL type 6562…..sounds like a designation for a WWII Japanese tank.

ibm300pl1

I’ve just always liked the look of these desktops. Kind of unique look that mixes more modern style (late 90’s and 200’s) with older (80’s early 90’s). The only thing I really don’t care for is the plastic case seems pretty fragile in parts and mine received a fair amount of damage in shipping. We have sort of a “ribbed” beige case with a nice prominent IBM logo. To the left we have a large round power button as well as your led lights for power, HDD and Ethernet. Not to much room for external bays as we have a spot for a 1.44mb floppy mid case and to the right of it two 5 1/4 bays that I currently have a DVD drive installed in one and nothing in the lower bay. Stock this machine would have a CD drive installed rather then a DVD drive.

One feature of the type 6562 that is lacking on most other models of the 300PL line is the convenient front audio options.

ibm300pl2

We have a microphone jack and a headphone jack as well as a very convenient volume knob. My research indicates this was removed from later models due to the fact it was difficult to line up the case with the volume knob when putting the case top back in place though personally I have not found this to difficult. The built in audio is powered by a Crystal 4236B chip. It is possible to enhance the audio quality of the sound by replacing some caps but I will leave a link outlining this processed at the end of the article.

Looking at the back.

??????????????

You may notice in the image above that the case uses plastic tabs to shut which unfortunately were damaged in shipping so the case doesn’t quite snap back together properly. There are four expansion slots arranged in a vertical manner as well as a key slot for locking the machine if you were the type to do such things. Its inclusion does make sense seeing as these were likely heavily marketed to business. Starting at the lower left we have the usual suspects, audio in and out jacks along with built in Ethernet port, parallel port, two USB ports, two serial ports, ps/2 ports for keyboard and mouse and finally a built in VGA port. Having built in Ethernet and audio out of the box is a nice feature for a Pentium 1 machine.

The IBM 300PL uses a screwless case design which causes it to suffer similarly to others 90’s screwless cases. The plastic has become brittle with age and is easy to accidentally snap off making shipping and even routine case open and closings a risky endeavor.

ibm300pl4

Above are the internals along with a view of where the drives are oriented. One interesting thing about this motherboard that you can’t see to well in this image is that floppy, IDE and power connectors are all located on the riser card rather then the motherboard itself.

ibm300pl6

With the removal of two screws the 5 1/4 bays can fold up on a hing allowing easy access and revealing a bay on the underside for a hard drive. I like this feature as it makes swapping drives very easy.

The primary IDE connector is actually located on the side of the riser card facing 5 1/4 bays. The primary power connector is also located on this side which can be made out in the background.

ibm300pl7Now to take a look at the riser card itself.

ibm300pl8

Here you can see the secondary IDE connector as well as the floppy connector and power connector for the floppy drive, which is somewhat odd seeing as power is not being supplied by a cable straight off the power supply. This riser card has three PCI and two 16-bit ISA slots though one of the PCI/ISA slots is shared. This is more then adequate for a late DOS or early windows rig in my opinion

ibm300pl9

??????????????

1) CPU – The 300PL is an early socket 7 motherboard with the Triton II chipset which seems to have been a high-end offering at the time. My 300PL came with a Intel Pentium 200mhz installed but I upgraded it to a 233mhz MMX CPU which is officially the fastest CPU it can take. Upgrading the CPU is possible though with something like a PowerLeap PL-K6-III. The stock CPU does not come with a fan on the heatsink but the case fan is located directly below the CPU blowing air over the heatsink.

The 300PL has 512kb of on-board L2 cache which I suspect are the two chips located just above the CPU

2) The 300PL is very picky about RAM. According to official documentation it must be EDO nonparity (NP) or EDO error correcting code (ECC) DRAMs of up to 128mb in size. Mine currently has 128MB that came installed when I acquired this machine. The max RAM that is physically possible to install is 384mb since there are only three sockets for RAM and the machine is only capable of using 128MB sticks each. The chipset itself though is capable of supporting 512mb of RAM. I attempted to use various RAM sticks over 128mb and none were accepted.

??????????????

3) Video – The built in video chip is actually rather good and is the Matrox Mystique 1064SG-H chip. Not a surprising choice seeing as this machine has business uses in mind but it still makes a fast chip for DOS games and offers excellent 2d image quality as well as providing some early 3D abilities. The Mystique does have some compatibility issues with things like fog layers in some games but overall is a good chip, especially when paired with something like a Voodoo 1 or 2. The chip comes with 2mb of video SGRAM built into the board with the option to increase the amount to 4mb with an add on card. There is also connections for video option cards like the Rainbow Runner.

ibm300pl11

That white connector to the right is for an optional IR upgrade.

4) Switch block – Rather then use all jumpers to make settings IBM opted to use a nice switch block to help set things such as CPU speed. Here is a shot of the info sheet on what the switches control located on the underside of my case.

ibm300pl10

ibm300pl13(double click to enlarge)

5) CMOS Battery – Next to the switch block is also located the CMOS battery for saving changes made in the BIOS.

That’s about it for the IBM 300PL type 6562. It’s actually not a bad choice for a DOS machine or early Windows. The amount of options built in is nice and the the built in video is actually very good for the time especially when paired with a Voodoo card. The case, although very estheticly pleasing, at least to me, suffers from aging brittle plastic issues as do most screwless 90’s computers.

A great resource on the 300PL 6562 HERE

Benchmarks (Intel 233mhz MMX, 512kn L2 cache, 128 EDO RAM, Built-in Matrox Mystique 1064SG-H)

3D Bench – 163.6

PCP Bench – 58.1

DOOM – 82.7

Quake – 45.6

Speedsys – 175.43

FDISKformat

A place for the pc collector

I ❤ Old Games!

Probabilmente il miglior blog bilingue al mondo*

Waltorious Writes About Games

Game-related ramblings.

NekoJonez's Gaming Blog

My Gaming Timeline

Evelynn Star

Lynn talks about video games, records and books ...

Retro Megabit

Sharing My Retro Video Game Collection.

133MHz's Junk Box

Random electronics and gaming crap

SNES A Day

Chronogaming project featuring reviews, screenshots, and videos of the entire Super Nintendo library in release order.

Retrocosm's Vintage Computing, Tech & Scale RC Blog

Random mutterings on retro computing, music, plus radio controlled scale modelling.

The PewPew Diaries.

Work(s) in Progress!

1001Up

1001 video games and beyond

retro computing and gaming plus a little more

sparcie

retro computers and stuff

jispylicious

Stay Jispy!