Skip navigation

Tag Archives: Pentium III

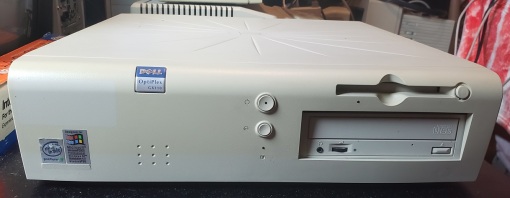
In this article we are going to take a brief look at the Dell Optiplex GX110 which is a Pentium III based small form factor computer from the year 2000. The Optiplex series was generally focused toward small business as well as education markets so we’re not looking at a gaming rig though it may make a fast and stable late DOS or Windows 9x machine. The closest similar machine I can think of from the same time is the Compaq EN small form factor which I wrote about here.

As you can see above the GX110 is a small form desktop PC but it also comes in a desktop and mini tower form factor. They also came in slot 1 and socket 370 form, this machine being the later socket 370 form. I would say the GX110 small form case is not as tall as the Compaq EN was but it’s not smaller by much. Unfortunately, I no longer have the EN to directly compare. On the front, we have a single button for power as well as a floppy drive and a CD-ROM drive though notice the CD drive is looking a bit odd with the eject button on the face plate but we will get to that.

On the back starting from left to right we have a parallel port with a serial port below it followed by two PS/2 ports for keyboard and mouse, two USB 1.1 ports another serial port followed by the built-in video port, Ethernet and finally three audio jacks for mic, line in and line out. Having a line in jack is nice as many of the small form factor PC’s I’ve looked at only have the mic and line out jacks.

Opening the case is very simple and you just pinch in two plastic side tabs on the sides near the rear of the case and lift the upper part of the case up and off.

Here is the inside with the riser card still attached. I currently have a Geforce 2 MX400 installed.

Here is the riser card removed though there isn’t much of interest revealed below it except that 3com chip which presumably controls the Ethernet.

The riser card here supports two PCI expansion cards but from what I’ve read Dell may have also offered an optional riser card with one PCI and one 16-bit ISA slot. If this is true those risers would have been optimal for a fast DOS build.

Now let’s take a look at that CD drive.

So this machine does something I don’t see very often in desktop IBM PC’s and that’s use a laptop style CD drive. Now the obvious benefit of using a laptop style drive is you can have a smaller case and it also is lighter. You also can use a smaller floppy style power connector if you like that kind of thing. I find this a bit of a negative though since I find laptop style CD drives to be a bit less robust and more prone to damage. I also find them to be harder to replace as they aren’t uncommon by any means but desktop style drives are so much more abundant and can be found on any given day at a retail PC shop or used at a thrift where a laptop style drive may take a little more hunting to track down.

The hard drive bay is located under the floppy drive. Originally these models came with a variety of size options for hard drives but mine has a 40gb drive installed, it is likely this drive was added later.

Here we have a good view of the board. The board is based on the Intel 810e chipset which allows us to run a 133mhz FSB for our CPU but our memory is limited to 100mhz PC100.

1) CPU – The PGA 370 GX110 came with a few CPU options. I’m not sure what this one originally came stock with but it has been upgraded to a 1ghz Coppermine-EB Pentium III running on the 133mhz FSB. Just about any 100/133mhz FSB socket 370 Pentium III or Celeron should work just fine in this machine and any choice should be fine for a Win 9x or DOS setup though if you want to run things in higher resolutions or do some XP gaming a faster P III is recommended. There is an option in the BIOS to disable the cache to lower speeds for earlier games.

2) RAM – The Optiplex GX110 can take up to 512 MB of PC100 SDRAM via two slots. My machine currently has the max of 512 MB using two PC133 256 MB sticks. The PC133 clocks down to PC100 though depending on the RAM brand and specifications I have read of incompatibilities when using PC133.

3) Riser slot – This is the riser slot for the riser card we looked at earlier. It installs like just about any other expansion card though it has a little green plastic lever you want to raise before removing the card.

4) Floppy connector

5) IDE – Two ATA-66 EIDE connectors supporting up to four EIDE devices. Of course, you only have room for three total drives unless you get creative with dual SSDs for hard drives.

6) CMOS battery

7) CD audio in connector for the on-board audio.

8) PSU connector

Sound – Built-in sound is a sound blaster compatible with Analog Devices AD1881 soundMAX. It’s similar if not the same sound chip that was in my Compaq EN and although it’s okay for basic Windows sound it’s pretty terrible for DOS. A PCI Sound Blaster Live! or Vortex 2 based card would be a smart upgrade for one of the available slots.

Video – Video is Intel Dynamic Video Memory which seems to pull memory from the system memory. It’s passable for desktop use but if you actually want to use this system to run games a video card should be your first upgrade. A PCI Voodoo 3 would work great in this machine for Windows and DOS gaming but other later PCI cards would compliment the Pentium III CPU as well.

There is a seemingly more common full desktop version of the Dell Optiplex GX110 that I had acquired many years after this one. I declined to do a full article on it though because its really just the exact same motherboard placed inside a larger desktop case. Other than a larger footprint for the case all you really get is an extra PCI slot on the expansion daughter board. Mine had a quite zippy Pentium III 933MHz CPU though.

dopti1101

This slideshow requires JavaScript.

And that’s about it for the Optiplex GX110. As usual, these Pentium III machines make great Windows 9x or late DOS gaming PCs with a few tweaks and additions such as appropriate sound and video cards. As for the GX110 though I don’t know if I’d necessarily recommend it just because there are better options out there. Unless you really really need the small form factor or are in an area starved for Pentium III PCs and earlier-era stuff. It’s just not that much smaller than other options like the Compaq EN which gave three expansion slots as opposed to two which can make a big difference when upgrading. In a pinch, it works but keep an eye out for something nicer if you can.

The Gateway GP7 computers were a series of late 90’s and early 2000’s Pentium III based computers from the Gateway corporation. It appears the GP series were meant for small businesses from what I could find on Gateways old website but it’s hard to tell since information is spotty via the Wayback Machine. I believe the PCs in the series had the same case but used different motherboards as the series progressed. This is why I’m writing this article specifically on the GP7-500 and not the entire GP7 series as the GP7-500 does not seem to represent later computers in the series. The GP7 series ran though models ranging from the GP7-450 to a GP7-850 where the number after the hyphen designates the speed of the installed Pentium III. The series may have sported models with higher CPU clocks but I could not find any first hand. The specific model we’re going to take a look at here is the GP7-500 with a 500mhz Pentium III installed manufactured in 2000.

I have to say I’m not totally in love with the style of this case but it does have some features that make it a little different. Aesthetic wise it’s more rounded then similar cases of the period and it does have a nice sort of grilled indent at the bottom to add some visual flair. Something I found odd was the 3 1/2 drive bay located under the first 5 1/4 bay. This very unusual as usually the bays are grouped together by size with however many 5 1/4 bays on top followed by one or two 3 1/2 bays under them. Functionally it makes no difference but it is a change from standard bay placement. My GP7 appears to of came with the original drives which were a Pioneer DVD drive in the top most bay and a standard 1.44mb floppy drive located underneath with lots of room for two more 5 1/4 drives and another 3 1/2 drive so adding a tape drive, a second CD drive or a ZIP drive is easy.

Another thing I noticed is a strange omission of a reset button. You get two LED’s for hard drive activity and power but no reset button so resetting must be done through the keyboard. CTRL + ALT + DEL.

The rear is fairly standard. My GP7 has a “property of Amiga Inc.” sticker that I did not add but seems otherwise to be stock. The GP7-500 and presumably others of the line came with video and sound cards preinstalled and not integrated to the motherboard which is a real bonus and usually a good sign as integrated graphics and sound in the 90’s and early 2000’s was usually sub par. As for integrated components we have the pretty standard two PS/2 ports, two USB 1.0 ports as well as two serial and one parallel port.

The case is pretty easy to open up via two thumb screws. Everything is fairly easy to access on the inside with a removable caddy below the drive bays which is meant to house up to three hard drives. The PC came with what I believe is a stock 16.5 Ultra IDE hard drive. For the year 2000 this most certainly wasn’t the fastest or the largest drive available at the time and feels pretty budget minded. It’s pretty easy to remove being held on by three screws as well as the metal support bar you can see just above the expansion slots. The PSU appears to be proprietary as it’s a little slimmer then a standard ATX PSU and has a removable plastic shroud used to direct airflow over the CPU from a fan located on the bottom of the PSU. Thankfully unlike DELL, Gateway does not require an additional AUX like power connector found on some Dell models of the time.

The motherboard is a Gateway specific Tabor3 ws440bx motherboard made by Intel. This motherboard also only supports a 100mhz front side bus with BIOS options for tweaking being pretty sparse.

1) CPU – The CPU in the GP7-500 corresponds with the final number being a 500mhz slot 1 Pentium III. This should be consistent along the entire GP7 line though I believe the highest GP7 PC I’ve seen was a 850mhz model and this is in fact the highest clocked CPU this board “officially” can take. The 500mhz model makes a good fast DOS machine or a good general Windows 9x CPU though for those late Windows games, Windows XP or running higher resolutions you may want to think about upgrading.

Unfortunately Gateway didn’t make upgrading super simple. To upgrade your going to need to remove the power supply which isn’t hard but it is an extra step and requires removing five screws (don’t forget the one inside close to the drive bays). The CPU itself also can have a death grip on the little plastic guide stands so be careful in removal. You may also encounter a situation where your case on your replacement slot 1 CPU isn’t compatible with the plastic stands that help keep the CPU from jostling on the slot 1 connector. You can either modify your CPU or remove the posts with a screwdriver and pliers. Doing this will allow your CPU to wiggle a little more freely in the slot but it should be okay and Ive never had an issue. You may also need to remove the plastic shroud on the PSU if your CPU is to tall but this shouldn’t effect things much especially if you upgrade to a CPU with a fan of its own on the heatsink. You should be able to drop in any 100mhz FSB slot 1 CPU up to a 1ghz which is the highest speed Intel went with its 100mhz FSB slot 1 processors.  I have managed to upgrade the GP7-500 up to a 1.3ghz Tualatin Celeron processor by means of a slot 1 powerleap converter. The BIOS reports a 1000mhz CPU on POST but windows 98SE was able to utilize the full 1.3ghz and reported its presence without issue. A 1.4ghz upgrade should also be possible

2) RAM – The GP7-500 came with 128mb of SDRAM installed but could be expanded to 384MB via 3 RAM slots. Speed was limited to PC-100 but you can use PC-133 which will downclock to PC-100 speeds. Installing more then 384MB of RAM with simply result in sticks over 128mb not being utilized at all. This is interesting since on other boards I’ve used when installing larger amounts of RAM the PC would usually use that RAM up to its hard limit. For example if I installed a 128mb stick as well as a 512mb stick in a PC with a limit of 384mb many times I would get my 384mb with 256mb simply being unused and wasted but with my GP7-500 if I attempted this The machine would boot but only give me the 128mb completely ignoring the 512mb stick. If I go into the BIOS the 512mb stick is seen and correctly reported as being 512mb but on POST and in Windows it is completely ignored. This I found was the same when using 256mb sticks so to get your full 384mb three 128mb sticks are required.

Searching various message boards I have found some reports that the chipset will support at least 256mb sticks of SDRAM and some users have even reported achieving 512mb using 256mb sticks but apparently the board is very picky about RAM with your best bet using 8×16 internal org, 16 memory chips (8 per side) DIMMs. I haven’t tested this myself though.

As far as games go This should be more then enough for just about all Windows 9x stuff and even at 128mb complete overkill for general DOS usage.

3) IDE – information on the specifics of the motherboards onboard IDE was a little iffy with specs and manuals being surprisingly difficult to find in any amount of detail. Looking though various sources online as well as Intel’s spec sheet for the reference motherboard it seems the IDE controller is ATA-33. This would be completely usable for a year 2000 machine but definitely on the budget side as ATA-66 and ATA-100 was available in 2000. This can be easily remedied though with a PCI IDE 100 or 133 controller or even a PCI SATA controller.

4) Expansion – The GP7-500 sports one AGP x2/x4 slot as well as five PCI slots (one being shared) and one all important 16-bit ISA slot for enhanced DOS compatibility as far as sound cards go.

5) Piezo speaker

6) CMOS battery

Expansion cards

The GP7-500 did not have video or audio built into the motherboard and thus all units came with a video as well as a sound card. These are the cards that came installed with my machine. I have no way to tell if they are 100% stock cards but from the period of the cards and what I could find out about the GP7-500’s specifications I strongly believe these were the stock cards. Seeing as this machine also seemed to of been marketed as a small business PC the cards also make sense as networking would of been very important as well as a video card that could display a sharp image while sound would of taken a back seat.

Video – The video card that came pre installed was a Nvidia TNT2 Pro with 16mb of memory as well as a DVI output. The TNT2 Pro offers excellent DOS compatibility as well as making an excellent Win 9x card. Except for the Voodoo 3 and TNT2 Ultra it’s possibly the best choice for an all around Windows 9x card. The interesting aspect of this card is its DVI port acting as the only source of video out. Of course a DVI to VGA converter can be used for connection with a standard VGA cable but this is one of the earliest cards I can recall seeing with DVI. This would make a great card for compatibility when hooking up to a more modern LCD display for running DOS and Windows software via a pure DVI or HDMI with a DVI to HDMI adapter. Running the card through the digital DVI connection may also give a slightly better image quality over an analog VGA connection as well.

Sound – The sound is nothing to write home about and is a fairly generic looking Creative Audio PCI. These cards are known to have fairly decent DOS compatibility for a PCI card but the question is why bother with a PCI sound card for DOS if you have an ISA slot available. I’ve never had much luck with these types of cards and even though they get the job done more or less I wouldn’t really recommend them for a retro gaming PC, either DOS or Windows. Much better options exist that won’t break the bank.

Other – The GP7-500 also contained an Ethernet and modem card, both from 3com. I usually don’t give these cards much use or thought but I’m including them here for the sake of posterity.

So what do I think of the GP7-500? Well The closest OEM machine I have on hand to compare it to is my Dell 4100 which is from only one year later but is significantly more advanced out of the box. The 4100 sports a faster FSB, newer CPU types, Faster built in IDE controller, faster RAM and universal AGP slot. The GP7 does have one big advantage though if your thinking about DOS games and that’s a 16-bit ISA slot. It’s hard to state how much this improves the DOS gaming experience and the options it opens up. That said though if you are primarily looking to play Windows 9x games at the highest settings or XP era games you may want to consider passing the Gateway GP7-500 up due to its rather outdated motherboard for the time period. If your looking for a machine to play DOS games as well as Win 9x titles I wholeheartedly endorse the GP7-500 if you can get one cheap.

Of course things can be done to upgrade the GP7. I’ve added a slotket CPU adapter and a 1.3ghz Tualatin Celeron CPU as well as a faster video card and faster PCI IDE controller. With these upgrades you should comfortably be able to play any Windows 9x game and most early XP era games just fine while retaining that old school slot 1 cool factor. The 384mb limit though may be an issue though when thinking of using this PC as a Windows XP machine unless you can achieve 512mb as some users have been reported able to do. The question is, is it worth the effort when more capable machines from that era can be found?


Anyone that has read my Dell Dimension XPS D and R series post knows that I have a large soft spot for the Dell Dimension series. Here were going to look at the 4100, one of the final PC’s in the Dimension series to sport the classic beige case style before moving on to the black/grey rounded P4 cases that currently litter thrift store electronics sections.

The 4100 seems to of been released sometimes in the very early 2000’s. Although I do not know for sure the exact factory configuration these shipped in mine is a good example of something period correct.

d41001

The 4100 uses the same case as some of the older models in the Dimension line such as the XPS R450 I looked at in the earlier article mentioned above. I do like these case designs and I think they give a unique look. There are two 5 1/4 bays at the top for things like CD drives and two 3 1/2 bays below those plus another 3 1/2 bay for a floppy or zip drive below that. I also like how these Dimension series cases are thinner then average PC towers of the time so they tend to be able to fit into smaller nooks.

d41002

The rear ports from the motherboard are very basic with no built in video or audio which is typical of some of the Dimension series. This was because they generally were sold with higher quality add on video and sound cards rather then built in A/V. Mot serious PC enthusiasts now and then preferred expansion card video and sound as opposed to built in options which you were stuck with and were generally of lower quality to save on costs.

Built in we have the basic two PS/2 ports for keyboard and mouse as well as one serial and one parallel port and two USB ports. The number of ports is adequate for the times but I feel it gives the back a rather sparse look.

removing the side cover is very simple and only involves removing one thumb screw and pinching the latches with a pull back.

??????????????

Here we have a view of the motherboard fully populated with expansion cards from when I first brought it home. Notice the nice space for a vertical hard drive near the front of the case where a typical PC speaker or fan may go.  I like this and it’s a nice use of space allowing for more open bays if you want to add more hard drives, ect… The drive that came with my 4100 is a 40gb drive and I believe this was likely the original drive that came stock with this PC.

d41004

Here we have a view of the motherboard without any expansion cards as well as having that fan shroud removed which diverted air flow from the case fan down over the CPU for cooling. Like the rest of the machine this motherboard looks relatively sparse and is very similar to the motherboard used in the older D and R series just with no ISA, one less RAM slot and a socket 370 CPU rather then the older slot 1 CPU type. The lack of an ISA connector does hurt this machine in terms of using it as a DOS rig as older DOS era games tend to get along much nicer with ISA sound cards. The AGP port supports 2x and x4 AGP cards.

1) CPU – The CPU that originally was installed in this machine was 1.1ghz Pentium III Celeron. The Celeron line was seen as more of a budget friendly entry level CPU and was basically a cut down “Coppermine” Pentium III . The 1.1ghz model ran on a 100mhz front side bus as opposed to 133mhz for many “full” Pentium III’s and also only had half the L2 cache on-chip (128kb vs 256kb). Thankfully the motherboard is capable of supporting all but the later Tualatin Pentium III’s so replacing the Celeron with a standard “Coppermine” Pentium III is a simple CPU swap. I swapped mine out with a slightly slower clock rate but higher performing 1ghz Pentium III. All I had to do was swap CPU’s and the computer knew without having to make any adjustments. Even with the 100mhz slower clock rate on the Pentium III chip I received noticeable performance gains due to the higher 133mhz FSB and double on-chip L2 cache. I also used a later Pentium III 1ghz chip which incorporated an integrated heat spreader. There is no performance difference with these chips but I prefer the heat spreader as it seems to make the CPU’s a little more durable during installation.

Bechmarks

1.1ghz Celeron

3DMark 2000 – 3513

3DMark 2001SE – 1874

1ghz Pentium III

3DMark 2000 – 4321

3DMark 2001SE – 2023

d41005

There is also no fan cooler directly mounted on the heatsink as in this design the case fan is used with a plastic shroud that diverts the air flow down and onto the CPU. Above image is with shroud removed.

2) RAM – Total memory officially supported is 512mb of PC133 SDRAM. I currently have one 512MB PC133 stick of RAM installed in the image below but I had no trouble at all installing a second 512mb PC133 stick and running things completely fine under Windows 2000 Pro.

??????????????

3) The 4100 motherboard continues to use the Dell proprietary PSU connector as you can see directly behind the RAM slot. Adapters can be found cheaply on eBay though for well under $10 so you can use any AT  PSU. Also behind the RAM are two IDE connectors (fairly sure they are ATA-100) and one floppy connector.

Lastly I want to talk about expansion cards. I believe the sound and video cards That I found installed in this PC are the stock cards that this machine was sold at retail though configurations may have varied.

The machine I bought came with several connectivity cards installed such as a modem, ethernet and wireless adapter. Unfortunately I had heavy stability issues initially with this machine until I removed these cards. This was likely caused by driver conflicts but since I didn’t plan on using these cards anyways they were just eating space.

d41007

Video – The video card was a Geforce 2MX.

d41009

This was Nvidia’s entry level budget card for the Geforce 2 line and was cut down feature and performance wise from the standard GF2 cards. That said it is still a capable card and offered good performance for the price point offering hardware T&L as well as dual monitor capability.

Sound – lastly we have the sound card installed.

d41008

This is a Creative CT5807 and is a very basic budget card. It lacks a joystick port which to be honest were phasing out at the time in favor of USB gamepads but is just very sparse in features. for output it simply offers line out/in and mic. it gets the job done but not to exciting.

Its fairly obvious that between the Celeron CPU, Geforce 2MX and budget sound card that whomever built or ordered this PC back in the day was doing it on a budget. Despite this the great thing about the Dimension series is that they were very easy to upgrade. I was able to boost performance very easily with a CPU swap to a full fledged PIII and swapping out the video and sound cards would be a breeze. Even though I’m not a fan of OEM builds from the mid 90’s up the Dimension series has always appealed to me. I love the look of the case and relative ease to get inside. I would certainly recommend the 4100 series as one of the final “beige box” Dimensions for a retro gamer. The lack of ISA slots hurt DOS games but with the right upgrades it still makes a great rig for late DOS, win 98 and early XP gaming.

This machine is a little newer then the machines I usually write about but its actually garnered somewhat of a reputation as being a very easy to work with and reliable PC for both work and gaming. I’m talking about the Pentium III based Compaq Deskpro EN. This machine came in a few forms such as tower, desktop and the small form factor as well as sported a few factory CPU and video option configurations. The one I’m going over here is the small form factor since in my opinion its the most interesting and also happens to be the one I own. As I mentioned this little machine has built somewhat of a reputation as a small space saving and reliable machine being easy to access as well as having few problems running over extended periods. In many ways I think this model barrows a lot of things from the Apple Macintosh designs of the late 90’s but in a PC they really work well. So lets take a look at the one I have here and see what can be done with it.

dpen1

The unit as you can see it quite small. Its primarily situated to act as a desktop form factor machine but there’s really no reason it cannot be turned on its side and act as a mini tower. I find the aesthetic to be pretty nice. On the left where we have the Compaq marking we also have a little vent area for air to circulate/escape. A nice large power button with power and HDD LED’s, one on each side. Also on the front we have an easily accessible headphone and microphone jack which is really nice if your using the onboard sound. I’ll get into more about the sound in a minute. This machine was built late 90’s early 2000’s period so as the sticker states it was designed for the Windows 2000 and Win 98 OS’s but you can easily run Windows 95 if you wanted. DOS isn’t really recommended since in my opinion it is a bit to fast. Also the lack of any ISA card support really hurts for DOS sound compatibility. XP will also run pretty happily on this machine. Being a small case there isn’t much room for drives but for a basic reliable Win 98 or XP rig a CD/DVD drive and a 1.44 floppy drive as came in the original configuration should more then suffice. The CD drive I’m using was added later as the original CD drive had died.

dpen2

Here I have 2 images of the rear of the machine. The one on top is the stock look and below that is after I added a separate video and sound card but I’ll go over the cards after I talk more about the machine.  There’s quite a few useful ports built into this little machine. From left to right we have a serial port followed by a 1/8 audio out and an audio in port for the onboard sound. Next to that is a printer parallel port, a Ethernet port and then another serial port. Two USB 1.1 ports, a VGA port for the onboard video and finally two PS/2 ports for a keyboard and mouse. There’s a good variety of legacy ports and its nice there’s so much built into this machine. I like that they actually fit two serial ports in there even though realistically they probably will not see much use. It actually makes a nice light (weighs about 20lbs) sort of mobile LAN party PC if you just want a moderately powerful PC to take over to a friends and do some late 90’s early 2000’s FPS death matches or something. The big thing the machine lacks built in is a gameport for an older style gamepad though this is easily remedied by adding most any PCI sound card (which I recommend doing anyways) or just using a USB gamepad.

Now I’m going to touch on a few things that make this machine a little “Mac-like”. First off If you haven’t noticed this machine is very compact and most all the essentials are built in. Beyond that you may notice the lack of any screws on the front or back to gain access to the inside of the PC. This is because like a lot of 90’s Macs this machine is tool-less and uses plastic tabs on the sides. Your required to press in and then pull the cover forward and up to remove. Unlike 90’s macs these tabs actually feel very solid and well built. I don’t know if its just build quality or that this machine has a few less years on it but the plastic tab system doesn’t feel nearly as brittle or flimsy as most of the older Macs I’ve worked with and I don’t have the sensation that some tab or piece is going to snap off every time I open this machine. Possibly this is due to the fact the design still uses a good deal of metal which does add weight but creates MUCH better durability. I should also point out that in operation this PC is deathly quiet.

dpen2x

Here you can see the tab, one of which is on both sides of the case. The right side also sports a built in speaker, another “Mac-like” quality. If your using the onboard sound these are really nice to have as it eliminates the need for extra external PC speakers. Granted its a single speaker and the sound is not amazing it is adequate and both the PC speaker beeps and boops as well as the any audio output from the onboard sound is output this way unless your using one of the various audio out ports with an external speaker.

On opening the case getting to the motherboard itself is amazingly simple as most of the major components in the way either swing out on a hing or easily can be pulled out and detached once more borrowing from the 90’s Macintosh design.

dpen3

Here we have the initial view from the top with the CD ROM drive and IDE hard drive visible.

dpen4

And as you can see everything easily lifts out and moves out of the way to give full assess to the motherboard. And speaking of the motherboard.

dpen5

Here is the exposed motherboard itself. The board is labeled Compaq and is dated 1999-2000 and has a cool bicycle logo printed on.

1) The CPU – These machines came with a variety of socket 370 Pentium III and Celeron processors. usually there is a code on the case that can help designate what CPU you have inside without actually turning the machine on. Mine is P833 designating an 833mhz Pentium III processor. I know the small form factor Deskpro EN’s came in 933mhz versions and possibly higher and as slow as 667mhz Celerons. In my own opinion I think this is a little to fast for running DOS stuff and without software to slow things down your going to have speed issues but its its acceptable for most Win 9x games and its actually really nice for later DOS FPS games run through Windows that can use that extra CPU power.

2) RAM – I think these came standard with 128MB of SDRAM but you can upgrade to a full 512MB of SDRAM as I have done via the three RAM slots. I suggest upgrading the RAM to the max 512mb as it is easy and cheap to do.

3) PCI expansion slot – This is where your PCI riser card goes. This riser card allows for three PCI expansion cards to be used in the small form factor machine.

dpen6

4) onboard graphics (optional) – This spot with the unused solder points is where on some models the onboard graphics chip and RAM is. Some models came with the Nvidia TNT2 Pro graphics chips onboard along with 16mb of video memory. The TNT2 Pro was a great video chip for the time and really would make this machine a good gaming platform. Unfortunately not all models were manufactured with the chip and mine apparently was a bit more of a budget model and lacks the TNT2 chipset. Instead I have to rely on the video from the Intel 815E chipset which is adequate for normal use but somewhat lacking for serious late Windows gaming. Thankfully the video issues can be resolved by adding a PCI video card if desired. You can also add a Voodoo II card as I checked and the space in the case allows it though with the reduced airflow a voodoo III may be a better bet. I read in some spec sheets some models have built in Matrox G200 and G400/G450 chips but I’ve never actually seen any that have.

5) CMOS battery, mine needed replacing when I received this machine

6) standard floppy connector

7) IDE connectors – there are two ATA 100 IDE connectors here so I suppose you could connect four devices but the case only allows for two which is most commonly a hard drive and a CD/DVD ROM drive. In the case of just two drives I would suggest placing your hard drive on the primary IDE and CD/DVD drive on the secondary. You could possibly use a mico drive hard drive or a compact flash drive and adapter on one connector and just kinda let it dangle or tape it down since there so small and do not generate much heat. The hard drive that came with mine was a 14GB IDE drive and I think it may be original.

8) PSU connector – this machine being so small uses a proprietary 120 watts PSU so if it ever dies good luck finding a replacement. I don’t think one would have much luck shoving a standard PSU in there since its so cramped and the shape and form factor is so odd. The PSU also functions as a sort of internal case fan here.

9) just a connector for the one serial port that’s located all the way to the left on the rear of the case.

well that’s the basic configuration of my machine. I did find the video and audio on this machine lacking So I wanted to correct this via the PCI slots. I primarily wanted to make this a Win 9x gaming machine with as much DOS comparability as I could. The onboard sound works fine for windows but as far as I could tell it didn’t do to well with older games and on testing a game like Wolfenstein 3D I got the sound effects via the built in speaker but no music whatsoever. No manner of adjusting corrected this. Next I installed a Monster mx300 based on the Aureal Vortex2  sound chip but unfortunately Windows would not work with it giving me an error message telling me it needed to be placed in a primary PCI slot. I tried all the slots on the riser with the same error. I assume this had to do with an issues caused by being run through a riser card. After that I tried an old ESS PCI audio card. These things are cheap and common as dirt and supposedly give good windows and DOS support for a PCI card. Unfortunately the sound in games like Wolf3d worked but the FM synth sounded unbearably bad in my opinion. It also kept cutting out in Simcity 3000. There are some people that really like these cards but I never had much luck with them. Lastly I moved on and installed this card.

dpen8

A Sound Blaster live! from the late 90’s. The problem with these cards are the drivers for them are terrible and most times look for a specific model Live! that they are meant for and the card has many versions (avoid the DELL OEM versions like the plague, part number SB0200/0203). Its usually best to buy a card with its driver CD but finding these cards with there original CD usually does not happen. After finding a drivers package that worked the card works great. Its a really nice clear sounding card for Windows gaming. It also adds a gameport which the original EN is lacking. DOS compatibility is also pretty good and Wolf3D actually sounds half decent now. I also played some Duke3d and the General Midi emulation sounds decent. My card is a CT4780 which is a 5.1 Value version but that really doesn’t make to much difference for just basic gaming and its light years ahead of the onboard audio.

After sound I moved on to the video. As I mentioned before my PC came without the optional TNT2 Pro chip which is a shame since that’s a pretty good graphical chipset for the time. Lucky for me I found a PCI Nvidia Geforce2MX 200 card at a flea market for $2.

dpen7

Its a low end entry level card for the time sporting 32MB of video RAM but its still far better then even if my model did come with the two generations prior TNT2 chipset. The specs of the MX 200 are pretty similar to the TNT2 pro but benchmarks have the newer generation MX200 beating the TNT2 Pro in just about everything. So I guess in this way I’ve added a nice power boost while still keeping in the era or spirit of the original. I really don’t think this machine is meant for a high end super card. Especially with the limitation of PCI, the anemic PSU and the small form factor of the machine.

The small form factor EN is a nice little machine. It has most things you need built in and with some minor PCI card upgrades it makes a nice semi-mobile Win9x game rig for a retro LAN party or for home use. Its reliable, quiet and easy to work on but if your going for a power build look elsewhere.

FDISKformat

A place for the pc collector

I ❤ Old Games!

Probabilmente il miglior blog bilingue al mondo*

Waltorious Writes About Games

Game-related ramblings.

NekoJonez's Gaming Blog

My Gaming Timeline

Evelynn Star

Lynn talks about video games, records and books ...

Retro Megabit

Sharing My Retro Video Game Collection.

133MHz's Junk Box

Random electronics and gaming crap

SNES A Day

Chronogaming project featuring reviews, screenshots, and videos of the entire Super Nintendo library in release order.

Retrocosm's Vintage Computing, Tech & Scale RC Blog

Random mutterings on retro computing, music, plus radio controlled scale modelling.

The PewPew Diaries.

Work(s) in Progress!

1001Up

1001 video games and beyond

retro computing and gaming plus a little more

sparcie

retro computers and stuff

jispylicious

Stay Jispy!